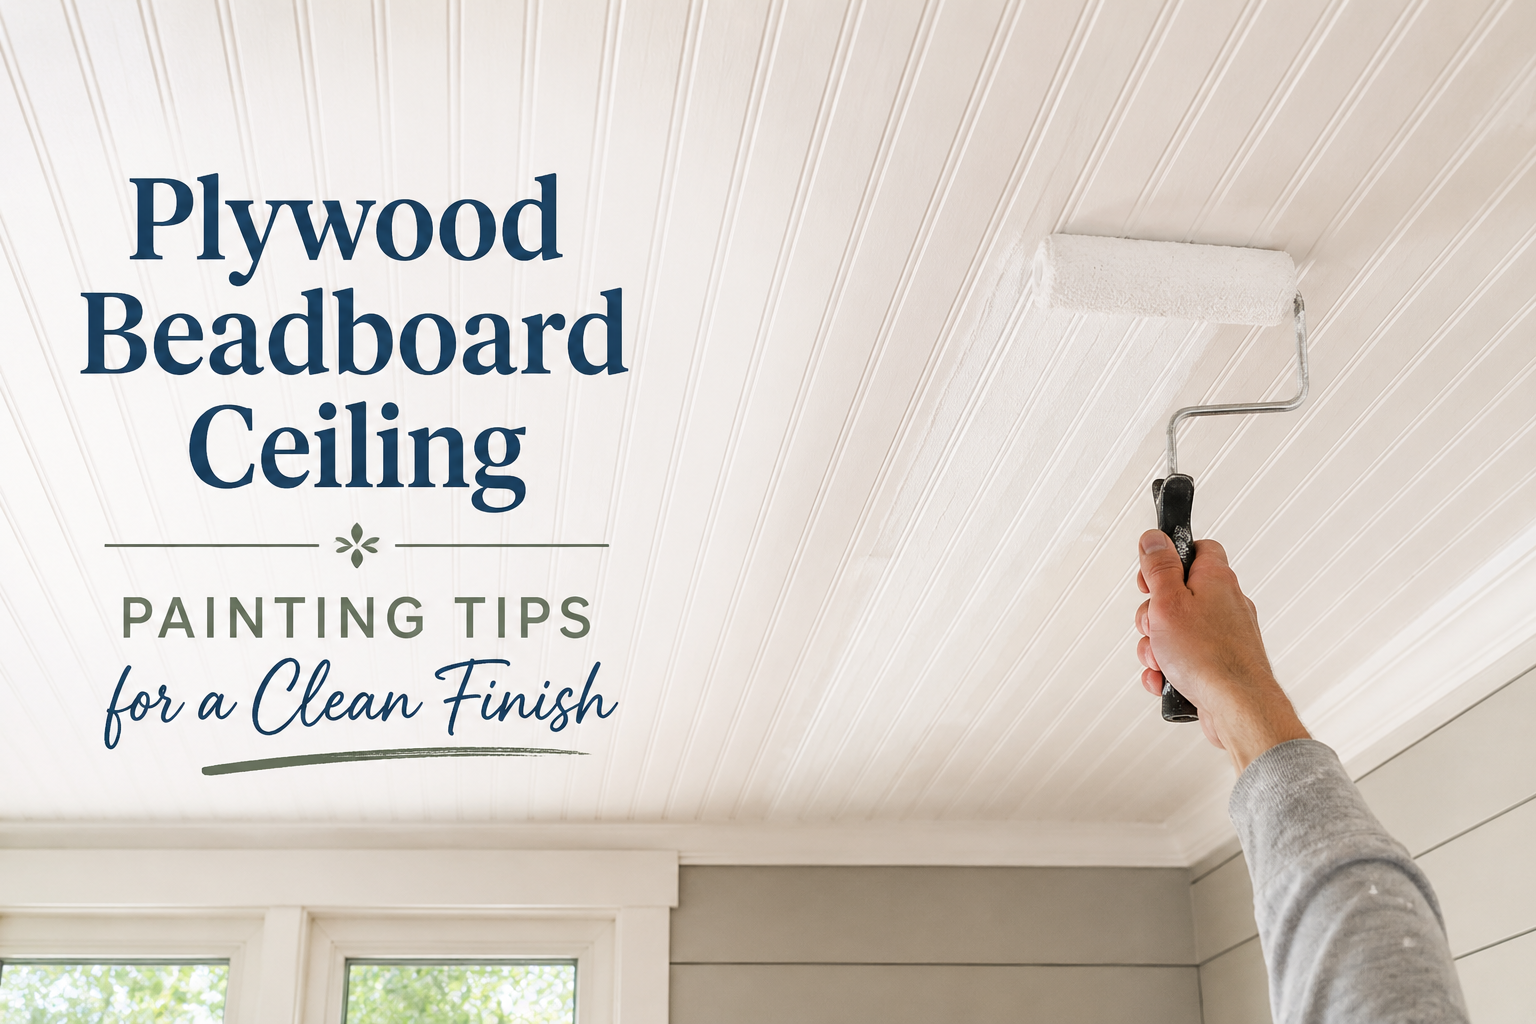
I’m not going to lie — I was already sweating before the video even started. That’s because I spent the first chunk of my morning sanding and patching a plywood beadboard ceiling I’d installed previously in my mini mobile trailer hobby room, and working above my head for that long is no joke. But it had to be done, and I want to walk you through exactly what I did, why I did it, and how the whole project came together — from ceiling prep all the way to getting the wall panels started.
If you’ve ever tackled a plywood ceiling and wondered whether you really need to sand it before painting, or whether one coat is enough, or what lighting to install after the paint dries — this post covers all of it. These are my real plywood beadboard ceiling painting tips from an actual build, not just theory. I’m converting this trailer into a hangout and hobby room, and every decision I make is about getting the best result with the least amount of wasted time and money.
Whether you’re finishing a shed, a workshop, a trailer, or a bonus room, I think you’ll find something useful here. Let me take you through the whole process step by step.
▶ Click to watch the full build video on YouTube
Why You Must Sand Plywood Before Painting
This is the tip I see people skip most often, and it’s a mistake. Plywood — especially when used as a beadboard ceiling — is fibery. It has little surface hairs that stand up, and if you just roll paint right over it without sanding, those hairs will get locked into the finish and you’ll end up with a rough, almost fuzzy texture. It might not bother everyone, but if you want a clean, smooth painted surface, sanding is not optional.
I did a quick but thorough pass over the entire ceiling with sandpaper, knocking down all those surface fibers before I even thought about picking up a roller. Yes, working above your head is exhausting. Yes, it takes longer than you expect. But it makes a real difference in the final result, and I’m glad I didn’t cut corners here. Take the extra time — your ceiling will thank you.
Patching Nail Holes and Imperfections as You Sand
While I was up there sanding, I also went ahead and patched the nail holes and any other imperfections in the ceiling. When you’re nailing plywood panels, sometimes a nail sets a little too deep and leaves a small divot. Those small imperfections catch light and shadow once the ceiling is painted, so I wanted to make sure everything was as smooth as reasonably possible before priming.
I patched as I went — sanding a section, spotting the holes, filling them, then moving on. Doing both tasks in one pass saved me a second trip across the ceiling. It’s a small efficiency that adds up when you’re working in a hot, humid space. If you’re working on a similar project, I’d recommend combining these two steps the same way rather than making separate passes.
Priming First — Don’t Skip This Step
Once the sanding and patching were done, my first coat was primer — not paint. I know some people wonder if they can just use a paint-and-primer-in-one and call it good, but for raw plywood, a dedicated primer coat makes a big difference. It seals the wood fibers, gives the paint something solid to grip, and helps you get a more even finish with fewer coats of paint on top.
The good news in my situation was that it was warm inside the trailer and I had air moving through the space, which meant the primer dried incredibly fast — almost as quickly as I could apply it. That made the whole process feel a lot more manageable. If you’re painting in a warm, well-ventilated space, you may be able to roll right into your paint coat sooner than you think.
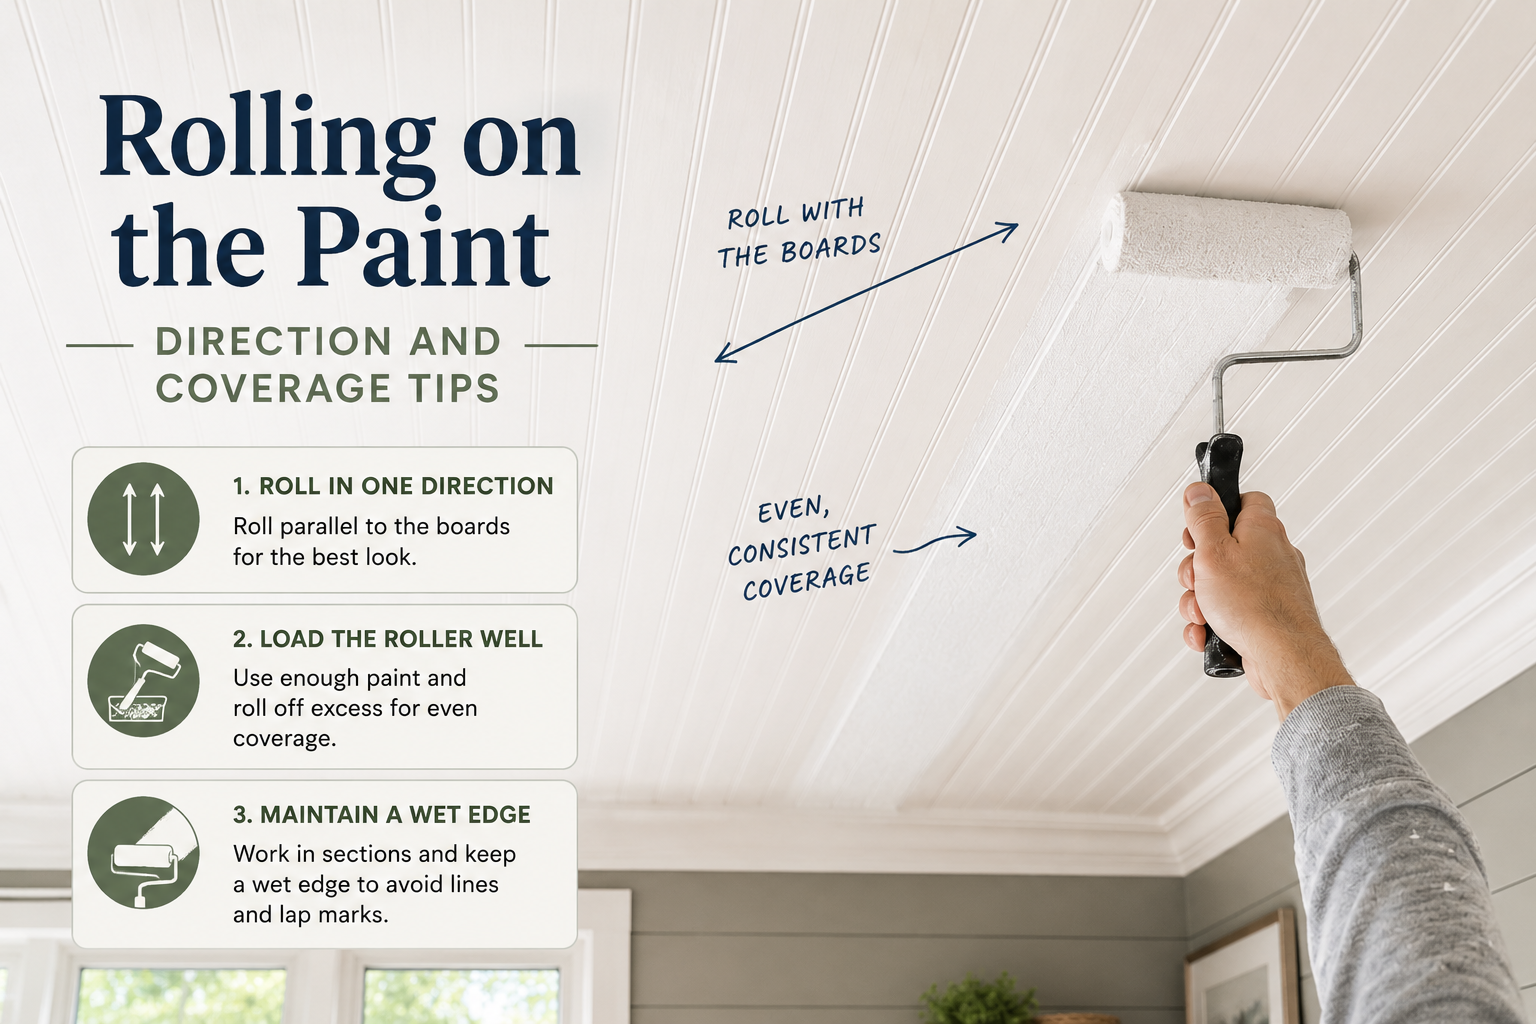
Rolling on the Paint — Direction and Coverage Tips
Once the primer was dry, I went right into the paint. My approach was simple: follow the same rolling direction all the way through the ceiling, staying consistent so the finish looks even. I used one coat of primer and one coat of paint, and for this particular building, I decided that was enough. Could it have used a second coat of paint? Maybe. But it looked good, and I’m working on a budget and a timeline.
One thing I want to flag here: wet paint on a ceiling always looks uneven. Don’t panic when you step back and it looks streaky or patchy while it’s still wet. Wait until it’s fully dry before you judge the coverage. I’ve made the mistake of adding more paint while it was still wet trying to fix something that wasn’t actually a problem, and that just creates more work. Let it dry first, then assess.
Do the Ceiling Before the Walls — Order of Operations Matters
This is a tip I can’t stress enough for anyone doing a full room build-out: paint the ceiling before you install your wall panels. I did the ceiling while the walls were still open, which meant I didn’t have to worry about getting paint drips or roller splatter on finished wall surfaces. Once the ceiling was done, I could move on to the walls without stressing about masking or cleanup.
If you look at how much paint splatter ended up on my floor after painting the ceiling, you’ll understand exactly why. It was white paint everywhere. I swept it out while it was still fresh so the drops wouldn’t dry into hard little lumps that would need scraping later before flooring goes in. If you’re planning a full room finish-out, think through your order of operations before you start — ceiling first, then walls, then floors. It’ll save you a ton of cleanup headaches.
Installing LED Can Lights Right After Painting
Here’s where the project got really fun. Once the ceiling was painted and dry, I realized I couldn’t do any wall panel cutting because it had rained heavily outside and the ground was soaked. Rather than losing the evening, I decided to install the LED can lights that were going in the ceiling. The drivers were already up there, so it was just a matter of attaching the fixtures and getting temporary power connected.
I used an appliance cord I had on hand and some WGO connectors — the kind where you insert the wire and flip to lock it — which are perfect for connecting stranded wire to solid wire cleanly. I connected ground, neutral, and live, ran an extension cord for temporary power, and flipped it on. The result was genuinely impressive. Six 6-inch LED can lights spread evenly across the ceiling, and it looked perfect — clean, even, and professional. Don’t underestimate how much the right lighting transforms a space even before anything else is finished.
Choosing the Right Color Temperature for Your Lights
I set the lights at 3500K initially, which reads as pretty white but still carries a little warmth. I didn’t want to go full cool white because that can feel harsh and clinical in a hangout space, but I also didn’t want it too yellow. For a hobby room or workshop-style space, that 3500K–4000K range is the sweet spot in my opinion.
After looking at it for a while, I was actually thinking about bumping them up one notch to 4000K for a slightly crisper, less yellow look. If you’re installing LED can lights in a similar space, I’d suggest testing a few color temperature options before committing. The difference between 3000K, 3500K, and 4000K is subtle but real, especially once you’re living and working in the space every day. For task-oriented spaces like hobby rooms and workshops, I lean toward the brighter, crisper end of warm white.
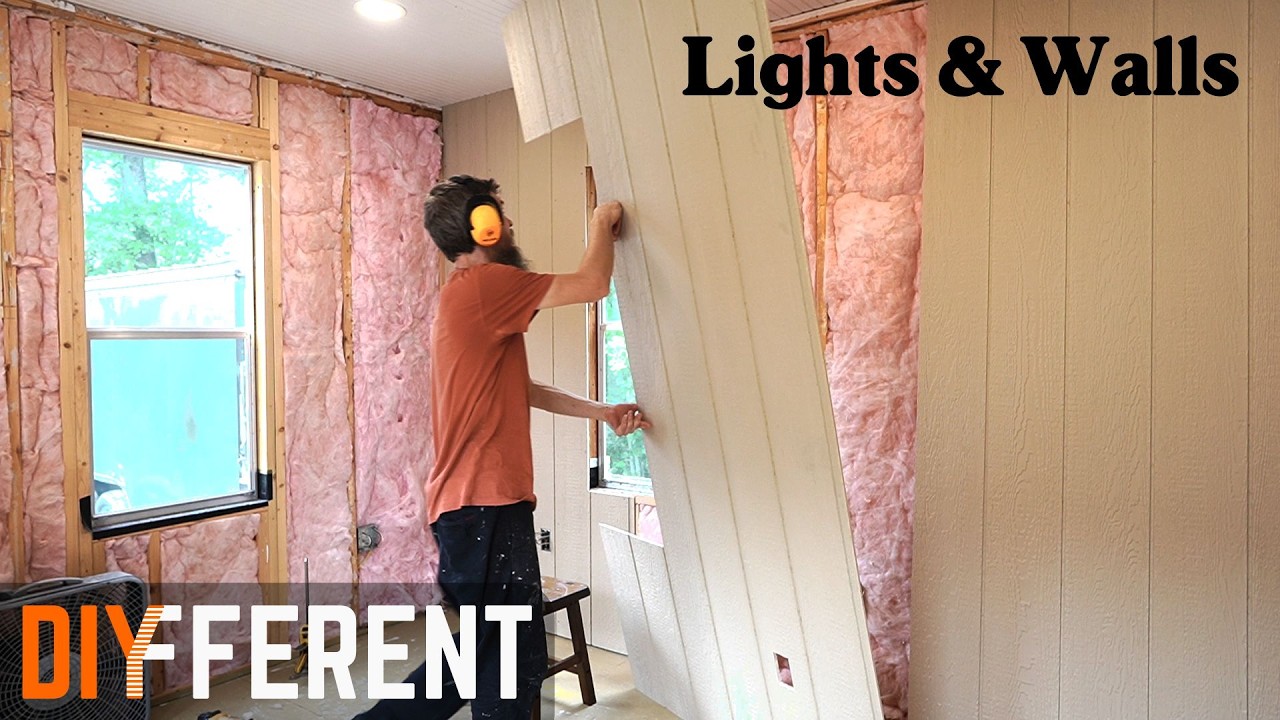
Choosing LP Smart Side Panels Over Drywall for Mobile Spaces
With the ceiling done and the lights installed, it was time to think about walls. I’m using LP Smart Side panels again for this trailer build, and I want to explain why — because I know it might seem like I just default to it without thinking. For a mobile trailer, drywall is genuinely a bad idea. Drywall cracks when a structure moves or gets transported. It’s also highly susceptible to moisture, mold, and rot — and in a trailer where condensation from a portable air conditioning unit can form on cold walls, that’s a real risk.
LP Smart Side is durable, holds up to moisture far better than drywall, and looks great once it’s painted. It’s the only wall panel option I’d recommend for a mobile structure or any space where you’re worried about humidity and movement. If you’re doing a shed or tiny home conversion, I’d give LP Smart Side serious consideration over traditional drywall for the same reasons.
Installing the First Wall Panels — Tips for Getting It Right
Getting the first few LP Smart Side panels on the wall was a mix of nerve-wracking and satisfying. I’m always a little anxious putting each piece in because one bad measurement means a wasted panel. I cut around the outlet locations right in place, which saved me time measuring and transferring marks to the panel before cutting. If you can cut outlet openings in place, do it — it’s faster and more accurate.
I got three panels up before I called it a day. It was hot, muggy, and honestly I just wasn’t mentally in the zone — and I’ve learned that when I’m not fully focused, that’s when I start measuring things backwards or making silly cuts. Knowing when to stop is just as important as knowing how to keep going. There’s no shame in stepping away when the conditions aren’t right. I’d rather come back fresh than make a mistake I have to fix.
Managing Weather and Humidity During Outdoor-Adjacent DIY Projects
This project is a good reminder that weather plays a huge role in outdoor or semi-outdoor builds, and you have to work around it rather than fight it. I’m in Florida and we’re in rainy season, which means afternoon downpours are basically guaranteed. The ground outside was completely soaked on this particular day, which made panel cutting outside impossible — wet panels, wet saw, wet ground. Not a good combination.
Instead of getting frustrated, I pivoted to interior tasks I could do without cutting panels outside — painting, priming, light installation. If you’re working on a similar project, I’d encourage you to think about what tasks you can do in each weather condition and sequence your work accordingly. Having a list of “inside tasks” and “outside tasks” ready means you never really lose a day. For more ideas on how to keep momentum going on a budget build, check out my guide on finishing a basement on a budget — a lot of the same scheduling and sequencing lessons apply.
Tips and Best Practices for Plywood Beadboard Ceiling Painting
Here’s a quick summary of the most important lessons from this project that I’d pass along to anyone tackling a similar ceiling:
Always sand raw plywood before painting. Those surface fibers will ruin your finish if you skip this step. A quick pass is better than nothing, but a thorough pass is best. Patch nail holes and imperfections in the same pass as sanding to save time. Prime before painting — especially on raw wood — for better adhesion and a more even topcoat. Follow a consistent roller direction throughout the ceiling to avoid visible lap marks. Don’t judge coverage while the paint is wet — let it dry fully before deciding if a second coat is needed. And do the ceiling before the walls so paint splatter doesn’t ruin your finished wall surfaces.
If you want more inspiration for transforming unconventional spaces, I’ve written a full guide on an attic home theater conversion that walks through a lot of the same ceiling and lighting decisions in a different context. And if you’re looking for quick wins to complement a bigger project like this one, my list of budget home improvement ideas you can do in 30 minutes is a great place to find momentum-builders between bigger tasks.
Frequently Asked Questions
Do I really need to sand a plywood beadboard ceiling before painting?
Yes, and I’d say it’s one of the most important plywood beadboard ceiling painting tips I can give. Raw plywood has surface fibers that, when painted over without sanding, get locked into the finish and create a rough, hairy texture. A good sanding pass before primer makes a noticeable difference in the smoothness and professionalism of the final result.
How many coats of paint does a plywood ceiling need?
In my experience, one coat of primer followed by one coat of paint is usually sufficient for a utility or hobby space. For a more polished finish in a living area, you might want a second topcoat. Always let the surface dry fully before deciding — wet paint looks uneven even when the coverage is actually fine.
Is LP Smart Side better than drywall for a mobile trailer?
For a mobile structure, absolutely. Drywall cracks when a trailer moves or gets transported, and it’s much more prone to moisture damage, mold, and rot. LP Smart Side holds up far better in environments where humidity and movement are factors. It’s my go-to wall panel for any mobile or semi-outdoor build.
What color temperature should I use for LED can lights in a hobby room?
I’d recommend somewhere between 3500K and 4000K for a hobby room or workshop space. That range gives you a clean, bright white light that’s easy to work under without feeling cold or harsh. I started at 3500K and was considering bumping to 4000K for a slightly crisper feel — both are solid choices depending on your preference.
Wrapping It Up
This was a big day of progress on the mini mobile trailer hobby room — ceiling sanded, patched, primed, and painted; LED can lights installed and tested; and the first three wall panels up. It doesn’t sound like much when I list it out, but each of those steps required real time and attention to do right. I’m genuinely excited about how this space is coming together, and I can’t wait to get back out there on a drier day and keep going on the walls.
If you found these plywood beadboard ceiling painting tips helpful, drop a comment below and let me know what project you’re working on. I’d love to hear about it. And if you want to follow along as this hobby room build continues, make sure you’re subscribed so you don’t miss the next update.