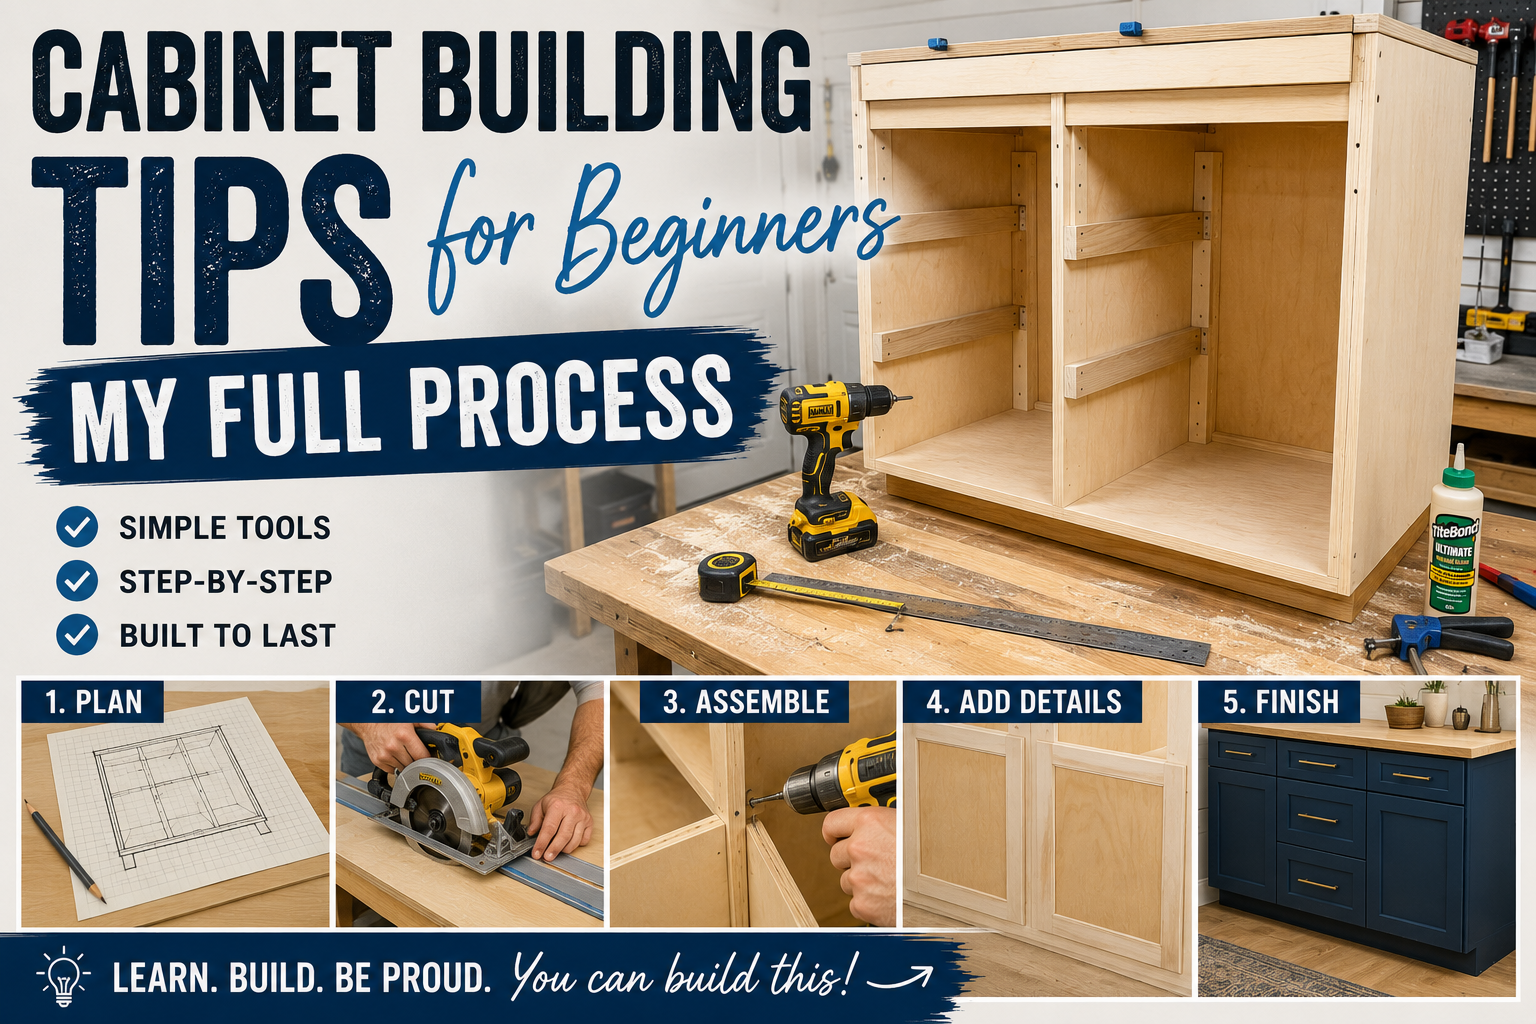
I’ve built a lot of cabinets over the years — from huge shop projects to built-ins to entire kitchens — and I’ve done it with everything from a basic job site table saw all the way up to a full CNC machine. And if there’s one thing I’ve learned, it’s that most beginners overcomplicate the whole process before they even make their first cut.
In this post, I’m walking you through every step of my cabinet building process: the style I’ve landed on, the construction methods that save the most time and material, and the assembly shortcuts that make the whole thing way less stressful. These are the cabinet building tips for beginners I wish someone had handed me years ago. Whether you’re building a single base cabinet or an entire kitchen run, these principles are going to help you get a cleaner result with less frustration.
If you’re new to bigger DIY builds, you might also want to check out my post on budget kitchen renovation under $5,000 — it pairs really well with what I’m covering here. Now let’s get into it.
Step 1: Measure Your Space and Figure Out How Many Cabinets You Need
The very first step in any cabinetry project is figuring out exactly how many cabinets you’re going to need and what the total run of your install is going to be. I always start by taking careful measurements of my space to understand the full footprint I’m working with.
Once I have those measurements, I hop into SketchUp to start designing. I like to begin with simple big boxes rather than trying to perfectly model every detail right away. That lets me work out what combination of cabinet sizes are going to fit in the space, and then I can go back and fill in all the detailed parts once the sizing is locked in. Don’t skip this planning phase — it saves a ton of headaches later.
Step 2: Choose Between Face Frame and Frameless Cabinets
One of the first real decisions you need to make is which cabinet style you’re going to build. There are two popular options: face frame cabinets and frameless (also called Euro-style) cabinets. I build almost exclusively frameless cabinets. I think they’re easier to build, I like the way they look, and the construction process is just more straightforward for me.
That said, if you prefer face frame cabinets, the construction of the cabinet boxes themselves doesn’t change that much between the two styles. You can follow along with the same process and simply add face frames to the boxes at the end and you’ll get a very similar result. So don’t let the style decision hold you up — pick the one you like and move forward.
Step 3: Understand the Two Main Cabinet Types (Base vs. Upper)
Every cabinet build is going to involve two main types: base cabinets and upper cabinets. Base cabinets sit on the floor and upper cabinets mount to the wall. Understanding the standard dimensions for each is one of the most useful cabinet building tips for beginners because it helps you design a functional layout from the start.
Base cabinets are typically 34½ inches tall, so when you add a 1½-inch countertop you end up with a comfortable 36-inch working height. The standard depth for base cabinets is 2 feet. Upper cabinets are typically about 1 foot deep, though you can go slightly deeper depending on the application. The height of your uppers will depend on your ceiling height — 30 inches works for low ceilings, 36 inches is great for standard 8-foot ceilings, and you can go up to 42 inches for taller ceilings. I wouldn’t go much beyond 42 inches though, because you’ll need a step ladder to reach anything stored up there.
Step 4: Plan Your Cabinet Widths Carefully
Cabinet widths are going to depend heavily on your specific space, but commercially available cabinets typically come in roughly 3-inch increments starting around 15 inches wide. You can go as narrow as 12 inches, but that’s not a lot of room to work with. Unless you have a really awkward configuration that requires it, I’d recommend a minimum of 15 inches wide and working up from there — 18, 21, 24, 27 inches are all very workable sizes.
I’d generally stop at 27 inches for most cabinets. Once you get wider than that, the cabinets get heavy and difficult to move, and you end up with these massive drawers that are really hard to keep organized. The main exceptions are sink bases, which are usually 30 or 36 inches wide depending on the size of the sink you’re installing.
Step 5: Size Your Panels to Get Maximum Yield from Plywood Sheets
Here’s a practical tip that’s going to save you real money: if you’re buying plywood from a big box store, the sheets are exactly 4 feet by 8 feet. To get the most panels out of each sheet, I undersize my panel depths slightly. For base cabinet side panels, I make them 23¾ inches deep instead of a full 24 inches. For upper cabinet side panels, I use 11¾ inches instead of 12 inches.
That extra wiggle room lets me rip off those factory edges to get clean, straight cuts — and it means I can get more usable panels out of each sheet without wasting material. For base cabinet sides cut to 30 inches tall (more on that below), I can get three full rows — six side panels total — out of a single sheet of plywood. That kind of efficiency adds up fast across a big project.
Step 6: Use a Separate Toe Kick System Instead of Notching Your Side Panels
The toe kick is that notched-out area at the bottom front of a cabinet that gives your feet somewhere to go when you’re standing at the counter. The traditional method is to notch that space right into the side panels — but I personally don’t like building cabinets that way. It adds a tricky extra step to the cutting process, it complicates assembly, and it’s inefficient from a material standpoint. If your side panels are 34½ inches tall to include that notch, you can’t get three rows of panels out of a standard plywood sheet.
Instead, I highly recommend using a separate toe kick system — either leveling feet or a separate base built from plywood scraps or 2x4s. Cut your side panels to 30 inches tall and you’ll get six side panels out of one sheet. My preferred method is a combination of leveling feet and a ledger board. I attach the ledger board to the wall 4½ inches up from the floor, put two leveling feet on the front of each cabinet, set the boxes in place, and twist the feet to level everything out. It makes installation dramatically easier and the material efficiency is hard to beat.
Step 7: Decide When to Use Full Panels vs. Stretchers and Nailers
For base cabinets, I always use a full bottom panel and full side panels — that gives the cabinet its core strength. But for the top and back of the cabinet box, you can typically get away with using stretchers (also called nailers) instead of full panels. The tops get covered by your countertop and the backs are rarely visible in a drawer-only cabinet, so using stretchers here saves a meaningful amount of material and makes the finished cabinet lighter and easier to install.
There are a couple of situations where you’ll want a full back panel on a base cabinet. If it’s a door cabinet where you’ll be able to see inside, a full back makes sense. For sink bases where plumbing comes out of the wall, I’d still recommend nailers because it makes running the plumbing a lot easier. Upper cabinets are a bit different — since you open the doors and see inside, you’ll want a full back panel and solid top panels rather than stretchers.
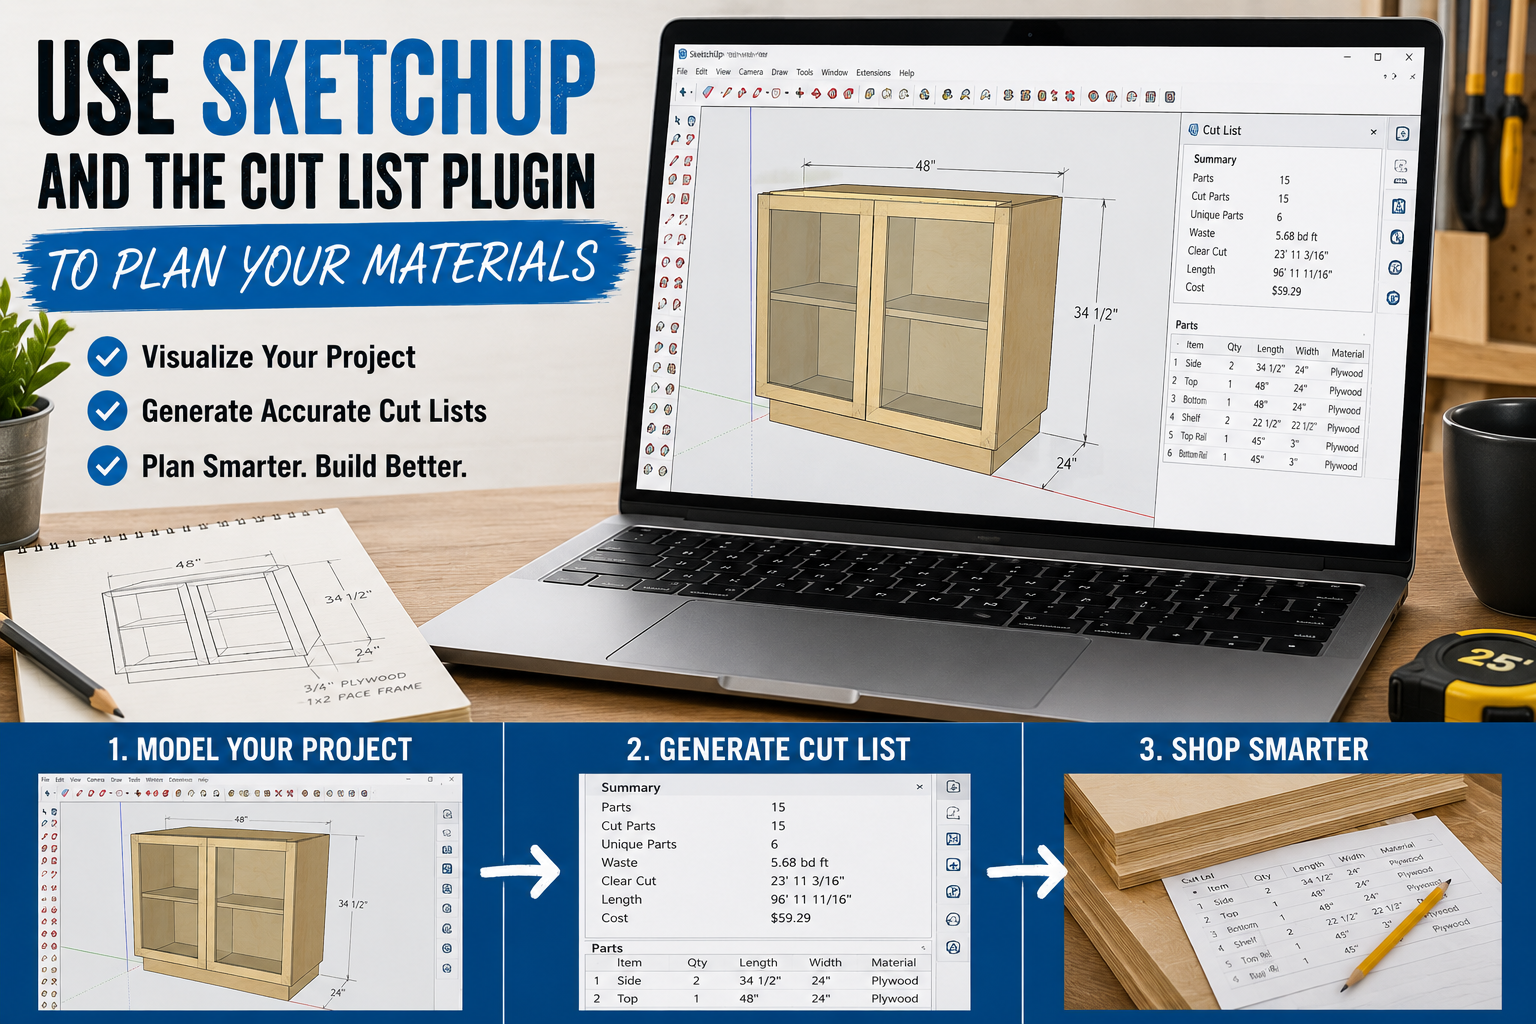
Step 8: Use SketchUp and the Cut List Plugin to Plan Your Materials
Once the design is figured out, I use SketchUp with a free plugin called Cut List to generate a cutting diagram. This diagram shows me exactly how to efficiently nest all my parts on a 4×8 sheet of plywood, and it tells me precisely how many sheets I need to buy. It eliminates guesswork and prevents both overbuying and running short mid-project.
I use this same process to create the plans for all my builds. I print the cut list and cutting diagram, take them out to the shop, and I’m ready to start breaking down material. If you’ve ever bought one of my project plans, that’s exactly how they’re built — I work through the design as I’m actually building, so the plans reflect real-world dimensions and decisions.
Step 9: Break Down Your Sheet Goods the Right Way
There are several solid options for breaking down plywood. A circular saw with a straight edge works fine, but if you go that route, upgrade to a higher tooth count blade designed for cutting plywood — otherwise you’ll get a lot of tear-out. A track saw is even better and more beginner-friendly, and you can find decent ones on Amazon for around $100. I’ve been testing the cheapest track saw on Amazon against my higher-end saws and I’ve been genuinely impressed so far. A table saw is also excellent for ripping sheet goods, which is what I used for this project.
The number one thing I keep in mind throughout the entire breakdown process is removing those factory edges. Factory edges on plywood are rarely perfectly straight or square, and if you build with them you’ll have assembly problems. I always rip off the factory edge on every panel so I’m working with clean, straight, square edges from the start. I also keep all my parts oriented the same direction so I always know which edge still has the factory finish on it.
Step 10: Cut Stretchers from Offcuts to Save a Half Sheet of Plywood
Here’s a tip that saved me about half a sheet of plywood on my last project: don’t cut your stretchers and nailers from fresh plywood. Instead, come back after you’ve cut all your side panels and cut the stretchers from the offcuts and scraps left over from those cuts.
Stretchers typically run about 3 to 4 inches wide, though you can go as narrow as 2½ inches, especially for the back corner nailers since those get stacked in the finished build anyway and still have plenty of strength. Cutting them from scraps keeps waste low and gets more use out of every sheet you buy. The SketchUp cut list will include stretchers in its layout, but I intentionally skip them there and cut from scraps instead — it consistently saves material.
Step 11: Don’t Use Glue for Cabinet Assembly
This one surprises a lot of people, but I haven’t used glue on any of my cabinetry projects for the last four years and I’ve had zero failures. It makes total sense when you think about it: the strength of a cabinet run doesn’t come from each individual box — it comes from all those cabinets being tied together and screwed into the wall. Once you install a run of cabinets, the load gets distributed to the wall, the floor, and the adjacent cabinets. Each individual box doesn’t need to be bombproof.
Also, if you’re working with pre-finished plywood or laminate — which I often am — glue simply won’t bond to those surfaces effectively anyway. Skipping glue saves you cleanup time and removes a major source of frustration. I know it feels stressful the first time you try it, but trust the process. Just put down the glue.
Step 12: Skip Pocket Holes Unless the Cabinet Sides Will Be Visible
Another thing I was guilty of early on was drilling Pocket hole joinery into every single cabinet joint. Here’s the thing: in a typical bank of cabinets, only one or two side panels are actually going to be visible in the finished install. On a built-in, none of the sides are visible at all. So why spend all that extra time drilling pocket holes on panels that will never be seen?
Pocket screws driven at an angle also tend to pull pieces out of alignment during assembly, which creates more work, not less. My recommendation is to skip pocket holes entirely unless you’re working on the last cabinet in a run that will be visible, or on a standalone cabinet where you need to hide the fasteners. For everything else, brad nails and screws are all you need.
Step 13: Start Assembly by Tacking Pieces Together with Brad Nails or Narrow Crown Staples
My assembly process starts by tacking all the pieces together with either brad nails or narrow crown staples. These fasteners aren’t meant to be the final structural connection — they’re just holding things in alignment while I come back and drive screws to reinforce all the joints. I start by attaching the bottom panel to one side panel, which gives me a stable L-shaped base to work from, then add the second side panel, and finally install all the stretchers and nailers.
I actually prefer narrow crown staples over brad nails for this step because a staple is essentially two brad nails side by side — you get twice the holding power with the same number of shots. That keeps larger panels more stable and aligned while I’m working. Using a flat workbench as a reference surface during this process makes everything go together square and clean. Once everything is tacked in place, I go back around with screws to lock it all in permanently.
Step 14: Use Finished End Panels Instead of Trying to Hide Fasteners on Cabinet Sides
Rather than trying to hide all my screws and nails on visible cabinet sides — which creates a lot of extra work — I use what are called finished end panels. A finished end panel is simply an additional piece of plywood attached to the last cabinet in a run, screwed in from the inside so the fasteners are never visible from the outside.
The big advantage here is that a finished end panel can be scribed to the wall or floor much more easily than trying to scribe the cabinet box itself, which means I don’t need to add a bunch of extra trim, molding, or caulk to fill gaps. I also make the front edge of the end panel flush with the front of the drawer fronts, which gives the whole install a clean, inset look without the hassle of actually building inset-style cabinets. I use finished end panels on pretty much all my cabinetry projects now and it’s one of those changes that makes a huge difference in the quality of the finished result.
Tips and Best Practices for Building Cabinets as a Beginner
Here’s a quick summary of the most important things to keep in mind as you take on your first cabinet build. Plan before you cut — spend time in SketchUp or on paper before touching a single sheet of plywood. Remove every factory edge — this is non-negotiable for clean, square assemblies. Use a separate toe kick system — it saves material and makes installation dramatically easier. Skip the glue — screws and nails are plenty strong for cabinet boxes in an installed run. Skip pocket holes unless the sides will actually be visible. Use finished end panels to give your install a polished look without extra trim work. And cut stretchers from offcuts — never from fresh plywood if you can avoid it.
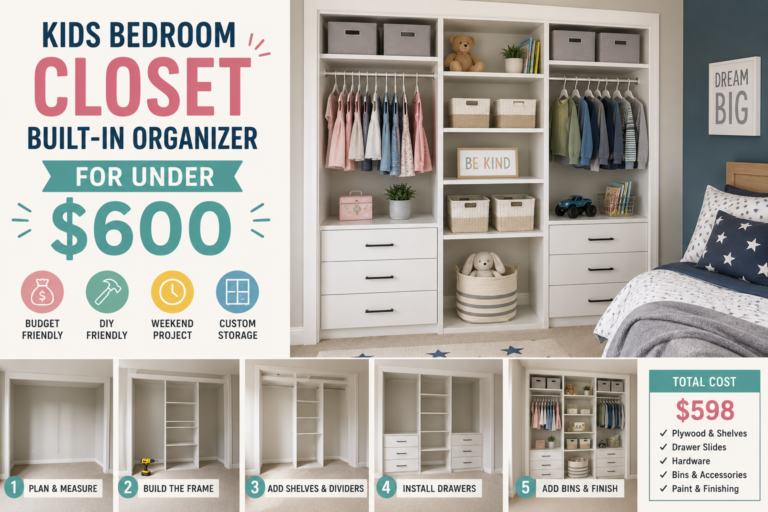
Building cabinets is one of those skills that compounds quickly. The first set takes a while, but by your second or third project you’ll find that you’ve internalized most of these steps and the whole process moves much faster. If you’re interested in seeing how cabinetry fits into a larger renovation, my post on built-in bookcase IKEA vs. custom is a great read, and so is my guide on kids bedroom closet built-in organizer for under $600 for a practical real-world application of these same cabinet-building principles.
Frequently Asked Questions
What is the easiest cabinet style for beginners to build?
Frameless (Euro-style) cabinets are generally the easiest for beginners. The construction is more straightforward than face frame cabinets — you’re essentially building clean boxes without the added step of building and attaching face frames. The joinery is simpler, the assembly goes faster, and you can still get a really professional-looking result.
Do I need a table saw to build cabinets?
No, you don’t need a table saw, though it does make breaking down sheet goods faster and more precise. A circular saw with a good straight edge or a track saw will absolutely get the job done. The key is using a blade designed for cutting plywood to minimize tear-out, and making sure you’re removing those factory edges on every panel.
How do I know how much plywood to buy for a cabinet project?
The most reliable method is to design your cabinets in SketchUp and use the free Cut List plugin, which generates a cutting diagram showing exactly how to nest all your parts on standard 4×8 sheets. That diagram tells you exactly how many sheets to buy. Alternatively, you can sketch out your parts on paper and calculate manually — just remember to account for your blade’s kerf (the width of the cut) in your calculations.
Can I build cabinets without pocket hole joinery?
Absolutely, and for most cabinet builds I’d actually recommend it. Unless the side panels of your cabinets are going to be visible in the finished installation, there’s no reason to use Pocket hole joinery. Brad nails or narrow crown staples to hold pieces in alignment, followed by screws to reinforce the joints, is all you need for strong, durable cabinet boxes.
Conclusion
Building your own cabinets is one of the most rewarding things you can do as a DIYer — and it’s a lot more approachable than most people think. The key is getting your design right before you cut anything, understanding your standard dimensions, working smart with your plywood to minimize waste, and keeping your assembly process simple. Skip the glue, skip the pocket holes where you don’t need them, use a separate toe kick system, and finish with end panels for a polished, professional look.
I hope these cabinet building tips for beginners give you the confidence to jump into your first build. Start with a single base cabinet to get comfortable with the process, and I promise the second one will go twice as fast. If you found this helpful, drop a comment below and let me know what you’re building — I love seeing what you all are working on. And if you want more project ideas and tutorials, check out my post on 8 DIY home improvement projects on a budget that transform your space for your next source of inspiration.