If you’ve been wondering about pergola cost — build vs buy — you’re in exactly the right place. I went down this rabbit hole recently when I decided my deck needed some serious shade before summer hit, and the numbers surprised me. As a DIY guy, I honestly expected to build it myself. But after crunching the numbers, I ended up going a completely different direction, and I think it might change the way you think about this decision too.
I’m Michael, and on The DIY Journey I document every project, every mistake, and every dollar spent so you don’t have to guess. This pergola project was one of those turning points where being a good DIYer actually means knowing when not to DIY. So let me walk you through everything — the cost breakdown, the company I used, the features that blew me away, and even a little HOA rant that I think a lot of you will relate to.
By the end of this post, you’ll have a clear picture of what it actually costs to build a pergola from scratch versus buying one, what to look for in a pre-built option, and how to decide which route makes sense for your situation. Let’s get into it.
The HOA Problem Nobody Talks About Enough
Before I get into the numbers, I want to talk about something that’s been sitting on my chest like a weight — HOAs. If you have a homeowners association, you already know the love-hate relationship that comes with it. I actually like my HOA board members personally, and I do respect them. But the covenants? That’s where I start to have some issues.
Here’s a perfect example: I recently asked if I could stain or paint the inside of my fence — the side that faces my yard, not the side facing the street or my neighbors. I got a hard no immediately. When I explained that I meant only the interior, private side that nobody outside my yard could see, it still didn’t move the needle. To me, that doesn’t make sense. My general rule is simple — if something doesn’t hurt property values, the answer should be yes. Anything hidden inside your own fence line shouldn’t require a committee vote.
What really got me was doing a little digging and discovering that our neighborhood’s covenants were established in 2006, even though the neighborhood itself was built in 2023. And when I dug deeper, it turned out the covenants were copied and pasted from a generic template originally written in the late 1990s. So here we are in 2024, living by rules from the ’90s. Fence styles, color trends, technology, building materials — everything has changed. The rules need to keep up. I’m not anti-HOA, but I do think outdated covenants do more harm than good, and it’s worth pushing back respectfully if you’re in the same boat.
Why I Wanted a Modern Pergola (Not the Traditional Kind)
When I started shopping for a pergola, I knew I didn’t want the classic cedar or pressure-treated wood look. I wanted something modern — clean lines, low maintenance, and something that would actually hold up over time without me having to re-stain or reseal it every couple of years. That ruled out a lot of the traditional DIY builds you see on Pinterest right away.
What I was looking for was something that looked like wood but wasn’t. I wanted the warmth of a wood finish without any of the upkeep. After some research, I landed on a company called Mirador. Their pergolas are aluminum — completely maintenance-free — but they have this cherry oak finish that genuinely looks like real wood. Modern design, traditional warmth, zero maintenance. That combination was exactly what I was after, and it made the space feel intentional rather than like a basic backyard add-on.
The Louvered Ceiling Feature That Sold Me Instantly
One of the things that really set this Mirador pergola apart was the louvered ceiling system. The louvers sit on a rotational arm mechanism that lets you open or close them depending on how much sun or shade you want. Want full shade? Close them up. Want to let in some morning light? Open them partway. It also deflects rain, which means I can sit outside even when it’s drizzling without getting soaked.
Installing the arm mechanism was actually pretty straightforward — simpler than I expected for how impressive the result looks. Once it was in place and I could see the louvers in action, I knew this was the right call. I genuinely don’t think I could have engineered something this functional and this clean-looking on my own, and that’s saying something coming from a guy who builds things for a living on this blog. If you want to see more on outdoor builds like this, check out my post on building a motorized pergola with programmable roller shades — it goes even deeper on the mechanical side of outdoor shade systems.
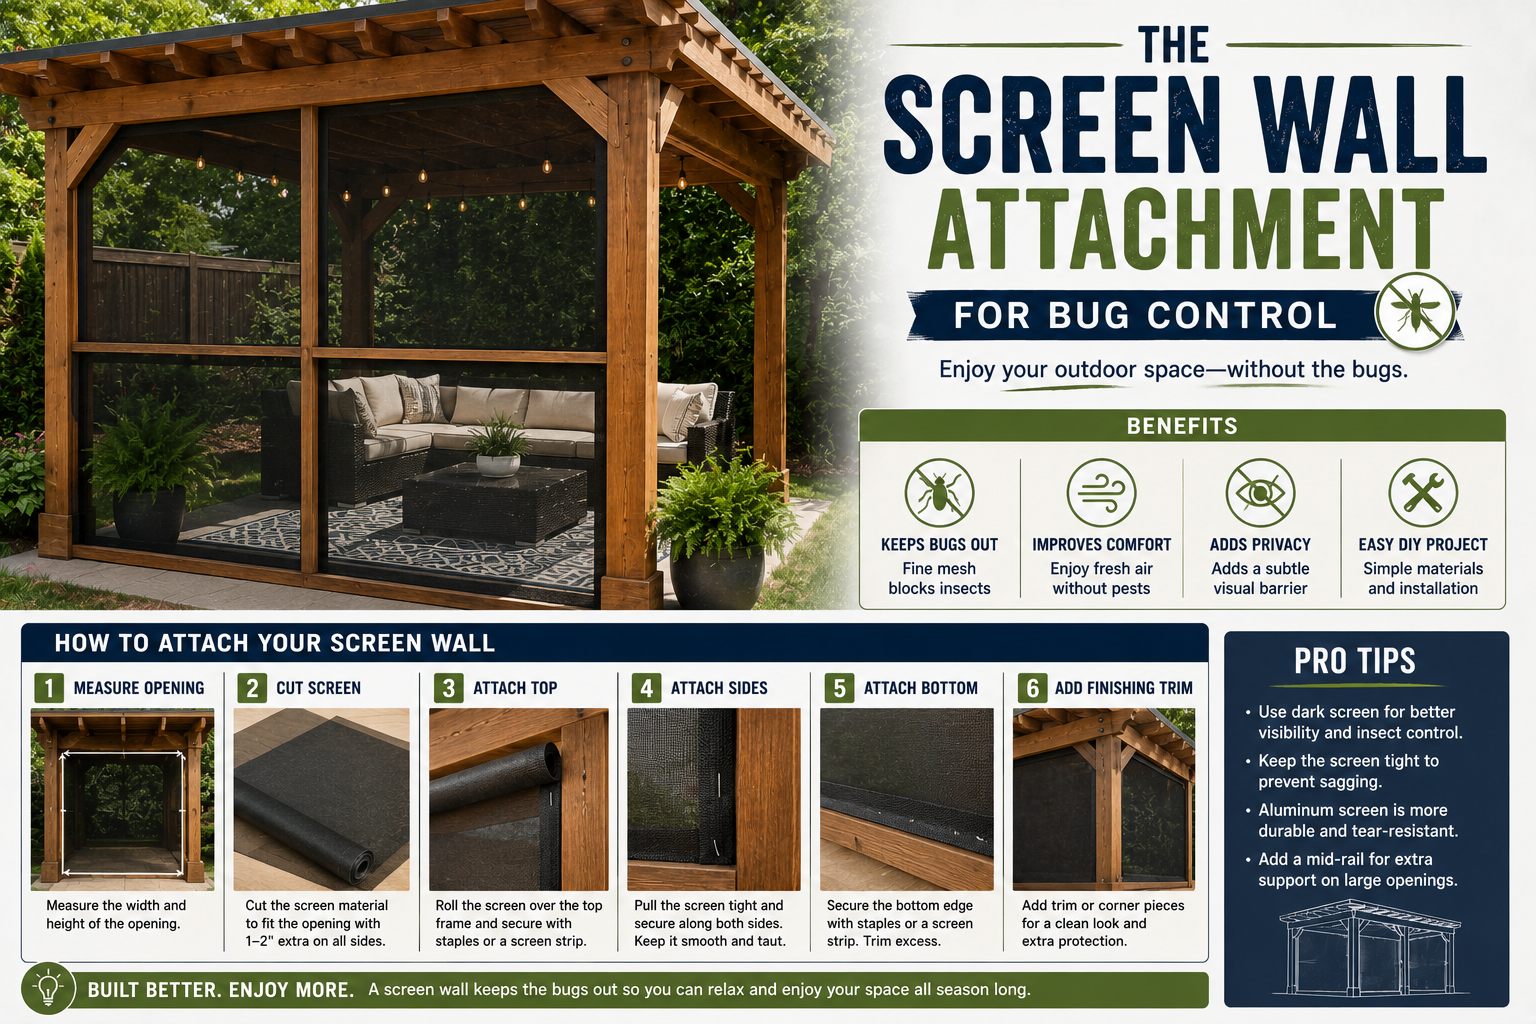
The Screen Wall Attachment for Bug Control
Another feature that impressed me was the screen wall attachment. Mirador offers these screen panels that attach to the sides of the pergola structure, essentially giving you a wall you can use to keep bugs out. For summer evenings, that’s a game-changer — especially in areas where mosquitoes are relentless once the sun goes down.
I didn’t end up installing the screens all the way around on this build, so I can’t say it’s fully bug-proof in my setup, but even the partial screening adds a layer of comfort. And having the option to add more walls later is a nice flexibility. If I change my mind mid-summer, the panels are designed to be added modularly, which is a smart design choice that I appreciate more every time I think about it.
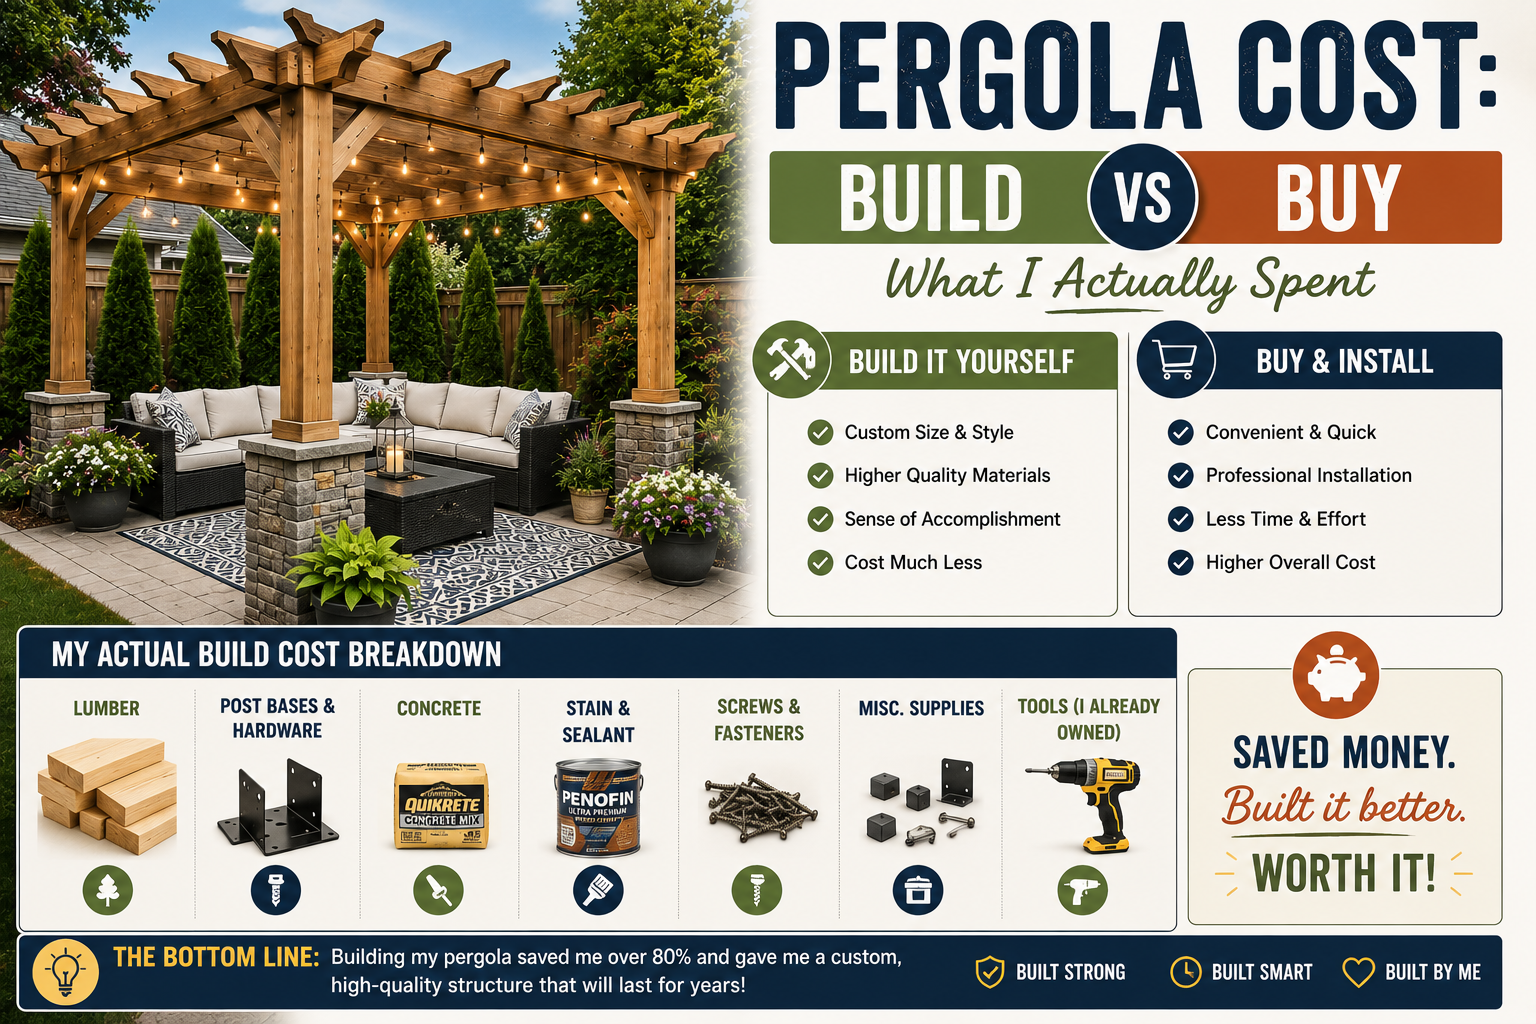
The Real Cost to Buy a Pergola — What I Paid
Alright, here’s what you actually came for — the numbers. The Mirador pergola I installed is 10 feet deep by 13 feet wide. That’s a solid footprint for a deck pergola, giving plenty of coverage for outdoor furniture and a seating area. The cost for this unit, with the louvered ceiling and shutter walls? $2,800.
I’ll be honest — when I first saw that number, I expected it to be higher. For an aluminum pergola with a wood-look finish, a mechanical louver system, and screen wall options, $2,800 felt like a reasonable price. There are additional costs if you add more wall panels around the perimeter, so keep that in mind if you want full enclosure. But as a baseline, that price point is competitive with a lot of what’s out there, and the quality felt like it punched above its weight class.
The Real Cost to Build a Pergola DIY Style — What I Researched
Here’s where things got interesting for me as a DIYer. When I looked up what it would cost to build a comparable pergola from scratch — same size, similar materials, similar features — I estimated the materials alone would run around $4,500. That’s not including my time.
And speaking of time, I figured it would take me roughly two and a half weeks to build this thing from the ground up. Two and a half weeks of my time, plus $4,500 in materials, versus $2,800 for the finished product delivered and installed. That math just doesn’t work in favor of the DIY route. Inflation has driven up the cost of lumber, hardware, and pretty much everything else you’d need for a build like this, and that’s reflected in that $4,500 estimate. If you’re curious about how material costs affect other outdoor projects, I broke down a similar decision in my post on building a DIY backyard patio and fireplace — same kind of cost-vs-time thinking applies there too.
Build vs Buy: Which Route Makes More Sense?
So let me lay it out clearly. DIY route: ~$4,500 in materials + 2.5 weeks of labor. Buy route: $2,800 delivered. That’s a $1,700 difference in materials alone, and that doesn’t account for the hours of your life you’d spend measuring, cutting, assembling, and troubleshooting a build from scratch. For me, the decision was obvious — even though I’m a DIY guy at heart.
Being good at DIY doesn’t mean doing everything yourself. It means knowing when building something yourself adds value and when it doesn’t. In this case, buying was smarter financially, faster logistically, and honestly produced a better result than I think I could have achieved on my own. I couldn’t have replicated those louvered ceilings, the maintenance-free aluminum finish, or the shutter wall system without spending significantly more and probably not achieving the same clean, professional look. Sometimes the best DIY decision is a strategic purchase — and that’s okay to admit.
Setting Up the Furniture and Dealing With 45 MPH Wind Gusts
Once the pergola structure was up, it was time to set up the furniture and start making the space feel like something. Of course, we picked the windiest day of the year to do it — wind gusts over 45 miles per hour, which felt like a miniature tornado rolling through the backyard. Trying to arrange outdoor furniture and decorate a space in those conditions is genuinely miserable, and I don’t recommend it.
Despite the wind chaos, the space started coming together piece by piece, and seeing it take shape made all the frustration worth it. The finished look — with the cherry oak aluminum, the louvered ceiling, and the deck underneath — is exactly what I envisioned when I started this project. If you’re planning a similar setup and want ideas on how to budget-stretch your outdoor space, my post on 5 DIY outdoor curb appeal projects you can do this weekend has some great complementary ideas.
Tips and Best Practices for Choosing Between Building or Buying a Pergola
Do the material math before you commit to DIY. Lumber, hardware, post bases, roofing — it adds up fast. Get actual quotes from your local hardware store before assuming DIY is cheaper. In many cases today, it isn’t.
Factor in your time honestly. If your time has value — and it does — a 2.5-week build has a real cost attached to it. Factor in what you could be doing with that time, or what you’d be earning if you were working instead.
Check your HOA covenants before you buy anything. Even if the rules seem outdated, get written approval before you spend money. It saves a lot of headaches. Also, research when your covenants were established — you might be surprised how old they are.
Look for aluminum over wood for a low-maintenance finish. If you don’t want to re-stain or reseal every year or two, aluminum with a wood-look powder coat is the way to go. It weathers better and requires almost no upkeep.
Consider louvers if you want year-round flexibility. A static roof gives you shade but nothing else. Adjustable louvers let you control light, shade, and rain deflection — making the space genuinely usable in more conditions.
Ask about discounts directly. I reached out to Mirador and asked if they’d offer a discount to my readers, and they said yes. Companies will often do this for content creators or if you ask nicely. Comment below if you want me to send you that link.
Frequently Asked Questions: Pergola Cost Build vs Buy
Is it cheaper to build a pergola yourself or buy one pre-built?
In many cases today, buying a pre-built pergola is actually cheaper than building one yourself — especially when you factor in current material costs. In my research, a DIY build comparable to the Mirador unit I purchased would have cost around $4,500 in materials alone, versus $2,800 for the pre-built option. Add in two and a half weeks of labor time, and the buy route becomes the clear winner financially.
What is a realistic budget for a 10×13 pergola?
For a quality aluminum pergola with louvered ceiling and shutter walls in the 10×13 foot range, expect to pay around $2,800 to $3,500 depending on the features you add. If you’re DIYing a similar size in wood, budget at least $3,500 to $5,000 for materials in today’s market, and more if you’re adding specialty features like louvered roofing systems.
What are the benefits of an aluminum pergola over a wood one?
Aluminum pergolas are essentially maintenance-free — no staining, sealing, or rot to worry about. They hold up better in moisture-heavy climates and don’t warp over time like wood can. Many aluminum options, like the Mirador unit I used, come with a powder-coated wood-look finish that gives you the warmth of wood aesthetics without any of the upkeep headaches.
Do I need HOA approval before installing a pergola?
In most cases, yes — especially if you live in a community with an active HOA. Even if your covenants seem outdated (mine were written from a 1990s template for a neighborhood built in 2023), it’s worth getting written approval before you spend any money. Skipping this step can result in removal orders or fines that cost far more than the approval process would have.
Final Thoughts: The Smart DIYer Knows When to Buy
If you came here expecting me to tell you to build your own pergola from scratch, I get it — I’m a DIY guy through and through. But the honest answer when it comes to pergola cost build vs buy in today’s market is that buying the right pre-built unit is often the smarter financial and practical move. I saved money, saved weeks of labor, and ended up with a finished product that genuinely looks better than what I could have built myself.
The Mirador pergola with its louvered ceiling, maintenance-free aluminum construction, and cherry oak finish has been everything I hoped for. If you want a link to their discount offer, drop a comment below and I’ll send it your way. And if you’re working on other outdoor or indoor projects, stick around — there’s plenty more on The DIY Journey to help you make smart decisions with your time and your money.