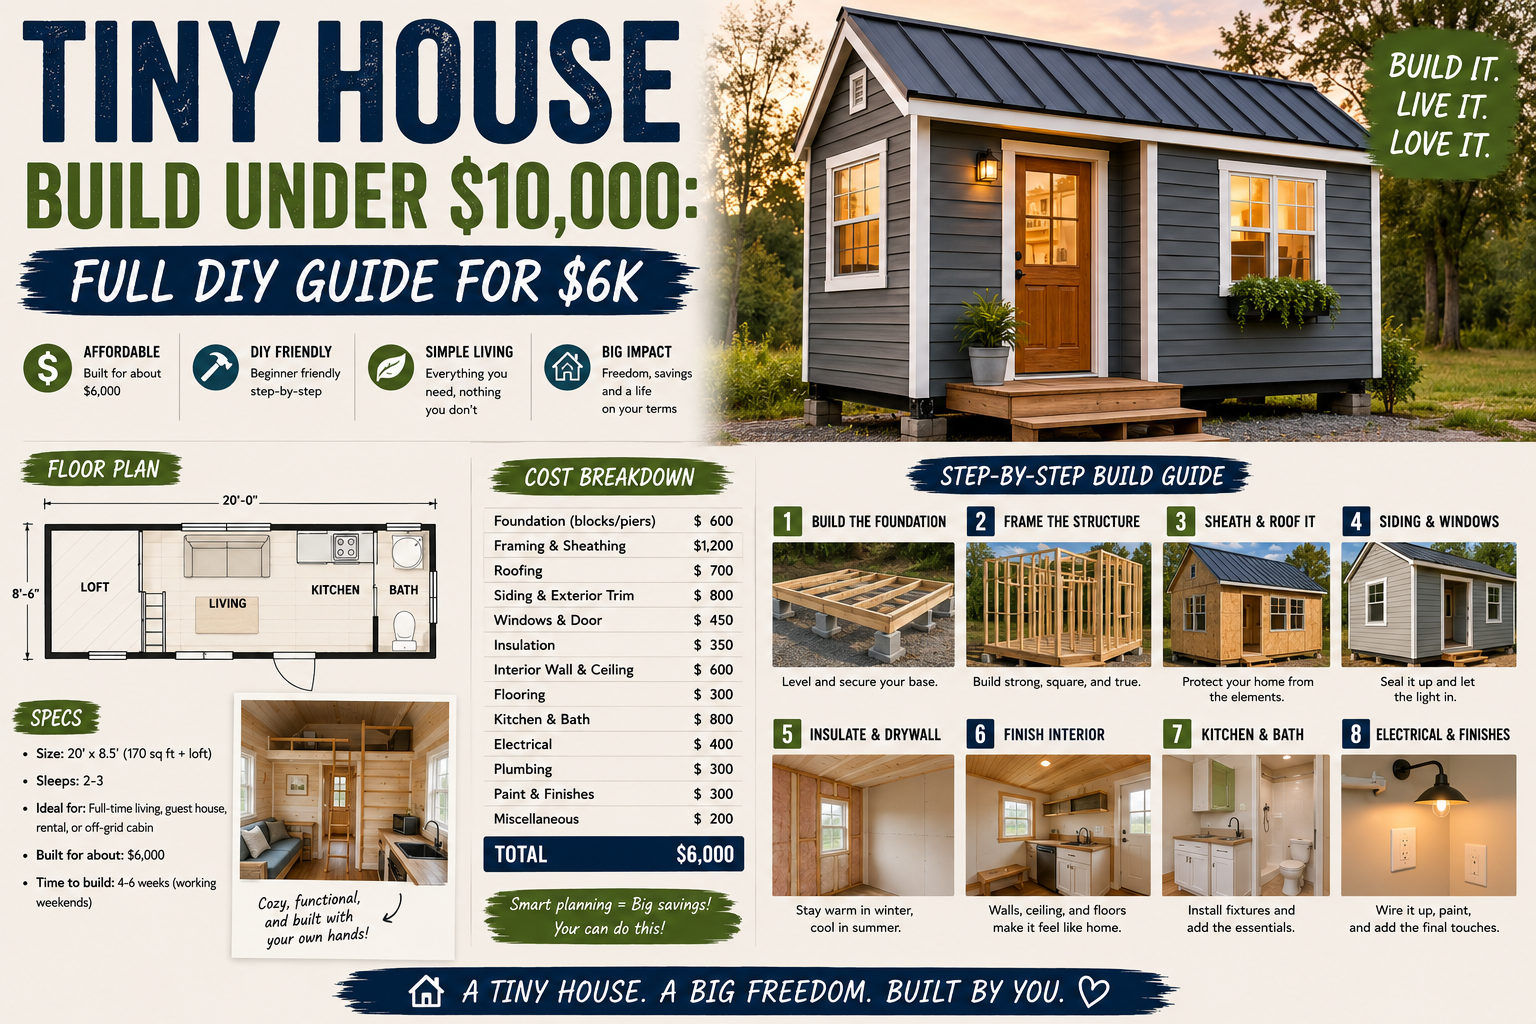
If you’ve been watching housing prices spiral out of control and wondering whether homeownership is even realistic anymore, I hear you. I grew up in the 70s/80s fully expecting I’d just buy a house one day — that’s what you did. But even when I finally had the means, the idea of paying a million dollars for a house built in 1964 just didn’t sit right with me. So I did what any self-respecting DIYer would do: I built my own. This is my complete guide to a tiny house build under $10,000 — and I’m talking a real tiny house with a full bathroom, bedroom, kitchen, and living room, all for around $6,000.
This project started with an old trailer picked up for just $500 — and that beat-up trailer became the foundation of something incredible. If you’ve been thinking about tackling a big build like this, I want you to know it’s absolutely doable. I’ve covered plenty of budget home improvement DIY ideas that save thousands, but this one takes the cake. Buckle up — I’m walking you through every single step of this build, from trailer prep all the way to a finished shell ready for a stunning interior.
Just to set your expectations: at the end of this phase, I’m a little over $3,000 into the build for the exterior shell alone, which is honestly mind-blowing. Everything I cover below is exactly what went into getting this tiny house from a rusty $500 trailer to a beautiful, road-ready structure. Let’s get into it.
Starting With the Right Trailer and Extending It to 16 Feet
The whole project kicked off with a used trailer my brother found for $500. As it sat, the trailer was only 13 feet long — but I knew the house needed to be 16 feet to fit everything I wanted inside. So the first task was extending the trailer by welding additional metal to it. It sounds intimidating, but with the right setup it’s very manageable. Getting that trailer length right from the start is critical because every other dimension in the build depends on it.
Once the extension was done, I grabbed a pressure washer and gave the whole trailer a thorough cleaning. You really can’t skip this step — any rust, grease, or grime will prevent paint from bonding properly. After it dried, a good coat of paint went on and honestly, the trailer looked completely transformed. A clean, solid trailer is the backbone of the entire build, and spending a few hours on prep here saves a ton of headaches later.
Building the Base Frame With 2x4s for Maximum Legal Width
With the trailer cleaned and prepped, I moved on to framing out the base. Because I wanted a full-size bathroom, bedroom, kitchen, and living room all inside this tiny house, every inch of width matters. I used 2×4s to build the base as wide as legally allowed for road transport, which gave me about 8 feet of interior width. That might not sound like much, but with smart planning it’s more than workable.
The finished base gives roughly 130 square feet to work with — about the same size as a full-size bus conversion I’d done before. To squeeze more livable space out of that footprint, I planned from the beginning to build the walls tall enough to create a two-story section in one part of the house. That decision alone dramatically changed what was possible in this tiny house build under $10,000.
Sealing the Floor With Spray Foam and a Moisture Barrier
Before laying the subfloor, I filled all the gaps and holes in the base frame with spray foam. This step is non-negotiable for two reasons: moisture control and insulation. A tiny house on a trailer is essentially sitting out in the elements 24/7, and any moisture that sneaks up through the floor will cause rot, mold, and all sorts of problems down the line. I made sure all the foam pieces were a tight fit so there were no air gaps.
After the foam, I laid down a plastic sheet as an additional moisture barrier before installing the subfloor on top. This three-layer approach — foam insulation, plastic vapor barrier, and subfloor — gives the house a solid, well-insulated base that will hold up for years. It’s one of those details that you’ll never see once the build is finished, but you’ll absolutely feel the difference in comfort and durability.
Framing the Walls — Including a Two-Story Section
With the base locked in, it was time to frame the walls. The first wall went up at 9 feet tall, which already felt enormous standing next to it. But the second wall was even taller at 10.5 feet to accommodate the two-story layout I had planned. Building walls this tall on a trailer takes some careful coordination — you need to make sure everything is square and plumb before it gets fastened down permanently.
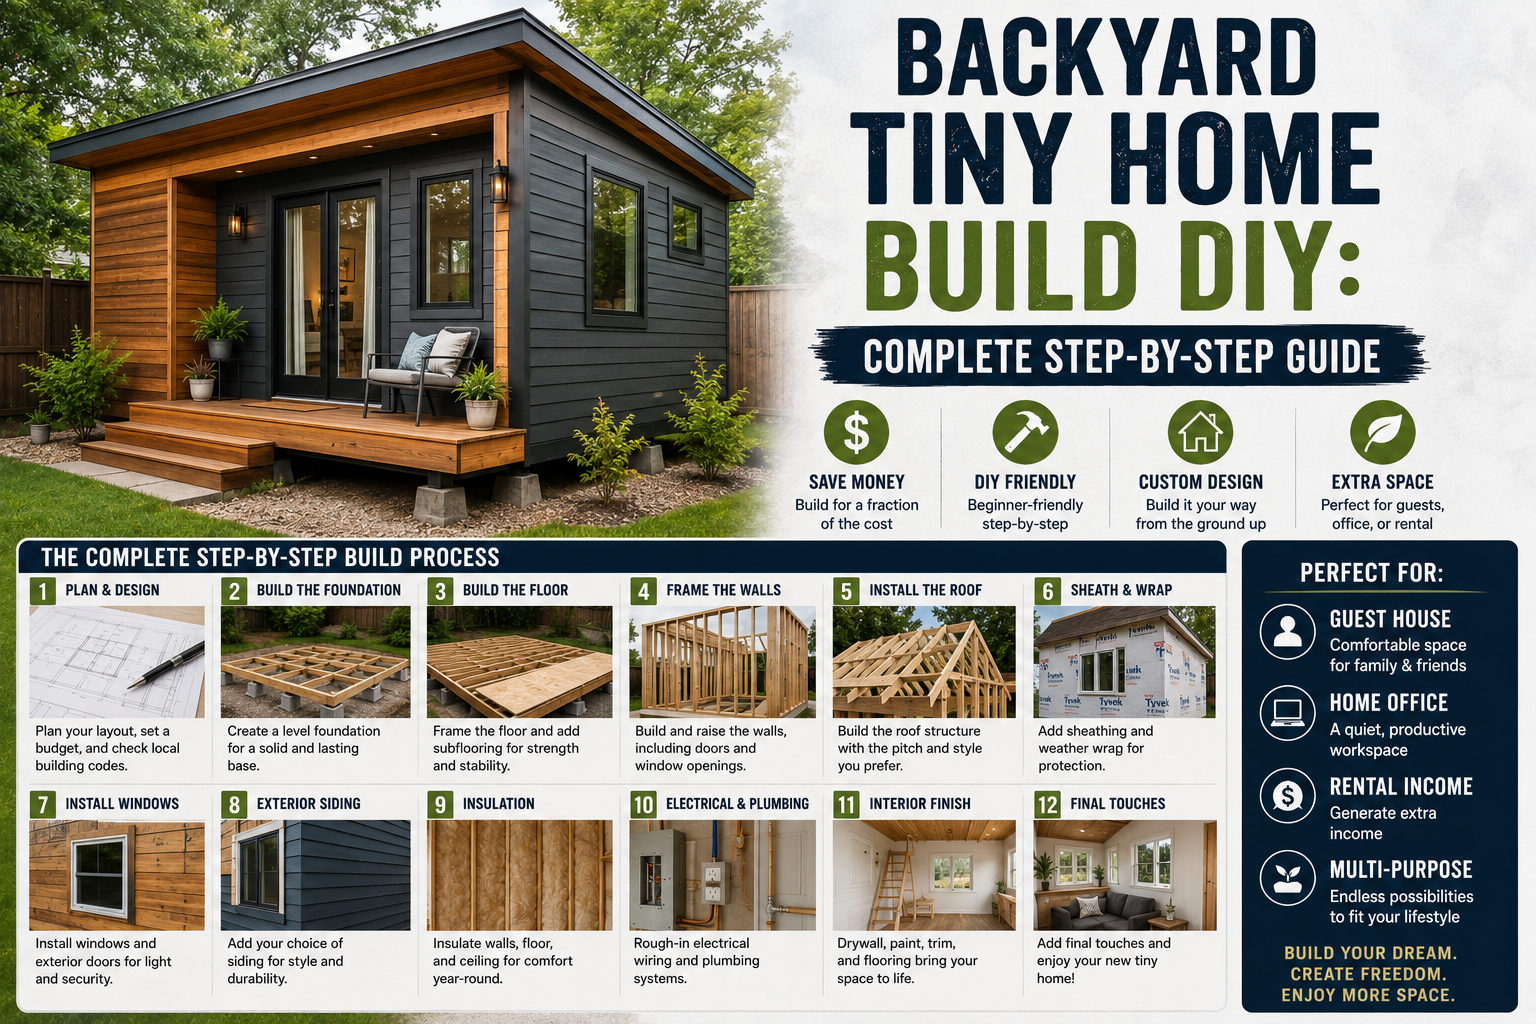
The next day, I added an extra section to the front wall to bump it up a bit higher, completing the framing needed for that second-story master bedroom. Seeing the walls standing on the trailer for the first time is one of those moments where the whole vision suddenly becomes real. If you’re considering a build like this and want more framing inspiration, check out my guide on backyard tiny home build DIY step-by-step for additional framing tips.
Framing the Roof and Adding an Overhang
Once the walls were up, I got to work framing the roof. This is honestly one of the most satisfying parts of any build because it’s when the structure starts to look like an actual house. After the main roof framing was installed, I went around the entire perimeter and added a generous overhang. In my opinion, a well-proportioned overhang is one of the biggest things that separates a house that looks great from one that looks like a storage shed.
With the overhang framed out, I put roof underlayment down followed by plywood sheathing. Getting the plywood on the roof solidifies the structure enormously — it goes from feeling like a frame to feeling like a real building almost instantly. Every screw in the roof also matters because this thing will eventually travel down a highway, so I made sure everything was fastened well beyond the minimum.
Building a Bathroom Extension for a Full-Size Bathroom
Here’s something I learned during the build: fitting a full-size bathroom into 8 feet of width is tight. My solution was to frame out a small extension on the side of the house specifically to give the bathroom a little extra room. You might have noticed in the video that one wall section looked more like a large opening than a wall — that was intentional, built specifically to create this bump-out for the bathroom.
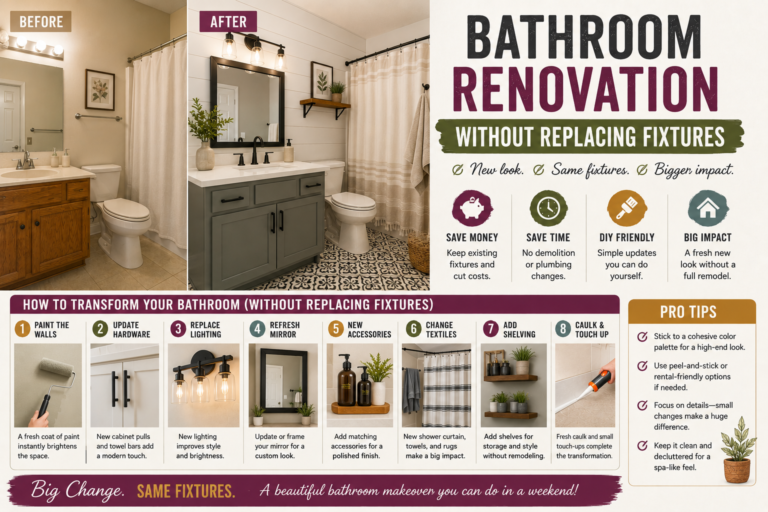
This is a great example of thinking creatively when you’re working within tight constraints. Rather than accepting a cramped bathroom or cutting the room out entirely, a small structural extension solves the problem without blowing the budget. If you’ve been wrestling with tight spaces in your own projects, my post on bathroom renovation without replacing fixtures has some great ideas for maximizing small bathrooms.
Installing Tyvek House Wrap for Waterproofing
Before any siding goes on, the walls need to be protected with Tyvec house wrap. This is essentially a waterproof paper that creates a final barrier between any moisture and the interior framing. Even if the siding keeps out 99% of rain and weather, that 1% that sneaks behind the panels can cause serious damage over time. Tyvek eliminates that risk entirely.
Applying it is straightforward — you roll it out horizontally, overlap each course by a few inches, and staple it in place. The key is making sure it overlaps correctly so water always drains down and away from the wall rather than behind the wrap. It’s a cheap material that provides huge long-term protection, so there’s no reason to skip it.
Installing the Siding With Affordable Wooden Panels
For the siding, I went with 4×8 wooden panels — similar to LP Smart Side panels — because they’re cost-effective and very easy to install. Large format panels go up fast, and on a tiny house where the total wall area isn’t massive, a few sheets cover a lot of ground quickly. The panels also give the house a clean, modern look that I really like.
Installation is as simple as measuring, cutting with a circular saw, and nailing the panels into the wall studs. Making sure the first course is perfectly level is critical because every row above it will follow that line. Take the extra few minutes to get it right and the rest of the siding will go up smooth and straight.
Building Custom Windows From Scratch to Save Thousands
This is one of my favorite cost-saving moves in the entire build: making the windows from scratch. The house needed some seriously large windows to flood the interior with light, and buying custom windows that size would have cost thousands of dollars. Instead, I ordered several sheets of custom-cut glass and built frames for them out of treated 2×4s.
The process involved cutting a notch in the 2x4s for the glass panel to sit in, then assembling a frame around each panel. The glass slides in and sticks up just slightly past the top of the frame, and a cap piece screws on over it to lock everything together permanently. The total cost for all the glass and wood came to under $400 — compared to thousands for commercial windows. Yes, it took time and some trial and error since I’d never made windows before, but the savings made it completely worth it.
Running Electrical Wiring Through the Soffits for Exterior Lighting
While installing the soffits around the perimeter of the roof, I ran electrical wire through them so I could later install exterior can lights under the overhang. This is the kind of detail that completely elevates a tiny house from looking like a budget build to looking like a high-end custom home. Doing the wiring at this stage — before the soffits are closed up — is the smart move because there’s no way to add it cleanly after the fact.
I also made sure to plan for LED lights throughout, which keep the electrical load low and the energy costs down. Planning your electrical rough-in before you close up any walls or soffits is one of those lessons that’s much easier to learn from reading about it than from experience. If you want to go deeper on DIY electrical for outbuildings and small structures, my guide on shed electrical wiring for beginners is a great starting point.
Adding Windows to the Upstairs Master Bedroom
Even with the large windows installed on the main level, the upstairs master bedroom was going to be completely dark without its own windows. So I made a last-minute decision to add dedicated windows to that upper section. It was one of those things that wasn’t in the original plan but made an enormous difference to the livability of that space.
Cutting openings in already-sheathed walls requires a reciprocating saw and careful measurement, but it’s very doable. The same custom window construction method I used for the main floor windows worked perfectly here. Natural light in a sleeping space makes a huge difference in how that room feels, and it was absolutely the right call.
Installing Trim to Cover Gaps, Screws, and Corners
Once the siding and windows were in, the house looked great from a distance — but up close, all the nail holes, screws, gaps, and rough corners were visible. That’s where trim comes in. I got to work cutting and installing trim pieces over every seam, corner, and edge on the exterior. This step took two full days and required about 3,000 nails and roughly 10 tubes of liquid nail.
The cost savings here were significant. Pre-made PVC trim would have run about $1,500 for the amount I needed. By using a more economical option and doing all the cutting myself, I got the same result for just $160. It required more time, but on a $6,000 budget, trading time for money is always the right call. The finished trim gave the house that crisp, professional edge that makes everything look intentional and polished.
Bending and Installing Custom Aluminum Fascia
Before the roofing material could go on, the fascia board at the front of the roof needed to be covered. Rather than buying pre-formed fascia, I got a roll of aluminum and cut and bent it myself to fit. This custom aluminum fascia does two important things: it gives the roofline a beautifully clean finished look, and it prevents water from ever reaching the wood behind it.
Bending aluminum by hand takes a little technique, but with a straight edge and a patient approach, you can get very clean, sharp bends. I also installed a matching aluminum piece on the back of the house to tie the whole roofline together. The result looks custom and high-end — which is exactly the goal when you’re building a tiny house on a fraction of what it would normally cost.
Shingling the Roof
With the fascia done, it was finally time to put shingles on the roof. I used standard architectural shingles over the roof underlayment already in place. Shingling goes faster than most people expect — you work in rows from the bottom up, staggering the seams between courses, and nail each row down before the next one covers the nails.
Since this tiny house will eventually be towed down a highway, I made sure to screw down the shingles extra securely at the edges and ridgeline. A shingle that works loose at 65 mph becomes a projectile, so this isn’t a spot to cut corners. The finished roof looked clean and completely weather-tight.
Filling Nail Holes With Bondo and Painting for a Flawless Finish
One of the details that separates a great-looking build from a mediocre one is surface preparation before paint. I went over the entire exterior and filled every nail hole and imperfection with Bondo body filler — the same stuff used on cars. With thousands of nail holes from all that trim work, this step took a while, but the results were completely worth it.
For the paint itself, I used Sherwin Williams paint for maximum durability and coverage. Before painting, a solid coat of primer went on first to ensure even adhesion. An extendable roller stick made painting the upper sections much easier without constantly repositioning a ladder. The aluminum fascia got its own special treatment — a big thank you to my dad for tackling that part and doing a beautiful job with it.
Tips and Best Practices for a Tiny House Build Under $10,000
Start with a used trailer. Buying a new trailer can cost $3,000–$5,000 or more. A used one for $500 that just needs some cleaning and paint is a massive win. Inspect the frame carefully for structural rust before you commit, but cosmetic rust is easy to address.
Build custom whenever possible. The windows are the perfect example — commercial custom windows would have cost thousands, while building my own cost under $400. Apply this thinking to trim, fascia, and any other element where labor can substitute for expensive prefabricated materials.
Plan your electrical before you close anything up. Running wire through framed walls and open soffits takes minutes. Running it after everything is sealed takes hours and looks messy. Rough in every circuit you think you might ever want while you have easy access.
Don’t skip the moisture protection layers. Spray foam, plastic vapor barrier, Tyvec house wrap — these layers cost relatively little but protect your entire investment from the single biggest enemy of any structure: moisture.
Trim and surface prep are the difference-makers. Anyone can frame a box. What separates a house that looks stunning from one that looks rough is the quality of the trim work and how carefully surfaces are prepped before paint. Budget the time for these finishing steps — they’re worth every minute.
Frequently Asked Questions
How much does a tiny house build under $10,000 actually cost?
My exterior shell — trailer, framing, roofing, siding, windows, trim, and paint — came in at just over $3,000. The total projected budget for the complete finished tiny house including interior work is around $6,000. This is achievable by using a used trailer, building custom windows, making your own trim, and doing all the labor yourself. Buying pre-made windows, PVC trim, and hiring contractors could easily push this same project to $20,000 or more.
What size is the living space in this tiny house?
The base footprint is approximately 130 square feet, but the two-story section in one part of the house adds meaningful additional livable space for a master bedroom loft. The main floor includes a full bathroom, kitchen, and living area, while the upper level serves as a bedroom — making the most of the vertical space that tall walls allow.
Is it legal to build and drive a tiny house on a trailer?
Tiny houses on wheels (THOW) are legal in most U.S. states but are subject to width and height restrictions for road travel — typically 8.5 feet wide and 13.5 feet tall maximum. Always check your state’s DOT regulations before you start framing. Some states also have specific rules about where a THOW can be parked as a primary residence.
What tools do I need to build a tiny house myself?
The core tools I used throughout this build include a circular saw, reciprocating saw, table saw, hammer, tape measure, laser level, jigsaw, and a nail gun loaded with brad nails. A pressure washer for trailer prep and a good set of Ladders for working at height are also essential. Most of these tools pay for themselves on a single big project like this.
Ready to Build Your Own Tiny House for Under $10,000?
I’ll be honest — when my brother and I first started talking about building a complete tiny house for $6,000, I wasn’t 100% sure we could pull it off. But looking at the finished exterior shell knowing we’re only $3,000 into it, I’m more confident than ever that this is possible for anyone willing to put in the work. A tiny house build under $10,000 isn’t just a YouTube fantasy — it’s a real, achievable goal with the right plan and a willingness to build custom instead of buying pre-made.
The interior is where things really get exciting — flooring, cabinets, bathroom tile, kitchen appliances, and all the finishing touches that turn an empty shell into a real home. If you want to see more budget-focused builds like this, check out my full guide on the shed studio build that saved $6,000 with a 3-day DIY. And if you’re just getting started on your DIY journey and want some quick wins before tackling something this ambitious, my list of 20 budget home improvement ideas you can do in 30 minutes is a great place to start.
Drop a comment below and let me know — are you thinking about building a tiny house? What’s the biggest challenge holding you back? I’d love to help you figure it out.