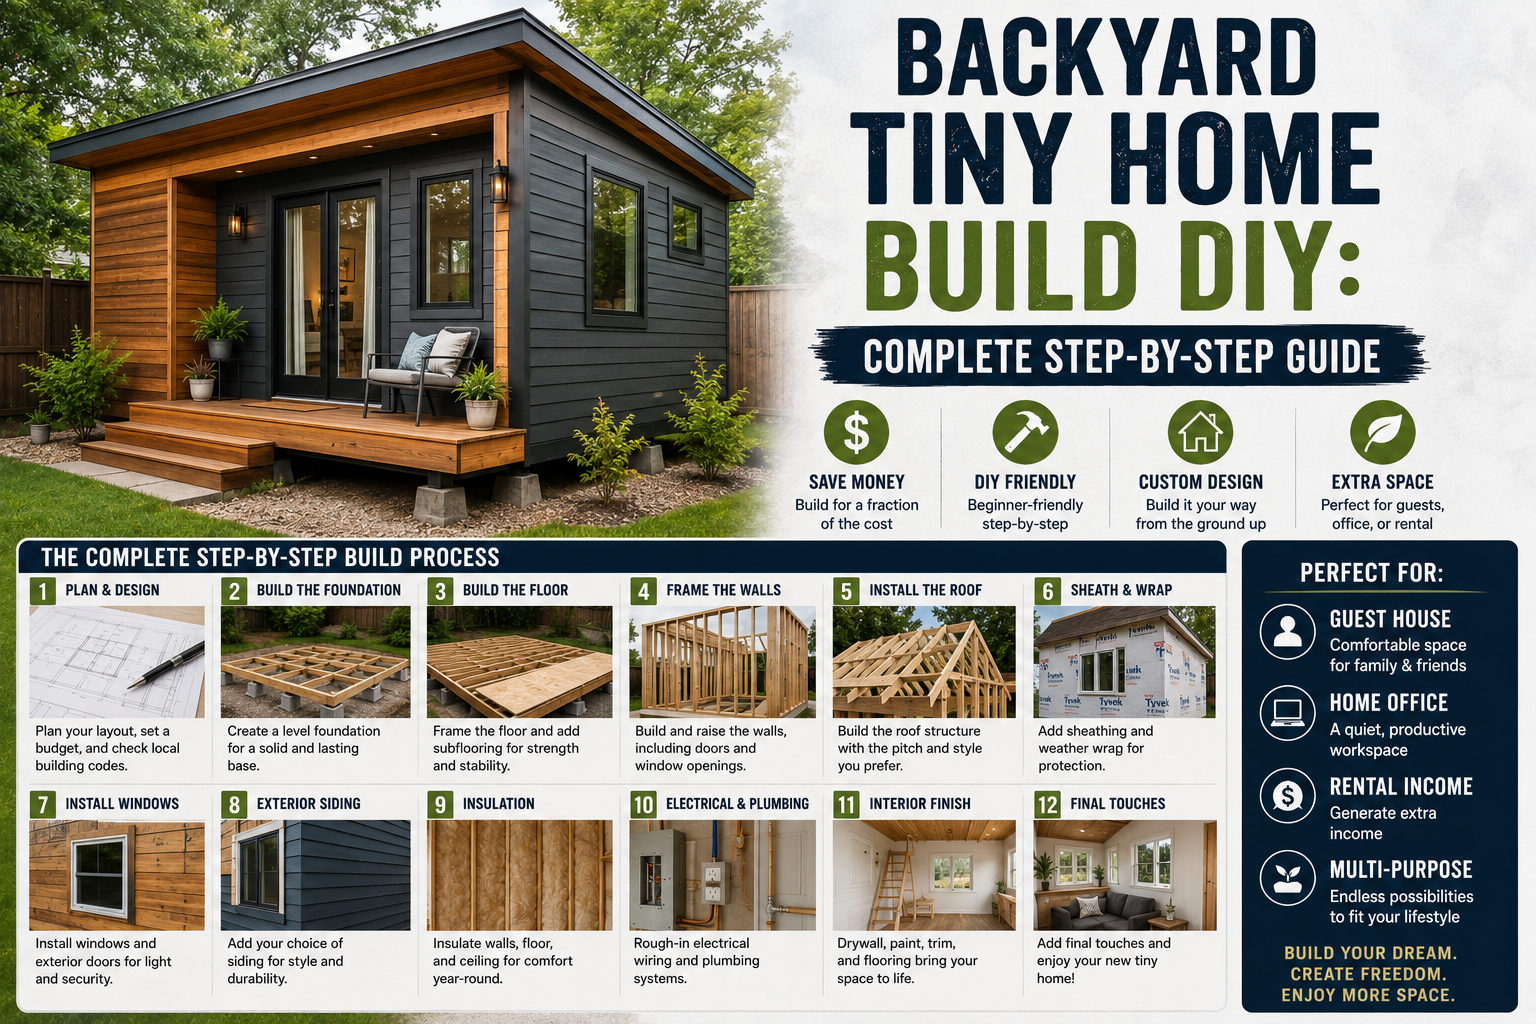
I’ve always dreamed of building something truly from scratch in my own backyard, and this year I finally did it — a full backyard tiny home build DIY that took me from raw ground to a finished, livable space. This wasn’t a kit, and it wasn’t a quick weekend project. It was weeks of planning, framing, roofing, wiring, insulating, drywalling, flooring, and finishing — and I documented every single step so you can follow along and build one yourself.
Whether you’re dreaming of a guest suite, a home office, or a rental unit, building a tiny home in your backyard is one of the most rewarding DIY projects you can take on. Yes, there are hard days, weather surprises, and moments where you cut something a half inch too big — but watching it come together makes every bit of it worth it. I spent roughly $15,000 on this build and I’m genuinely proud of how it turned out. If you’re the kind of person who loves tackling big projects (like my basement finishing on a budget build or my shed studio build), this one is going to be right up your alley.
Let me walk you through every phase of this build from the ground up — literally.
Step 1: Planning the Layout and Setting the Foundation
Before a single board went down, I carefully planned and marked out the exact spot in my backyard where this tiny home would live. I wanted it positioned well, with good drainage and enough clearance on all sides. Once I had my layout marked, I picked up some concrete deck blocks and started leveling them out to create a solid base.
For the foundation framing, I used pressure treated 2x6s and set them into the grooves of the deck blocks, shimming and adjusting until everything was perfectly level. Once all the 2x6s were level, I pulled a tape measure corner to corner to confirm the frame was perfectly square — this step is critical and not something to skip. I then screwed and nailed everything together and marked out where the remaining 2x6s would go at 16-inch center. I crowned all the joists, used 3½-inch exterior screws throughout, and added joist hangers at each connection point for extra long-term strength.
Step 2: Insulating and Installing the Subfloor
With the foundation frame complete, I moved on to insulating the subfloor. I picked up half-inch foam insulation with an R-value of 5, which is sufficient for my climate. I cut the foam pieces to fit snugly between each 2×6, then used spray foam to seal all the gaps as tightly as possible.
I drilled small holes in the insulation to allow any trapped moisture to escape, then trimmed away all the excess spray foam. After that, I rolled out a 6-mil plastic sheet as my moisture barrier, laying a bead of construction adhesive around all the edges before pressing it down. For the actual subfloor, I used ¾-inch tongue and groove OSB. I know some people will disagree with not staggering the sheets, but since the platform is exactly 8 feet wide and every joint sits directly over a support, I’m confident the floor will hold up for a very long time. I secured everything with 2-inch nails and plenty of 3-inch screws.
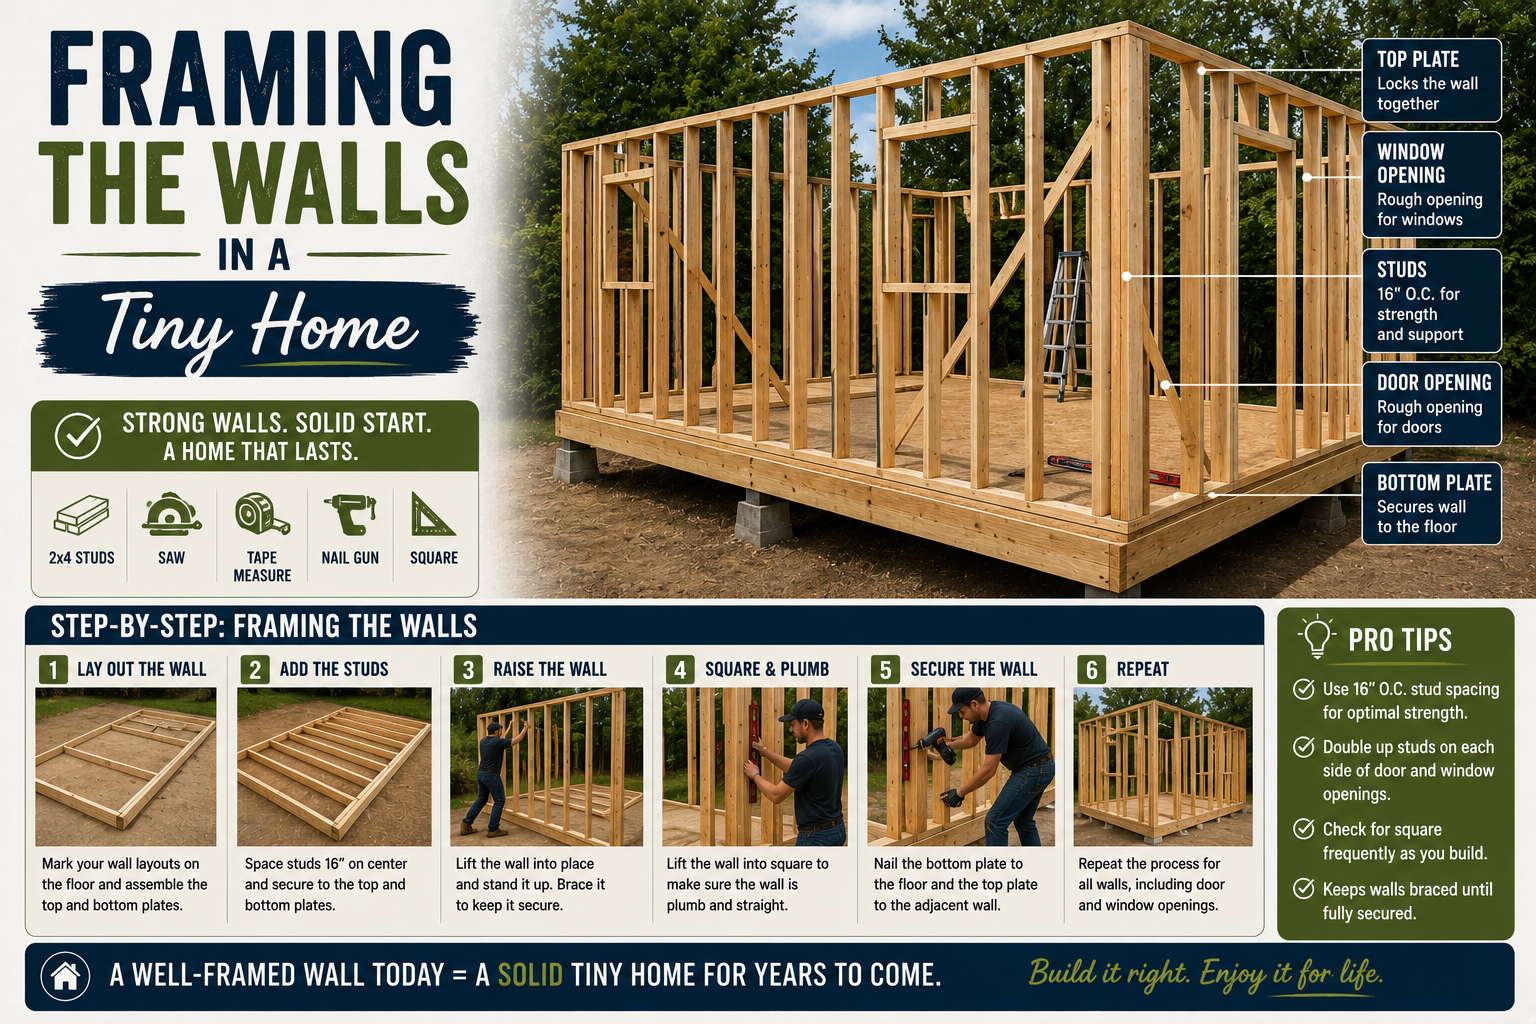
Step 3: Framing the Walls
The next day I picked up a load of 2x4s and started assembling the wall frames right on top of the subfloor platform. I framed everything at 16-inch center, securing with 3½-inch screws and following up with 3-inch framing nails. I used a chalk line to mark all my blocking locations, then worked my way through each wall section systematically.
I want to give a big shoutout to my neighbor Tom, who came by to lend a hand with the heavy lifting during framing — having an extra set of hands makes a huge difference on days like this. I also couldn’t have pulled this whole project off without my wife’s help throughout. The front wall of this tiny home is framed at 10 feet tall and the back at 8 feet, which creates a slight pitch and makes the interior feel much more spacious than you’d expect. Once all the walls were standing, I checked everything for square and level, then screwed the sections together to make the whole structure as rigid as possible.
Step 4: Building and Installing the Rafters
Roof framing day was one of the more technical parts of this build. I climbed up with a 2×6 and started measuring out where to cut my bird’s mouth — essentially creating a template rafter that I could trace onto all the rest so every single rafter would be identical. This is the key to getting a nice, consistent flat roof plane.
Once I had my template dialed in, I spent about an hour and a half tracing and cutting all the rafters. Then I marked 16-inch center on the top plates and screwed each rafter into place with 3½-inch screws, then added joist hangers to every single one. Taking the time to do this right at the rafter stage saves a huge amount of headache later when you’re trying to get a flat, leak-proof roof surface.
Step 5: Sheathing the Exterior Walls and Roof
With the rafter frame complete, I moved on to sheathing. For the walls, I used half-inch OSB with small expansion clips between each sheet so they have room to expand and contract with seasonal changes. I worked my way around the entire structure until every wall was covered.
For the roof sheathing, I got full sheets of plywood up onto the roof and screwed them down, making sure every edge had something solid to land on. I also used subfloor adhesive to bond them down as tightly as possible. The roof overhang on this tiny home ended up being 3 feet in the front, 10 inches on the sides, and 18 inches in the back — enough to really protect the siding and windows from rain. Once all the sheathing was up, I added drip edge around the entire perimeter of the roof with nails every 10 inches or so.
Step 6: Roofing — Waterproof Wrap and Shingles
After checking the weather and seeing rain was coming the very next night, I kicked it into high gear to get the roof waterproofed fast. Before laying shingles, I installed a self-sealing sticky waterproof roof wrap — this stuff is great because if a nail punches through it, it seals itself back around the nail. That alone gives me a ton of peace of mind about long-term leaking.
I’d never actually installed a roof before this build, but after doing my research I went with a stair-step pattern and drove six nails into each shingle. I just repeated that same process row by row until the entire roof was covered. Honestly, it was more straightforward than I expected once I got into a rhythm. With the roof done and the rain on the way, I was relieved to have everything sealed up in time.
Step 7: Installing House Wrap and Cutting Window Openings
Once the roof was watertight, I turned my attention to the walls. I installed house wrap starting from the bottom and overlapping each upper course over the lower — just like shingles, this ensures any water running down the wall sheds outward rather than getting behind the wrap. It’s a pretty forgiving process as long as you maintain that overlap throughout.
I also had to router out the window openings in the sheathing at this stage, and I’ll be honest — this looked much easier online than it was in real life. It was a frustrating process and not one I’d recommend doing this way again. That said, it got done, and I made sure to cut the house wrap so it could be wrapped around the framing at each opening to keep moisture out even if water gets past the window.
Step 8: Installing the Windows
Window day was exciting. I picked up the main windows from Facebook Marketplace in nearly brand new condition — a great way to save real money on a build like this. I used window flashing tape wrapped around the studs at each opening before setting the windows, then laid a bead of window and door adhesive before pressing each one into place.
I checked every window for square, made sure they opened and closed smoothly, and nailed them in securely. I also built four smaller custom windows for the top of the walls using glass I picked up at Home Depot — I cut a dado into 1x4s, slid the glass in, squared everything up, nailed the frames in place, and ran a bead of silicone around both the inside and outside of each one. With the overhang above and the flashing I added, I’m very confident these windows won’t give me any trouble.
Step 9: Hanging the Front Door
The front door was one of the more challenging moments of the build. I found French doors on Facebook Marketplace for a great price, but they didn’t come with a frame — so I had to build one. I grabbed some 1x4s and built the most square frame I could, then brought it into the rough opening to test the fit.
Here’s where things got humbling — I made the frame a half inch too big, and the doors weren’t closing properly. After a few adjustments and some trimming, I got everything fitting correctly. I added window flashing around the door frame, and at that point the whole structure was really starting to look like a real tiny home. Seeing those French doors in place was a genuinely proud moment.
Step 10: Installing the Soffits and Puck Lights
With the exterior structure solid, I moved on to the soffits. I drilled holes to run wire before installing the soffit boards because it’s much easier to do the rough-in wiring before you close everything up. For the soffit material, I used the same treated tongue and groove pine boards I’d been using elsewhere on the build to keep a clean, consistent look throughout the exterior.
Once all the soffit boards were up, I drilled holes for the puck lights, pulled the wire through, connected everything to the junction boxes that came with the lights, and clipped them into place. Having soffit lighting on a small structure like this makes a massive difference in how it looks at night — it gives it a polished, intentional feel rather than just a plain box in the backyard.
Step 11: Running Electrical Wiring
Now that the exterior was buttoned up, it was time to wire the whole structure before insulation went in. I installed a 125-amp breaker panel on one of the 2x4s at 64 inches high. I then positioned all the receptacle boxes, making sure they stuck out about ¾ of an inch so the drywall would land flush with the face of each box once installed.
I marked 2 feet up on every stud and drilled ¾-inch holes to run all my wire through cleanly. I ran wire from the soffit lights back to the switch boxes, prepped the wires, and coiled them into the boxes for connecting later. I also installed a GFI outlet with an exterior weatherproof box on the outside wall, since I was planning to build a deck. After running that wire in from the inside, I filled the penetration with spray foam to keep bugs out. Everywhere wire crossed a stud cavity, I hammered on metal wire protectors to make sure I couldn’t accidentally screw through a wire during drywall installation.
Step 12: Installing Wool Insulation in the Walls
For wall insulation, I went with a product called Half-Lock Wool — a completely non-toxic, loose-fill wool insulation that achieves R-15, which actually surpasses my local building code. I chose this over traditional fiberglass or spray foam batts specifically because it’s natural, made from 100% wool, and I could install it without gloves or a mask.
The process involved stapling the netting that came with the product across each stud bay, then slowly blowing and packing the wool in from the bottom up. My son finally made his way out of bed and came over to help, which I appreciated. It was time-consuming work, but when you’re investing $15,000 into a backyard structure, doing the insulation right is non-negotiable. Once the walls were full, I trimmed out the netting in front of all the electrical boxes and moved on.
Step 13: Installing the Ceiling Boards — Staining, Sealing, and Hanging
For the ceiling, I used the same tongue and groove pine boards I’d used on the soffits to keep everything visually consistent. Before hanging them, I stained all 42 boards to match the soffit color and let them dry overnight, then applied a thick coat of polyurethane to protect them long-term. Just staining and sealing 42 boards took a full day and a half — this is one of those steps that doesn’t show much in a video but represents a huge time investment in real life.
Before the boards went up, I drilled holes through the roof joists to run wiring for eight ceiling lights, leaving plenty of slack at each light location and hammering on metal wire protectors throughout. I also stapled insulation netting to the ceiling framing and stuffed each cavity with wool insulation, adding foam baffles between each rafter to keep insulation from sliding down toward the low end of the sloped roof over time. Then the boards went up using 18-gauge finish nails, staggered so there was no continuous seam running down the center of the ceiling. It was back-breaking work but the result looked absolutely beautiful.
Step 14: Installing the Ceiling Lights
With all the ceiling boards in place, I drilled 6-inch holes at each of the eight light locations and pulled through the wire I’d run earlier. I connected the wires to the junction boxes that came with the LED can lights, clipped each light into the ceiling, and worked my way through all eight locations the same way.
Having eight evenly spaced recessed lights in a small space like this creates a bright, clean look that makes the interior feel much more like a real home than a converted outbuilding. I’m really glad I took the time to run all that wire before the ceiling went up — trying to add lighting after the fact would have been a nightmare.
Step 15: Hanging and Finishing Drywall
I’ll admit drywall is not my strongest skill — I’ve only done it a handful of times. But after watching a solid stack of YouTube tutorials, I felt confident enough to get it done. I used an oscillating tool to cut out the opening for my electrical panel, then measured and hung all the sheets systematically until every wall was covered.
Once all the drywall was up, I applied sheetrock tape along every seam and corner, then spread joint compound over the tape and all the screw holes, working as flat as I could to minimize sanding later. I let it cure for 24 hours and then sanded. I won’t sugarcoat it — I ended up sanding and re-applying joint compound for three full days to get the walls as flat as possible. It’s tedious work, but rushing it means your paint job will show every imperfection.
Step 16: Painting the Interior Walls
Once the walls were smooth and ready, I rolled on Sherwin Williams Showcase paint and primer in one coat — starting by cutting in all the edges and then rolling out the fields. The one-coat guarantee on this paint really did hold up, and the color transformed the space completely.
This is one of those moments in a build where everything starts to feel real. Going from bare OSB walls to a freshly painted, evenly lit interior with a beautiful wood ceiling is a genuinely exciting transformation. If you’ve ever thought about taking on a large painting project and want to make it easier, an extendable roller stick is something I’d recommend picking up — it saves your back on wall and ceiling work.
Step 17: Installing the LVP Flooring
With the walls painted, it was finally time to lay the floor. I ordered a sample box from Floret to choose the right look, then stapled down a roll of underlayment across the entire subfloor. Even though the luxury vinyl plank I chose had a built-in underlayment, I added an extra 2mm layer underneath for added cushion and sound dampening.
These planks were large format, and it only took about two and a half pieces to span the full length of the tiny home — which saved a ton of time and looks stunning. The whole floor was installed in about 45 minutes. I specifically chose this brand because the planks are thicker and the click edges don’t chip or break during installation the way cheaper options do. They’re also 100% waterproof, which matters in a backyard structure that will see humidity fluctuations. The finished floor looked incredible.
Step 18: Installing Outlets, Switches, Baseboards, and Trim
With the floor down, I went back and wired up all the outlet covers and switches, tested every light and outlet to confirm everything was working correctly, and then moved straight into installing the baseboards and trim. Getting these details right is what separates a build that looks finished from one that looks like a construction project.
The trim and baseboards really pulled the room together — especially combined with the painted walls, wood ceiling, and new flooring. At this point, the interior of the tiny home was looking genuinely beautiful, and all that remained was the deck and any interior finishing touches. For anyone curious about doing electrical work on an outbuilding like this, my post on shed electrical wiring for beginners covers the basics in a really approachable way.
Step 19: Building the Exterior Deck
The last major phase of this build was adding a deck to the front of the tiny home. I started by measuring and marking out the deck footprint, then got to work building a frame that would be solid enough to handle foot traffic and outdoor furniture long-term.
The deck really completes the look of the structure from the outside. It creates a transition zone between the backyard and the interior, gives the front door a proper landing, and makes the whole thing feel much more like a finished dwelling rather than a shed. I already had the exterior outlet roughed in from the electrical phase, which meant the deck would have power for string lights or a small appliance right from day one — a detail I was really glad I planned ahead for.
Tips and Best Practices for Your Backyard Tiny Home Build DIY
Plan your electrical before any walls close up. Running wire after insulation and drywall is extremely difficult. Map out every outlet, switch, and light location before framing is done and rough everything in during the framing phase.
Source windows and doors from Facebook Marketplace. I saved a significant amount by finding nearly new windows and French doors through local listings. This is one of the highest-impact ways to cut budget on a build like this without sacrificing quality.
Don’t rush joint compound. Skipping the multi-day sanding and re-coating process will haunt your paint job. Budget three days for finishing drywall and you’ll thank yourself when the walls are painted.
Use metal wire protectors everywhere. Any time wire passes through a stud bay near where drywall screws or ceiling nails will go, hammer on wire protectors. It’s cheap insurance against a very expensive mistake.
Choose high-quality LVP flooring. The thicker planks cost more upfront but they install without breaking, hold up better over time, and are 100% waterproof — worth every penny in an outbuilding that sees humidity swings.
Install soffit venting and roof baffles. When insulating a sloped ceiling, make sure air can still flow from soffit to ridge. Adding foam baffles between rafters prevents the insulation from blocking that airflow and causing moisture problems over time.
Frequently Asked Questions
How much does a backyard tiny home build DIY cost?
My total build came in around $15,000. That includes foundation materials, framing lumber, roofing, insulation, drywall, flooring, electrical, windows, and doors. Costs vary significantly by region and material choices — sourcing items like windows and doors used (Facebook Marketplace is great for this) can shave thousands off the total.
Do I need permits to build a tiny home in my backyard?
Permit requirements vary widely depending on your city, county, and state or province. Some jurisdictions treat backyard tiny homes as accessory dwelling units (ADUs) and have specific rules around size, setbacks, and utilities. Always check with your local planning or building department before breaking ground.
What’s the best insulation for a backyard tiny home?
I used Half-Lock Wool loose-fill insulation, which is non-toxic, achieves R-15, and can be installed without a mask or gloves. It’s a premium product but well worth it for a permanent structure. Traditional fiberglass batts are a more budget-friendly alternative that still perform well if wool is outside your budget.
How long does a backyard tiny home build take?
My build took several weeks of consistent weekend and weekday work. Framing took two solid days, roofing another couple of days, and finishing work (drywall, flooring, trim, electrical) stretched across many more sessions. If you’re building solo on weekends only, budget two to three months for a complete build similar to mine.
Conclusion
This backyard tiny home build DIY project has been one of the most challenging and rewarding things I’ve ever built. From leveling the first deck block to installing the last outlet cover, every step taught me something new and pushed my DIY skills further than I expected. The finished result is a fully insulated, wired, floored, and painted tiny home that looks and feels like real living space — not a glorified shed.
If you’re thinking about tackling something like this, my biggest advice is to just start. Plan carefully, do your research, ask questions in the comments, and don’t be afraid to make mistakes — they’re part of the process. And if you want more big-project inspiration, check out my post on converting an abandoned shed into a tiny home for another take on small-space builds. I’ll keep sharing every phase of this project and more, so make sure you’re subscribed so you don’t miss what’s coming next.