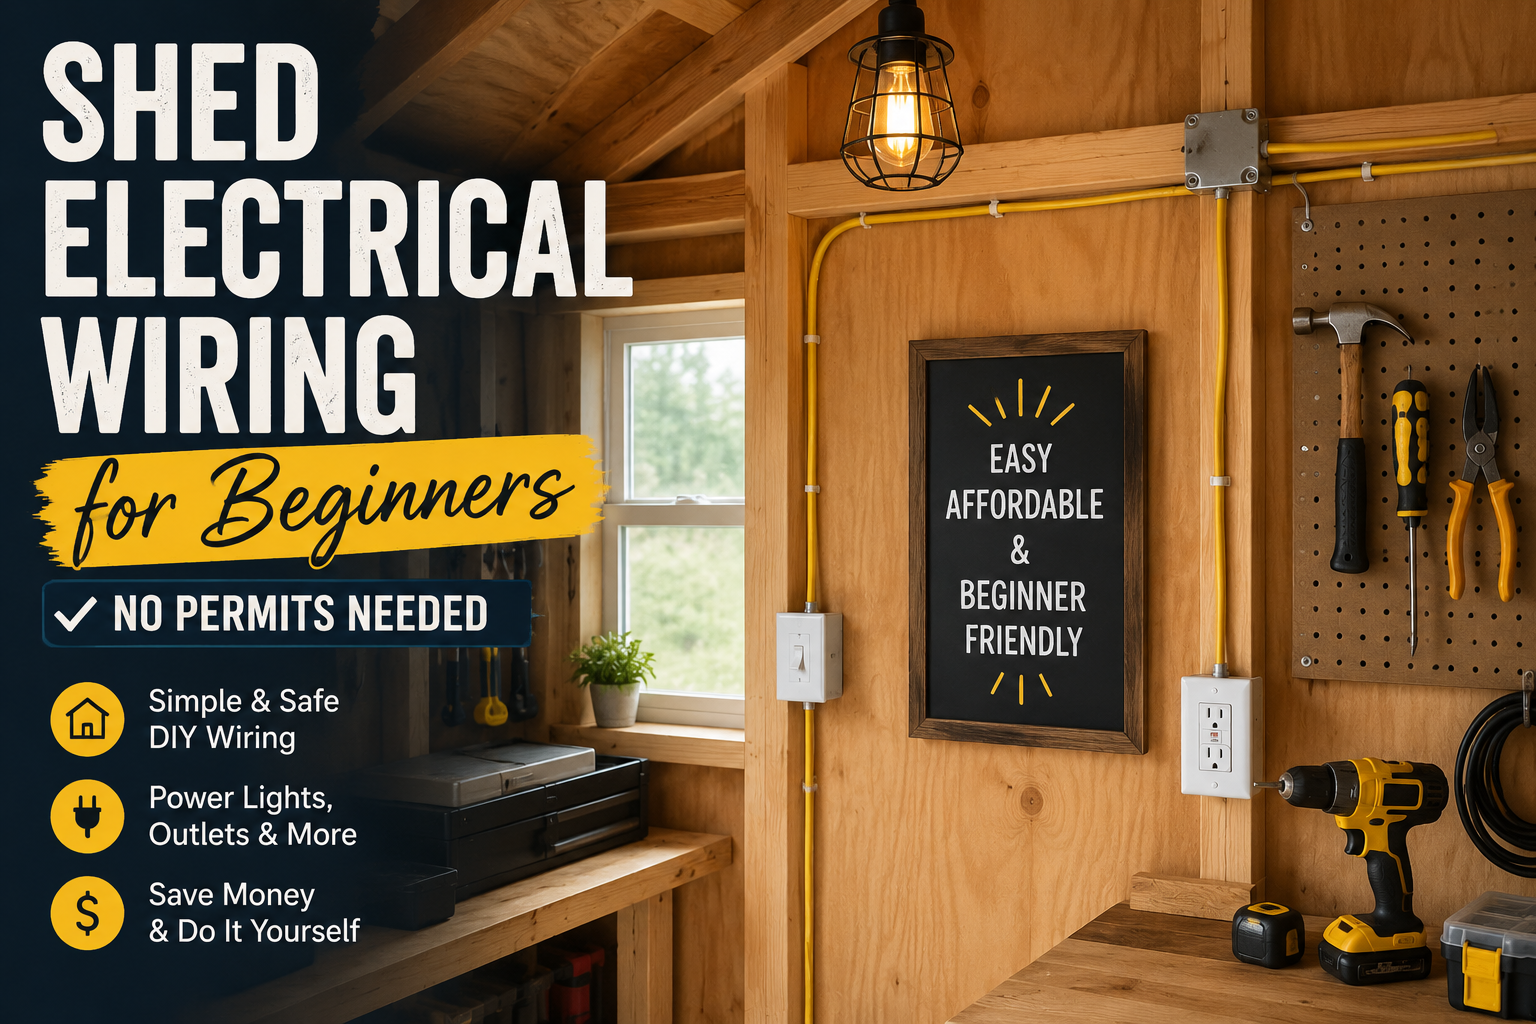
If you’ve been putting off adding electricity to your shed because it sounds complicated, I’m here to tell you — it doesn’t have to be. I recently wired up my entire shed with LED lighting, automated ventilation, and even a TV, and I never once picked up a pair of wire strippers. Seriously. This is one of those projects that sounds intimidating but is actually totally approachable for a complete beginner.
Shed electrical wiring for beginners really comes down to one key decision: do you want to hard wire it, or do you want to keep it simple with an extension cord setup? I went the simple route, and honestly, I couldn’t be happier with how it turned out. Let me walk you through everything I did — from running the power to setting up lights, ventilation, seating, and even a full entertainment setup.
If you’re also thinking about other budget-friendly upgrades around the house, check out my guide on cheap shed organization ideas that actually work — it pairs perfectly with this project once your power is up and running. Note: always check your local building codes before doing any electrical work — requirements vary by location.
Step 1: Understand Your Two Options for Getting Power to the Shed
Before anything else, I had to figure out how I was actually going to get electricity into my shed. There are two main approaches, and both have their pros and cons depending on your situation.
The first option is hard wiring — trenching and running a dedicated electrical service line from your home to the shed. Depending on whether you’re using conduit or direct-burial cable, you could need to bury it up to 24 inches deep. Once it’s in, you’d run into a junction box and distribute power from there. It’s a clean, permanent solution — but it requires permits, inspections, and a decent amount of work. I wasn’t interested in going down that road.
The second option is running power off an extension cord, which is exactly what I did. It’s fast, it’s easy, and for most hobby sheds or storage spaces, it’s more than enough. No permits, no trenching, no stress. This is the approach I recommend for anyone just getting started with shed electrical wiring.
Step 2: Choose the Right Power Entry Solution
Once I decided to go the extension cord route, I had to figure out the cleanest way to get power inside. You can use a simple outdoor box with a cover, drill a hole in the side of the shed, and feed the female end of an extension cord through — it works, but it’s not the most elegant setup.
I found a much better option: a recessed male plug that mounts flush on the outside of the shed. You plug your extension cord right into it, and on the inside, it looks like a clean, tidy connection point. Even better, I found a version that comes with a double whip already wired in on the back, so the inside connection is completely ready to go. It’s weather-protected when not in use, and it looks way more finished than just a cord dangling through a hole.
I drilled a 2-inch hole using a hole saw, fed the fitting through, and sealed around the outside with a bead of caulk. Even though the fitting has a gasket, I wanted that extra weather protection. Once it was in, I plugged in my extension cord from the house and had live power inside the shed. Simple as that.
Step 3: Distribute Power Inside the Shed With a Multi-Outlet Extension Cord
Here’s where things got really clever. Instead of wiring in individual outlets — which would require cutting, splicing, and actual electrical work — I picked up a 50-foot extension cord with six outlets evenly spaced along its entire length. This single cord gave me plug-and-play outlets anywhere I needed them without touching a single wire.
I ran the cord up along the studs and headers, routing it around the perimeter of the shed so I could drop an outlet wherever I needed one — near the workbench, up high near the ventilation vent, and by the front door for lighting. I used nails to hold it in place temporarily while I figured out the best routing, knowing I’d come back and secure everything properly later. The cord also has caps on each outlet to keep moisture out, which is a nice detail.
One thing worth noting: because my outdoor outlet at the house is GFCI-protected, everything running off that extension cord is also covered. So even though I’m not running dedicated circuits, I still have that safety net built in. If you’re using a standard outdoor outlet at your home, there’s a good chance it’s already GFCI-protected — just double-check before you start.
Step 4: Run the Extension Cord From the House to the Shed
My shed is quite a ways from the house, so I needed a 100-foot extension cord to cover the distance. Even then, I ended up having to daisy-chain two cords together to reach — very Clark Griswold energy, I’ll admit. I also had my robot lawnmower running off the same outdoor outlet, which added a little extra load to think about.
One thing I’ll be honest about: running a long extension cord across your yard isn’t the most permanent or elegant solution. It can get in the way, and yes — I did actually run over mine with the lawn mower at one point. If that’s a concern for you, or if your shed is completely off-grid, I used a Jackary Home Power 3600 Plus power station as a backup solution. I can park it in the corner of the shed, plug my interior extension cord into it instead of the outdoor pigtail, and it even pairs with a solar panel (the Solar Saga 500X) that charges it faster than the shed drains it. It’s a great option if you want to keep the yard clear or need emergency backup power.
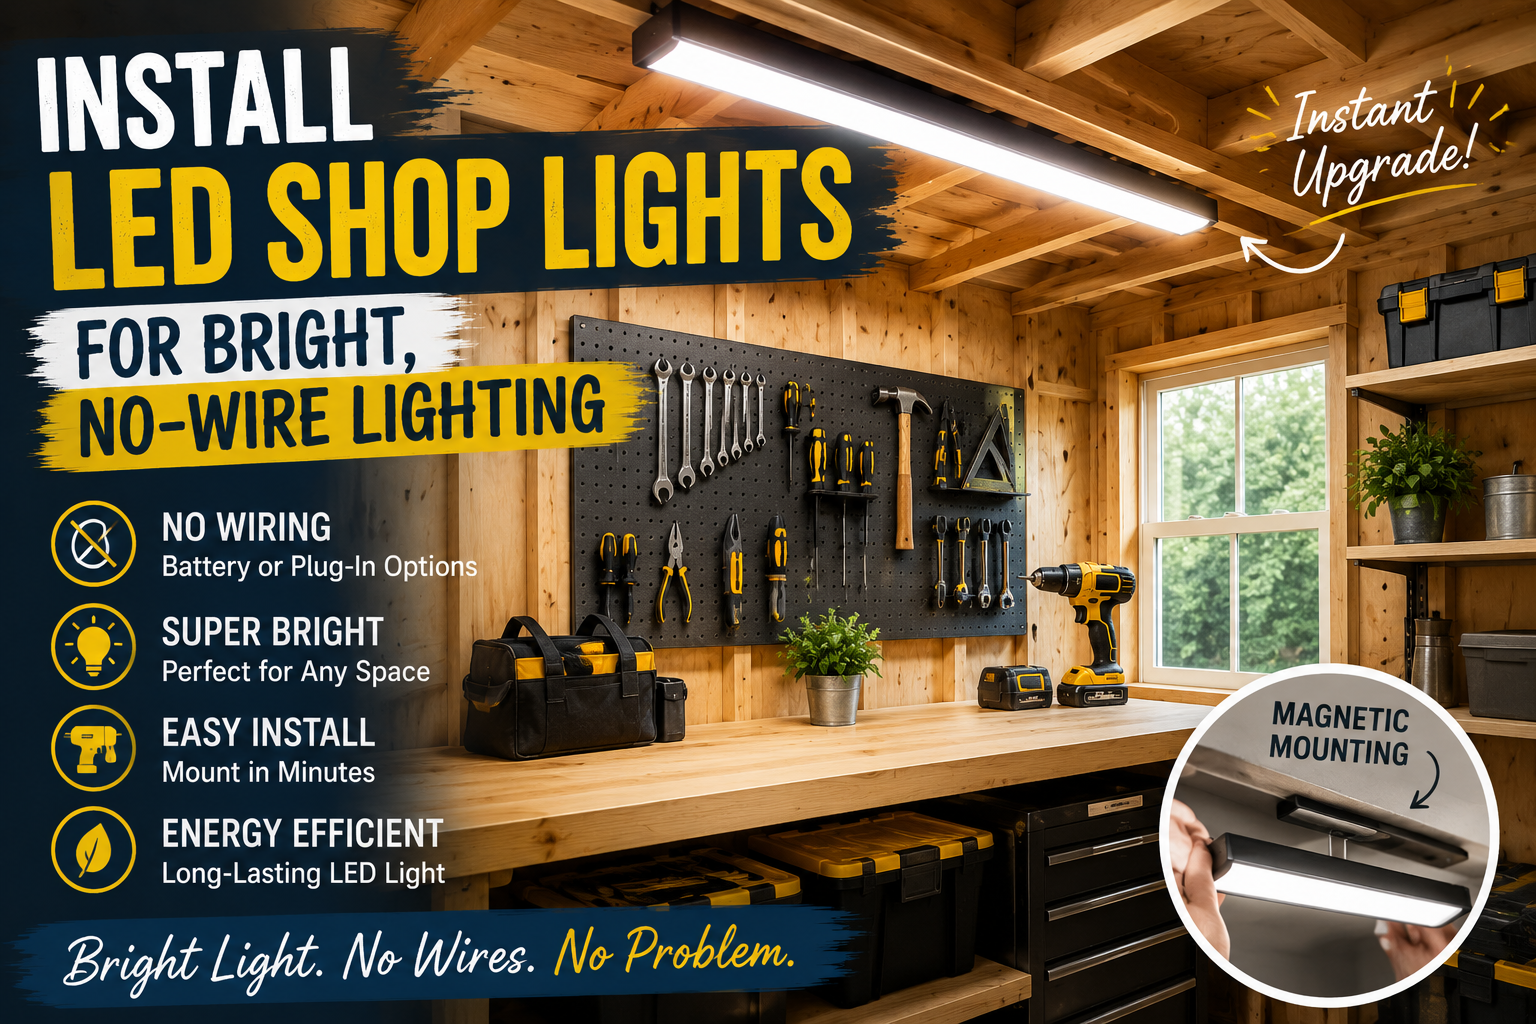
Step 5: Install LED Shop Lights for Bright, No-Wire Lighting
For lighting, I went with a set of three-foot T5 LED shop lights that come in a six-pack. They’re inexpensive, they daisy-chain together (male plug on one end, female on the other), and they mount with simple little clips and tiny screws. No wiring, no electrician, no permit. Each light has a toggle switch built in, which is handy, though it does mean the switch location is tied to where the cord reaches.
I mounted two lights per stud bay along the walls, creating a ring of light around the perimeter — which is actually where you want it most, right above your work surfaces. I initially had the switch in a less-than-ideal spot, but I re-routed the cord so the switch sits right next to the door where a normal light switch would be. I’ll eventually splice the cord to move the switch to the perfect height, but even off the shelf, you can make it work with a little creative routing. The light above the workbench especially made a huge difference — I can actually see what I’m doing now.
Step 6: Add Automated Ventilation to Control Heat and Prevent Mold
This is honestly one of my favorite parts of the whole setup. My shed faces west, and by late afternoon, the heat inside gets brutal. More importantly, stagnant damp air is a killer for tools — it leads to rust and mold. I wanted a ventilation solution that would actually keep the air moving without me having to remember to turn it on.
I started with a 120mm computer-style fan with a 12-volt adapter that plugs right into an outlet. At full speed it moves 92 CFM, which is enough to exchange the air in my shed about three times per hour. I 3D-printed a bracket to extend the mounting to 180mm so it would fit properly in my existing vent opening, but you could easily buy a larger fan if you don’t have a printer — a 150mm or 180mm fan would work even better.
The real upgrade, though, was adding a temperature-controlled outlet — basically a thermostat plug with a little sensor probe. I set it to kick on at 90°F (I may bump that up to 100°F), and now the fan runs automatically whenever the shed gets too hot and shuts off when it cools down. It’s like having a smart thermostat for your shed for almost nothing. Plug the fan into the temperature outlet, plug that into your extension cord, and you’ve got automated climate control.
Step 7: Build a Folding Wall-Mounted Seat
Every good shed hangout spot needs somewhere to sit, so I built a folding wall-mounted chair out of wood. The concept is a horizontal seat that folds out from the wall and is supported by angled legs that drop down from the studs. I cut the pieces, rounded the edges with a jigsaw, and used all-thread rod instead of hex bolts so the folding mechanism wouldn’t bind.
I’ll be straight with you — this was the most frustrating part of the whole project. I had the rounded piece installed upside down, the boards bowing out, and at one point I genuinely declared it “the worst project of my life.” After a lot of clamping and rethinking, I did get it working, but the seat ended up sitting a bit low. It’s functional, but I’ll be looking for better seating options going forward. Still — a folding chair that disappears into the wall when not in use is a legitimately cool feature for a shed.
Step 8: Mount a TV for Entertainment (Yes, Really)
Here’s the upgrade I was most excited about: mounting a 55-inch TV in the shed. I got it for free, so before you tell me it’s a crazy idea — I agree, and I don’t care. The goal was to mount it so it could hoist up out of the way when not in use and swivel to face both inside the shed and outside, so I can watch while I work in the yard.
I initially tried to build a mount out of 2x4s, and it was a disaster — the cord kept binding on the pulley mechanism. So I found a heavy-duty ceiling-mount TV bracket on Amazon, the kind you’d see at a sports bar. It’s extremely sturdy, has a swivel at the top for stowing, and swivels side to side for flexible viewing angles. To mount it properly, I added a 2×12 piece of blocking between the studs first, got it level, and drove in plenty of screws to make sure it could handle the weight. With the power already running through the shed from my multi-outlet extension cord, plugging in the TV was as simple as finding the nearest outlet.
Tips and Best Practices for Shed Electrical Wiring for Beginners
After going through this whole process, here are the things I’d tell anyone starting their own shed wiring project. Plan your outlet locations before you run the cord — I put my power entry on the wrong side of the building and had to work around it. Think about where you’ll want outlets for your workbench, chargers, lights, and any fans before you commit.
Always use a GFCI-protected outdoor outlet as your source. It protects everything downstream. A multi-outlet extension cord is the easiest way to distribute power without any actual wiring — just route it along the studs and secure it as you go. For ventilation, don’t skip the temperature-controlled outlet — it’s a small investment that makes a big difference in protecting your tools. And if you’re doing a lot of projects like this, check out my post on garage organization ideas on a budget for more ways to make your workspace functional without spending a fortune. For more ambitious space conversions, my abandoned shed to tiny home conversion guide covers what’s possible when you take these upgrades even further.
Frequently Asked Questions
Do I need a permit to run electricity to my shed?
If you’re hard wiring a dedicated circuit from your home’s electrical panel to the shed, yes — most municipalities require a permit for that work. However, running power via an extension cord (which is what I did) typically doesn’t require a permit because it’s not a permanent electrical installation. Always check your local codes to be sure, but the extension cord method is the simplest way to avoid the permit process entirely.
What’s the safest way to run power to a shed without hard wiring?
Use a heavy-duty outdoor-rated extension cord plugged into a GFCI-protected outdoor outlet. I used a recessed weatherproof male plug fitting mounted in the shed wall as the connection point, which keeps things neat and protected. Make sure your extension cord is rated for the amperage you’ll be pulling, and avoid running it where it could be damaged by lawn equipment or foot traffic.
How do I keep my shed cool in the summer without AC?
A ventilation fan mounted in an exhaust vent is a great first step. I used a 120mm (upgraded to 180mm with a 3D-printed bracket) computer-style fan with a 12-volt adapter. Paired with a temperature-controlled thermostat outlet, the fan kicks on automatically when the shed hits a set temperature and shuts off when it cools down. It won’t cool the shed below outside temperature, but it will prevent heat and humidity from building up — which protects your tools from rust and your shed from mold.
Can I use a power station instead of running an extension cord from the house?
Absolutely, and it’s actually a great solution if your shed is far from the house or if you want to keep your yard free of extension cords. I used a Jackary Home Power 3600 Plus paired with their Solar Saga 500X solar panel. The solar panel charges the unit faster than the shed’s normal usage drains it, so it’s always topped off. It also doubles as emergency home backup power, which means it earns its keep even when the shed isn’t in use.
Final Thoughts
Shed electrical wiring for beginners really doesn’t have to be scary or complicated. With the right fitting, a good multi-outlet extension cord, and a few smart accessories like temperature-controlled outlets and plug-and-play LED lights, I turned my basic shed into a genuinely comfortable and functional space — with ventilation, great lighting, and yes, a 55-inch TV — without ever touching a wire stripper.
The whole setup cost a fraction of what a hard-wired installation would run, and I can expand or change it at any time. If you’re on the fence about taking on a project like this, I promise you can do it. Start small, plan your outlet locations ahead of time, and enjoy the upgrades as they come together.
Have questions about your shed setup or want to share what you’re working on? Drop a comment below — I’d love to hear about it. And if you found this helpful, check out more of my DIY projects right here on The DIY Journey.