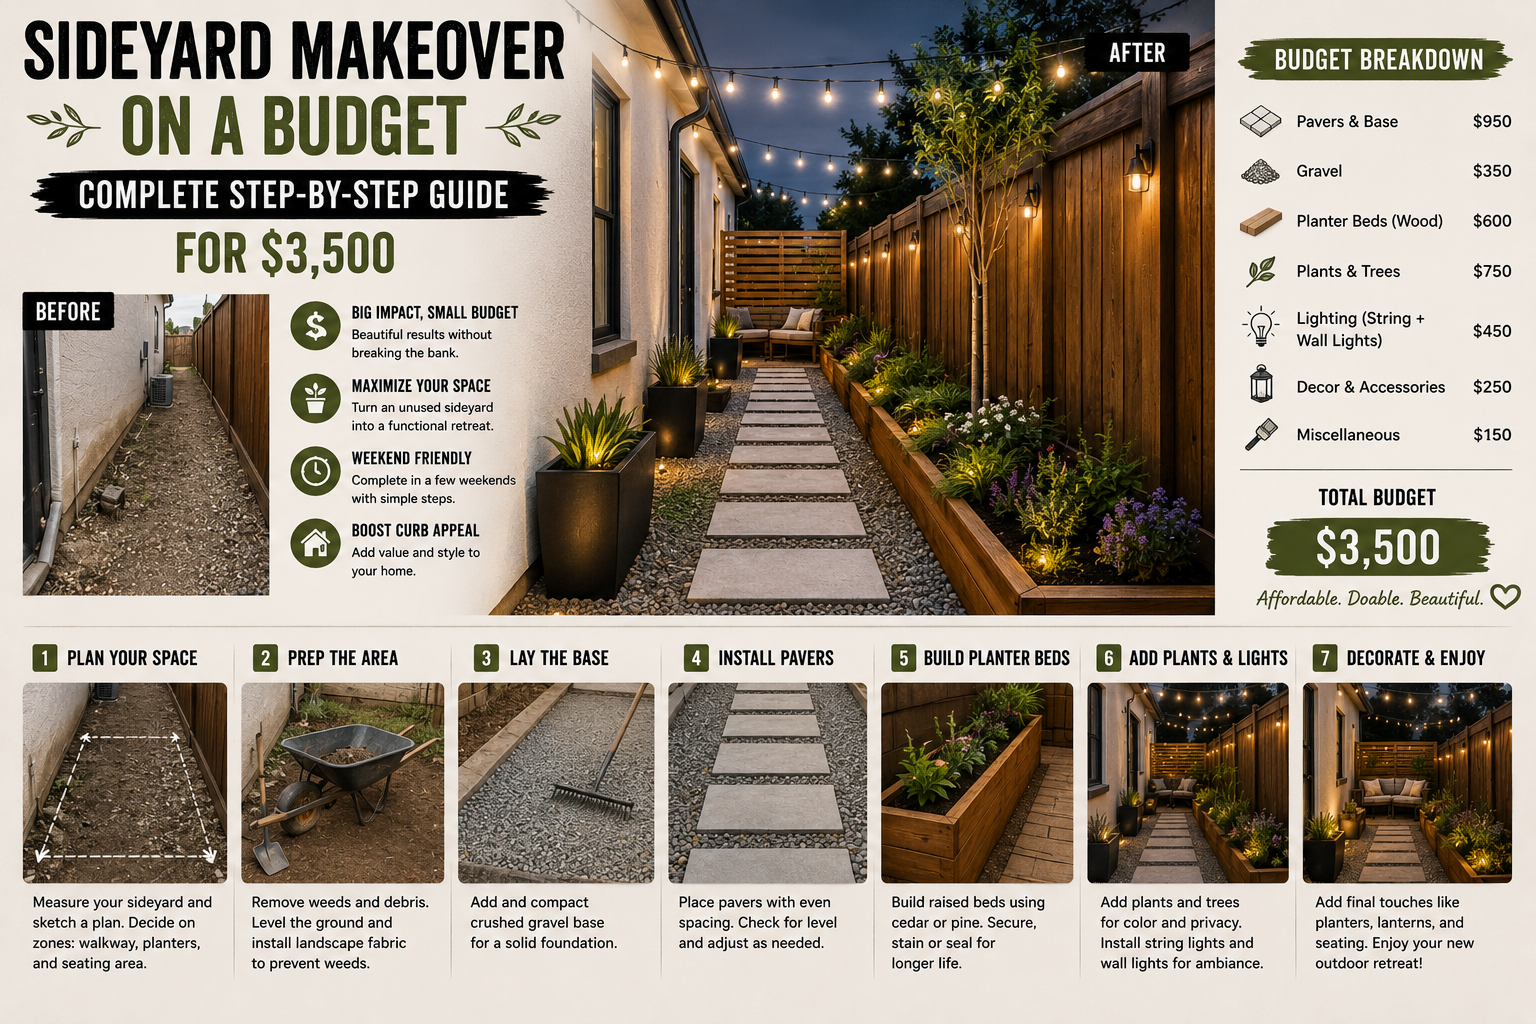
If your sideyard looks like a forgotten strip of dirt and weeds, I completely get it — mine was an eyesore for way too long. I finally decided enough was enough and tackled a full sideyard makeover on a budget, and I’m here to walk you through every single step I took to turn that neglected space into something I’m actually proud of. The original plan was to stay under $3,500, and while I came in just slightly over at $3,729, I added extras I hadn’t originally planned for — including sod, plants, and underglow LEDs — so I consider that a win.
This project covers everything: tilling and grading the ground, building retaining walls, installing a paver pathway, setting up a French drain, adding LED lighting, and finishing it all off with landscaping. It’s a big undertaking, but I broke it down into manageable phases so you can tackle each part at your own pace. Whether you want to do the whole thing or just pick out the parts that apply to your yard, there’s plenty here to work with. If you’re looking for more ways to stretch your renovation dollars, check out my guide on budget home improvement DIY ideas that save thousands for even more inspiration.
I’m going to share every material cost, every tool I used, and every lesson I learned along the way. Let’s get into it.
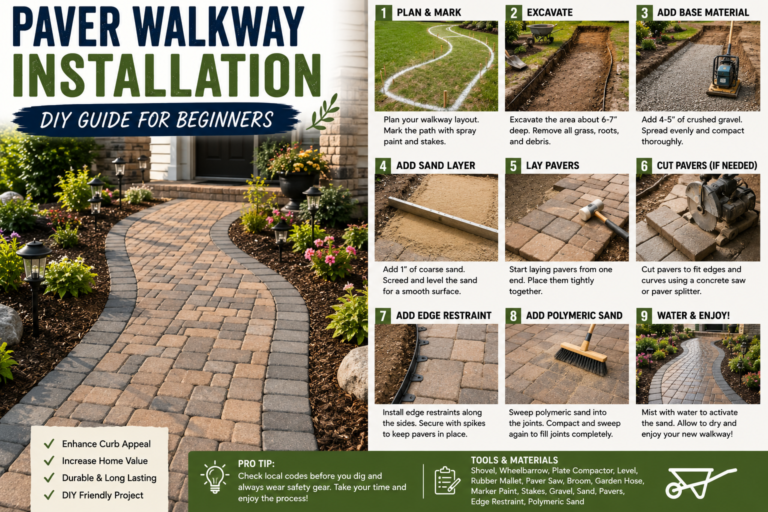
Step 1: Renting a Tiller to Break Up the Ground
Before I could do anything else, I needed to deal with the dirt. The ground in my sideyard was hard-packed and uneven, which would have made every subsequent step a nightmare if I didn’t loosen it up first. I rented a tiller from a local equipment rental place for $70 for 24 hours, which immediately brought my remaining budget down to $3,430. That rental fee was 100% worth it — trying to break up compacted dirt by hand with a shovel would have taken forever and worn me out before the real work even started.
Once the tiller did its job, I went back over the entire area with a hand tamper to compress the loosened dirt back down into a firm base. This is a critical step that a lot of people skip — you need that ground solid before you start building walls or laying anything on top of it. Don’t rush this part.
Step 2: Building the First Retaining Wall with Paver Bases
With the ground prepped, it was time to start building the first retaining wall. I used paver base blocks picked up from Lowe’s, cutting them to size with a utility knife where needed. Before setting the blocks, I spread a layer of sand along the base and leveled it out as best I could, then placed the paver base directly on top. The paver bases ran about $13 each, and I needed 45 of them for this build — a total of $585. Yes, that feels like a lot for one element, but these bases save you from needing massive amounts of leveling sand, so the cost largely washes out.
Once the first row of blocks was in place, I picked up some construction adhesive to glue down the second row. This step is non-negotiable if you want the wall to stay together long-term — without adhesive, those upper rows will eventually shift and separate. I kept checking for level as I went and repeated the process row by row until the wall was completely built out. Take your time here, because a crooked wall is very hard to fix once the adhesive sets.
Step 3: Renting an Automatic Tamper for Pathway Prep
After the first wall was done, I tilled the entire pathway area one more time to loosen things up for proper grading, then returned the tiller and rented an automatic tamper to really pack the dirt down solidly. The automatic tamper rental cost me $85, bringing the running total spent down to $2,760 remaining. Hand tamping is fine for smaller areas, but for a full pathway, the mechanical tamper saved me hours of work and produced a much more consistent result.
Once the tamping was done, I used a 2×4 to screed off any high spots across the pathway. Getting this surface flat and consistent is what makes the difference between a pathway that looks professional and one that looks lumpy and amateur. Before bringing in leveling sand, I also laid down landscaping fabric — also called weed barrier — across the entire area. This keeps the sand from washing away over time, which is a problem that will absolutely come back to haunt you if you skip it.
Step 4: Screeding Sand with PVC Pipes for a Perfectly Level Base
Here’s a technique I’ve seen work really well and used myself on this project: instead of trying to eyeball a flat sand surface, I laid down sections of PVC pipe as screed guides and dragged a 2×4 across the tops of them. This gives you a perfectly consistent sand depth across the entire surface without needing any fancy equipment. I made sure to pitch the PVC sections slightly downhill so that water would naturally flow away from the house — I was planning to install a drain, and I needed the water to move toward it rather than pooling.
Once the sand was screeded flat, I carefully laid the paver bases down on top without disturbing the surface. Then it was time for the main event — actually installing the pavers. These ran $6 each, and I needed 88 of them for a total of $528, leaving $2,232 in the budget to work with. Lay each paver carefully and check for consistency as you go — small gaps and slight unevenness at this stage add up quickly across a long pathway.
Step 5: Building the Second Retaining Wall
Before I could continue laying pavers, I needed to build a second wall to hold the sand in place on the other side of the pathway. Without this wall, the sand base would eventually wash out from the edges and the whole pathway would start to sink and shift. I dug down along a string line to keep everything straight, then used a metal rake to prep the surface before going back over it with the hand tamper to compress it solid.
The total cost for all the blocks needed to build both walls came out to $700 plus a $20 delivery fee from Lowe’s, bringing the remaining budget down to $1,510. I also want to mention the Kobalt wagon I picked up during this phase — I originally went to buy a standard wheelbarrow but found they were running close to $200 anyway, so I went with the wagon instead since it can hold up to 1,500 lbs and is easier to maneuver. I didn’t count it in the project budget since it’s a tool I’ll reuse for years.
Step 6: Relocating the Flower Bed to Install the French Drain
Here’s where things got complicated. I needed to install a French drain along the pathway, but there was an existing raised flower bed sitting right where the drain needed to go. That meant I had to relocate the entire flower bed before I could proceed. I spent several hours moving wagon load after wagon load of dirt from the old bed to the new flower bed location, which ended up working out well since the soil still had fertilizer in it — saved me a trip to the hardware store and a couple hundred dollars in fresh soil.
There was also a fence line that needed to be addressed: I had to line it with cinder blocks to keep the dirt from pressing directly against the fence and causing it to rot or warp over time. It felt like a spiral of dependencies — the drain required moving the flower bed, which required dealing with the excess dirt, which required the cinder blocks to be in place first. My advice: map out all these dependencies before you start so you’re not caught off guard mid-project like I was.
Step 7: Finishing the Paver Pathway and Adding a Step
With the French drain location cleared out, I was able to get back to finishing the paver pathway. One of the goals was to connect this new pathway to an existing patio, which required turning the pathway at an angle. Because the yard slopes significantly at the connection point, I also had to add a step where the two pathways meet — this keeps everything safe to walk on and gives it a really clean, intentional look.
I made sure to slope the entire pathway downhill throughout for proper drainage, then continued laying pavers using the same sand-bed and screeding process as before. The last two pavers needed to be cut down to fit, and a few other blocks needed to be cut in half to cap off the walls. A neighbor helped out with the cuts, which I was grateful for. Once everything was trimmed and fitted, I glued the final pieces in place with construction adhesive and glued on the end caps to finish the walls cleanly.
Step 8: Installing the French Drain and Drainage Hole
With the pathway done, drainage was the next priority. The tricky part: I needed somewhere for the water to actually go. My solution was to dig a large hole nearby that would act as a dry well — the water from the drain would travel down the pipe and into this hole, where it would slowly percolate into the surrounding soil. I used PVC glue to attach 2-inch PVC pipe to the French drain outlet, set the pipe into the hole, and backfilled around the base to hold it in position.
I then filled the hole with approximately 2,000 lbs of rock — this allows the water to drain into the hole without the surrounding soil immediately clogging up the system. The rock fill cost $60, and the French drain components plus PVC came to another $110, leaving $1,170 in the budget. Once the hole was filled with rock, I covered the whole thing with dirt so it’s completely invisible — you’d never know it’s there.
Step 9: Pouring a Concrete Border Around the Pavers
One of the finishing touches that makes a paver pathway look truly polished is a concrete border. I built forms using 2x4s, made sure they were level, then mixed up Quikrete to fill them in. The concrete border serves two important purposes: it locks the pavers in place so the sand underneath can’t wash out from the edges, and it also secures the French drain so it won’t shift over time. I used a trowel to work the concrete as it set, coming back every few minutes to smooth it out as it hardened.
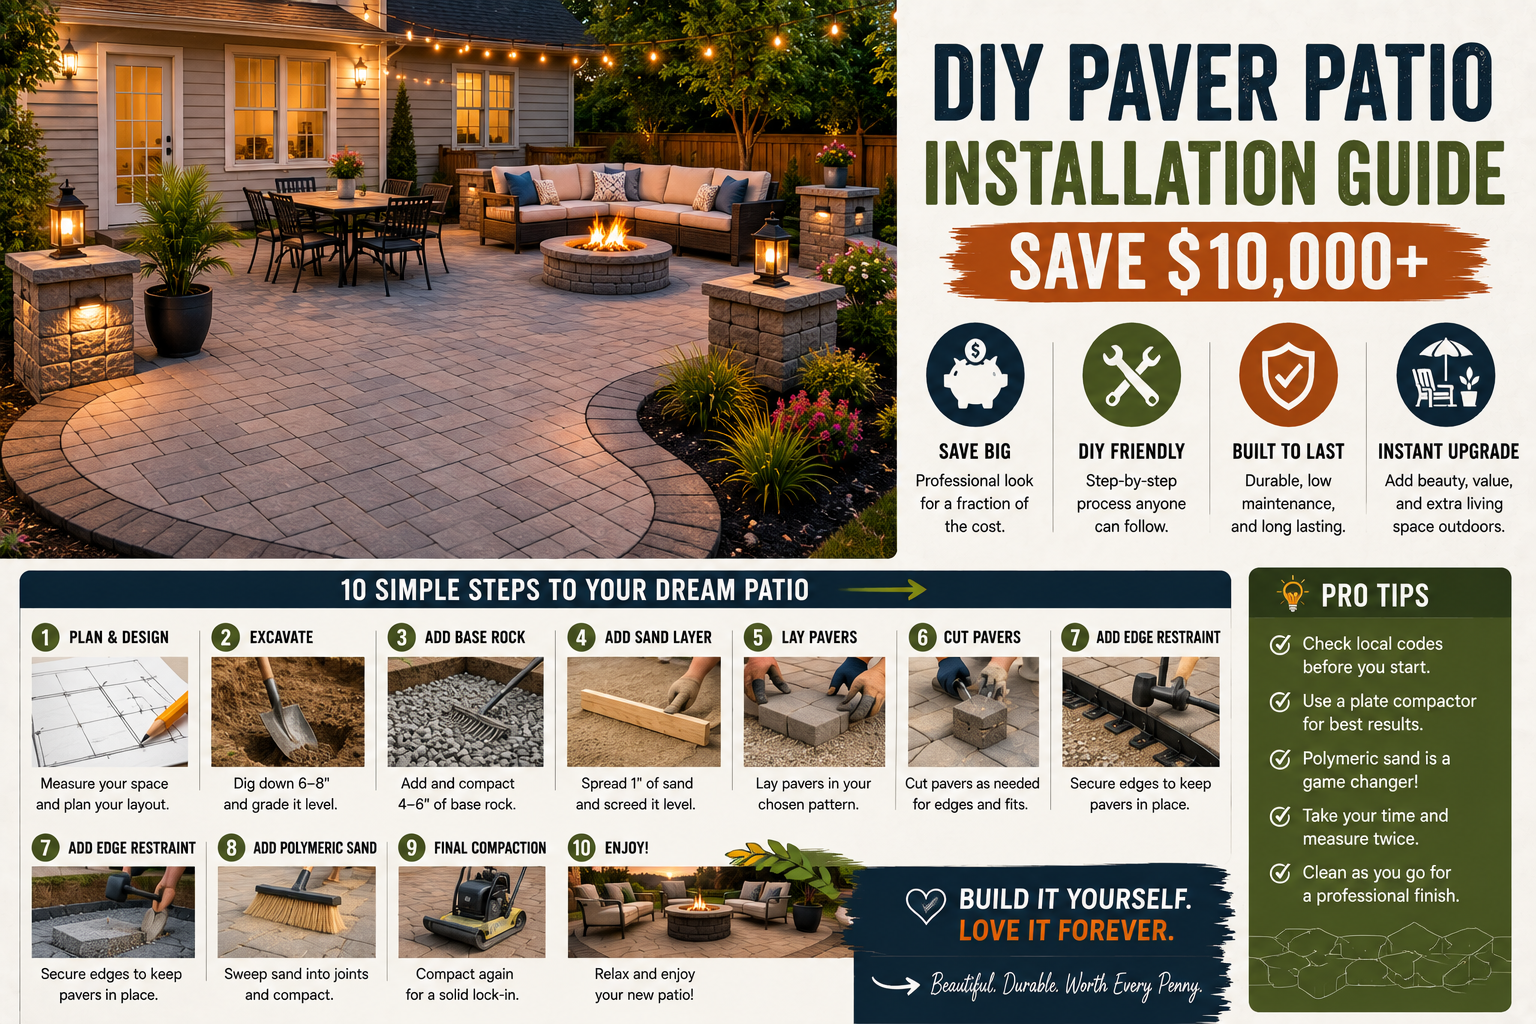
I ended up using 3 bags of concrete at 80 lbs each, which cost $25 total and left $1,145 in the budget. After letting it cure overnight, I pulled the forms off the next morning and was really happy with how clean and finished everything looked. The concrete border is one of those details that separates a DIY project that looks homemade from one that looks like it was professionally installed. For more ideas on getting that professional look with outdoor hardscaping, my DIY paver patio installation guide goes deep on technique.
Step 10: Installing LED Track Lighting for Underglow
This was honestly my favorite part of the whole build. I picked up LED tracks designed to mount onto the top of the wall blocks, creating a channel that holds the LED lights in place while allowing them to cast a subtle underglow effect down the side of the wall. I spread a bead of construction adhesive along the top of the wall, pressed the track into place, then added toppers — decorative caps that overhang the wall slightly so the LED channel sits perfectly underneath them.
The tracks cost $132, the LEDs were $70, and the toppers came to $397, leaving $546 in the budget. The LEDs themselves are 24-volt strips that come with a power converter so you can plug them into a standard 110V outlet — no electrician required. I slid heat shrink tubing onto the wire connections before crimping them, then used a heat gun to seal everything up and make the connections waterproof. The tracks also came with clear plastic clip-on covers that protect the LED strips from the elements. Once installed, the underglow effect at night is absolutely stunning — it completely transforms how the space feels after dark.
Step 11: Spray Painting Rebar and Reinforcing the Wall with Concrete
Before wrapping up the structural work, I reinforced the retaining wall with rebar and concrete. Since rebar is bare metal, I used spray paint to coat the sections that would be going into the ground — this helps slow down rust and extends the life of the rebar significantly. I then hammered the painted rebar down into the wall and filled the cavities with concrete to lock everything in place and prevent any shifting over time.
This step doesn’t cost much and doesn’t take long, but it’s the kind of structural detail that prevents expensive repairs down the road. A wall that shifts or leans after a few seasons of freeze-thaw cycles is a headache you really don’t want to deal with, and a little rebar and concrete upfront eliminates that risk entirely.
Step 12: Planting Bushes and Adding a Privacy Flower Bed
With all the hardscaping done, it was time to make the space actually feel like a yard. I picked up six large privacy bushes plus some additional plants to fill out the flower bed — the bushes were chosen specifically because they’d grow tall enough to provide a natural privacy screen along the sideyard. The bushes cost $360 and the additional plants ran another $80, leaving just $106 in the budget at this point.
When planting the bushes, I made sure to use the fertilizer-rich soil I’d relocated from the old flower bed earlier in the project. Not only did that save me money on fresh soil, but it gave the new plants a much better start than they’d have gotten in plain dirt. Space the bushes evenly and consider their mature spread when planting — they’ll look a little sparse at first, but giving them room to grow means you won’t have to dig them up and replant in a few years.
Step 13: Applying Polymeric Sand to Lock the Pavers in Place
Once the plants were in and the pavers were swept clean, I applied polymeric sand to fill all the joints between the pavers. This is a specially formulated sand that, when wet, activates a bonding agent inside it that essentially glues itself in place between the pavers. It prevents weeds from growing up through the joints and stops the sand base underneath from washing out — it’s a must-do step for any paver project.
I taped off the French drain first so no polymeric sand could get inside it and clog it up. After spreading the sand and working it into all the joints, I used the hand tamper to vibrate it down into every crack, then used a leaf blower on its lowest setting to blow off the excess without disturbing the filled joints. The final step was misting the entire surface with a garden hose set to mist, waiting about 5 minutes, then rinsing it one more time. After that, you just let it cure and it’s done.
Step 14: Adding Wall Toppers for a Finished Look
After stepping back and looking at the cinder block wall behind the plant bed, I wasn’t happy with how raw and unfinished it looked against all the nice work around it. The fix was simple: I picked up additional wall toppers — the same decorative cap pieces I used on the LED wall — and glued them along the top of the cinder block wall. Each one just needed a bead of construction adhesive and a few seconds of pressure to hold in place.
It’s a small detail, but it made a huge visual difference. The toppers unified the look of the two walls and made everything feel cohesive and intentional rather than thrown together. If you’re building any kind of block wall on a budget, don’t skip the cap pieces — they’re relatively inexpensive and they’re what make the wall look finished rather than like a construction site.
Step 15: Adding Black Mulch to the Flower Bed
The final landscaping touch was adding black mulch to the flower bed area. I used five bags of mulch spread across the bed, which took about an hour to complete. Black mulch is one of those incredibly affordable upgrades that makes a huge visual impact — it creates a sharp contrast against green plants and the light-colored pavers, and it also helps retain moisture in the soil and suppress weed growth.
This kind of finishing detail is exactly what separates a yard project that looks “done” from one that looks polished. The mulch also defines the edge of the flower bed cleanly, so even before the bushes fill in, the space already has a structured, intentional look. If you want more ideas for transforming your outdoor spaces on a tight budget, my roundup of 5 DIY outdoor curb appeal projects you can do this weekend has some great options that pair well with this kind of hardscaping work.
Step 16: Laying Sod to Complete the Graded Areas
The very last step was grading and sodding the remaining dirt areas around the pathway and flower bed. I used a metal rake to grade the ground so it was smooth and had a slight slope away from the house, then spread fresh topsoil over the area to give the sod roots something to grab onto. I then laid the sod pieces down, butting each section up tightly against the next to avoid gaps where weeds could sneak in.
Sod wasn’t in my original budget, but it was absolutely the right call. Raw dirt around a beautiful paver pathway and planted flower bed would have looked terrible, and seeding takes months to fill in properly. The sod instantly completed the look and made the whole project feel like a finished yard rather than a work in progress. It’s one of those splurges that I don’t regret at all.
Tips and Best Practices for a Sideyard Makeover on a Budget
After going through this entire project start to finish, here are the most important lessons I’d pass along to anyone taking on a similar sideyard makeover on a budget:
Map out your dependencies before you start. This project had a classic chain reaction: the drain required moving the flower bed, which required cinder blocks along the fence first. Knowing that sequence upfront would have saved me a lot of back-and-forth.
Rent equipment for one-time heavy tasks. The tiller and automatic tamper together cost me $155 in rentals but saved hours of physical labor and produced better results than I could have managed by hand. Equipment rental is almost always worth it for large earthmoving jobs.
Don’t skip the weed barrier. Laying landscaping fabric before your sand costs almost nothing and prevents years of headaches with sand washing away and weeds pushing through.
Use construction adhesive on every block row. It’s tempting to skip it on the middle rows, but the adhesive is what keeps your wall from separating over time, especially through freeze-thaw cycles in colder climates.
Pitch everything away from the house. Every surface — the sand bed, the pathway, the graded soil — should slope slightly away from your foundation. Water management is the most important structural consideration in any outdoor project.
Polymeric sand is non-negotiable for pavers. Regular sand will wash out over time. Polymeric sand locks in place when activated and dramatically extends the life of your paver installation.
Finishing details make or break the look. The wall toppers, black mulch, and sod cost a fraction of the total budget but account for a huge percentage of the visual impact. Always budget for finishing materials.
Frequently Asked Questions
How much does a sideyard makeover on a budget realistically cost?
My project came in at $3,729, which included pavers, retaining walls, a French drain system, LED lighting, plants, and sod. You can do a scaled-down version for significantly less if you skip the lighting or limit the wall-building — a simple paver pathway with weed barrier and mulch can be done for under $1,000 depending on the size of your space.
Do I need to hire a contractor for a sideyard makeover?
For the scope of work I tackled here — paver installation, retaining walls, basic drainage, and landscaping — a homeowner with basic DIY skills can absolutely handle this without a contractor. The most important things are renting the right equipment (tiller, tamper) and taking your time with leveling and grading. None of the individual steps are particularly complicated; it’s just a lot of them.
What type of pavers work best for a sideyard pathway?
For a sideyard, I’d recommend standard concrete pavers in the 12×12 or 16×16 inch range. They’re affordable (I paid $6 each), easy to cut, and durable enough to handle foot traffic and the elements. Make sure to lay them on a compacted sand base with landscaping fabric underneath and finish with polymeric sand in the joints.
How do I handle drainage in a sideyard makeover?
Drainage is honestly the most important part of this kind of project. I handled it in two ways: pitching every surface to slope away from the house, and installing a French drain connected to a rock-filled dry well. The French drain collects water that pools in the low spot and routes it to the dry well where it can percolate into the soil. This system works well for most residential sideyards and doesn’t require any permits or utility hookups.
Final Thoughts
This sideyard makeover was one of the most satisfying projects I’ve taken on. What started as an overgrown, uneven strip of dirt is now a clean, functional, and honestly beautiful outdoor space — complete with a paver pathway, retaining walls, proper drainage, underglow LED lighting, and a privacy planting bed. Coming in at $3,729 against a $3,500 budget is something I’m proud of, especially given how much we added to the original plan.
The key to making a project like this work on a budget is doing your own labor, renting equipment instead of buying it, and being resourceful with materials — like reusing fertilized soil from the old flower bed instead of buying new. Every dollar you save on materials and equipment is a dollar you can put toward finishing details that elevate the whole look. If this project inspired you, drop a comment below and let me know which part you’re planning to tackle first — I’d love to hear how your sideyard turns out.