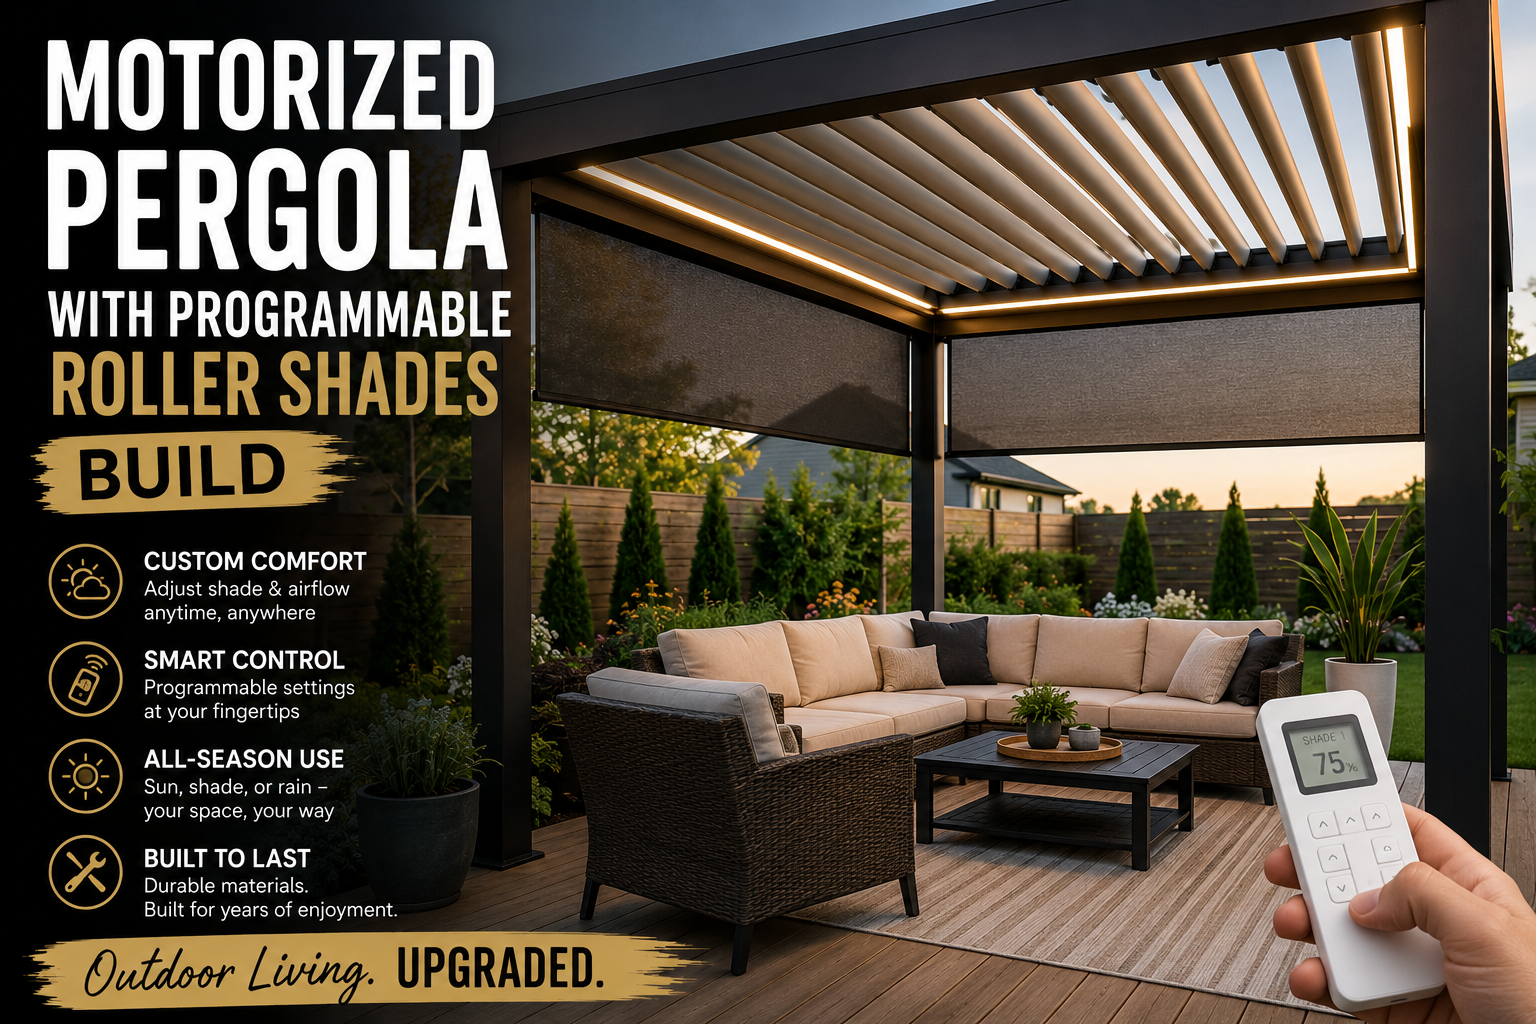
I’ve been dreaming about transforming my back deck for a while now, and this project absolutely delivered. I built a fully motorized pergola with programmable roller shades — and honestly, it might be the coolest thing I’ve ever added to my home. We’re talking smart louvers, built-in LED gutters, windproof motorized roller shades, and an app-controlled system that ties it all together. If you’ve been eyeing a pergola upgrade, I think this one is going to blow your mind.
This build uses the Smart Wings Flexar Smart Pergola system — the build quality is exceptional, everything is heavy-duty metal construction, well-packaged and clearly labeled. Whether you’re a seasoned DIYer or tackling your first big outdoor project, this system is approachable.
In this post, I’m walking you through every single step of my build: from pouring concrete footings under the deck, to assembling the pergola frame, installing the smart louvers, hanging motorized roller shades, wiring the LED gutters, and powering the whole thing up. Let’s get into it — this is one of those projects that’s genuinely worth the effort. And if you’re looking for more ways to level up your outdoor space, check out my post on DIY backyard patio and fireplace builds that save thousands.
Step 1: Deck Prep — Removing Boards and Pouring Concrete Footings
Before any pergola assembly could happen, I needed to prep my back deck with proper concrete footings. The pergola posts need a solid foundation, and just sitting them on deck boards alone wasn’t going to cut it. I started by removing the deck boards in the spots where the pergola feet would land. I had installed those boards using a hidden screw jig that angles screws in from the edge, so pulling them up was fairly straightforward.
Once the boards were out, I built simple forms to pour the footings into and added a little extra 2×4 and 1×4 blocking to help close off the forms. I wrapped some tape around the edges to seal everything before mixing my concrete. I went with a slightly drier mix on purpose — if it’s too wet, it runs right through any gaps in your formwork. After spraying down the dirt underneath, I shoveled the concrete in and really worked it into the corners.
I also cut some rebar with my angle grinder and wiggled the pieces halfway into each pour to help prevent cracking and flexing over time. Then I screeded everything flat with the surrounding joists. On the footing closest to the house, I used spray foam to make sure the concrete wasn’t putting pressure on the foundation. One important note: I’m in Southern California’s Joshua Tree Desert, so I don’t have to worry about a frost line. If you’re in a colder climate, make sure you bury your footings below the frost line so they don’t shift with the seasons.
Step 2: Finishing the Footings — Troweling and Edging
After each pour, I waited about 30 minutes before coming back with a trowel and an edge trowel to address the corners and smooth everything out. This step made a real difference in the final look and function. The footings came out clean, flush with the joists, and perfectly ready for the deck boards to screw right back down on top.
The beauty of this setup is that the pergola posts sit on top of the deck boards, but they’re actually supported by those concrete footings underneath. That means the load is transferred straight to solid ground, not just resting on wood. I’d come back the next day to clean everything up before moving into assembly mode.
Step 3: Unboxing and Assembling the Smart Wings Flexar Pergola Frame
Assembly day was exciting. When I opened up the Smart Wings Flexar Pergola kit, I was immediately impressed by the packaging. Every piece had multiple layers of plastic protection, and each component had a sticker with a letter on it corresponding to the instruction manual. That made it really easy to figure out what was what right from the start.
I started by grabbing two vertical columns and connecting them to a horizontal support beam. The screws I needed were already in the bracket — I just removed them, slid the pieces together, and tightened everything down at a perfect 90 degrees. The metal construction on this system is seriously heavy duty. After completing the first 10-foot wide section, I set it aside and built the second section the same way, this time using an impact driver to speed things up significantly.
After that, I attached the mounting brackets to the bottom of the posts. My buddy Shane helped me move these sections into position before we slid in the long 13-foot support beam. The way these pieces slide together and lock in place is really satisfying — it’s engineered well. This is definitely a two-person job at certain points, but no individual step felt overly complicated or frustrating.
Step 4: Positioning the Pergola and Installing Corner Brackets
Once all the major sections were connected, Shane and I shimmied the pergola into its final position on the deck. I made sure everything was sitting plumb and that the opening at the top measured the same as at the bottom — getting this right before anchoring is important. A little patience here saves a lot of headache later.
With the pergola square and level, I added a support bracket to each corner. I also added rubber gutter protectors at each bracket location — these protect the gutters that were about to go in. And yes, the gutters on this system have built-in LEDs. I’ll get to that, but just know that it’s as cool as it sounds.
Step 5: Installing the LED Gutters and the Matter Smart Controller
The gutters on the Smart Wings Flexar system have a French cleat on the back, which lets them snap into place directly on the support beams. It’s a clean, tool-friendly install. Before sliding the front 13-foot gutter into place, I slid in the linear actuator — this is the motor that controls and moves the louvers, so it needs to be inside the gutter before installation.
Next up was the Matter smart controller, which is the brain of the whole system. The lights, louvers, and roller shades all plug into this controller, and it makes everything programmable and wirelessly controllable from your phone. It tucks up hidden inside the gutter, which keeps the look clean and modern. The system uses waterproof twist-to-connect connectors throughout, so you don’t have to worry about moisture getting into any of the wiring.
I connected all the LED gutters together at this stage, ran the long cable from the controller to the linear actuator, and prepped the connection points where the roller shades would eventually tie in. Then I ran the main power cable down one of the legs to where it would connect to the voltage regulator and power supply. Those drainage holes in the legs double as cable management paths — a really smart design detail.
Step 6: Installing the Motorized Smart Louvers
With the gutters in place, it was time to install the louvers — and this is where the pergola really starts looking like something special. The first louver I installed is called the “drive louver,” and it connects directly to the linear actuator inside the gutter. This is the one that pushes and pulls to rotate all the other louvers in unison.
There’s also a center slat that functions as a structural support brace, screwing in to keep the top of the pergola square. Outside of those two special pieces, all the remaining louvers just slip and slide right into place. One thing to pay attention to: there is a correct up and down orientation to each louver. Getting this right ensures that water drains properly into the gutters when the louvers are in the closed position.
Once all the louvers were in, I installed a metal flat bar across the top of all of them to connect them together. I tightened the nuts by hand first to get everything aligned, then went back with a drill to fully secure them. The bar is tight but still allows the louvers to all pivot together as one — it’s a well-engineered detail that makes the system feel solid and reliable.
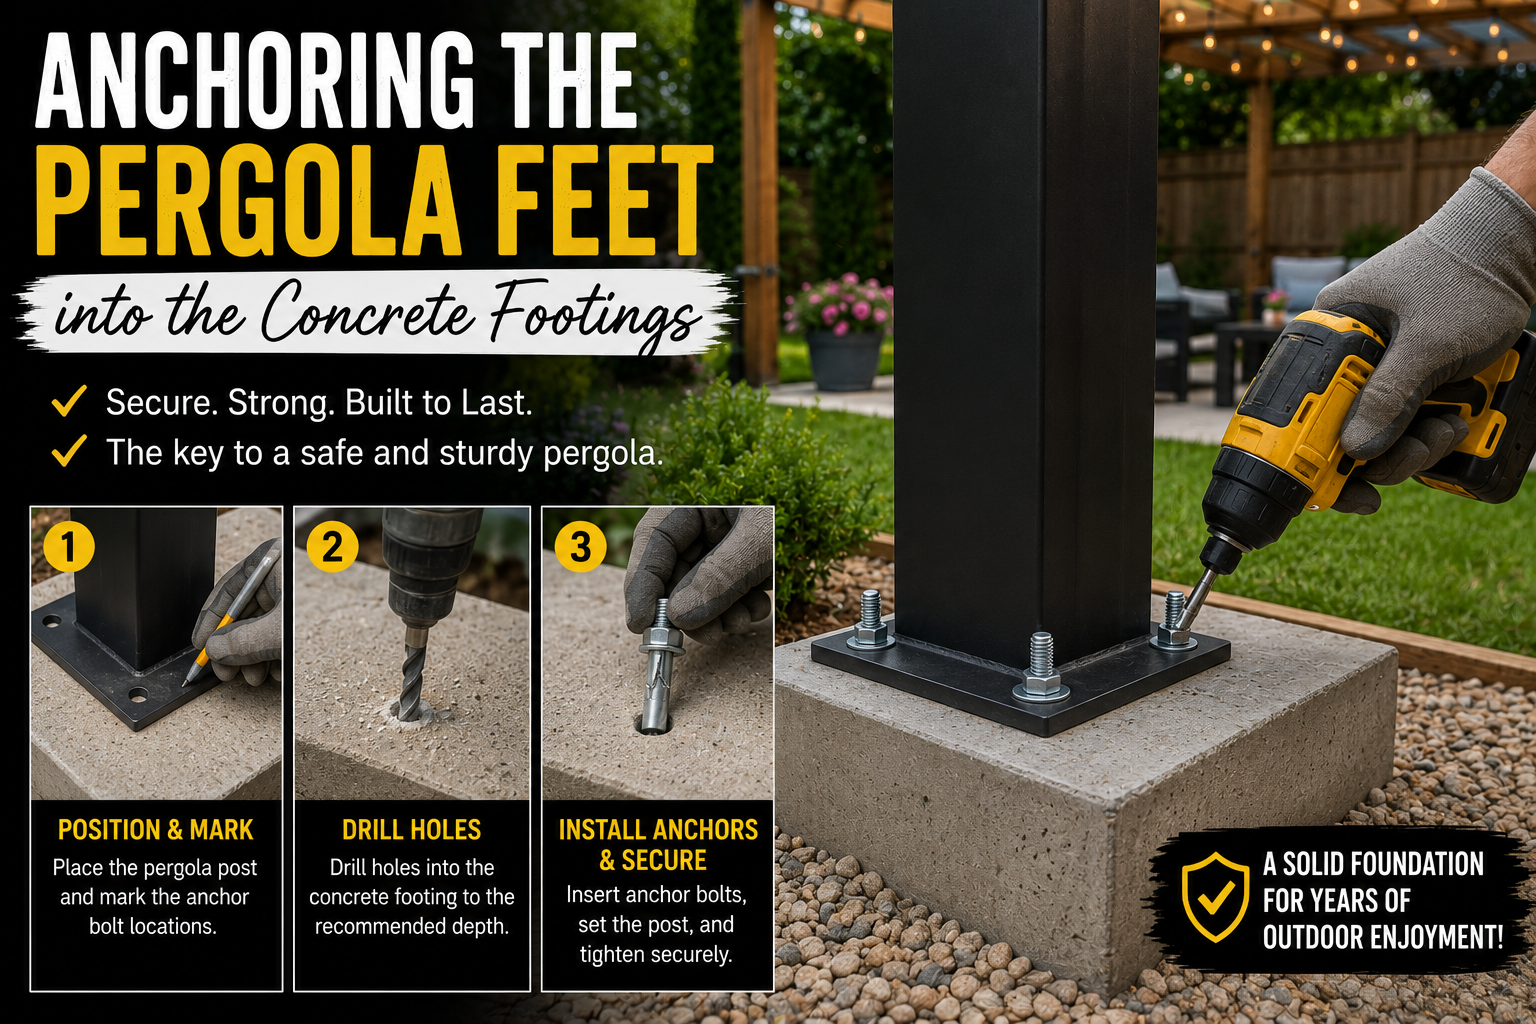
Step 7: Anchoring the Pergola Feet into the Concrete Footings
With the louvers installed, I turned my attention to anchoring the pergola feet down permanently. I used a masonry drill bit to drill through the wood decking and into the concrete footings beneath. Then I dropped in a concrete anchor and tightened it down. The anchors came included with the Smart Wings Flexar kit, and they worked great.
My one tip here: make sure the pre-drilled hole is as clear of dust as possible before inserting the anchor. Concrete dust packed in the bottom of the hole can prevent the anchor from seating fully, which reduces its holding strength. A quick puff of air or a tap to clear it out makes a difference. Once anchored, the pergola felt rock solid — even with a pretty good wind picking up that afternoon.
Step 8: Installing the Windproof Motorized Roller Shades
This is the part I was most personally excited about, and it absolutely did not disappoint. The motorized roller shades from Smart Wings are windproof, which is a big deal for my location in the Joshua Tree Desert where gusts can come out of nowhere. Assembly was easy — I just attached the vertical rails to the roller shade unit itself.
Shane and I lifted each shade into position, pre-drilled holes, and screwed the vertical rails into the pergola legs at the top, middle, and bottom. Once that was done, I paired each shade to the remote control by holding down the pairing button for a couple of seconds on both the shade motor and the remote. Simple and fast. Then I added an inner track to each vertical rail before finishing everything off with trim pieces for a clean, polished look.
These roller shades are going to be a total game changer for summer use. Blocking out the desert sun makes the outdoor space dramatically more comfortable, and having motorized control means I don’t have to manually adjust anything. Smart Wings is genuinely excellent at roller shades — I’ve collaborated with them on a previous project involving interior shades, and the outdoor version lives up to the same standard. For more ways to make outdoor spaces more livable, I’ve got a great post on 5 DIY outdoor curb appeal projects you can do this weekend.
Step 9: Installing an Outdoor Electrical Outlet for the Pergola
Every smart pergola needs power, and I wanted something cleaner than just running an extension cord across the deck. As an in-between solution, I found a mountable outdoor electrical box on Amazon that has an outdoor-rated plug in a proper waterproof enclosure. The other end has a standard plug that I ran through the wall to connect to an existing interior outlet just on the other side.
It’s not a permanent hardwired solution, but it’s clean, safe, and waterproof — and it meant I could power the pergola up right away without waiting on an electrician. Eventually I’d like to run a dedicated circuit out here, but for now, this works great and keeps everything tidy. With that done, the build was complete.
The Finished Smart Pergola — First Impressions
Stepping back and looking at the finished pergola for the first time was genuinely one of those moments that makes all the hard work worth it. The matte black finish is sharp and modern, and it ties in beautifully with the new windows I recently had installed on the house. Everything looks intentional and cohesive rather than just “a thing I added to the deck.”
The motorized louvers are impressive on video, but in person they’re even cooler. Using the helix dial remote to open and close them feels like the future. And once the sun started going down, the LED gutters lit up the entire back deck in a really warm, inviting way. The roller shades seal off the sides completely when closed, making the space feel like an actual outdoor room. I genuinely cannot get over how much this transformed the space. If you’re inspired to take on a big outdoor project, my post on building a picture frame floating deck with no concrete is another great starting point.
Tips and Best Practices for Building a Motorized Pergola With Programmable Roller Shades
Know your frost line. If you live in a climate with freezing winters, bury your concrete footings below the frost line. Footings that sit above frost depth will heave and move as the ground freezes and thaws, which can throw your entire structure out of alignment over time.
Use a slightly drier concrete mix for deck footings. A wetter mix runs through gaps in formwork. A drier mix stays put and is easier to control, especially when your form isn’t perfectly sealed.
Clear your anchor holes before inserting concrete anchors. Dust in the bottom of the hole prevents anchors from seating fully. Blow it out or tap the hole to clear it before dropping the anchor in.
Install the linear actuator before hanging the gutter. It has to go inside the gutter before installation — this is easy to miss if you’re not reading ahead in the instructions. Always read through the full manual before starting assembly.
Check louver orientation before locking them in. There’s a correct up and down to each louver for proper water drainage. Installing them backwards means water won’t drain properly when they’re closed.
Use an impact driver for the pergola frame assembly. I used a regular drill on my first section and switched to an impact driver for the second. The impact driver was noticeably faster and easier on long fasteners.
Plan your power solution before you start building. Think about where your power source is and how you’ll run the cable down the pergola leg before you start assembly. It’s much easier to plan the cable route before everything is anchored in place.
Frequently Asked Questions
Do I need a permit to build a motorized pergola with programmable roller shades?
Permit requirements vary by city, county, and state, so there’s no universal answer. In many areas, freestanding pergolas under a certain size don’t require a permit, but adding electrical work often triggers a separate requirement. I’d recommend checking with your local building department before starting — it’s a quick call and saves potential headaches later.
How difficult is it to build the Smart Wings Flexar Pergola as a DIYer?
It’s genuinely manageable for a motivated DIYer. The pieces are clearly labeled, the instructions are logical, and nothing requires specialized skills beyond basic comfort with tools. The biggest physical challenge is handling the 13-foot beams, so having a second person available for those steps is important. I’d rate it a moderate DIY project overall.
Can the motorized louvers and roller shades be controlled from a phone?
Yes — that’s one of the best features of the system. The Matter smart controller connects everything to your home network, and you can control the louvers, roller shades, and LED lighting from your smartphone. You can also set schedules and automation, which is why I describe it as a programmable system rather than just motorized.
What’s the best way to anchor a pergola to an existing deck?
The most reliable method — and what I used — is to pour concrete footings beneath the deck boards and use concrete anchors to attach the pergola posts through the decking and into the footing below. This keeps the load off the deck boards themselves and ensures the pergola is secured to solid ground. Make sure the footings are level and flush with the joists before your deck boards go back down.
Wrapping It Up
Building this motorized pergola with programmable roller shades has been one of the most rewarding outdoor projects I’ve taken on, and the results speak for themselves. From pouring concrete footings to snapping in LED gutters to pairing motorized roller shades to a remote — every step of this build added something functional and beautiful to my back deck. This space went from a plain wood deck to a smart, comfortable outdoor room that I can use year-round.
If you’re thinking about a similar build, I’d strongly encourage you to go for it. The Smart Wings Flexar system makes it approachable, and the payoff in terms of livability and curb appeal is massive. Drop a comment below and let me know what you think of the finished pergola — and if you’re working on your own outdoor space, I’d love to hear about it. Also check out my post on budget home improvement DIY ideas that save thousands for more inspiration. Happy building!