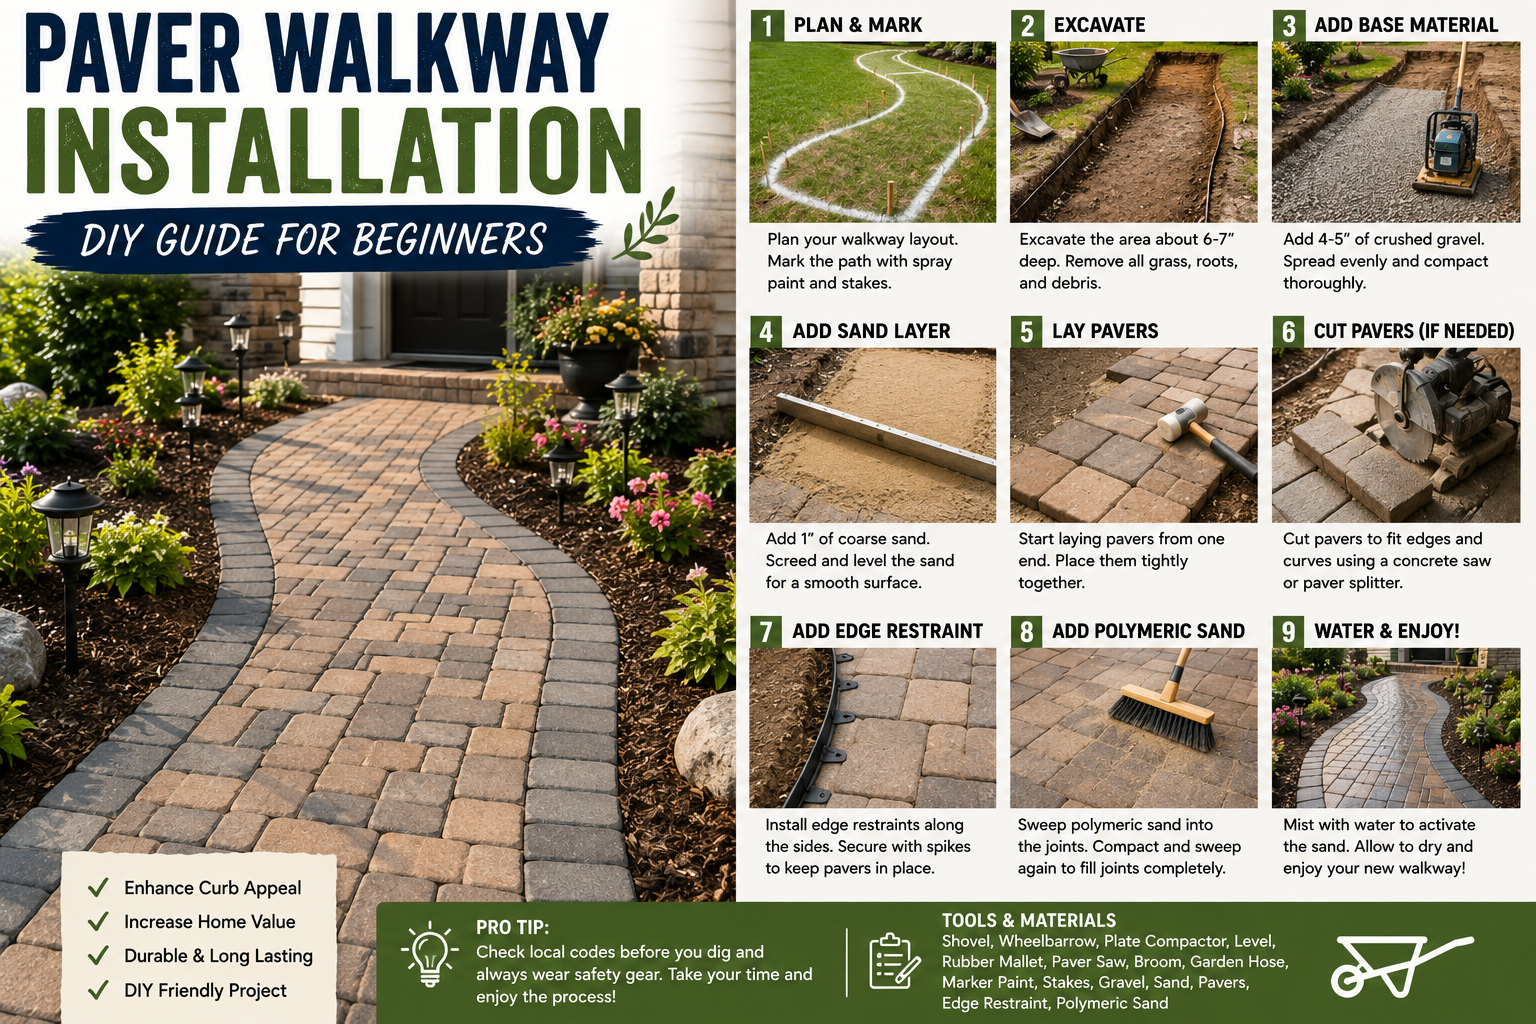
If you’ve been thinking about adding a paver walkway to your yard but aren’t sure where to start, I’m here to tell you — this is one of the most satisfying DIY projects you can tackle as a homeowner. I recently installed a brand-new paver walkway alongside a deck I built for my parents’ home, and the transformation was incredible. The area had random pavers, planters thrown everywhere, and it just looked messy. Once I cleaned it up and laid a proper walkway, it looked completely polished and intentional.
In this paver walkway installation DIY guide, I’m walking you through every single step I took — from marking the layout and digging out the ground, to laying the base, screeding the sand, and placing the final pavers and pebbles. This is beginner-friendly, I promise. You don’t need fancy equipment or a big crew. You just need patience, the right tools, and a plan. Let’s get into it.
If you enjoy outdoor DIY projects like this one, you might also want to check out my guide on DIY paver patio installation where I saved over $10,000 — a lot of the same principles apply and it’s a great companion read.
Step 1: Remove the Old Pavers and Clean Up the Area
The first thing I did was remove all the existing pavers and planters that were scattered around the deck. My parents had just placed loose pavers along the side with no real plan, and over time plants and clutter had taken over. Before I could install anything new, I needed a clean slate.
This step doesn’t take long, but it’s important because you need to see exactly what you’re working with before you start measuring. Once everything was cleared, I could actually assess the ground, identify problem spots, and plan the layout properly. Don’t skip this — starting with a messy base will cause headaches later.
Step 2: Measure and Mark Your Layout
For this walkway, I decided to keep the pavers 20 inches away from the deck. I marked that measurement on both sides using steel pegs, then ran a piece of string between them to create a straight guide line. Once the string was set, I used spray paint to mark directly along the string on the ground — that way I could remove the string and still follow the line perfectly.
I didn’t have fluorescent paint on hand, so I used black spray paint, and honestly it worked just fine. The point is just to get that guide line on the ground so you have something permanent to work from. Use a tape measure and double-check your measurements on both sides before you spray — you want everything even from end to end. I’m using 11.5 x 11.5 inch square pavers, so keeping my spacing consistent from the start made the rest of the project much smoother.
Step 3: Dig Out the Ground to the Right Depth
This is honestly the hardest part of the whole project — and I won’t sugarcoat it. Digging is labor-intensive, especially if your ground is packed with rocks like mine was. I was really thankful it had rained the night before because it softened things up considerably. My parents actually helped me out here, and I’d strongly suggest getting extra hands if you can. The more help you have, the faster it goes.
My target depth was four inches. I used a spade shovel — specifically one with a nice flat, square edge — because it gives you straighter, cleaner cuts along your edges. After loosening the dirt, I used a bow rake to scoop out the excess. It’s okay if one side is four inches and another side ends up five — you’ll level everything out with your base material later. Just focus on clearing out the dirt and rocks consistently.
Step 4: Tamp Down the Ground
Once the dirt was dug out, I used an 8×8 weighted tamper to flatten and compact the ground. My dad handled a lot of the tamping while I kept raking and cleaning the edges. This step is really important because a well-compacted base means your pavers won’t shift or sink unevenly over time.
If you’re working on a larger area, I’d highly recommend renting a plate compactor from Home Depot or Lowe’s — it’s much faster and does a better job on bigger surfaces. For my project, the hand tamper was plenty. I also used a transfer shovel to help flatten out uneven spots as I worked. Take your time with this step — it pays off in the end.
Step 5: Lay Down Landscaping Fabric (Weed Mat)
Before laying any base material, I put down a weed mat — and I can’t stress enough how much I recommend doing this. If you skip it, weeds will push up through your rocks and you’ll be pulling them constantly for years. Laying landscaping fabric now saves you a massive amount of future cleanup time.
One thing I’ll warn you about: when you buy it rolled up, it can be stubborn to straighten out. I used a large snail stake to punch the initial hole in the hard ground before driving my metal pegs in — if you try to peg it straight into rocky soil without a pilot hole, the pegs will just bend. Work along the full line, keep the fabric taut, and trim any excess with a utility knife or simply fold it under. Either way works fine.
Step 6: Install the Edging Material
Right alongside the weed mat, I installed Edging Material to give the walkway clean, defined borders. This is what keeps your pebbles and base material from spilling out to the sides over time, and it gives the whole project a polished, professional look. Without it, the edges will gradually erode and look messy.
I used a metal edging tool to help press the edging into position. Since it comes rolled, it wants to curl back on itself — pegging it down firmly along the entire length is key. I’ll straighten it out more completely once I start placing the rocks, but getting it anchored early keeps it in position as I work through the rest of the steps.
Step 7: Lay Down the Paver Base
Now we’re getting into the real build. I picked up paver base in bags from Home Depot — I used about eight bags total for my project, which was just the right amount. You can also buy it in bulk truckloads, which is more cost-effective for larger areas. For a small project like mine, the bags were the more practical choice.
Once I dumped the paver base down, I spread it evenly across the entire surface with my bow rake. My goal was about one inch of paver base on top of the compacted soil, bringing me to roughly four inches total depth once everything was stacked up. To spread it more easily, I flipped the bow rake over and used the flat back side — it distributes the material much more smoothly than the tine side. After spreading, I went back over everything with my tamper to compact the base down solid.
Step 8: Spread and Screed the Paver Sand
Paver sand is what takes your base from “good enough” to perfectly level. It fills in every little high and low spot and gives your pavers a smooth, even bed to sit on. I used fewer bags of paver sand than paver base — just enough to create a thin, even layer over the entire surface.
Since I didn’t have a screed bar on hand, I made one out of a 2×4 and used two PVC pipes as guides. I laid the pipes parallel to each other across the area, dumped the sand between them, and dragged the 2×4 across the top of both pipes — that’s screeding. It creates a perfectly flat surface at a consistent depth. After removing the pipes, I tamped down the small marks they left behind and the sand smoothed right out. Simple, effective, and free since I already had the materials.
Step 9: Measure and Pre-Plan Paver Spacing Before Installing
Before I placed a single paver permanently, I took time to measure out and pre-plan the spacing. I set the first paver four inches from the edge and spaced each subsequent paver five and five-eighths inches apart. I actually laid them all out loosely first just to simulate how everything would sit before committing to the install.
This step might feel like extra work, but it’s a real time-saver. If you just start placing pavers without pre-planning, you can end up with weird gaps or uneven spacing at the end. It also helps you catch any layout issues before the pavers are set. A tape measure is your best friend here. Alternatively, you could run a string line across the full width and use that as your reference instead of measuring each paver individually — both methods work.
Step 10: Lay and Level Each Paver
Now comes the satisfying part — actually laying the pavers. I placed each one down carefully and checked it with a level. If a paver was sitting high or low, I either shook it gently to settle it into the sand or added a small amount of sand underneath and adjusted. A rubber mallet is ideal for tapping pavers into place — I didn’t have one on hand, so I used a 2×4 and a hammer, which worked well enough.
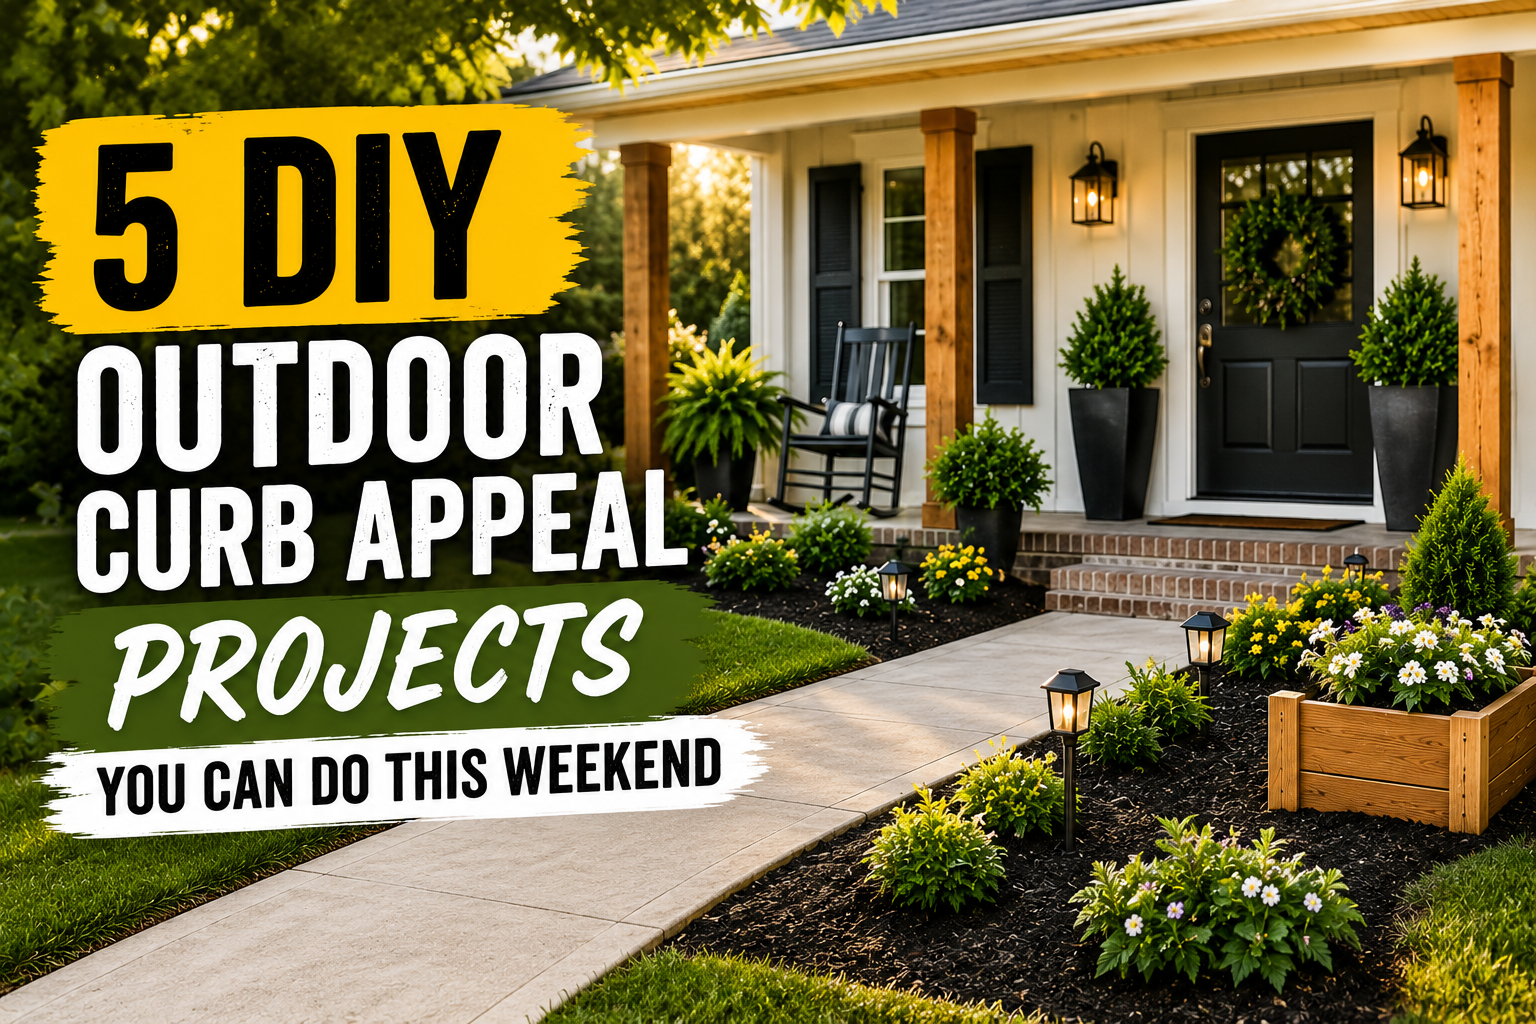
I worked one paver at a time since my PVC pipes weren’t long enough to screed the entire surface at once. That’s totally fine — just do what works with what you have. The important thing is checking level on every single paver as you go. Fixing a slightly unlevel paver mid-project takes two seconds. Fixing it after everything is done is a much bigger headache. This is a project I really enjoy — watching each paver settle into place perfectly is genuinely satisfying. For more outdoor projects that can boost your home’s curb appeal, check out my post on 5 DIY outdoor curb appeal projects you can do this weekend.
Step 11: Fill in the Gaps With Pond Pebbles
With all the pavers laid and leveled, the last step was filling in the surrounding spaces with pond pebbles. My parents specifically chose the color they wanted for their stones — I personally would have gone with white pebbles, but it’s their home so their call! Whatever color you choose, the process is the same: dump the pebbles into the gaps and spread them out evenly.
I used about six bags of pebbles to fill in the entire area around the pavers. This is genuinely the easiest part of the whole project. The pebbles nestle into the spaces naturally, and you just use your hands or a rake to distribute them evenly. The final look was clean, intentional, and really elevated the whole deck area. It’s amazing what a difference proper edging, leveled pavers, and finished pebble fill can make.
Tips and Best Practices for Paver Walkway Installation
After going through this whole project, here are my top takeaways that I’d want any beginner to know going in. First, get help with the digging. It’s the most physically demanding part and goes much faster with even one extra person. Second, always use landscaping fabric — it’s cheap, it’s easy to install, and it will save you hours of weed-pulling every year.
Third, don’t skip the paver base and paver sand layers — both are essential for long-term stability. Fourth, check level constantly as you lay each paver, not just at the end. Fifth, if the ground is really hard, try to work after rain or water the area the night before — it makes digging dramatically easier. And finally, pre-plan your spacing before you commit to installing — laying everything out loosely first prevents costly spacing errors. This kind of careful preparation is something I cover in detail in my DIY backyard patio and fireplace build guide as well, since many of the same ground-prep principles apply.
Frequently Asked Questions
How deep do I need to dig for a paver walkway?
For a standard paver walkway, I recommend digging down about four inches. This gives you enough room for your compacted soil base, the paver base layer, a thin layer of paver sand, and the paver itself — all sitting flush with or just slightly above the surrounding ground level. If your ground has a lot of organic material or soft soil, you may want to go a bit deeper.
Do I really need landscaping fabric under my pavers?
In my experience, yes — absolutely. Landscaping fabric prevents weeds from pushing up through your pebbles and between your pavers. It’s inexpensive and easy to install, and skipping it means you’ll be pulling weeds for years. I always use it on any project where pebbles or gravel are going down.
Can I do a paver walkway installation without a plate compactor?
Yes — for a small walkway, a hand tamper works perfectly well. It takes more elbow grease, but it gets the job done. For larger patio areas, I’d suggest renting a plate compactor from Home Depot or Lowe’s for a day, as it’s much more efficient and gives you a more thorough compaction across a big surface.
What’s the best way to level pavers that keep sitting uneven?
If a paver keeps coming up unlevel, lift it out and add or remove a small amount of paver sand underneath until it sits correctly. Then place the paver back down and either shake it gently to settle it, or use a rubber mallet (or a 2×4 and a hammer like I did) to tap it into place. Check with a level after every adjustment. The sand layer is specifically designed to allow these small corrections, so don’t be afraid to lift and re-lay a paver until it’s right.
Wrapping Up
Installing a paver walkway is one of those projects that looks intimidating from the outside but is completely doable once you break it down step by step. I went from a messy, cluttered side yard to a clean, polished walkway alongside my parents’ deck — and it cost a fraction of what a contractor would charge. The digging is hard work, but the rest of the process is methodical and genuinely enjoyable.
If you take your time with the prep work — especially the digging, tamping, and screeding — the paver installation itself goes smoothly. Just remember: measure twice, level constantly, and don’t skip the base layers. Have questions about your own paver walkway project? Drop them in the comments below — I’d love to help. And if you found this guide useful, check out my full DIY paver patio installation guide for even more outdoor hardscaping tips. Happy building!