I have five items sitting in my recycling bin right now — and I turned every single one of them into something I’m genuinely proud to display in my home. I’m talking about a cereal box, a handful of jar lids, an egg carton, some tin cans, and a big old pickle jar. Nothing fancy, nothing expensive, and nothing you’d normally think twice about before tossing in the trash.
These recycled materials home improvement crafts are some of my favorite projects I’ve done in a long time, and I think that’s because the bar feels so low going in. When your raw material costs nothing, there’s no pressure — just creativity. Everything I used beyond the recycled items themselves came from supplies I already had on hand: Mod Podge, acrylic paint, paper napkins, and a hot glue gun. That’s it. If you’ve been looking for a fun weekend project that won’t cost you much, you’re in exactly the right place. I love pairing projects like these with ideas from my roundup of budget home improvement DIY ideas that save thousands — because looking good at home really doesn’t have to cost a fortune.
I’m going to walk you through all five projects, share my ratings for each one, and call out the one that completely surprised me — in the best possible way. Let’s get into it.
1. Cereal Box Magazine and Book Organizer
First up is one of the most practical recycled materials home improvement crafts I’ve made: a magazine or book organizer built out of a Costco-size cereal box. I used a giant Rice Krispies box for mine, and the transformation is honestly remarkable for something that was headed straight for the recycling bin.
The process is straightforward. I cut the top off the box, then cut the two side panels down at an angle — from the top corner down to about the halfway point on the box — and cut the front panel straight across. That gives you the classic slanted magazine holder shape. From there, I coated the outside of the box with Mod Podge and wrapped it in some wrapping paper I had on hand. I covered the back, both sides, and the front, making sure to leave enough paper to fold over the top edges, sides, and bottom. Once I had it wrapped all the way around, I folded the excess to the inside, added more Mod Podge, and smoothed it down. You can also add paint, decorative trim, or a coordinating paper on the inside if you want a fully finished look — I skipped that step because I’m storing large books in mine and nobody’s going to see the inside anyway.
I’m currently using this on my homework desk, and it’s genuinely functional and cute. The best part is that you can choose any wrapping paper or decorative paper to match your existing decor — kraft paper for a neutral look, floral prints for something more playful, or even newspaper for an eclectic vibe. I’m giving this one a 9 out of 10. Easy, free, and actually useful.
2. Jar Lid Coasters
I collect a whole lot of jar lids, and for a while I had no idea what to do with them. When I saw I had a bunch of BMA mod jam lids with that adorable red gingham pattern, something clicked — these would make the most charming coasters. And I was right.
The craft itself couldn’t be simpler. I picked up a small paintbrush from the dollar store and used white acrylic paint to add flower petal shapes directly on top of the darker squares in the gingham pattern. The pattern acts as a natural grid, which makes the flowers look intentional and even. Then I added a small yellow dot in the center of each flower to finish the look. You could honestly do any pattern you like on top of these lids — dots, stripes, geometric shapes — but I love how the gingham base adds so much character without any extra effort.
Once the paint dried, I applied a coat of Mod Podge over the top to seal everything in. I’d recommend using either dishwasher-safe Mod Podge or outdoor Mod Podge here, since these coasters will be holding drinks. They seem to hold up really well with hand washing. These are the perfect size for a regular tumbler, they’d be adorable at a summer picnic, and they’d make a genuinely sweet handmade gift. I’m giving these a 9 out of 10.
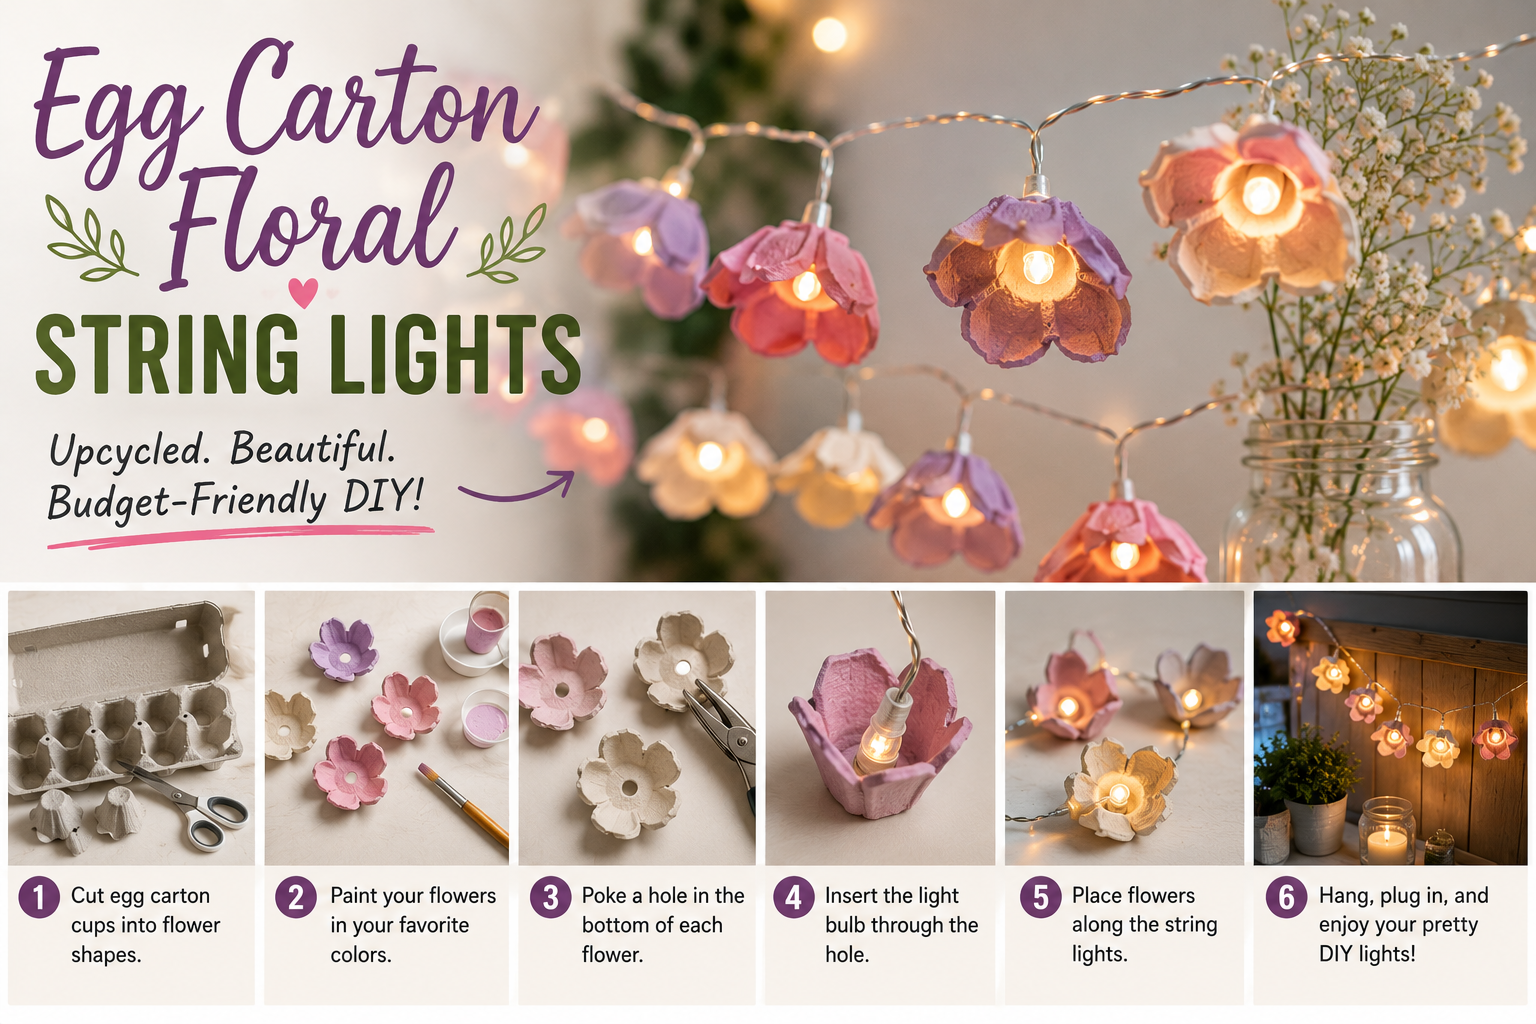
3. Egg Carton Floral String Lights
Okay, I have to be honest — this is the project I was most skeptical about, and it turned into my absolute favorite craft of the entire week. I stared at an egg carton and had zero confidence in the idea, but I wanted to try it anyway just to see what happened. What happened was nothing short of magical.
I started by cutting the egg carton into its individual cups, and then I cut each cup into a flower shape by making five slits around the outside and rounding off each petal. That gives you five petals per flower. Then I mixed up some acrylic paint with water — pink and blue to get a soft lavender purple — keeping it thin so it looked more like watercolor than opaque paint. I brushed the diluted paint onto each flower shape and let them dry. Once they were dry, I added a tiny yellow dot in the center of each one to make them look more realistic. Ten flowers total.
For the lights, I used a Dollar Tree LED light string with 12 lights, which was perfect — it meant I had one extra light at each end and ten in the middle for the flowers. I poked a small hole in the center of each flower using a Cricut tool (any sharp pointed tool works), then bent the LED string at each light, pushed one light through each flower, and bent it back so it stayed in place. When I turned the lights on, I genuinely stopped and stared. It looks so beautiful — soft, whimsical, and nothing like a kindergarten craft. I’ve added mine to the mantle and I’m already planning to make a second one for the other side. This one earns a 10 out of 10 from me, no question.
4. Tin Can Napkin Vase
Tin cans used to go straight into my recycling without a second thought. Now I genuinely cannot believe I was doing that. The decoupage napkin technique turns a plain tin can into a vase that looks like it came from a boutique home goods store, and it takes almost no time at all.
Start with a clean tin can — make sure the inside edges aren’t sharp. Paint the outside white with acrylic paint and let it dry completely. Then take a decorative paper napkin (I found mine at Dollarama) and peel away all the plain plies, leaving only the patterned top layer. Cut that single ply to fit around your tin can. Coat the outside of the can with Mod Podge, then slowly roll the can along the napkin so it wraps all the way around. Add Mod Podge to the top and bottom edges and fold the napkin over neatly, then trim any excess with scissors. Finish with a top coat of Mod Podge over the entire outside and let it dry.
The result is genuinely stunning. I filled mine with fresh lilacs from my yard and set it on my kitchen counter — the purple in the napkin pattern matches the flowers perfectly. This is also a fantastic craft to do with kids since the technique is forgiving and the payoff is immediate. I’m rating this one a 10 out of 10. If you enjoy budget-friendly home decor projects like this, you might also love my post on 6 Dollar Tree DIY home decor ideas tested for even more low-cost inspiration.
5. Pickle Jar Nature Lantern
The last project on my list is one of the most versatile, and honestly one of the most beautiful results I’ve gotten from a recycled container. I used a giant Costco pickle jar — fully cleaned and de-pickled, I promise — but you could use any clean glass jar for this idea. The concept is simple: fill the jar with natural and faux elements to create a miniature naturescape, add some LED lights, and let it glow.
I started by adding a base of reindeer moss I found at Dollar Tree. Then I layered in some dried baby’s breath, a few faux mini roses, and some dried star flowers. The goal is to make it look organic and layered, like something you’d find in a terrarium. Once I had the naturescape arranged the way I liked it, I took a small Dollar Tree LED light strand and glued the battery pack to the inside top of the lid, then wound the lights gently through the arrangement. For the lid itself, I painted over the expiry date stamp with white acrylic paint and let it dry before closing everything up. If you wanted to get fancy, a metallic gold or silver paint on the lid would look incredible.
I’ve placed mine on a tray in my breakfast nook alongside some candle holders, faux taper candles, and a small dried floral arrangement. The whole tablescape looks intentional and cozy. What I love most about this craft is how easily you could swap out the interior seasonally — imagine swapping the spring florals for pine greenery and pinecones in December. This one gets a 9 out of 10 from me. Totally fabulous and endlessly adaptable. For more creative ways to style your space on a dime, check out my guide to summer home decor DIY ideas to refresh your space.
Tips and Best Practices for Recycled Materials Home Improvement Crafts
After making all five of these projects, here are the things I wish I’d known going in — or the habits I’ve built that make everything go smoother:
Clean everything thoroughly before you start. Whether it’s a tin can, a jar, or a cereal box, any grease, residue, or odor will affect how well your materials adhere and how pleasant your finished piece looks. For jars especially, a soak in hot soapy water followed by a baking soda rinse works wonders.
Use the right Mod Podge for the right project. For coasters or anything that will come into contact with moisture, reach for dishwasher-safe or outdoor Mod Podge rather than the standard formula. It makes a real difference in how long your project holds up.
Thin your acrylic paint with water for a watercolor effect. This is the technique I used on the egg carton flowers, and it gives such a beautiful, soft result. Full-strength acrylic can look a little heavy on delicate materials like egg carton or tissue-thin napkins.
Peel your napkins before you decoupage. This one tripped me up early on. You only want the single patterned ply of a paper napkin — using all the layers makes the paper too thick and it wrinkles unevenly. Take a minute to separate them before you start.
Build a small craft stash so you’re always ready. Mod Podge, acrylic paint in a few basic colors, a hot glue gun, and some dollar store LED light strings will cover you for nearly any project in this post. Once you have these on hand, the only cost for future crafts is essentially zero.
Frequently Asked Questions
What recycled materials are best for home improvement crafts?
Tin cans, glass jars, cardboard boxes, egg cartons, and jar lids are all fantastic starting points for recycled materials home improvement crafts. They’re sturdy, easy to paint and decoupage, and widely available in any household. Glass jars and tin cans especially take paint and Mod Podge extremely well, making them perfect for decorative vases, lanterns, and organizers.
Do I need special supplies to make these crafts?
Not really. The supplies I used for all five projects were Mod Podge (standard and outdoor formula), basic acrylic paint from the dollar store, a small paintbrush, decorative paper napkins, wrapping paper, hot glue, and a Dollar Tree LED light string. These are all inexpensive and widely available, and once you have them on hand you can make dozens of projects for essentially no cost.
How do I make the egg carton flowers look more professional?
The key is the watered-down acrylic paint technique. Instead of painting with full-strength paint, thin it significantly with water until it behaves more like watercolor. This gives the egg carton a soft, translucent look that feels intentional rather than crafty. Adding a small yellow dot in the center of each flower also makes a big difference — it tricks the eye into seeing a realistic bloom rather than a painted cup.
Can these recycled crafts be used outdoors?
Some of them can with the right finishing products. The jar lid coasters and the tin can vase will hold up better outdoors if you seal them with outdoor Mod Podge rather than the standard formula. The pickle jar lantern works beautifully on an outdoor tablescape. The egg carton flowers and the cereal box organizer are best kept indoors, as cardboard and paper egg cartons don’t fare well in moisture or direct sunlight.
Conclusion
If there’s one thing I hope you take away from this post, it’s that having a beautiful home doesn’t require spending a lot of money. Some creativity, a few dollar store supplies, and the items in your recycling bin are genuinely all you need. Out of the five projects I tackled, my personal favorite is still the egg carton floral string lights — I did not expect them to turn out that beautifully, and they look absolutely stunning on my mantle. But every single one of these crafts delivered something I’m genuinely happy to keep in my home.
If you want to keep exploring budget-friendly ways to make your home look amazing, I’d encourage you to check out my post on 20 budget home improvement ideas you can do in 30 minutes — there are plenty of quick wins in there that pair perfectly with creative projects like these. Now go check your recycling bin and see what you’ve got to work with. I’d love to know which of these five projects you’re planning to try first — drop a comment and let me know!