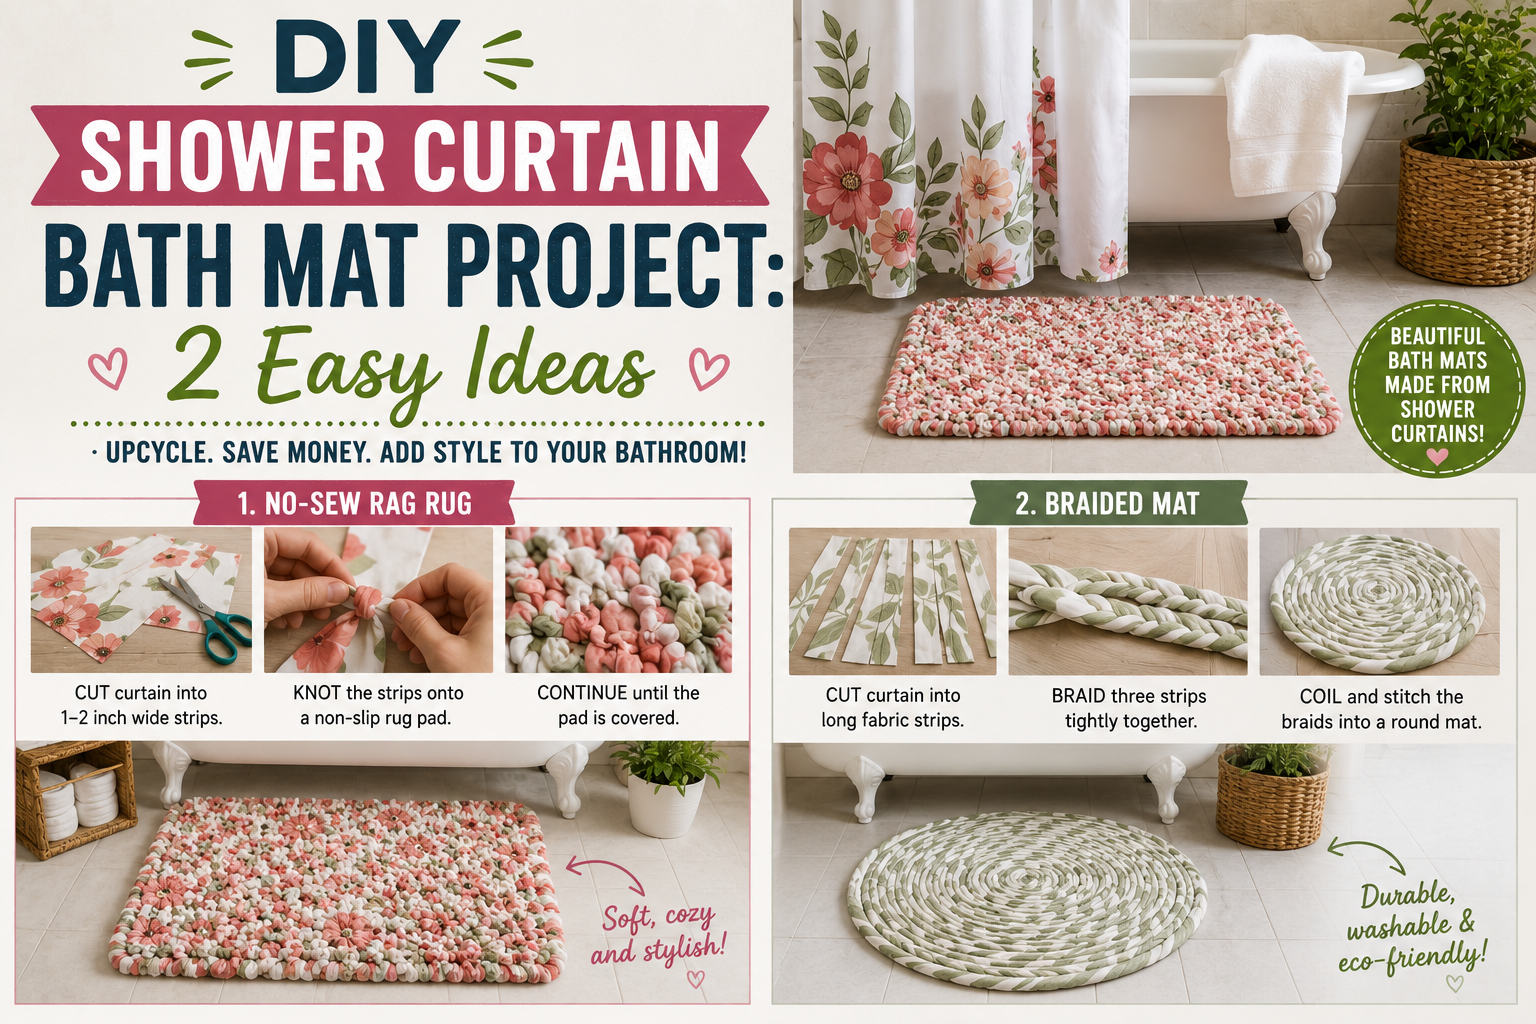
If you’ve ever walked past a cool shower curtain at Walmart or scrolled through Amazon and thought, “I could do something creative with that,” — you’re in the right place. I’m Michael, and today I’m sharing two of my favorite DIY shower curtain bath mat projects that are budget-friendly, surprisingly easy, and honestly look incredible when they’re done. One turns into a custom bath mat (that also works perfectly outdoors!), and the other becomes a waterproof outdoor pillow cover. Both use materials you can grab for just a few dollars, and neither requires any serious crafting skills.
I love these kinds of projects because they punch way above their weight. You spend maybe $10 to $15 total and walk away with something that looks like it came from a boutique home decor shop. If you’re into making budget home upgrades that genuinely impress people, you might also want to check out my post on budget home improvement DIY ideas that save thousands — it’s packed with similar inspiration. But for now, let’s dig into these two shower curtain projects step by step.
I’ll walk you through every single step I took, including the little tricks I learned along the way (like the hot glue grip secret and the polyurethane waterproofing step that makes all the difference). Let’s get into it!
Step 1 — Gather Your Materials at Walmart and Dollar Tree
The first thing I did for the bath mat project was head to my local Walmart to pick up my favorite curtain. I wanted something with a cool design — I ended up going with a beach scene that I knew would match the decor I already have hanging in my bathroom. The great thing about shower curtains is that they come in so many patterns and colors, so you can really personalize this project to fit your space.
After Walmart, I swung by the Dollar Tree to grab four of their simple rubber-backed mats. These are the foundation of the bath mat, and at Dollar Tree prices, you’re spending almost nothing. I needed four mats total to get the right coverage, so make sure you grab enough before you start — it saves you a second trip. Once I had everything in hand, I was ready to start building.
Step 2 — Arrange and Tape the Dollar Tree Mats Together
With my four Dollar Tree mats in hand, I laid them out upside down on a flat surface, arranging them in a square so all four fit together like puzzle pieces. The key here is making sure the seams line up nice and neat — take your time with this step because a sloppy seam will show up later. Once I was happy with the alignment, I grabbed some duct tape and ran it right along the seams to hold everything together.
I made sure to tape from front to back and from side to side to create a strong bond across the entire surface. If you feel like you need a few extra strips, go ahead and add them — you want this base to be rock solid. Once the tape was down, I smoothed everything out so I had a nice, even surface to work on. This flat, stable base is what makes the finished mat look professional instead of lumpy.
Step 3 — Cut the Shower Curtain to Size
Next, I took my curtain and laid it across my table with the design facing up. I did it this way intentionally — having the pattern visible helps you figure out exactly where to position it so the design is centered and looks intentional on the finished mat. Once I had it positioned the way I liked, I went ahead and cut around the edges.
The important thing here is to leave about 3 to 4 inches of overlap on each side. That extra fabric is what you’ll fold and glue around the back later, so don’t skip it. Shower curtain material cuts really easily — just grab a pair of sharp scissors and work your way around. This part goes faster than you’d expect.
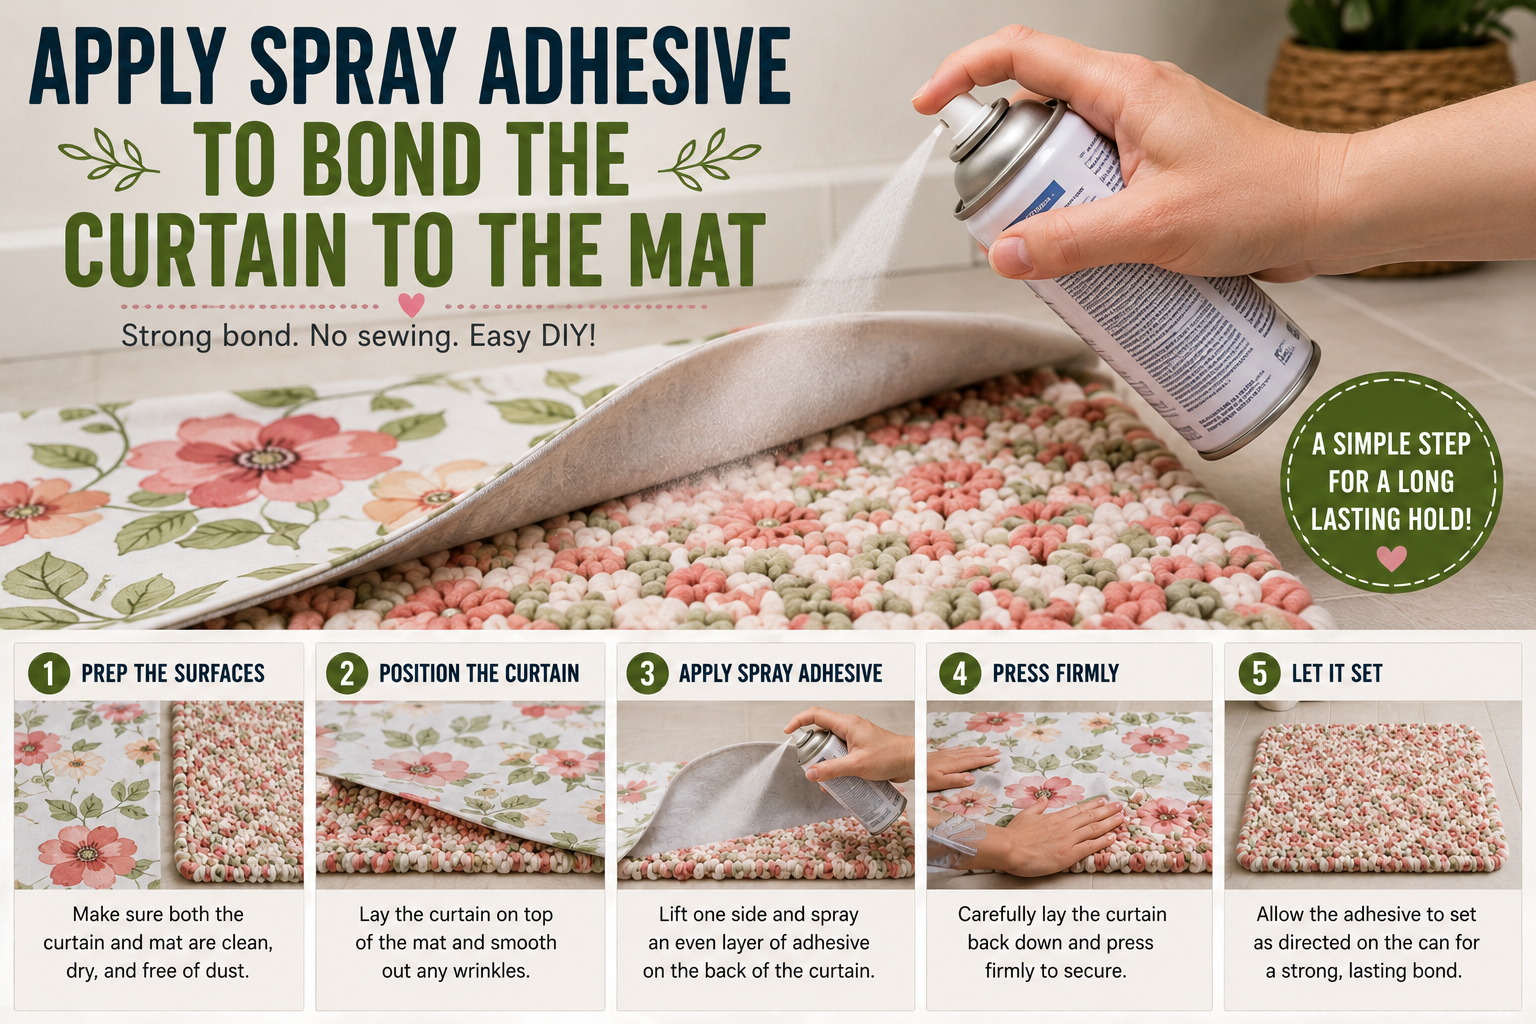
Step 4 — Apply Spray Adhesive to Bond the Curtain to the Mat
This is where things start coming together. I took spray adhesive and covered the entire back surface of the mat — every square inch, including right over the duct tape I’d laid down earlier. I made sure to hit the edges especially well, since those areas need the strongest bond. Spray adhesive sets fairly quickly, so you want to work with a little bit of urgency here without rushing so much that you make mistakes.
Rather than flopping the entire curtain down at once, I laid it in two stages. I pressed one half down first, smoothed out the wrinkles with my hand, then folded over the second half and repeated the process. Working in halves gives you much better control and helps you avoid air bubbles and creases. Even with careful work, some wrinkles will remain from the curtain being folded in its packaging — and I’ll cover how to handle those in the next step.
Step 5 — Iron Out the Wrinkles for a Smooth Finish
After I got the curtain adhered to the mat, I noticed there were still some stubborn wrinkles, especially in areas where the curtain had been tightly folded in the package. My fix for this was simple: I took a regular iron and gently pressed it over the surface to smooth everything flat. This step makes a huge difference in how the finished mat looks, so don’t skip it.
Just be mindful of your heat setting depending on the curtain material — you don’t want to melt or scorch anything. Keep the iron moving and work in sections. After a couple of passes, my mat was smooth and flat, exactly the way I wanted it.
Step 6 — Glue Down the Edges and Fold the Corners
Once the surface was smooth, I flipped the mat over and grabbed my hot glue gun. Working just a few inches at a time, I ran a thin bead of hot glue along the overlap of the shower curtain and folded it down onto the back of the mat. The key here is to work in small sections — the glue sets fast, and trying to do too much at once means you’ll be fighting wrinkles and lifting edges. Take your time, and do light, careful touches so you don’t burn yourself since the material can stay warm for a moment.
Once all four sides were glued down, I turned my attention to the corners. I folded one side first, added a small dab of hot glue, then folded the adjacent edge over it — just like wrapping a gift. I held each corner down for about 15 to 20 seconds until the glue set completely. Clean, folded corners are what separate a polished DIY project from one that looks homemade in a bad way.
Step 7 — Use the Hot Glue Grip Trick on the Back
Here’s a little secret I discovered that I think is genuinely clever: after I finished gluing down all the edges, I added a few small dots of hot glue to the very back of the mat — the side that will sit on the floor. When the glue dries, those little bumps act as grip points, helping the mat stay in place on smooth bathroom tile or an outdoor surface without sliding around.
It’s a tiny detail, but it makes the mat so much more functional. Nobody wants a bath mat that slides the second you step on it, and this simple trick takes care of that problem with materials you already have out on your table. Smart, simple, and free.
Step 8 — Waterproof the Mat With Water-Based Polyurethane
The final step for the bath mat is the one that really unlocks its versatility: waterproofing. I grabbed a can of water-based polyurethane and sprayed the entire top surface of the mat. This creates a protective coating that makes the mat water-resistant, which is essential for a bathroom setting and absolutely critical if you plan to use it outdoors.
I let it dry completely before putting it in place, and the results were fantastic. My beach-scene mat looked amazing in my bathroom where it matched the existing decor perfectly, but I could also see myself taking it outside to use near my Adera chairs on the patio. The polyurethane finish gives the whole thing a subtle sheen that actually makes it look more intentional and finished. This project genuinely inspired me, and if you’re looking for more ways to upgrade your home on a budget, my post on affordable home improvement projects under $100 has a ton of ideas in that same spirit.
Project 2 — Making a DIY Shower Curtain Outdoor Pillow Cover
The second project I tackled with a shower curtain is just as fun: making a waterproof outdoor pillow cover. The concept is simple — you use a shower curtain as your fabric because it’s already water-resistant, which makes it perfect for outdoor furniture. I started with a 14-inch by 14-inch pillow insert, and I cut my curtain down to 15 inches square for the front panel, giving me that extra inch of seam allowance all the way around.
You can use an old shower curtain you already have lying around or grab a new one — I found a great one on Amazon for less than $10. The low cost of the materials is part of what makes this project so satisfying. And because you can choose any curtain pattern you like, the creative possibilities are basically endless.
Step 9 — Cut and Prepare the Back Panel Pieces
The back of the pillow works a little differently than the front because you need to create a pocket opening so you can actually slide the pillow insert in and out. To do this, I took my fabric and folded it in half. One side of the fold matched the front panel dimensions at 15 inches. The other side I cut to 11 inches, which is half of the 14-inch pillow width (7 inches) plus 4 inches for the overlap. This creates two separate back pieces that overlap in the middle to form the pocket opening.
Before cutting, I pinned the fabric layers together so they wouldn’t shift on me mid-cut. I also used pins throughout the hemming and assembly process to keep everything tidy and aligned. If you’re not a sewer, don’t worry — this project can absolutely be done as a no-sew project using fabric glue instead of stitching at every step.
Step 10 — Iron and Hem the Pocket Edges
To create clean, professional-looking pocket edges on the back panels, I folded each piece back about half an inch and ironed it flat. I pinned the fold in place as I moved along with the iron to keep that crisp edge consistent. Shower curtain fabric isn’t always the easiest to work with — it can be a bit slippery — so the pins really help here. Take it slow and work in short sections.
Once the edges were ironed, I did a simple straight stitch across each panel to secure the hem. If you’re going the no-sew route, a thin bead of fabric glue along that folded edge works just as well. Either way, you want that edge to be clean and flat before you move on to assembling the pillow cover.
Step 11 — Assemble and Sew (or Glue) the Pillow Cover
Assembly time! I laid my front panel face-up on the table, then placed the two back panels on top of it with the presentation sides facing inward — so the pretty sides were facing each other. The two back pieces overlapped in the middle, creating that pocket opening. I lined up all the corners carefully, then pinned around the entire perimeter to hold everything in place.
Then I stitched (or glued) all the way around the outside edge, connecting all the layers together. I finished my stitching by securing the thread with a knot — looping my needle and thread a couple of times and pulling it tight to keep the knot right where I needed it. Before flipping the cover right-side out, I clipped each corner diagonally. This removes the bulk of fabric at the corners so when you flip it, the corners pop out nice and sharp instead of looking bunched or rounded.
Step 12 — Add Buttons and Ribbon Loop Closures
The finishing touch that elevates these pillow covers from “homemade” to “handcrafted” is the button-and-ribbon closure. I sewed a button onto the front of each pillow cover, going in from the inside to secure it firmly. I used brown thread with brown buttons — small matching details like this make a big difference in the overall look. To finish each button off, I looped the thread behind the button shank a few times before knotting it off on the inside of the cover.
On the back panel, I attached small pre-cut loops of ribbon to the inside edge of the overlapping pocket flap. These ribbon loops are sized to slip right around the buttons, holding the back closed securely so the pillow insert stays put even outdoors. Once I slipped the pillow insert inside and wrapped the ribbon loops around the buttons, the covers looked absolutely amazing. I placed them on my outdoor patio furniture and they completely transformed the space. For more ideas on refreshing your outdoor and indoor spaces creatively, check out my post on summer home decor DIY ideas to refresh your space.
Tips and Best Practices for Your DIY Shower Curtain Projects
Before you dive in, here are a few things I learned that will make your experience smoother. First, always choose a curtain with a bold, intentional design — busy patterns hide minor imperfections in cutting and gluing much better than solid colors do. Second, work in small sections with the hot glue gun — it sets fast, and small manageable sections give you the cleanest results.
Third, don’t skip the polyurethane step on the bath mat if you plan to use it anywhere near water or outdoors — it’s what makes the whole thing durable. Fourth, use pins generously during the pillow assembly — shower curtain fabric loves to shift around, and pins are your best friend. Finally, the no-sew option is completely legitimate — fabric glue works beautifully on shower curtain material, so don’t let a lack of sewing experience stop you from trying this. If you’re inspired to keep going with creative budget projects, my post on recycled materials home improvement crafts has five more easy DIY ideas worth exploring.
Frequently Asked Questions
What type of shower curtain works best for a DIY bath mat project?
I recommend a fabric-style shower curtain with a bold print — something that’s flexible but not too thick. Thinner curtains are easier to cut cleanly and fold around the edges of the mat. Avoid very heavy curtains, as they can be harder to glue smoothly. You can find great options at Walmart for just a few dollars, or grab one on Amazon for under $10.
Can I make this bath mat completely waterproof?
Yes! The spray adhesive and hot glue hold everything together, but the key waterproofing step is the water-based polyurethane I sprayed over the finished surface. It creates a protective layer that makes the mat water-resistant and durable. This is especially important if you plan to use the mat outdoors or in a high-splash bathroom area.
Do I need to sew the outdoor pillow cover, or can I use glue?
You absolutely can make a no-sew version using fabric glue — I specifically designed this project to work either way. The key is choosing a fabric glue that bonds well to shower curtain material. Apply it along the hemmed edges and perimeter seams just as you would a stitch, hold the pieces together firmly, and let it dry completely before handling. It works great!
How durable are these DIY shower curtain projects?
Both projects are surprisingly durable when made correctly. The bath mat holds up well to regular foot traffic, and the polyurethane coating protects the curtain design from fading and moisture. The pillow covers are naturally water-resistant since shower curtain fabric is designed to handle moisture. With reasonable care, both should last a solid season or longer outdoors and much longer indoors.
Wrapping It Up
I’m honestly thrilled with how both of these DIY shower curtain bath mat projects turned out. The bath mat is functional, good-looking, and doubles as an outdoor mat near my patio chairs. The pillow covers transformed my outdoor furniture and cost me almost nothing to make. Both projects took just a few hours from start to finish, and the total investment was maybe $15 to $20 for everything combined.
If you’ve been looking for a creative, low-cost weekend project that makes a real visual impact in your home or backyard, I can’t recommend these enough. Give them a try, put your own spin on the pattern and color choices, and let me know how they turn out. I’d love to see what you create — drop a comment below and share your version!