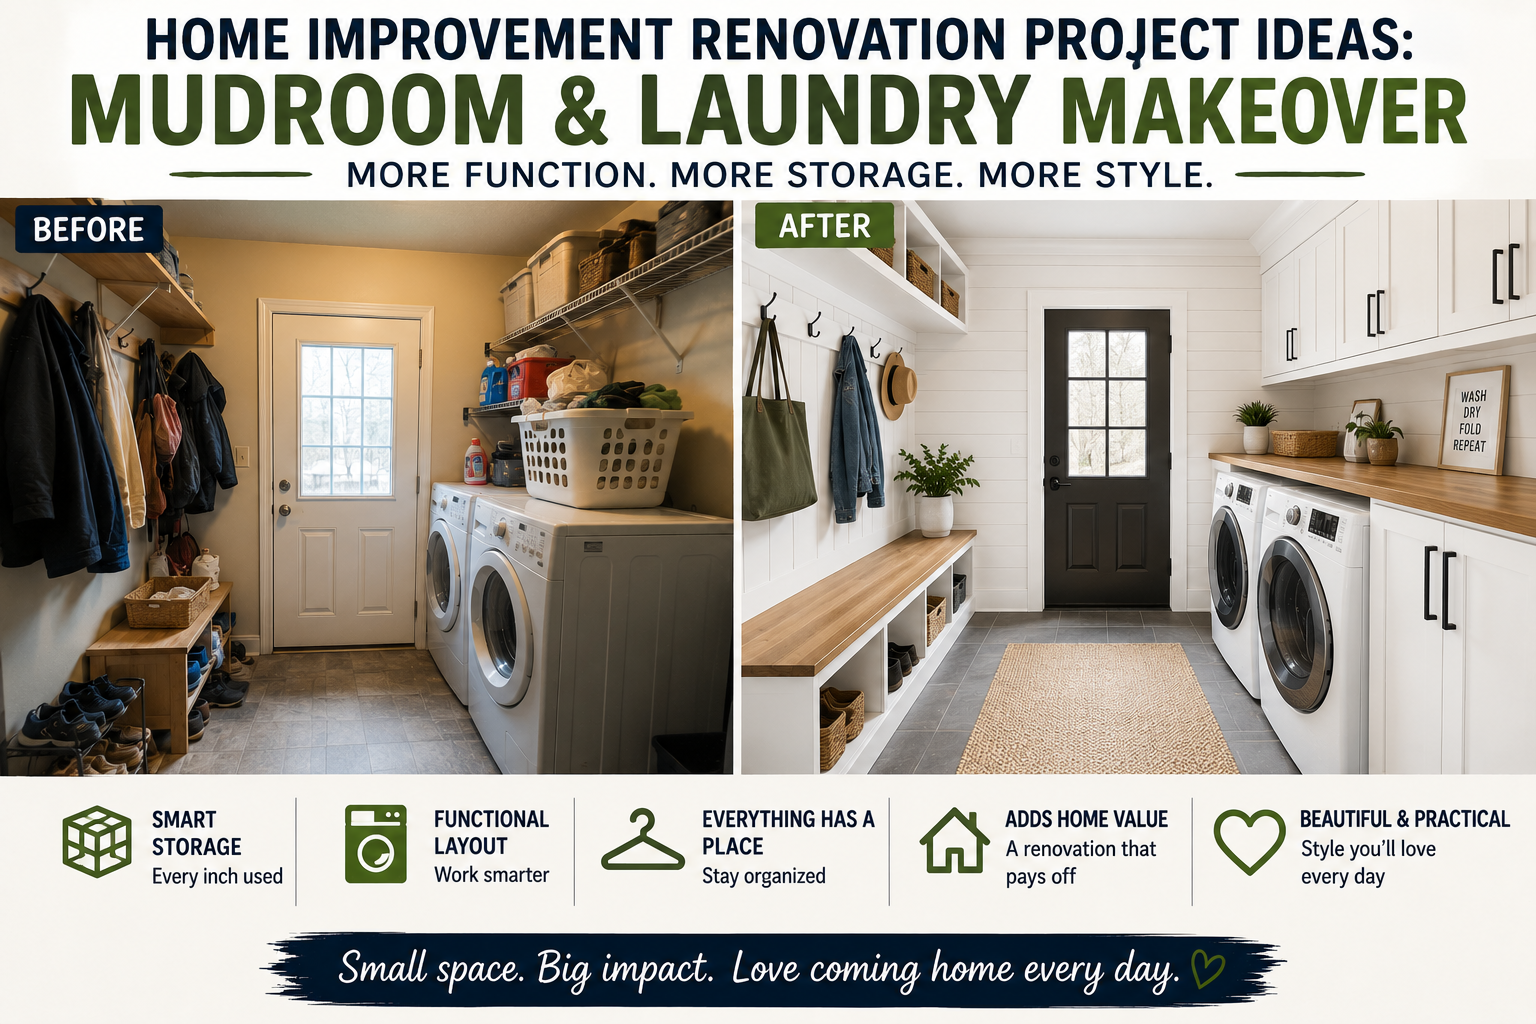
If you’ve been staring at a cramped, dysfunctional space in your home and thinking there has to be a better way, you’re in the right place. Today we’re walking through one of the most exciting home improvement renovation project ideas you can tackle — transforming a tight, outdated laundry room into a beautiful, hardworking mudroom and laundry nook. This is a real renovation from start to finish, and whether you’re planning something similar or just looking for inspiration, there’s something here for every skill level and every budget.
This project started with a laundry area that caused daily frustration — doors bumping into each other, no room to set down a basket, closets being used for cat litter, and a sunroom doubling as a dumping ground because there was no functional entryway. Sound familiar? The goal was to move the laundry, convert a window into an exterior door, create a proper mudroom, and make it all feel cohesive, beautiful, and intentional. Along the way, there are so many lessons and ideas you can borrow for your own home.
Let’s walk through every step of this renovation — from demo day all the way to the finishing touches — so you can see exactly how it all came together and steal the ideas that work best for your space. If you love quick wins, also check out these 20 budget home improvement ideas you can do in 30 minutes to keep the momentum going.
Step 1: Assess the Space and Plan the Demo
Before swinging a single hammer, you need to spend real time in your space and figure out what’s actually causing the friction. In this case, the laundry room was too small for the machines, the closets weren’t being used well, and there was no dedicated entry point for the family. The sunroom was getting trashed because it was the default drop zone.
The renovation plan involved moving the laundry across the room, removing walls, repurposing two cat-litter closets, and converting an existing window into an exterior door. Planning every single change before demo day saves you time, money, and headaches. Walk through your space and list every pain point — that list becomes your renovation roadmap.
Step 2: Demo Day — Opening Up the Space
Demo day is one of the most satisfying steps in any home improvement renovation project. Walls came down, doorways were removed, and the entire area immediately felt larger and more connected. When you remove walls and overhead doorway frames, ceiling height feels dramatically taller — a detail that changes the entire mood of a room.
One fun discovery during demo: the original house plans were found tucked inside the wall. Old homes are full of surprises — dog food stashes included, apparently. Always expect the unexpected during demo, and build a small contingency into your budget for whatever gets found behind the drywall. On the flip side, existing plumbing was intentionally left in the wall during demo to allow for a future butler pantry with a sink — a smart move that preserves options without adding cost now.
Step 3: Plan Your Electrical Layout Thoughtfully
One of the most overlooked steps in a renovation is planning your electrical before the walls close back up. Working with an electrician during this project, the lighting plan included two balanced light fixtures above the future countertop, dedicated outlets for lamps, a decorative pendant centered over the main entry zone, and LED can lights centered toward the new exterior door rather than the door itself — a subtle but important design decision.
Centering can lights on the door rather than the room throws off the whole visual balance. Placing them in the zone around the door instead keeps everything feeling intentional. A bonus light was also added to a small nook that tends to go dark, because shadows can make paint colors look completely different than intended. Plan for every corner to have appropriate light, and make it dimmable wherever possible.
Step 4: Move the Plumbing Where You Need It
Moving plumbing is one of those renovation tasks that feels intimidating but is completely manageable with the right plumber. In this project, the water lines were moved to the interior wall so the new laundry machine could be positioned exactly where it needed to be. A second water line was also added at the same time — a forward-thinking move that makes it easy to add a second machine later without tearing open walls again.
If you’re already paying to have plumbing moved, think ahead about what you might want in the future. Adding an extra line while the wall is already open costs very little compared to doing it separately later. This is the kind of smart planning that separates a good renovation from a great one.
Step 5: Convert a Window Into an Exterior Door
One of the boldest and most functional home improvement renovation project ideas in this entire build was converting an existing window into a brand-new exterior entry door. This single change transformed the entire purpose of the room — suddenly there’s a real mudroom entrance that the family can use daily, keeping dirt, shoes, and coats out of the main living areas.
When ordering a pre-hung exterior door, don’t forget to check the hinge color — they’ll come pre-installed, and if they don’t match your hardware vision, you’ll need to address it. In this case, the hinges arrived in black while unlacquered brass was chosen for the interior hardware. The fix? Buff the hinges to match. Details like hinge and hardware finishes are easy to overlook but make a big difference in the finished look. Check out door hardware options if you’re planning something similar.
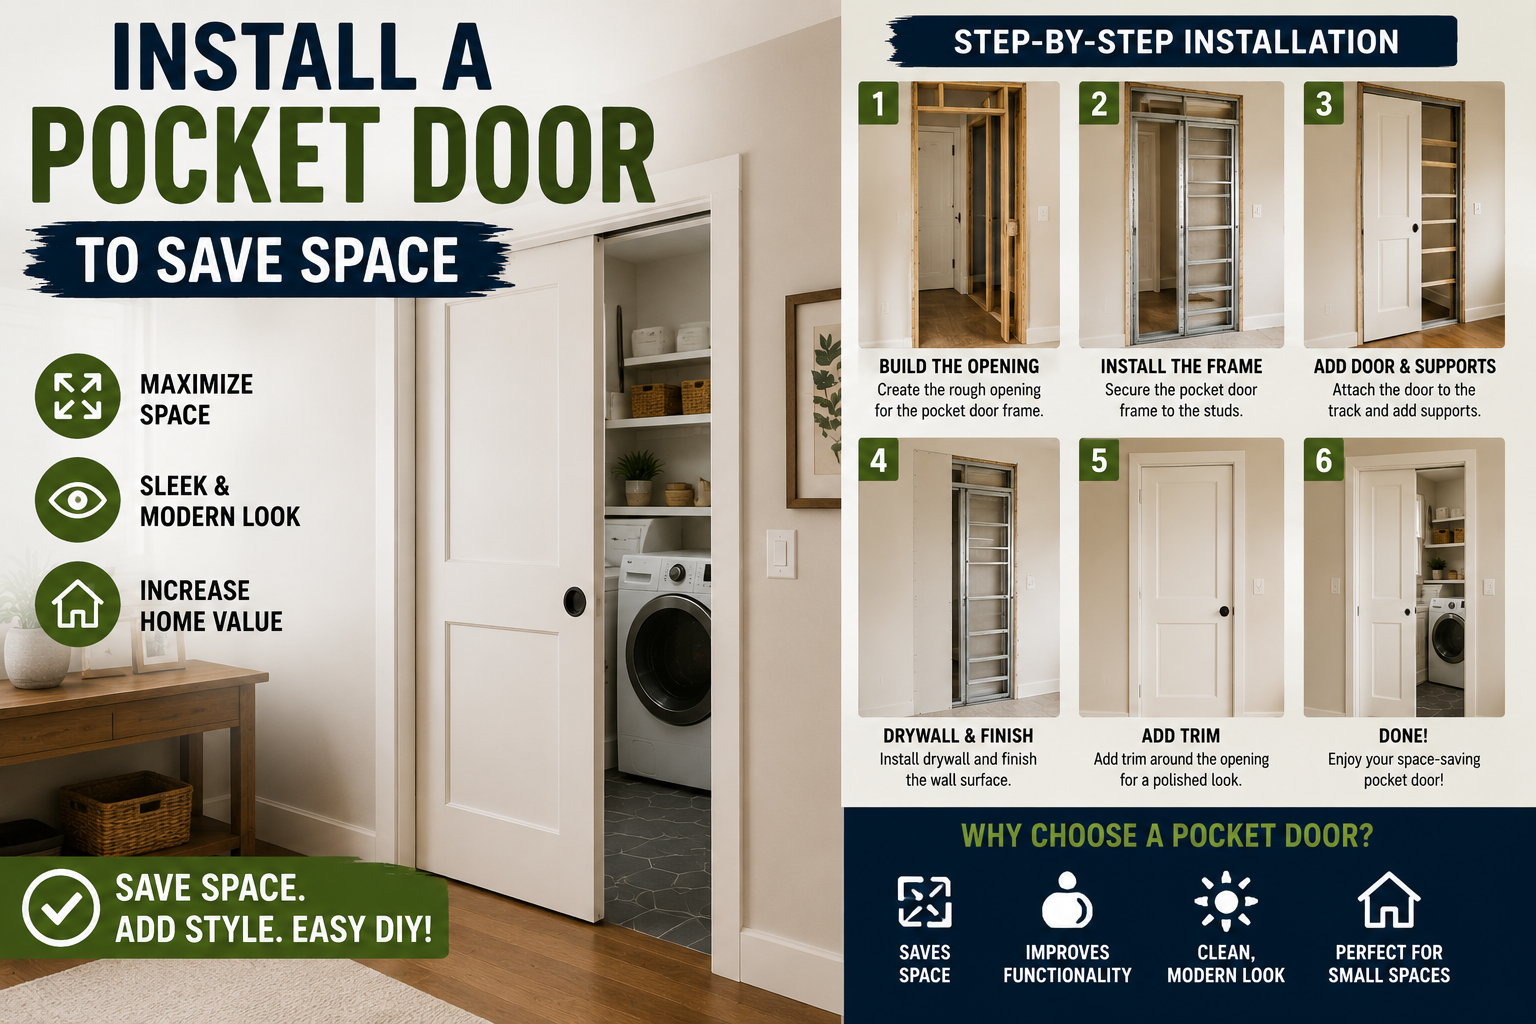
Step 6: Install a Pocket Door to Save Space
Wherever you can use a pocket door in your home, do it. That’s the takeaway here. A pocket door was installed to separate the laundry nook from the rest of the mudroom, and it slides completely into the wall when open — meaning zero square footage is lost to a door swing. It can be closed for privacy when guests are over or left open so the space flows freely.
Pocket doors are ideal for tight spaces, laundry areas, bathrooms, and closets — really anywhere a traditional swing door would eat into usable floor area. Many pocket door kits come with the full hardware and framing system included, so installation is more straightforward than you might expect. Adding a header above the adjacent doorway to lower its height was also a smart move here, creating visual balance between both openings.
Step 7: Choose Your Floor Tile and Pattern Intentionally
Tile selection and layout direction both matter more than most people realize. For this mudroom, a warm-and-cool-toned tile was chosen from Amazon — one that pulls colors in multiple directions and gives flexibility across the whole design. Fourteen boxes were ordered to account for the herringbone pattern, which always requires extra cuts and therefore extra tile. Order more than you think you need, especially for diagonal or herringbone layouts.
The tile was laid in the direction you enter the home, so the pattern visually pulls you into the space — a classic designer trick. Grout width also plays a big role: 1/8-inch spacers were used here to create a slightly wider grout line that gives the floor a more brick-like appearance. Go too narrow and it just looks like standard tile. A seamless vent cover in a matching color was also tiled around to avoid interrupting the pattern.
Step 8: Install Vertical Tongue and Groove Paneling for Character
If you want to add instant character and texture to a room, vertical tongue and groove shiplap paneling is one of the best home improvement renovation project ideas out there. Running it floor to ceiling on every wall creates that English colonial cottage feel — it draws your eye upward, makes ceilings feel taller, and adds richness that paint alone can’t achieve.
One important technical note: vertical shiplap requires a plywood backer behind it because studs are only 16 inches apart and won’t catch every vertical piece. Horizontal shiplap nails directly into studs, but vertical installation needs that solid substrate behind it. This is a step many DIYers skip and regret. Plan for it from the start and your installation will go much more smoothly. For more wall treatment inspiration, the DIY wainscoting accent wall tutorial is a great companion read.
Step 9: Add Wall Hook Boards for Built-In Storage
Behind the new exterior door, 1×4 boards were mounted in two layers on the wall — one at a high height and one lower — to create a double row of wall hooks for coats, bags, and everyday items. This is a brilliant use of the slim wall space behind a door that would otherwise go completely unused.
Wood peg hooks give that classic cottage look while being incredibly functional. Two rows of hooks mean you can hang everything from heavy winter coats at the top to kids’ backpacks and leashes at the bottom. This kind of built-in storage solution is what makes a mudroom actually work. If you love smart storage ideas like this, check out these garage organization ideas on a budget for more inspiration.
Step 10: Choose the Right Light Fixtures for Each Zone
Lighting was one of the biggest visual wins in this renovation. A scalloped-edge milk glass pendant with a brass detail was chosen for the main laundry nook — it diffuses light beautifully and anchors that zone visually. Two dedicated lights were added directly above the laundry machine so you can light just that area without illuminating the entire room, which is both practical and atmospheric.
Dimmable fixtures were specified throughout so the mood of the space can shift from bright and functional to warm and welcoming. When you’re renovating a multi-purpose room like this — part utility, part entryway — zoned lighting is what makes it feel designed rather than just functional. A light fixture that has personality and fits the design style is worth the investment.
Step 11: Color Drench the Entire Space in One Beautiful Shade
Color drenching — painting the walls, trim, ceiling, and paneling all the same color — is one of the most impactful and underused home improvement renovation project ideas available. For this mudroom, the color chosen was Whispering Woods by Benjamin Moore, a rosy, mauvy, dusty brown inspired by Farrow & Ball’s Dead Salmon. The colors are nearly identical, but the Benjamin Moore version is significantly more affordable, especially when you need a lot of it.
The key to color drenching working beautifully is pulling a color that already exists in your flooring or other fixed elements. Here, the warm dusty brown of the tile had this exact color woven through it, so painting all the surfaces in that same tone made the floor and walls feel like one cohesive, intentional design. Flat finish was used on the ceiling to tie everything together without adding sheen where you don’t want it.
Step 12: Install a Space-Saving All-in-One Laundry Machine
The Samsung Bespoke AI Ventless Laundry Combo is the centerpiece appliance of this renovation — and it’s a genuinely game-changing piece of equipment for anyone working with limited laundry space. It’s a washer and dryer in one unit, requires no vent (just a 120V outlet and water supply), and can be installed virtually anywhere. That freedom is what made moving the laundry across the room possible in the first place.
Features worth highlighting: a 47-load auto-dispense detergent drawer at the bottom so you never have to manually add detergent, AI OptiWash that analyzes your load and adjusts settings automatically, a 5.3 cubic foot drum, a door that automatically pops open at the end of the cycle to air out the machine, and a touchscreen display that shows cycle information in real time. The dark steel finish pulls out the darker gray tones in the tile flooring — proof that even appliance finishes should be chosen with the room’s palette in mind. Discover more at samsung.com.
Step 13: Build a Butcher Block Countertop Over the Laundry Machine
To give the laundry nook a finished, built-in look, a butcher block countertop was planned to mount across the top of the machine on cleats around the wall. This adds a functional surface for folding laundry, setting down baskets, and generally making the space feel more like a room than a closet. It’s one of those simple additions that elevates everything around it.
Mounting it on wall cleats rather than cabinets keeps the cost low and the look clean. If you have a laundry nook, a butcher block top is one of the best upgrades you can make — it’s warm, beautiful, durable, and surprisingly affordable compared to other countertop materials.
Step 14: Add Open Shelves with Decorative Brackets
Above the butcher block countertop, simple open shelves with decorative brackets were planned to complete the laundry nook. The shelves and brackets will be painted the same color as the walls so they read as built-in rather than afterthoughts. This is a classic trick for making inexpensive shelving look intentional and custom.
Painting shelves the same color as your walls makes them feel architectural rather than decorative. It’s the difference between shelves that feel like furniture placed in a room and shelves that feel like they’ve always been there. The brackets add that traditional cottage character that ties back to the overall design direction of the space.
Step 15: Use a Curtain to Conceal Storage in the Nook
The finishing touch for the laundry nook involves a curtain on one side to conceal a large laundry basket that can be slid in and out of the space. This is a classic English cottage design element — under-counter curtains in place of cabinet doors — and it adds softness and texture to what could otherwise feel like a purely utilitarian zone.
Under-counter curtains are an underrated storage solution that also add warmth and personality. A center divide separates the two sides of the nook, so the curtain side stays tidy while the open side remains accessible. It’s functional, it’s beautiful, and it’s very easy to execute on any budget.
Tips and Best Practices for Your Own Renovation
Before you dive into your own home improvement renovation project, here are the most important lessons from this build that will save you time, money, and frustration:
Order materials early. The tile in this project was back-ordered and had to be ordered well in advance. Supply chain delays are real — especially for specialty items. Order early, and always order 10–15% extra for pattern cuts and breakage. Plan your electrical before walls close. Once drywall is up, adding or moving outlets and fixtures is expensive. Walk through every scenario — where will you want a lamp? Do you need a USB outlet? Where does the light switch make the most sense? Think it through completely before calling the electrician. Preserve future options during demo. Leaving plumbing in the wall for a potential future sink cost nothing and keeps that option alive without committing to it now. Think about what you might want in five years and build that flexibility in today. Match your grout width to the look you want. Wider grout lines read as brick; narrow lines read as tile. Neither is wrong, but they create very different aesthetics. And finally, color drench with confidence. It feels bold and a little scary, but painting every surface the same color in a detailed space like this is almost always the right call.
Frequently Asked Questions
What is the best way to start a laundry room renovation on a budget?
Start by identifying what’s actually causing friction in the space. Is it storage? Layout? Lighting? Often the biggest improvements come from reorganizing the layout rather than buying new things. Swapping to a compact all-in-one laundry unit, adding open shelving, and painting everything the same color can completely transform a laundry room for a few hundred dollars. For more ideas, check out these affordable home improvement projects under $100.
Do I need a permit to convert a window to a door?
In most jurisdictions, yes — converting a window to an exterior door requires a permit because it involves structural modification to an exterior wall. Always check with your local building department before starting this kind of work. Pulling the correct permits protects you when you sell the home and ensures the work is done safely.
Is vertical shiplap harder to install than horizontal?
Yes, slightly. Horizontal shiplap nails directly into wall studs, which are perfectly spaced for that application. Vertical shiplap needs a plywood backer installed first so every board has something solid to nail into. It’s an extra step and some added material cost, but the visual payoff is worth it — vertical lines draw the eye up and make ceilings feel dramatically taller.
Can a ventless laundry combo unit really replace separate washer and dryer machines?
For most households, absolutely. The Samsung Bespoke AI Ventless Laundry Combo handles full-size loads, washes and dries in one cycle without transferring clothes, and has a 5.3 cubic foot capacity that handles everything from delicates to bulky bedding. The main trade-off is cycle time versus a traditional two-machine setup, but the space savings and convenience more than make up for it in most homes.
Ready to Start Your Own Renovation?
This laundry room to mudroom transformation is proof that even the most frustrating, dysfunctional spaces in your home can become your absolute favorite rooms with the right plan and the right home improvement renovation project ideas. From demo day to the final coat of Whispering Woods paint, every decision in this renovation was intentional — and that intentionality is what you want to bring to your own projects.
Whether you’re tackling a full renovation like this one or just looking to make a few smart upgrades, start with your biggest pain points, plan your electrical and plumbing before walls close, and don’t be afraid to commit to a bold design direction. The results speak for themselves. Drop your questions in the comments below, and if you’re planning a bigger project, our guide to 8 DIY home improvement projects on a budget that transform your space is a great next read.