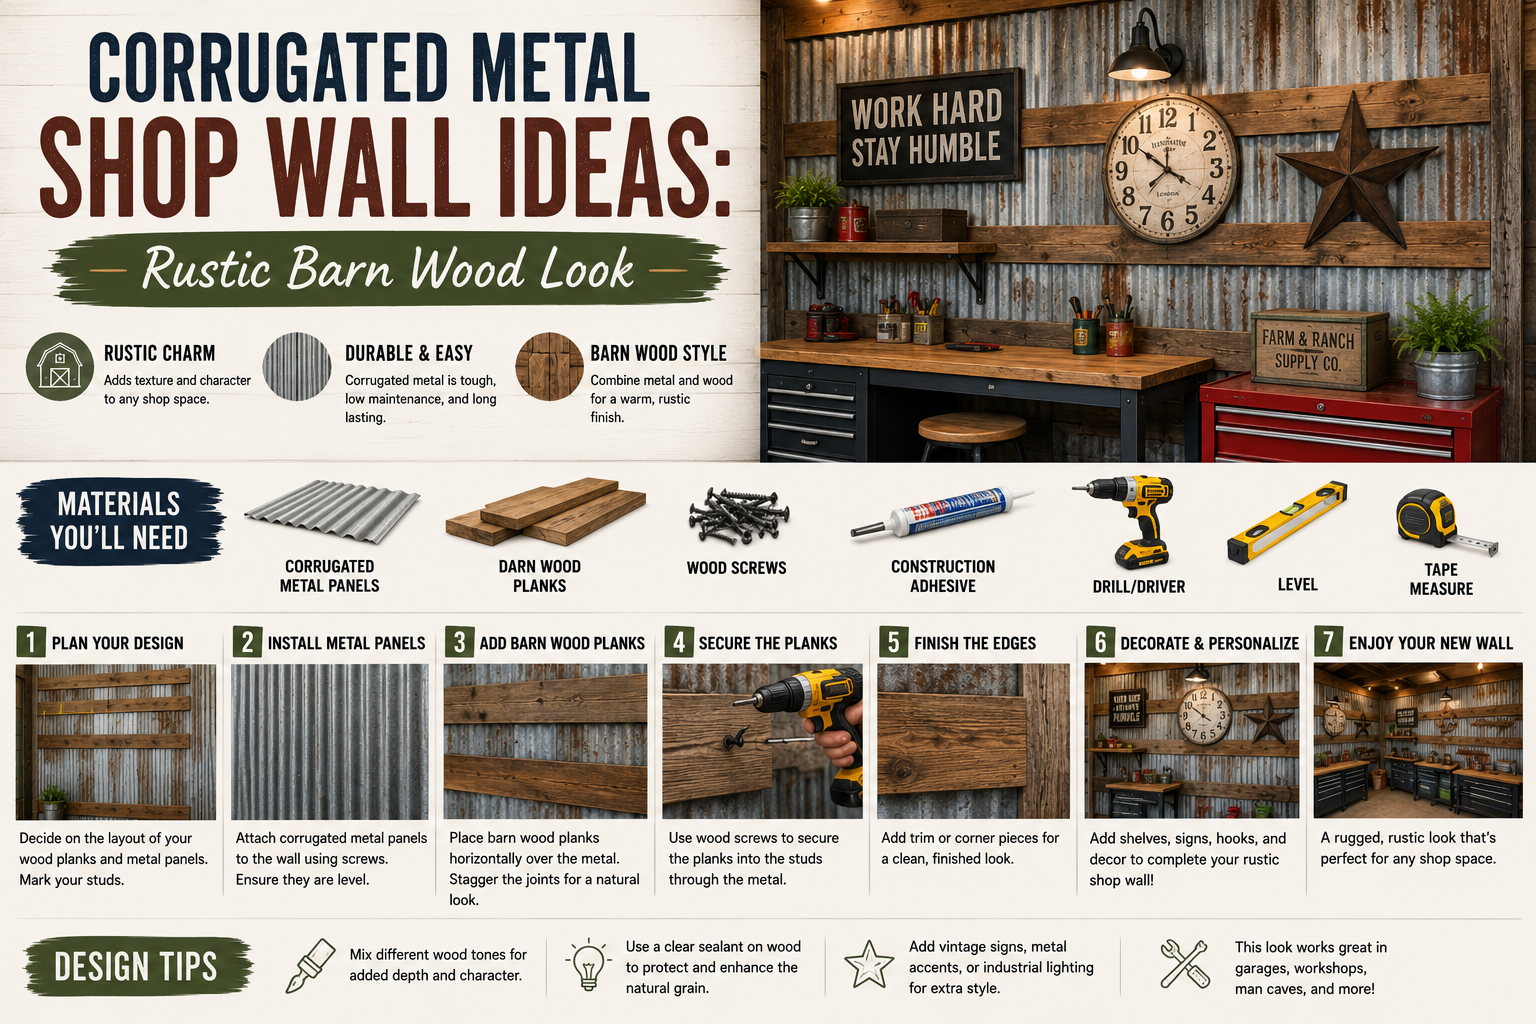
If you’ve been looking for corrugated metal shop wall ideas that actually deliver that wow factor, I’ve got something really special to share with you today. I wanted to transform a plain, boring shop wall into a rustic old-saloon-style entrance for a bar and hangout room I was building out — and the combination of distressed, rusted corrugated metal paired with reclaimed barn wood turned out even better than I imagined.
The barn wood I used came from an old tobacco barn, and I distressed and rusted the corrugated metal myself before installation. Both of those prep steps are worth doing ahead of time because they make the final wall look genuinely aged and authentic rather than like something you just picked up at a big-box store. If you want to see how I tackled similar budget-friendly transformations, my post on budget home improvement DIY ideas that save thousands covers a lot of the same thinking I bring to every project like this.
Below I’m going to walk you through every single step of how I built this wall — from prepping the surface and building out the stud structure, all the way to trimming it out and making it look finished. Let’s get into it.
Step 1: Prep the Wall Area and Install a Base Board
Before anything goes up on the wall, I always start with a clean, prepped surface. I cleared everything out of the way, swept the area down, and got organized. The first structural piece I installed was a 1×4 board screwed horizontally along the bottom of the wall. This acts as a base ledger that the corrugated metal panels will sit on and register against, which makes alignment a lot easier during installation.
I also used quarter-inch spacers on the ground before setting that 1×4 in place. That small gap at the floor level is important — it keeps moisture from wicking up into the wood and helps the whole installation feel more intentional. It’s a simple detail, but one I’d recommend skipping at your own risk if you’re building in a shop that sees any kind of humidity or water exposure.
Step 2: Build Out a Stud Structure on the Wall
Here’s where a lot of people get tripped up with corrugated metal shop wall ideas — you can’t just screw metal panels directly into drywall and call it a day. You need something solid to fasten into. My shop has metal studs behind the walls, so I built out a secondary wood structure using scrap 2×2 lumber attached to those metal studs with metal L-brackets.
This creates a wood sub-structure that gives me reliable fastening points across the entire wall. It doesn’t have to be pretty — it just needs to be solid and plumb. I used whatever scrap 2×4 and 2×2 material I had around the shop, which kept the cost of this phase essentially at zero. If you’re working with wood-framed walls, you can often skip this step and fasten directly into existing studs.
Step 3: Lay Out and Attach the Corrugated Metal Panels
With the stud structure in place, I laid out all of my corrugated metal panels before committing to any fasteners. This is a step I really recommend — it lets you figure out panel placement, overlap, and any tricky cuts before you’re committed. Once I was happy with the layout, I started fastening the panels using roofing screws, which are designed specifically for metal and have a neoprene washer built in to create a weathertight seal at each fastener point.
Roofing screws are the right call here because they grip metal well and the washer prevents the panel from cracking or distorting at the screw point. I drove them into my wood sub-structure, making sure every panel had multiple attachment points and wasn’t flexing or rattling. For a shop wall, rigidity matters — you don’t want panels moving around every time a door slams or equipment vibrates.
Step 4: Build Additional Studs for the Barn Wood in a T-Shape
The barn wood portion of this wall needed its own support structure, and I built those studs in a T-shape to give them rigidity and to make fastening to the metal studs easier. I used Pocket hole joinery to assemble the T-shaped studs quickly and cleanly — pocket hole screws are one of those tools I reach for constantly on shop builds because they’re fast, strong, and don’t require clamping setups for every joint.
Once assembled, I fastened these T-studs to the metal wall studs using the same metal L-brackets I used in Step 2. This creates a consistent, unified sub-structure that supports both the corrugated metal at the lower section and the barn wood above. Getting this framework right is what makes the whole wall feel solid and professional once it’s done.
Step 5: Cut the Barn Wood to Size
Cutting reclaimed barn wood is a little different from cutting fresh dimensional lumber. Old barn wood is often slightly cupped, twisted, or uneven — and the character is exactly what you want, so you don’t want to mill it flat. I used a circular saw for all my length cuts, and I found that using a speed square as a guide fence made getting clean, straight crosscuts much easier, especially on wide boards.
For any cutouts I needed — around light switches, outlets, or other wall obstructions — I switched to my jigsaw. A jigsaw is the right tool for those internal cutouts because you can plunge-cut into the board and navigate curves or corners that a circular saw simply can’t reach. I pre-marked every cutout location carefully before making any cuts, which saved me from having to patch any mistakes in expensive reclaimed material.
Step 6: Paint Behind the Gaps With Black Spray Paint
This is one of those small tricks that makes a huge difference in the final result, and I want to make sure I call it out clearly. Old rough-sawn barn wood is not perfectly flat or straight — which is part of the charm — but it does mean you’ll have visible gaps between boards. If the wall behind those gaps is white drywall, those bright white lines will stand out and ruin the rustic effect you’re going for.
My fix was simple: before installing each board, I hit the wall area directly behind where the gaps would fall with a quick coat of black spray paint. Those gaps essentially disappear because your eye reads dark shadow rather than a stark white line. It’s a two-minute step that makes the whole wall look intentional and polished. I’ve used this same trick on shiplap installs and board-and-batten work — it always pays off.
Step 7: Fasten the Barn Wood to the Wall
With the prep work done, I started putting barn wood up on the wall. For boards landing on the wooden T-studs, I used standard wood screws. For any boards that were fastening into the metal studs directly, I switched to self-drilling drywall screws, which are designed to tap through metal without pre-drilling. To make the process faster and to avoid splitting the old barn wood, I pre-drilled most of my holes before driving the screws.
Pre-drilling is especially important with reclaimed barn wood because it can be dried out and brittle after years of weathering — driving a screw without a pilot hole risks splitting a board you can’t easily replace. I also kept a tape measure handy throughout to keep courses level and consistent, even though a perfectly uniform layout isn’t required or even desirable with reclaimed material. You want it to look natural, not factory-installed.
Step 8: Tackle the Most Challenging Board — the 17-Foot Span
I’ll be honest with you — this was the hardest part of the entire project. I needed to get a 1×12 board that was 17 feet long up onto the wall at about 9 feet off the ground, and I was working solo. There’s no elegant way to do this, but here’s how I managed it: I set up two Ladders at either end of the board to act as temporary supports, and I used clamps to hold the board against the wall while I worked my way along it driving screws.
It was a little sketchy, not going to lie. But it worked. If you’re tackling something similar, take your time, make sure your ladders are stable, and use as many clamps as you need to keep the board from shifting before it’s secured. This is one of those situations where having a helper would make the job dramatically easier and safer — if you have someone who can help, use them. If you’re doing it solo like I was, go slow and be patient. For other cheap shed organization ideas that also involve working with large panels solo, the same clamping approach applies.

Step 9: Install Trim Pieces and Baseboards
Once the main wall panels were up, I cut additional pieces of barn wood to serve as trim. These trim pieces cover the gap between the corrugated metal section and the barn wood section above, creating a clean visual transition between the two materials. It’s a detail that reads as intentional design rather than an afterthought, and it’s worth taking the time to fit those pieces carefully.
I also installed a baseboards piece along the bottom of the wall. Functionally it’s not doing much — it’s purely cosmetic — but it grounds the whole installation and gives the wall a finished, built-in feel. Without it, the bottom edge of the corrugated metal feels a little raw and unresolved. With it, the wall looks like it was always meant to be there. It’s a 30-minute addition that makes a real difference.
Step 10: Frame Out the Doorway Opening With Barn Wood Trim
The last piece of this wall project was trimming out the opening that leads into the bar and hangout room. I framed the entire opening with barn wood trim pieces to carry the rustic saloon aesthetic all the way around the doorway. This is what ties the whole look together — without consistent trim around the opening, the wall feels unfinished even if the panels themselves look great.
This step did require me to go back and source additional barn wood before I could complete it, which is worth noting if you’re planning a similar project. Always get more reclaimed material than you think you’ll need, because matching it after the fact can be difficult. I’d rather have leftover pieces I can use for smaller trim details than find myself short when I’m trying to wrap up a doorway. For more ideas on working with reclaimed and rustic materials in shop and shed builds, my guide on shed studio builds that save thousands is worth a read.
Tips and Best Practices for Corrugated Metal Shop Wall Ideas
After building this wall from start to finish, here are the lessons I’d pass on to anyone tackling a similar project:
Distress and rust your metal before installation. Pre-treating the corrugated metal panels before they go on the wall gives you a much more even, authentic aged look. Trying to treat them in place is awkward and inconsistent.
Always build a wood sub-structure if you have metal studs. Roofing screws and wood screws are not designed for metal stud walls. Take the time to fur out a wood framework — your panels will be dramatically more solid.
Use a spray paint behind gaps before installing boards. Black spray paint on the wall behind gaps in reclaimed wood is a small detail with a big visual payoff. Don’t skip it.
Pre-drill every hole in reclaimed wood. Old barn wood is dry and brittle. A pilot hole prevents splitting and makes driving screws much cleaner and more controlled.
Use a speed square as a circular saw guide. For clean, square crosscuts on wide barn wood boards, a speed square clamped or held against the board works better than trying to freehand it.
Buy more reclaimed material than you think you need. Trim pieces, doorway framing, and touch-ups all eat into your supply. Sourcing matching reclaimed material after the fact is difficult — get extra upfront.
Clamp large boards in place before fastening. Especially for long or heavy boards installed high on the wall, use clamps to hold everything exactly where you want it before committing to any screws.
Frequently Asked Questions
Do I need to build a sub-structure before installing corrugated metal on shop walls?
If your shop has standard wood-framed walls with accessible studs, you can often fasten directly into those studs. But if your walls have metal studs — which is common in metal buildings and newer shop construction — you’ll need to build out a wood sub-structure first using 2×2 lumber and metal L-brackets. This gives your roofing screws and wood screws proper material to bite into and keeps the panels solid and rattle-free.
What kind of screws should I use to attach corrugated metal panels to a wall?
Roofing screws are the right choice for attaching corrugated metal panels. They have a hex head for easy driving, a sharp self-tapping point, and a built-in neoprene washer that prevents the panel from cracking or distorting at the fastener point. For attaching barn wood to wooden studs, standard wood screws work perfectly. For any fastening into metal studs directly, use self-drilling drywall screws.
How do I hide gaps between reclaimed barn wood boards?
The easiest and most effective solution is to apply black spray paint to the wall surface directly behind where each gap will fall before you install the board. When light hits those gaps, your eye reads dark shadow rather than bright white wall, and the gaps become virtually invisible. This trick works for shiplap, board-and-batten, and any other application where gaps are expected or unavoidable.
Can I do a corrugated metal and barn wood wall install as a solo DIYer?
Yes — I built mine solo, including a 17-foot board installed 9 feet up. It’s absolutely doable, but it requires patience and the right setup. Use multiple Ladders and plenty of clamps to temporarily support large boards in position while you drive fasteners. Pre-drilling all your holes first also makes the actual fastening go much faster once a heavy board is in position. That said, if you can get a helper for the large board portions, it will be safer and less stressful.
Wrapping It Up
This corrugated metal and reclaimed barn wood wall project is one of those builds that looks incredibly complex but is actually very achievable for a solo DIYer with basic tools and some patience. The key is doing the prep work right — building a solid sub-structure, pre-treating your materials, and taking the time on small details like the spray paint behind gaps and the trim pieces around the opening. Those details are what separate a wall that looks like a craft project from one that looks like a professional build.
I’m really happy with how this came out, and it’s just the beginning of the bar and hangout room build. If this kind of shop and workspace transformation is your thing, make sure you check out my post on garage organization ideas on a budget for more ways to make your workspace look and function better without spending a fortune.
If you have questions about any of the steps, drop them in the comments below — I read every one. And if you try this project yourself, I’d love to see how it turns out. Tag me or share a photo. Happy building!