If you’ve been looking for ways to upgrade your backyard this season, I’ve got five projects that will completely transform your outdoor space — and every single one of them is totally DIY-able, even if you’re just getting started. From creating a warm, glowing atmosphere with DIY backyard string light planters to building a full floating deck, there’s something here for every skill level and every budget.
My name is Michael, and here on The DIY Journey I share real, hands-on home improvement projects that save you money and give you something to be genuinely proud of. Whether you have a free weekend or a whole summer to work with, these backyard ideas are worth every minute you put into them. I’m breaking down five of the best backyard transformation projects so you have everything you need in one place.
I’ll walk you through each project from start to finish — the materials, the process, and the tips that make the difference between a project that looks amateur and one that looks like you hired a pro. Let’s get into it.
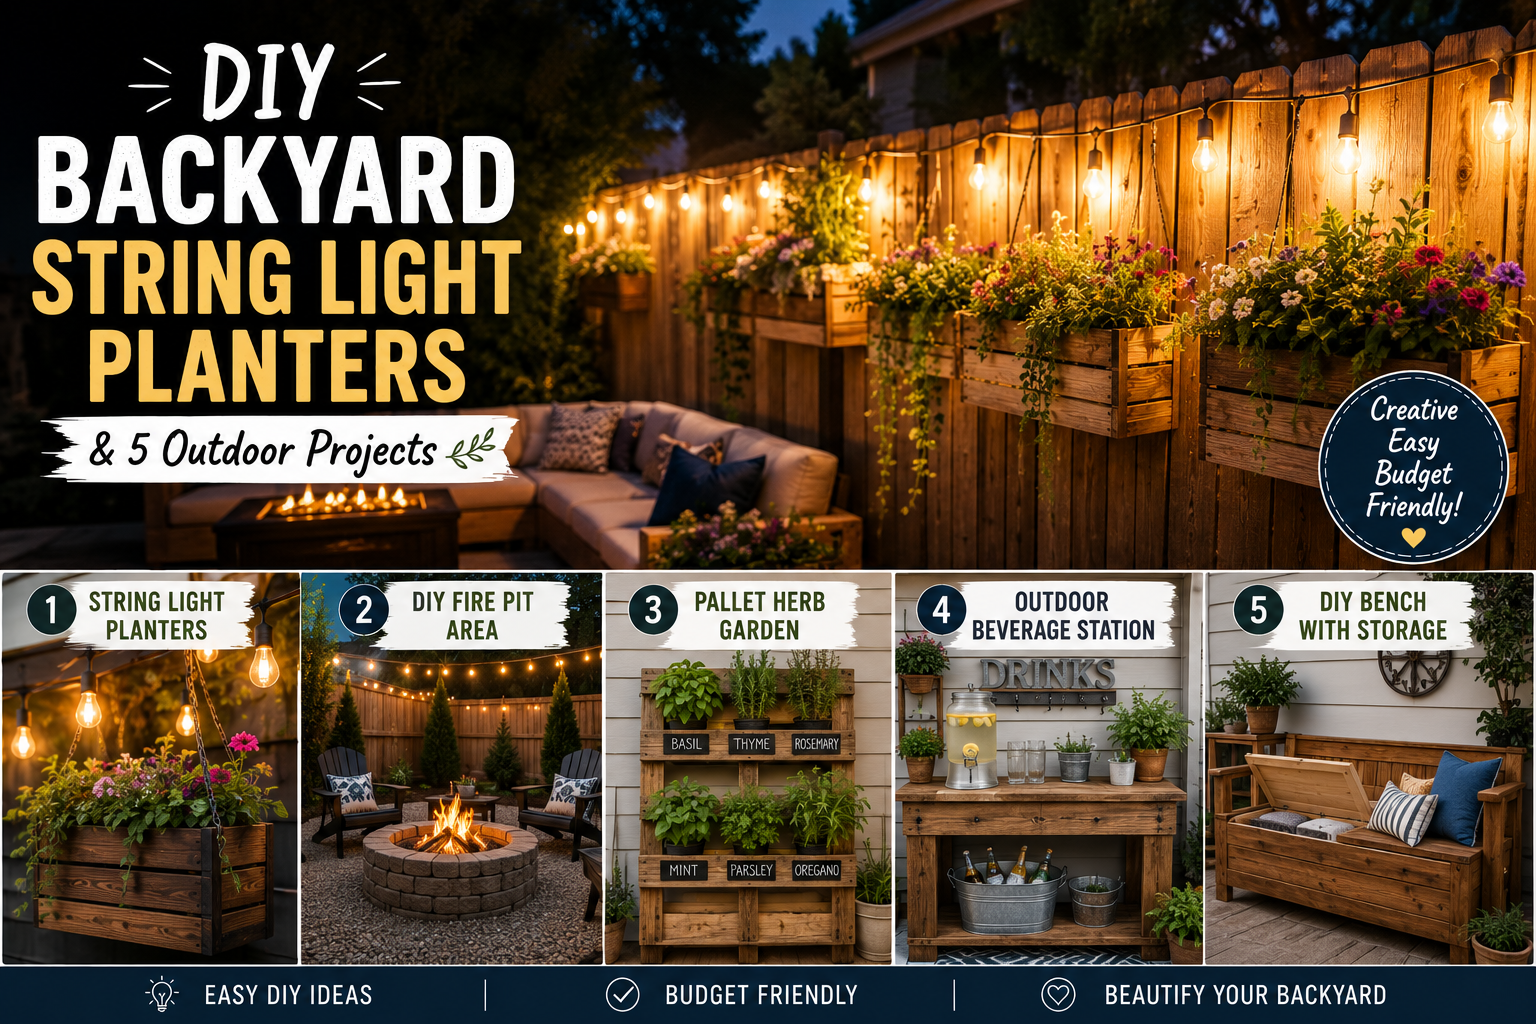
1. DIY Backyard String Light Planters
This is hands-down one of my favorite backyard upgrades, and it’s one of the easiest ways to create a beautiful ambiance for outdoor gatherings. The idea is simple: you build a sturdy post, set it into a concrete-filled planter pot, and hang string lights between the posts to create a soft, warm glow across your yard. It looks like something out of a magazine, but it’s completely DIY-friendly and surprisingly affordable.
For the posts, I’d use treated two-by-twos painted with a black exterior paint — that clean, modern look pairs perfectly with almost any outdoor style. For the pots, inexpensive planter pots from IKEA work great, though if you’re planning to use 4×4 posts, you’ll want to size up to a larger pot and use more concrete. Mix your concrete at about a 50/50 ratio with water, pour it in to about three-quarters full, then use scrap wood to hold the post perfectly level while it sets overnight.
Once the concrete has cured, drill a few drainage holes just above the concrete line, add potting soil, and plant some small decorative plants to finish the look. Then screw black hooks near the top of each post, run your string lights between them, and use an extension cord to power everything. One pro tip: staple the extension cord along the back of the post so it’s completely hidden. The result is a stunning, polished look that makes your backyard feel like an outdoor restaurant. During big storms, bring the lights indoors just to be safe — but in normal wind conditions, the concrete weight keeps everything secure. If you love budget-friendly outdoor transformations like this one, check out my guide on 5 DIY outdoor curb appeal projects you can do this weekend.
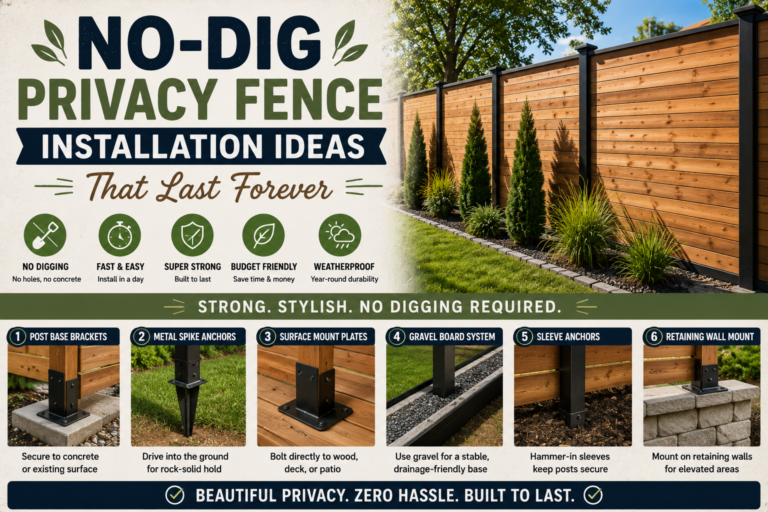
2. DIY Privacy Fence with Vertical Slats
If your backyard feels a little too exposed, a vertical slat privacy fence is one of the best investments you can make — and building one yourself saves a serious amount of money compared to hiring it out. This style of fence adds both privacy and a cool, modern visual interest that elevates the entire look of your outdoor space. The great thing about this design is how customizable it is: you can change the lumber size, adjust the spacing between boards, and pick any stain or paint color to match your yard’s vibe.
For a classic look, I’d mix one-by-threes, one-by-fours, and one-by-sixes in a random pattern — that varied width gives the fence a lot of character without requiring any fancy skills. Attach the boards to your support posts using a pneumatic stapler to speed things up considerably. The lumber doesn’t need to be treated as long as you finish it with a good exterior-grade stain and sealer, which will protect it from moisture, UV damage, and the general beating that outdoor wood takes over the years.
This is a project that pays off every single day — you get privacy, you get curb appeal, and you get the satisfaction of knowing you built it yourself. I’ve seen this type of fence completely transform a backyard from feeling like a fishbowl to feeling like a private retreat. For more inspiration on outdoor builds that add serious value, take a look at my post on DIY backyard patio and fireplace builds that save you thousands.
3. DIY Garbage Can Privacy Screen
Here’s a project that’s simple, practical, and makes a bigger difference than you’d expect: a privacy screen specifically designed to hide your garbage cans, recycling bins, or any bulky outdoor equipment that clutters up your yard. It’s built very similarly to the slat fence above, which means if you’ve already tackled that project, this one will feel like a breeze.
To keep costs down, buy one-by-six boards and rip them down the middle on a circular saw — you essentially get two boards for the price of one. Use two-by-fours for the posts, space the boards evenly, and secure everything with exterior screws. Build three separate sections, then connect them with heavy-duty hinges so the screen can fold open for easy access to your bins. The hinged design is key — it means you’re not fighting a rigid structure every trash day.
Finish the whole thing with a waterproofing stain and sealer applied with a paint sprayer for quick, even coverage. This one project alone can make your entire yard look cleaner and more intentional, and it costs a fraction of what a prefab privacy screen would run you at the hardware store. It’s the kind of small upgrade that visitors always notice, even if they can’t quite put their finger on why your yard looks so put-together.
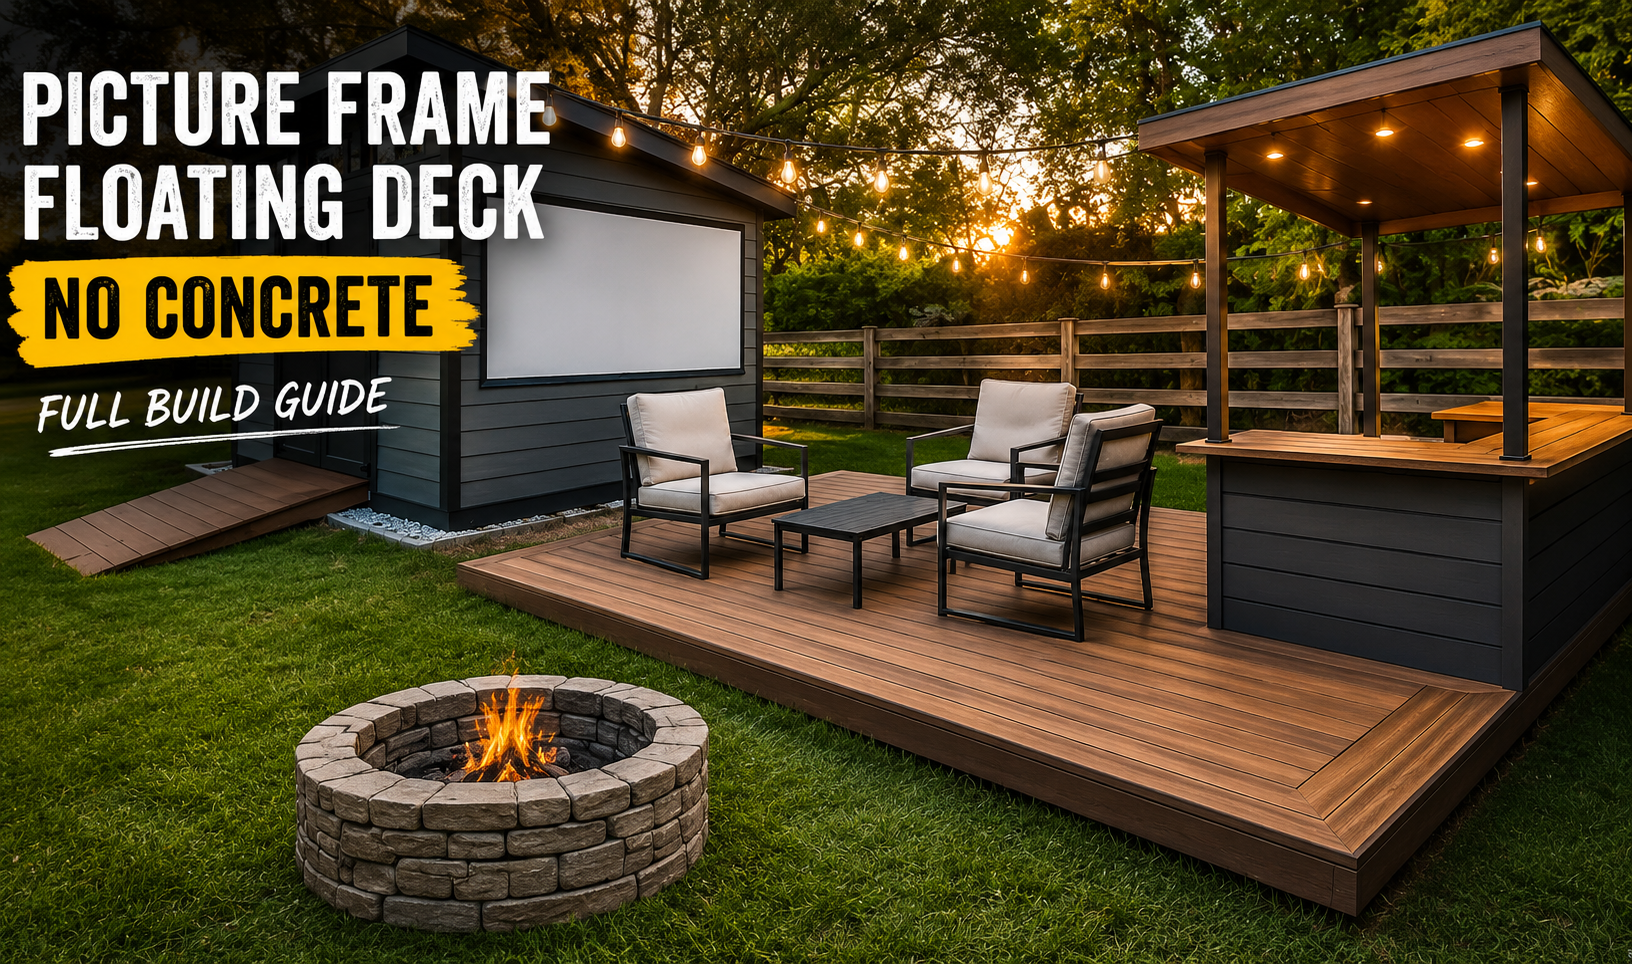
4. DIY Floating Deck
Now we’re getting into the big leagues. Of all five projects covered here, the floating deck is the most time-consuming — but it’s also the one with the highest payoff. A well-built deck adds real, measurable value to your home, and it creates usable outdoor living space that you’ll enjoy literally every single day of the warm season. The “floating” part means it doesn’t require permanent footings attached to the house, which simplifies the build considerably and often eliminates the need for permits (though always check your local codes).
For materials, I’d use treated lumber for all the framing — it needs to hold up against ground moisture and the elements for years to come. For the decking surface, Trex composite is worth the investment: it looks beautiful, it’s incredibly low maintenance, and it won’t warp, splinter, or need annual sealing the way traditional wood decking does. Use joist hangers to properly secure your framing members, and expansion clips when installing the composite boards to allow for natural expansion and contraction with temperature changes.
Yes, this is a multi-day project and it will test your patience at times. But if you’re willing to put in the work, building your own floating deck is completely achievable as a DIY project — even for someone without professional carpentry experience. Having the right tools matters: a good circular saw, a tape measure, and a laser level will make the process so much smoother. For a deep dive into a similar outdoor build, my post on building a picture frame floating deck with no concrete needed walks through the whole process in detail.
5. DIY Cedar Planter Boxes on Wheels
Rounding out the list is one of the most thoughtful backyard DIY projects I’ve come across: raised cedar planter boxes built tall enough that you don’t have to bend over to tend your plants, and mounted on casters so you can wheel them in and out of the shade depending on what you’re growing. It’s such a smart, functional design, and it looks absolutely beautiful in any outdoor space.
Cedar is the ideal wood for this project. It’s naturally weather-resistant and insect-resistant, which means you don’t need to stain or seal it to keep it looking great for years. Yes, it costs a bit more than other lumber options, but the longevity and the low maintenance make it well worth the extra spend. Use four-by-fours for the legs and two-by-fours for the framing. Connect the framing boards with pocket hole joinery — it creates strong, clean joints without visible fasteners on the outside of the box.
For the bottom, use 1×8 cedar boards to create the floor of the planter (don’t forget to leave small gaps for drainage). Stack two 1×8 boards on each side for the exterior walls, then cap the whole thing with 1×4 cedar trim around the top edge for a finished, polished look. Before you attach the legs permanently, mount three-inch rubber casters to the bottom of each leg so the whole planter rolls easily across a deck or patio. The ability to move these around based on sunlight is a total game-changer, especially if you’re growing vegetables or herbs that need specific light conditions throughout the day.
Tips and Best Practices for DIY Backyard Projects
Before you dive into any of these projects, here are a few things I’ve learned that will save you time, money, and frustration along the way.
Always use exterior-grade materials. Whether it’s screws, paint, stain, or lumber, anything going outside needs to be rated for outdoor use. Interior materials will break down quickly when exposed to moisture and UV, and you’ll end up redoing the project far sooner than you should. Measure twice, cut once — this is the oldest rule in the book, but I still remind myself of it on every single project. A tape measure is your best friend, and a laser level is worth every penny for keeping things plumb and square.
Don’t skip the finish. Whether it’s a waterproofing stain on your fence, drainage holes in your planter, or composite decking on your floating deck, the finishing details are what separate a project that lasts five years from one that lasts twenty. Plan for drainage on any project involving soil or water — concrete planters, cedar boxes, and deck surfaces all need a way to let water escape. And finally, invest in decent tools — a reliable circular saw, quality extension cords, and proper safety gear will make every project safer and more enjoyable. You can find more budget-conscious ways to approach projects like these in my roundup of budget home improvement DIY ideas that save thousands.
FAQ: DIY Backyard String Light Planters & Outdoor Projects
How much concrete do I need for DIY backyard string light planters?
For a standard IKEA planter pot with a two-by-two post, one to two bags of concrete mix is usually plenty. You’re filling the pot about three-quarters full at a 50/50 mix ratio with water. If you’re upgrading to a larger pot with a 4×4 post, plan on using more — possibly three to four bags — to ensure the post stays stable and upright in windy conditions.
What kind of string lights work best for outdoor planters?
You want bulb-style string lights rated for outdoor use — the kind with exposed Edison-style bulbs tend to look the best and create the warmest ambiance. I’d look for lights at Costco or similar warehouse stores for the best price-per-foot value. Make sure whatever lights you buy can connect to a standard outdoor extension cord, and always use an outdoor-rated cord rather than an indoor one.
Is cedar worth the extra cost for outdoor planter boxes?
In my opinion, absolutely yes. Cedar is naturally resistant to rot, moisture, and insects, which means you don’t have to stain or seal it to keep it in good shape — and it still looks beautiful as it weathers over time. While it costs more upfront than standard dimensional lumber, you’ll more than make up for it in longevity and zero maintenance costs over the years.
Do I need a permit to build a floating deck?
This varies by location, but floating decks — because they’re not attached to the house and sit close to the ground — often don’t require a permit in many municipalities. That said, always check with your local building department before you start. Rules vary significantly by city, county, and state, and the last thing you want is to build a beautiful deck only to have to modify or remove it later.
Conclusion
There you have it — five backyard DIY projects that range from a simple afternoon build to a full multi-day challenge, and every single one of them is completely worth it. Whether you start with the DIY backyard string light planters to set the mood for evening gatherings, add a slat privacy fence to reclaim your space, hide your garbage cans with a clever hinged screen, build your own floating deck to add real value to your home, or construct beautiful cedar planter boxes on wheels — each project builds your skills and transforms your outdoor living space one step at a time.
I’d love to hear which project you’re tackling first. Drop a comment below and let me know what outdoor DIY you’re working on this spring or summer — and if you found this post helpful, share it with a friend who’s been wanting to upgrade their backyard too. Let’s make this the best outdoor season yet.