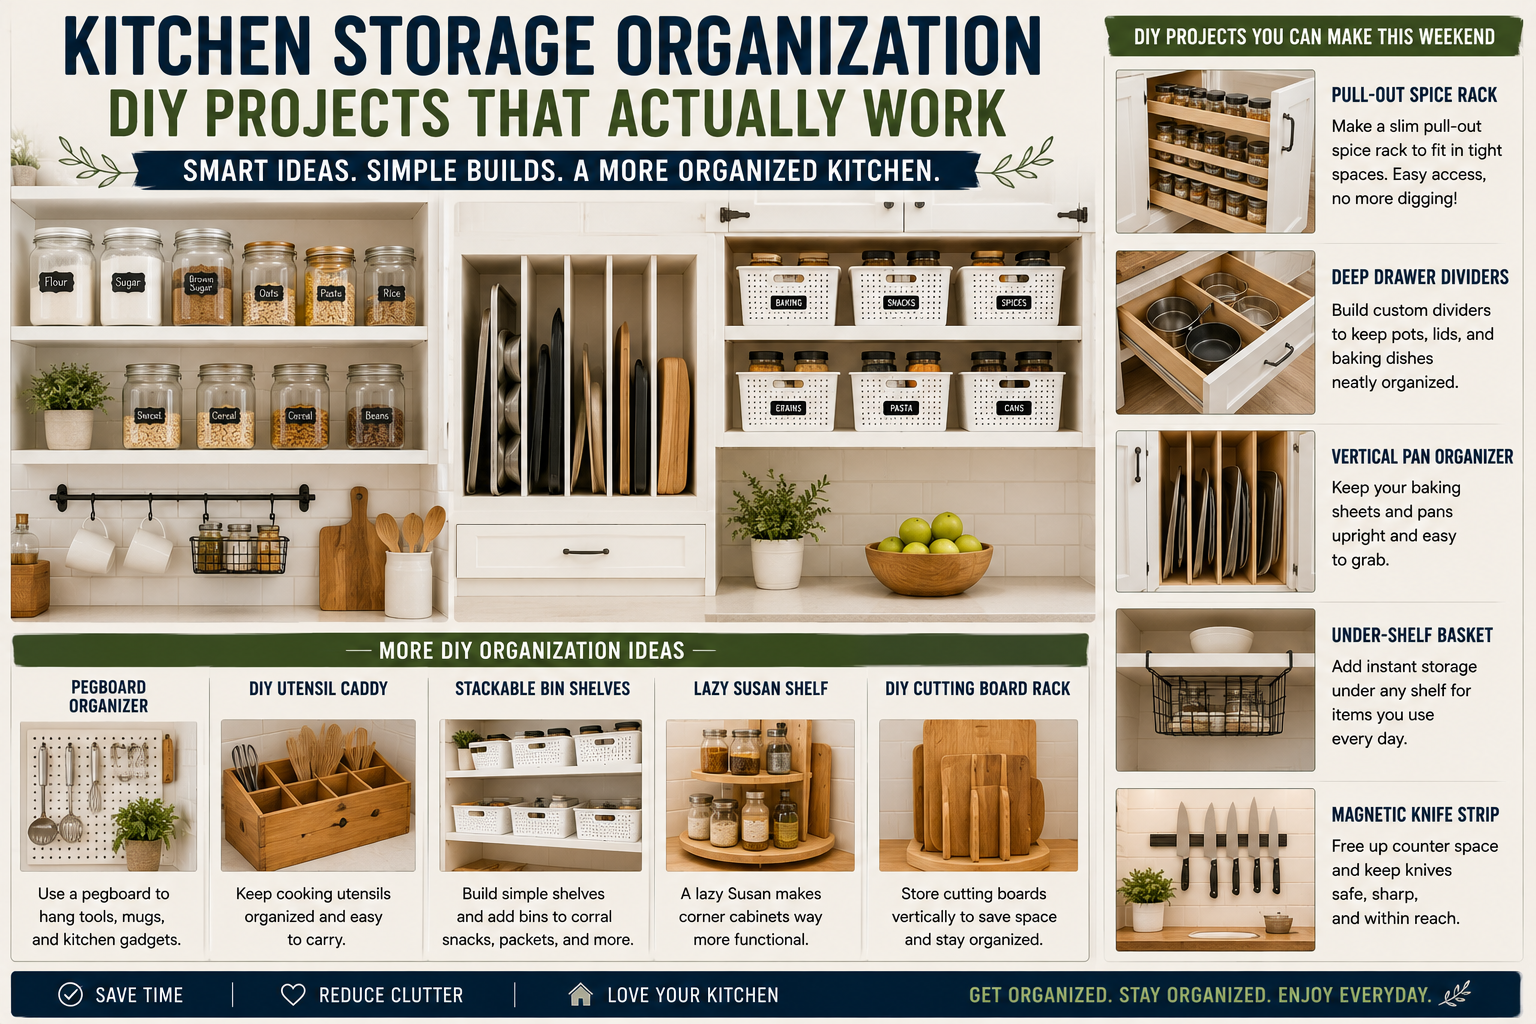
If your kitchen cabinets are a chaotic mess of duplicate spices, mystery ingredients, and awkward appliances shoved into the wrong spots — I get it. I’ve been there. I’m Michael, and I’ve spent years tackling the most frustrating storage problems in my own kitchen, one DIY project at a time. Today I’m sharing three kitchen storage organization DIY projects that seriously changed the game for me, covering the biggest offenders: spices, baking supplies, large containers, and those oversized kitchen items that always end up in some random cabinet you can never reach.
The best part? None of these projects require a massive workshop or an expensive tool collection. I built all three of these with basic tools, affordable materials, and a little patience. If you’ve been looking for budget DIY home improvement projects that actually transform your space, this one is right up your alley. Whether you’re a seasoned builder or just getting started, these are completely approachable and the results are incredible. Oh — and I’m also going to show you how to use one of these projects to hide your secret snacks. You’re welcome.
Let me walk you through each project from start to finish so you can tackle them yourself this weekend. I’ll cover materials, techniques, tips for avoiding the mistakes I already made, and how to customize everything to fit your own kitchen.
Project 1: The VIP Door-Mounted Spice Rack
This is the simplest of the three projects by far, and honestly, it might be the most satisfying. The whole thing comes from a single piece of wood cut into four pieces — two long pieces for the sides and two shorter pieces for the shelves. I used my miter saw for the first cuts, but you can absolutely use a basic hand miter box if that’s what you’ve got. Affordable tools get the job done, and I’m proof of that.
The concept here is a VIP spice rack — not one that holds every spice you own, but one that keeps your most-used spices right at your fingertips. For me, that’s Lowry’s, Lawry’s seasoning, Montreal seasoning, garlic salt, and lemon pepper. I always found myself digging through two containers of ginger and some garam masala I’ve never touched just to find the things I actually use. This rack mounts on the back of a cabinet door and holds five or six of your go-to spices in prime real estate.
To keep the spices from falling out when the door swings open and closed, I added an aluminum rod across the front of each shelf instead of just a plain strip of wood. I drilled clean holes using a 1/4-inch brad point bit, which gives you a crisp hole with no blowout. I cut the aluminum rods just a little longer than the opening so they sit securely in the holes — about 3/16 of an inch into each side. A rookie mistake is cutting them too short, and yes, I’ve done that a few times. After cutting, I buffed the ends smooth for a clean, matte finish that looks really sharp.
Rounding the Edges and Finishing the Spice Rack
I’m a firm believer that squared front edges on a handmade project are basically a crime. To give the side pieces a nice rounded corner at the front, I traced an arc using the top of a spice container as a guide — it’s the perfect radius and it’s already sitting right there in your kitchen. I taped both side pieces together and sanded them as one unit so the curves matched perfectly.
For finishing, I gave everything a light sand with 150-grit sandpaper, then used wood putty and the blue tape trick for any nail holes. Here’s the trick: apply the blue tape first, fill the nail holes right on top of the tape, let it set for a minute, then peel the tape off. The wood putty stays exactly where you want it without any mess spreading across the surface. After a light sanding, the surface is smooth and ready to paint or finish. I went with a clear spray-on finish to protect the wood and match the natural look, but you can paint this to match your cabinet color if you prefer a more seamless look.
For mounting, I used a small strip glued and nailed to the top of the unit, which lets me screw into the cabinet frame rather than risking going through the cabinet door face. This is especially important if you have a frame-and-panel door like mine — because the panel is recessed, you can’t just use L-brackets on the bottom the way you would with a solid slab door. Whatever your door style, the key rule is: never drive a screw all the way through the front of your cabinet. Take your time on the mounting step and measure carefully. Once it’s in, it’s incredibly satisfying — I now have my six most-used spices right on the door and I haven’t bought a duplicate container of kosher salt since.
Project 2: Converting a Cabinet Into a Pull-Out Pantry Organizer
This one I’ve been wanting to tackle for a long time, and it completely changed how I use one of the most underutilized cabinets in my kitchen. The cabinet in question had a pull-out tray but was being used to store a single small appliance — a total waste of vertical space. My goal was to convert it from a simple opening door into a full pull-out unit with multiple levels, so I could store the things that were piling up above the microwave and actually access them easily.
The build starts with 3/4-inch plywood cut into four pieces to form a simple box. The dimensions will depend on your specific cabinet, but the goal is to make the box just slightly narrower than the cabinet opening so it slides in and out smoothly on drawer slides. I added a fixed bottom shelf and one adjustable middle shelf using shelf pin brackets. The floating shelf means I can technically adjust it — though honestly, like most shelf pins in history, I’ll probably set it once and never touch it again.
One of my favorite details on this build was using edge banding on all the plywood edges. Edge banding is a veneer strip with heat-activated glue on the back — you just iron it on, trim the excess with a razor blade or chisel, and suddenly your plywood looks like real hardwood. I used my wife’s iron. I did not actually use my wife’s iron because I value my life — I have my own. Applying edge banding is genuinely one of my favorite parts of any woodworking project. It’s meditative, it’s easy, and the transformation is remarkable. After banding, I also added small 1/4-inch by 1.5-inch strips along the front edges of the shelves with a round-over profile so nothing rolls off and there are no sharp edges.
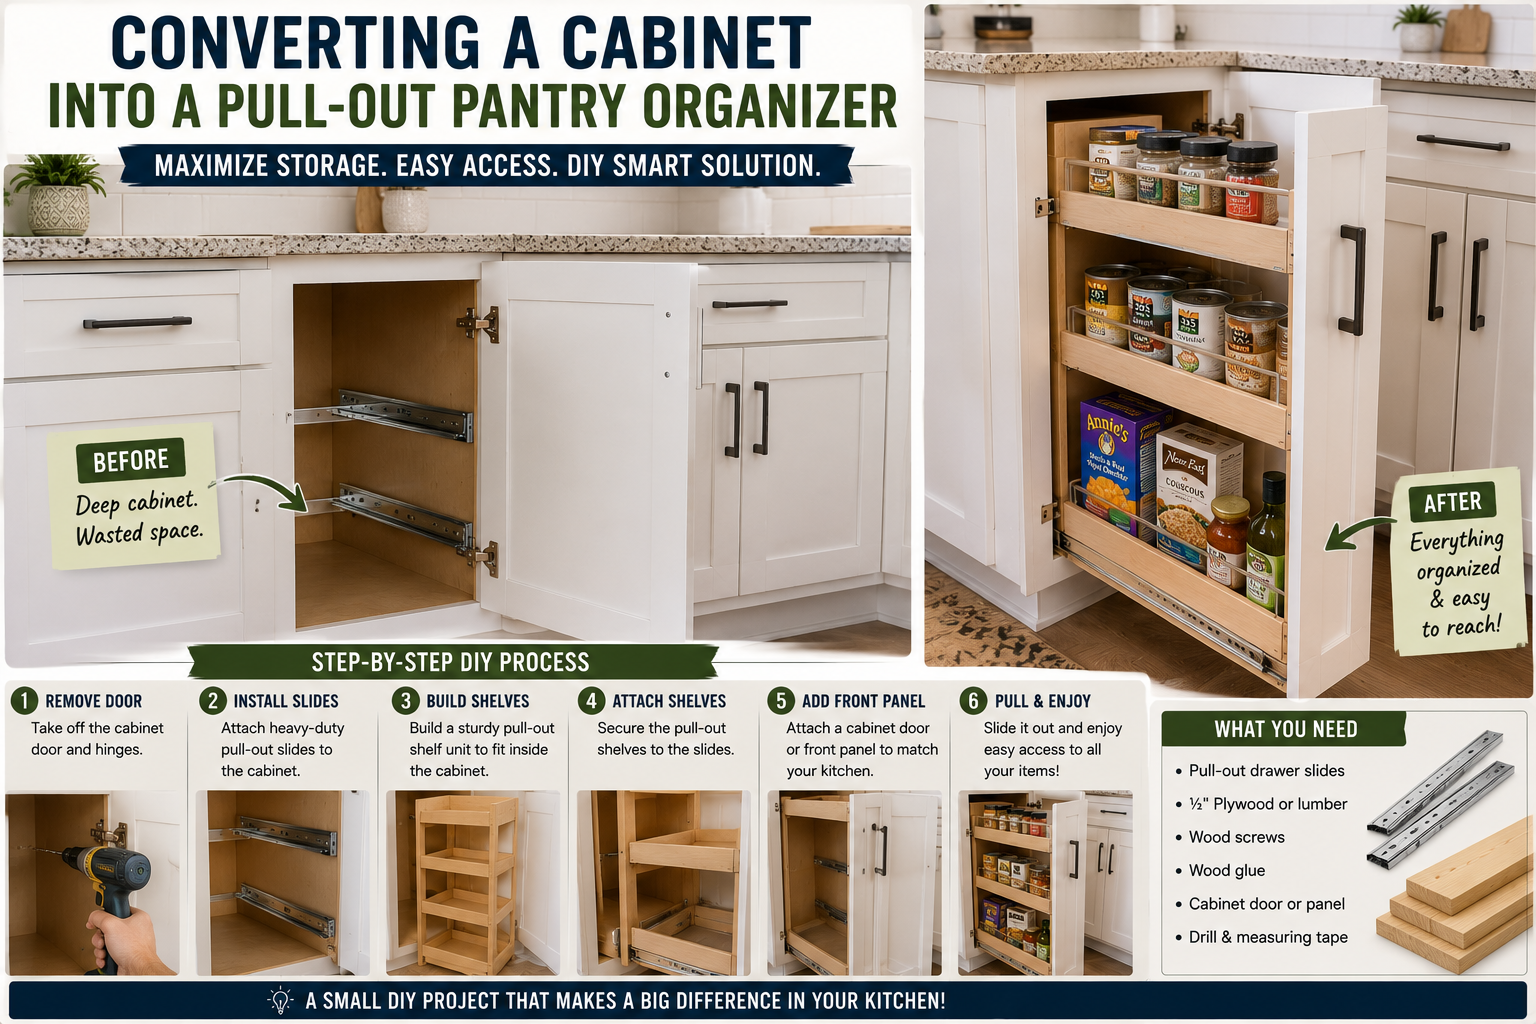
The Drawer Slide Trick That Saves an Inch of Cabinet Width
Here’s where I went a little off-script and it paid off. Standard drawer slides mount on the outside of a box, which means you lose about an inch of cabinet width — half an inch per side. Since I was building this as large as I possibly could to maximize storage, losing that inch wasn’t acceptable. My solution was to cut notches in the corners of the box and recess the drawer slides into the sides of the unit itself.
That way the drawer takes up nearly the full interior width of the cabinet rather than the full width minus the slide thickness. It added a little complexity to the cuts, but the fit was perfect. I used 22-inch drawer slides, positioned them using a speed square to keep them level, and shimmed out the face frame on the cabinet so the inside wall was flush with the frame — a critical step that a lot of people skip and then wonder why the drawer doesn’t glide smoothly.
Once the slides were set, attaching the cabinet door face was straightforward. I removed the original hinges and handle, positioned the slab door on the front of the new pull-out box, drilled new holes for the handle using longer screws to accommodate the added thickness, and secured everything in place. The adjustable middle shelf got screwed into position once I found the sweet spot. Then came the really satisfying part: loading it up. I moved all my spices down to the bottom shelf and all my different salts — and yes, I found three containers of kosher salt because we kept buying more since we could never find them — up on the top. There’s even an entire open row on the back side for future additions. This is a serious upgrade for any kitchen.
Project 3: Unlocking Unused Cabinet Space (The Secret Snack Hideout)
The transcript cuts off before the full reveal of project three, but here’s what I can tell you: I’ve been taking advantage of drawers, doors, and the space in between for years — but there was one area I had completely ignored. That unused, overlooked space is exactly where this third project lives, and it’s also where I stash the snacks that no one else in the house needs to know about. Every kitchen has that dead zone, whether it’s above the cabinets, in a deep corner, or behind a cabinet door that never gets opened — and that’s the target.
The approach follows the same philosophy as the other two projects: measure what you have, build a simple structure that fits the space, add some organization layers, and mount it cleanly. The materials are minimal, the tools are basic, and the payoff is massive. If you’re inspired to keep going after these three projects, I’d also recommend checking out my full garage organization ideas on a budget guide — a lot of the same principles apply in different rooms of the house.
Tips and Best Practices for Kitchen Storage Organization DIY Projects
After building all three of these projects, here are the key lessons I want you to take away before you start cutting wood:
Measure your cabinet opening first, then subtract. Always build your insert slightly smaller than the opening — even just an 1/8 inch on each side — so you have room to work with during install. Building to the exact dimension looks great on paper and becomes a nightmare in real life.
Use edge banding on any exposed plywood edges. It takes ten extra minutes and turns a rough workshop-looking piece into something that looks store-bought. This single step elevates the finished quality more than almost anything else you can do.
Apply blue tape before filling nail holes. Fill right on top of the tape, wait for the putty to set, peel the tape off, give it a light sand. No mess, no cleanup, clean result every time.
Drill shelf pin holes at high speed. If your drill has two speeds, always use the high speed for shelf pin holes. It makes a cleaner hole with less tear-out, and your shelf pins will fit snugly without wobbling.
Recess your drawer slides when space is tight. If you’re building a pull-out for a narrow cabinet, cutting notches to recess the slides into the sides of the box instead of mounting them on the outside can recover a full inch of usable width. That inch matters more than you’d think.
Don’t skip the shim step on face frame cabinets. If your cabinet has a face frame (the wood border around the opening), the interior wall will be recessed from the front of the frame. Shimming it out so everything is flush is what makes your drawer slides work correctly and your pull-out glide smoothly.
Start with your most-used items. Whether it’s a spice rack or a pull-out pantry, organize around the things you reach for every single day. Your most-used items should be at eye level and within arm’s reach. Everything else can go higher, lower, or toward the back.
Frequently Asked Questions About Kitchen Storage Organization DIY Projects
What type of wood should I use for a door-mounted spice rack?
For a door-mounted spice rack, I used a single board of common pine, which is lightweight, affordable, and easy to cut and sand. Since spices are light, you don’t need anything heavy-duty. If you want a more finished look, poplar takes paint beautifully. Just make sure whatever wood you choose is light enough not to stress the cabinet door hinges over time.
Can I build these projects without a power saw?
Yes, absolutely. I used a miter saw for speed, but I also showed off a basic hand miter box in the spice rack build — and that works just fine for these cuts. A circular saw is another great option if you have one, but none of these projects require anything fancy. Budget-friendly tools are completely capable of producing great results, and I say that from experience.
How do I mount a pull-out organizer in a cabinet with a face frame?
The trick is to shim out the inside of the cabinet so the interior wall is flush with the face frame. I used small pieces of plywood as spacers, screwed into place before installing the drawer slides. This gives the slides a flat, flush surface to mount against so the pull-out glides smoothly without catching on the frame. It adds a step, but it’s what makes the difference between a janky drawer and one that feels custom-built.
What drawer slides work best for a kitchen pull-out cabinet organizer?
I used 22-inch full-extension drawer slides for my pull-out organizer, which let the unit slide all the way out so I can see and access everything on every shelf. Full-extension slides cost a little more than standard slides but are absolutely worth it for kitchen storage — the whole point is being able to see and grab what you need without digging around. Make sure you buy slides rated for at least 75–100 lbs if you’re planning to load them up with canned goods or heavy kitchen items.
Final Thoughts: Your Kitchen Deserves Better Storage
These three kitchen storage organization DIY projects prove that you don’t need to spend a fortune or gut your entire kitchen to make it work better. A single board and some aluminum rod turned into a mounted spice rack that finally put my most-used seasonings within arm’s reach. A box of plywood and a set of drawer slides turned a wasted cabinet into a pull-out pantry I use every single day. And the secret snack situation? Handled.
If you’re ready to keep the momentum going, I’d highly recommend reading through my guide on budget kitchen renovation ideas under $5,000 for bigger-picture upgrades that still keep costs reasonable. And if organizing one room has you fired up to tackle the whole house, check out my roundup of budget home improvement ideas you can do in 30 minutes — perfect for quick wins between bigger builds.
Now get off the internet and go build something. Your kitchen is waiting.