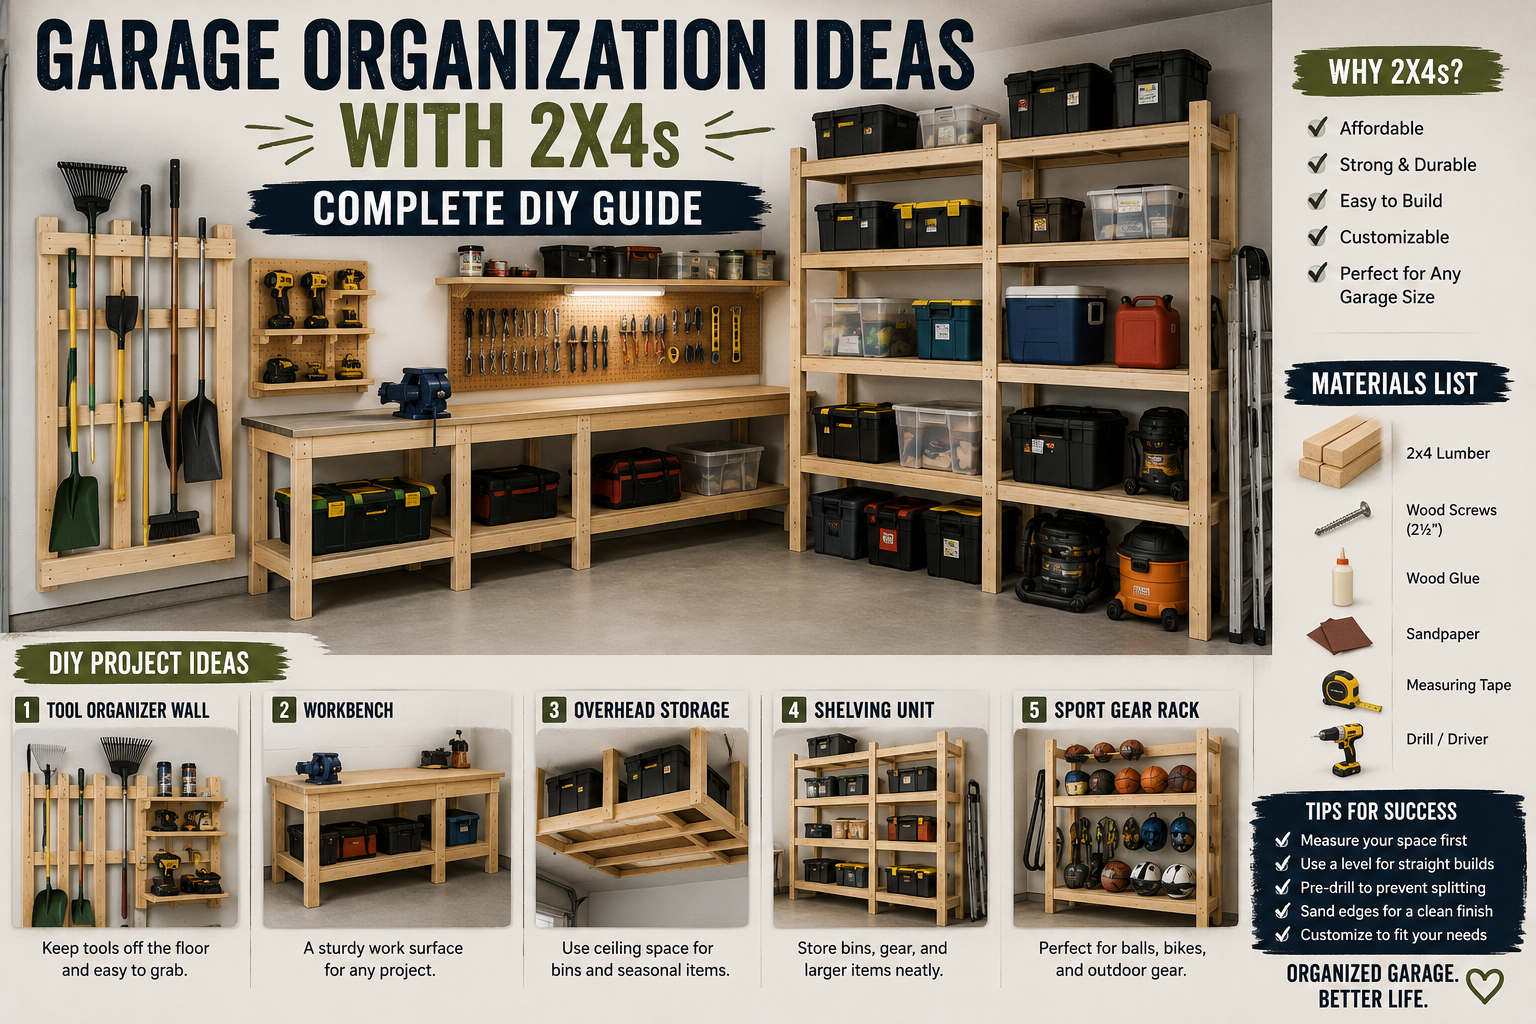
If your garage looks like a disaster zone — bins everywhere, tools piled up, and no clear path to walk through — I’ve got good news. I’ve tested a garage organization system that uses nothing more than 2×4s, some 3/4-inch plywood, and two different lengths of construction screws, and it completely transforms the space. No fancy joinery, no expensive materials, and honestly, no nails at all. The whole thing goes together with screws, which means it’s also fully removable and reconfigurable whenever your storage needs change.
What I love most about this approach is how customizable it is. Shelves can be 16, 24, 32, or even 48 inches deep depending on what you’re storing. You can build in a workbench, dedicated spots for ladders, freezer space, or bins — whatever fits your life. And if your needs change down the road, you can pull a section apart with just four screws and rebuild it entirely differently. That kind of flexibility is hard to find with traditional shelving systems. If you’re looking for more budget-friendly ways to upgrade your garage, check out my post on garage organization ideas on a budget for even more inspiration.
In this post, I’m going to walk you through every step of this build — from setting a level base all the way to framing in a built-in freezer and a custom workbench. Let’s dig in.
Step 1: Build a Flat and Level Base Platform
The very first thing I do before anything else is establish a flat, level platform to build on. Garage floors are almost never perfectly level, so if you skip this step, everything you build on top of it will be slightly off. I start by setting up a laser level to project a level line on the wall, then I take a 10-foot 2×4 and screw it directly into the wall studs along that laser line. Because it’s not contacting the cement directly, untreated lumber works fine here.
To find the studs, I use a rare earth magnet to locate the existing screws or nails in the drywall — it’s one of those little tricks that saves a ton of time. I also pre-set my screws before lifting the board into position so I can just drive them right in once I’ve got the board aligned to the laser. Once the wall 2×4 is in, I cut intermediate blocking pieces to fill in the base frame. The key measurement here is to measure from the wall 2×4, not from the wavy garage wall itself — that way your toe kick stays perfectly straight instead of following every dip and bulge in the concrete wall behind it.
Step 2: Shim the Base Perfectly Level
Once both sides of the base frame are built, I use composite shims along with construction adhesive to get everything perfectly level front to back. Composite shims are great for this because they won’t compress or rot over time the way wood shims can. I check the base with a level and adjust the shims until everything reads flat in every direction.
This step might feel like overkill, but it’s what gives the whole system that polished, built-in look at the end. If your base is off even slightly, your shelves will sit crooked, your bins won’t slide in cleanly, and you’ll notice it every time you’re in the garage. Taking an extra 20 minutes here saves a lot of frustration later. Once the shims are set, I screw down the 3/4-inch plywood base on top — this is the foundation everything else rests on.
Step 3: Attach a Ceiling Plywood Strip for the Top of the Partitions
Here’s a step that a lot of DIYers skip, and it makes a huge difference in how solid the finished system feels. I set my laser level on the front edge of where my top shelf will sit, project that line up onto the ceiling, and then screw two strips of 3/4-inch plywood — each about 6 inches wide — all the way across the ceiling at that line. In a wide garage, that could mean running strips 25 feet across.
These ceiling strips are what the tops of my vertical partitions will attach to. It’s essentially creating a top rail for the entire storage system, which is what makes everything so rigid and stable. Without it, the partitions would just be floating, and the whole thing would rack and wobble under load. With it screwed to the ceiling joists, the system is locked in place from top to bottom.
Step 4: Build and Install the Vertical Partitions
The partitions are the vertical dividers that separate your storage sections — bins here, tools there, brewing equipment in another bay. Each one is built from two 2×4s cut to the exact height I measured inside (from the bottom of the ceiling plywood strip down to the top of my base), connected top and bottom by 1.5-inch by 32-inch strips of plywood. Two screws into each 2×4 at each end gives eight screws total per partition — plenty strong.
To install, I just lift the partition into place — it should be snug, just like you want — flush it out, then put one screw at the top connecting into the ceiling plywood and two screws at the bottom into the base. That partition is going absolutely nowhere. And because I know from the laser that the front of the system is perfectly plumb, I don’t worry too much about the back wall being out of square (garage walls frequently fall away by over an inch across 9 feet). The front face is what people see, and that’s what matters. Once all partitions are in, I have clearly defined bays for every storage category I need.
Step 5: Cut and Install Shelf Cleats Efficiently
Instead of measuring every single shelf placement individually, I use spacer blocks cut to a consistent size and just stack them to set the height of each cleat. This way I’m not crawling around on the floor with a tape measure for every single shelf — I set the spacer block down, rest the cleat on top, and screw it in. Fast and consistent.
The cleats themselves are cut from 2×4s at 31 and 7/8 inches long — just slightly shorter than the 32-inch plywood shelf width, which is intentional. That fraction of an inch gives the shelf room to slide in cleanly without binding. Better yet, I can get three cleats out of a single 8-foot 2×4, which keeps material waste to a minimum. I also always measure the actual width of each bay at the bottom rather than assuming it matches the partition spacing — 2×4s can bow slightly, and measuring at the base gives me the true dimension.
Step 6: Cut and Install the Plywood Shelves
Once the cleats are in, I rip the 3/4-inch plywood to the right width on the table saw, then cross-cut each shelf to length with a circular saw or track saw. After each cut, I run a quick pass with a piece of sandpaper along the edges to knock off any splinters — a small step that makes handling the shelves much more comfortable. Each shelf gets two cleats underneath it (one near the front, one near the back) before it slides into place like a drawer.
I also make a point of screwing each shelf down to its cleats rather than just letting it rest on them. Screwing from underneath into the shelf prevents any movement, and it means the shelf contributes to keeping the whole structure square and tight. On a 32-inch deep shelf loaded with heavy bins or equipment, that connection matters. For maximizing plywood use, don’t stress if the grain direction isn’t perfect on every piece — at 32 inches deep with cleats supporting underneath, the shelf won’t flex or sag regardless of grain orientation.
Step 7: Fix Bowed 2x4s with a Simple Screw Trick
Here’s one of my favorite tips in the whole build, and it’s something most people don’t think about. When you’re working with construction lumber, the 2×4s are almost never perfectly straight. They bow, twist, and cup — and if you just screw your shelf down without addressing that, you’ll end up with gaps and shelves that don’t sit flush against the partition.
The fix is straightforward. Drive a longer screw — a 2.5 or 3-inch screw — into the end grain of the bowed 2×4. Then use a hammer to grab the head of that screw and lever the stud exactly where you want it — flush with the shelf edge. Once it’s in position, drive a screw through the shelf and into the 2×4 to lock it in place, then pull the lever screw back out. The shelf holds the 2×4 in position permanently from that point forward. It works remarkably well and takes about 30 seconds per bow.
Step 8: Create Dedicated Bin Storage Sections
One of the first sections I build out is dedicated bin storage — a couple of bays with shelves sized specifically to fit standard plastic storage bins. The beauty of the customizable partition system is that I can dial in shelf heights to match exactly the bins I’m using, whether those are small stackable totes or those big heavy-duty 27-gallon totes. I can fit 12 bins in two sections pretty comfortably, stacked three high with enough clearance to pull them in and out without fighting them.
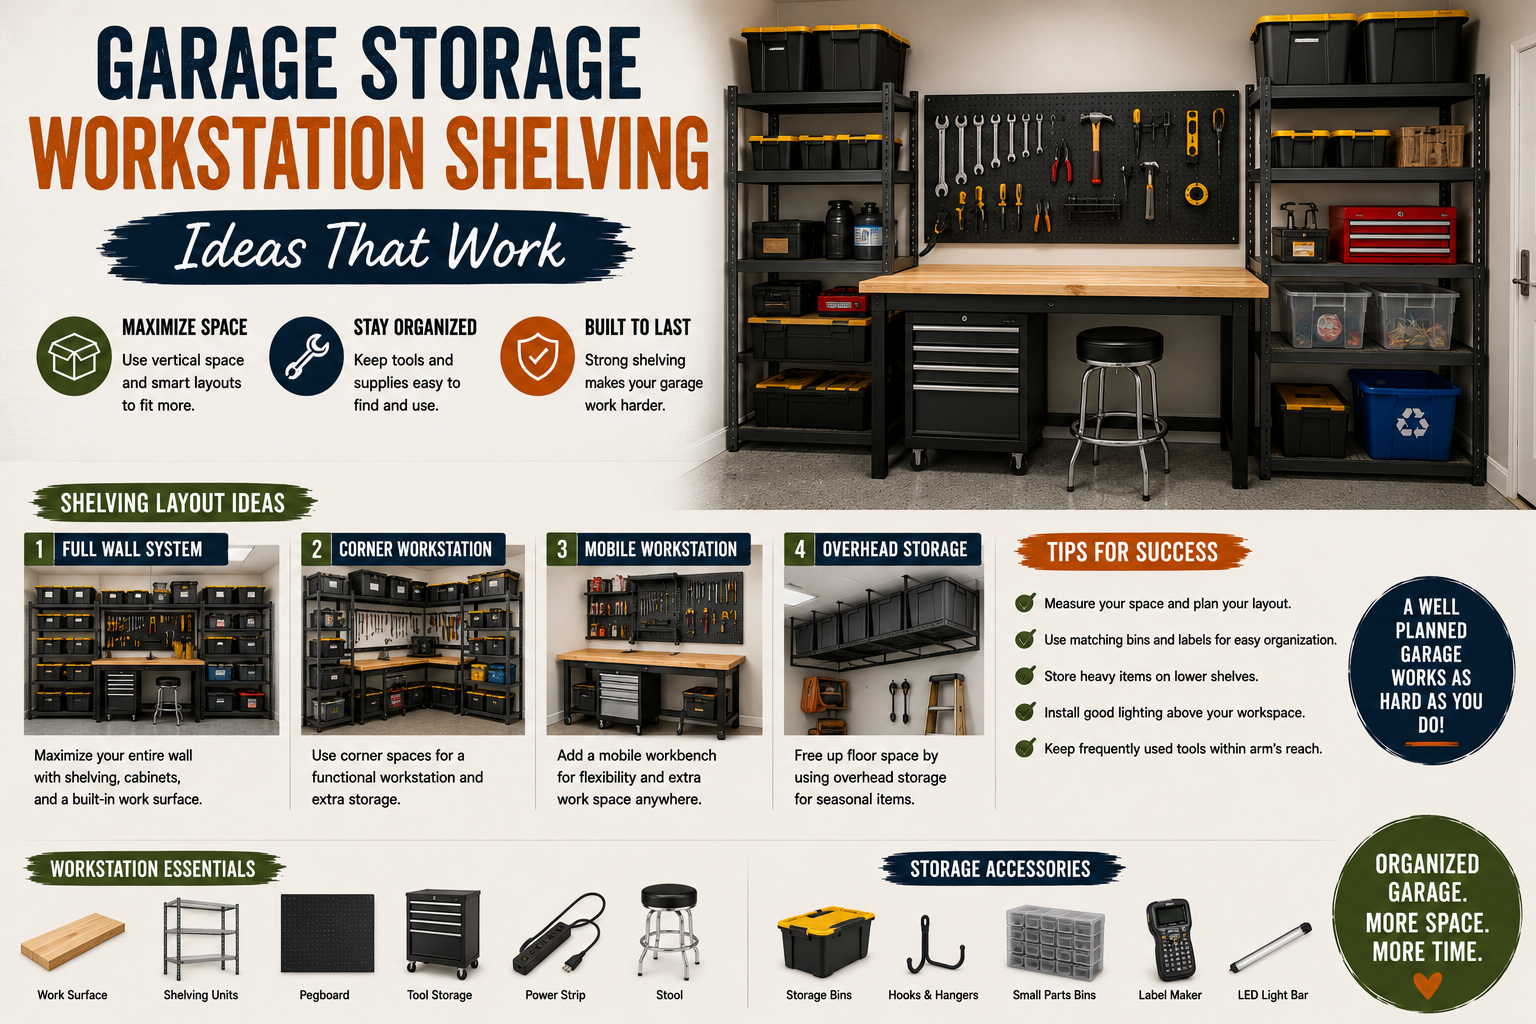
If you’ve ever had bins piled in a random corner of your garage with no system, this section alone will change how you use the space. Everything is visible, accessible, and labeled. No more digging through a stack of six bins to find the one at the bottom. If you’re tackling other storage challenges around the house, my post on garage storage workstation shelving ideas has some great complementary approaches worth checking out.
Step 9: Build Tall Sections for Ladder and Specialty Storage
Not every bay needs to be the same height, and that’s exactly the point of this system. For ladders, tall gun cases, tree stands, or anything else that’s awkwardly long, I build a full-height section — no intermediate shelves — so those items can stand upright or lean against the back wall without being jammed into a low space. A shelf above this tall section still makes use of the dead space up near the ceiling for lighter, less-accessed items.
The partition system handles this effortlessly because I’m just choosing where (or whether) to install cleats in any given bay. Want the whole bay open? Don’t put in any cleats. Want one shelf at the top for overhead storage and open space below for tall gear? Put in one set of cleats up high. It takes about five minutes to configure a bay completely differently from its neighbor, and you can always change it later.
Step 10: Build a Built-In Freezer Space
This one’s a detail that really elevates the whole system from “garage shelves” to “built-in cabinetry.” Instead of just parking a chest freezer on the floor in front of the shelving, I frame a dedicated bay specifically sized for the freezer — with a shelf directly above it to use that vertical space. The freezer slides in and the shelf sits right over the top, making it look intentional and built-in rather than an afterthought.
Measure your freezer carefully before building this section — you want enough clearance for the lid to open fully if it’s a chest freezer, or for airflow if it’s an upright. A couple of extra inches of width on each side makes it easy to slide in and out for cleaning or if you ever need to replace the unit. The shelf above can hold items you want to access regularly — in my case, that overhead space is perfect for lighter seasonal items.
Step 11: Build the Workbench
The workbench section uses the same basic shelf construction as the rest of the system — 3/4-inch plywood on cleats — but with a couple of extra details that make it feel more purposeful. I recess the shelf back slightly from the front face of the frame, which gives it a more built-in, finished look and also keeps the work surface just slightly inset so it’s less likely to catch on things as you move around the garage.
On the left and right sides of the workbench bay, I add plywood “side splashes” using scrap material — essentially small vertical panels that keep tools and small parts from rolling off the sides of the bench. I screw these in from the back so the screw heads don’t show on the plywood surface. For the work surface itself, a couple of coats of clear polyurethane will protect the plywood and make it easy to wipe down. Down the road, this surface could be swapped out for a piece of Butcher block if you want a more premium feel — just unscrew the plywood top and drop in the new surface. The whole thing is designed to be upgraded without tearing out the frame.
Step 12: Plan for Future Cabinet Doors
Once the open shelving system is complete, one smart next step is adding doors to cover the whole run. Sliding doors on a track are a great option for a garage because they don’t swing out into your parking space or walking area, and they hide all the storage behind a clean face. For a wide bay system, that might mean six doors spanning the full width — each one tall enough to cover the full height of the partitions.
The great news is that the partition-and-ceiling-strip framework I’ve already built creates a natural track mounting point at the top, so adding doors later is a logical extension of the same system. If doors are in your plan from the start, keep that in mind as you finalize your ceiling strip and partition heights — you want the door height to align cleanly with the top of the partitions. For anyone who loves the look of custom built-ins throughout the house, I’ve covered a similar approach in my post on built-in bookshelves and home office storage that translates well to garage cabinetry thinking.
Tips and Best Practices for Building Garage Storage with 2x4s
Use a laser level from the start. A laser level takes the guesswork out of every horizontal reference in the build — your wall 2×4, your ceiling strip, and your cleat heights all benefit from a perfectly projected level line. It’s one tool that pays for itself on a project like this.
Measure from your frame, not your wall. Garage walls are almost never flat or plumb. Always measure from your installed 2×4 frame or your laser line — never from the wall itself — and your finished faces will be straight even if the wall behind them isn’t.
Use spacer blocks instead of measuring every shelf. Cut a spacer block to your desired shelf spacing and use it to set every cleat at the same height. It’s faster, more consistent, and eliminates the cumulative measurement error that can creep in when you’re measuring 12 shelves one at a time.
Pre-select your best 2×4s for the front faces. At any lumber yard or home center, dig through the pile and pick the straightest boards for your visible front framing. Save the cupped and twisted ones for blocking and interior framing where they won’t affect the finished look.
Maximize your plywood cuts. Plan your shelf sizes around efficient plywood yields before you start cutting. A standard 4×8 sheet of plywood cuts into three 32-inch by 32-inch squares with almost no waste, or four 24-inch deep shelves — knowing this before you design your shelf depths saves real money on a large system.
Sand your cut edges before installation. A quick pass of sandpaper on every cut edge takes 10 seconds and makes the whole system much more pleasant to work around. Splinters on bin edges and shelf lips add up over time.
Design with your actual stuff in mind. Before you build a single partition, lay out your bins, equipment, and tools and figure out what height each bay needs to be. The whole point of this customizable system is that it fits your stuff — don’t build it generically and then try to make your stuff fit it.
Frequently Asked Questions
Do I need any special tools to build garage storage with 2x4s?
Not really — this is one of the most accessible builds you can tackle. At minimum, you need a circular saw for cross-cuts, a drill/driver for screws, and a laser level or a standard level for keeping things straight. A table saw makes ripping plywood to width much easier, but you can also have your lumber yard or home center do those rips for you at a small fee. A tape measure is obviously essential too.
How deep should I make my garage shelves?
It depends entirely on what you’re storing. Standard storage bins fit well on 24-inch deep shelves. If you’re storing larger items like brewing equipment, sports gear, or seasonal decorations, 32 inches gives you much more usability. You can mix depths across different bays in the same system — that’s one of the great advantages of building with partitions rather than one continuous run of shelving.
Can I add doors to this shelving system later?
Yes — and I’d actually encourage you to plan for it from the start. The ceiling plywood strip and the partition framework create natural mounting points for a top track. Sliding bypass doors or barn-style doors on a rail are both practical options for a garage. Having cabinet doors covering your storage dramatically cleans up the visual clutter and keeps dust off your gear.
How do I handle bowed or twisted 2x4s?
Use the screw-and-lever trick I covered above — drive a longer screw into the end grain of the bowed board, use a hammer to grab the head and pull the board to where you need it, then lock it in place with a structural screw through the shelf before removing the lever screw. It’s fast, effective, and works on most bows you’ll encounter in standard framing lumber. The best prevention, though, is hand-selecting your straightest boards at the store — especially for your front-facing partitions.
Wrapping It Up
A complete, customizable garage storage system made from 2×4s and plywood is one of the most satisfying projects you can tackle as a homeowner. It’s not complicated — it’s basic construction with basic materials — but the result looks like built-in cabinetry and transforms a chaotic garage into a space you’re actually proud to open the door on. Every bay is customized for specific storage needs, every shelf is removable and reconfigurable, and the whole system goes together without a single nail.
Whether you’re building bin storage, a dedicated workbench, ladder racks, or even a built-in freezer bay, this approach handles all of it with the same core technique. Start with a level base, work from your frame (not your walls), and let the laser line do the heavy lifting on keeping everything plumb. If you want to take this further and apply the same organized thinking to other parts of your home, my post on cheap shed organization ideas covers a lot of the same principles in a smaller footprint.
Got questions about sizing, materials, or adapting this to your specific garage? Drop them in the comments — I read every one and I’m happy to help you work through the details of your own build.