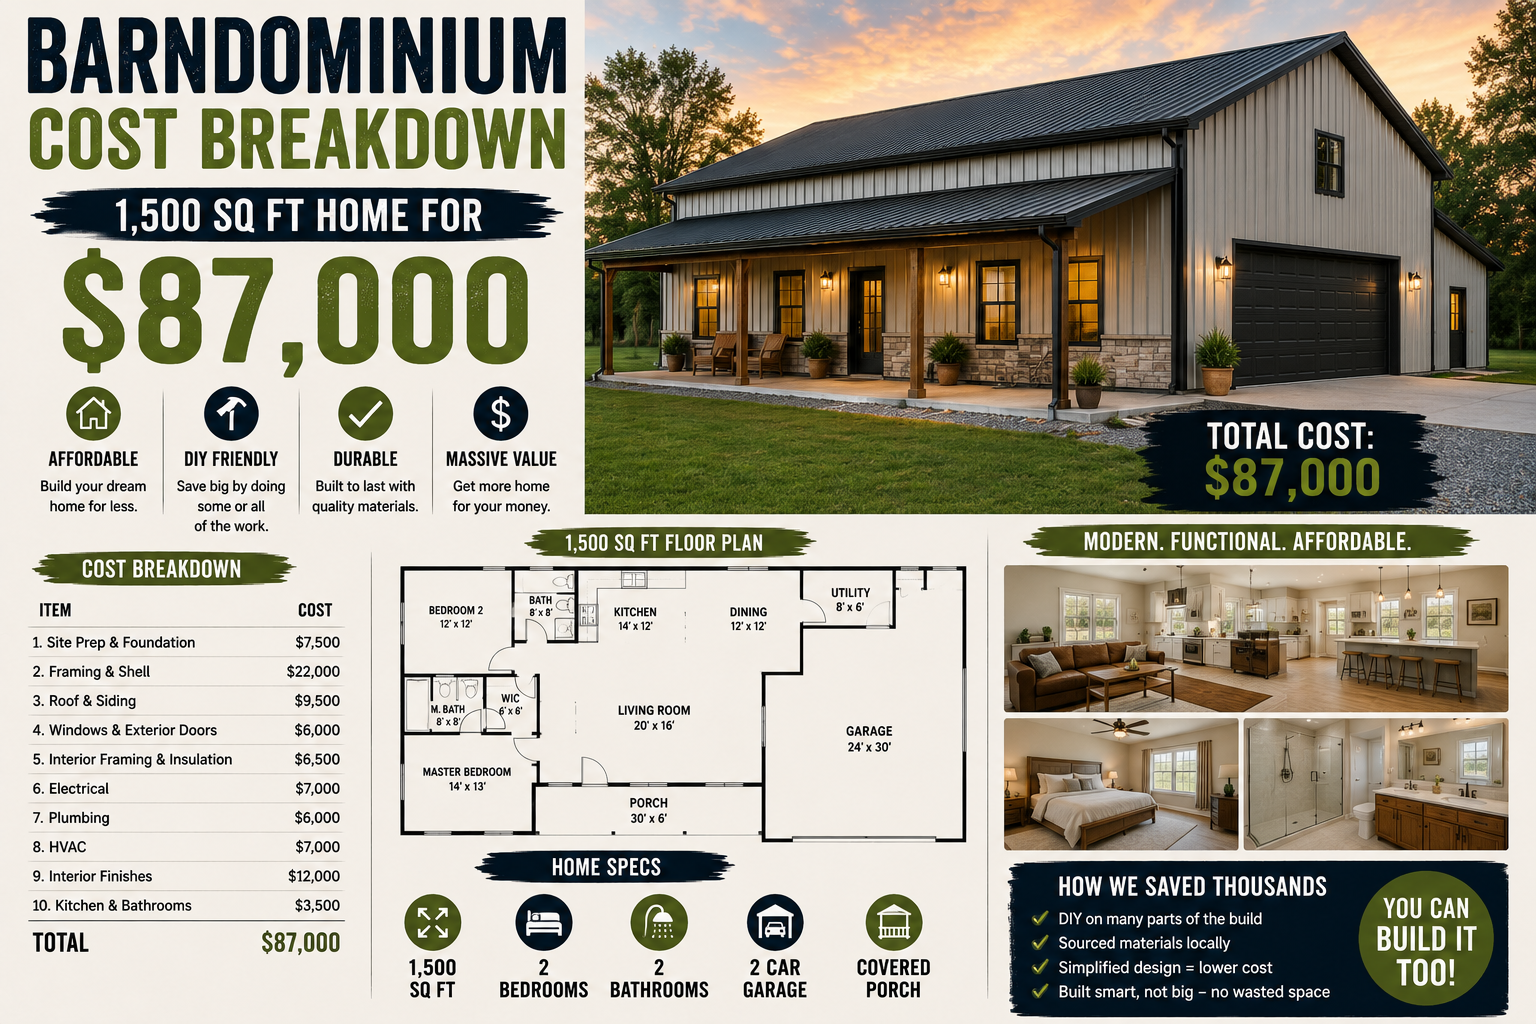
If you’ve ever wondered what it actually costs to build a 150 mph wind rated shop home from the ground up, I’ve got the complete, no-fluff breakdown for you right here. I’m talking a 1,500 square foot, three-bed, two-bath tubular steel building that’s rated to handle winds between 130 and 160 mph — and I tracked every single dollar from the house pad to the final finishing touches.
The grand total came out to $88,200, and I think that number will surprise a lot of people — in a good way. This type of build is genuinely one of the most durable, efficient, and cost-effective ways to put a quality home on a piece of property. I made some smart savings calls along the way and splurged in a few strategic spots where it really counted. If you’re thinking about a similar build, this post is going to save you a ton of time and guesswork. I’ve also covered how a shed studio build can save $6,000 in just three days if you want a smaller-scale starting point.
Let me walk you through every phase of this build, what I spent, where I saved, and where I hired out. This is the kind of real-world cost breakdown I wish I’d had before I started.
Site Preparation: The Variable You Can’t Ignore
Before a single board goes up or a bag of concrete gets poured, you have to deal with your construction site — and this is the part of the budget that can swing wildly depending on your property. My site prep involved digging a pond to build up the house pad, moving dirt for driveways, and burying utilities over 600 feet to reach the building location. That’s more involved than what most homeowners will face, but it’s a real cost that you need to account for before you even think about foundation work.
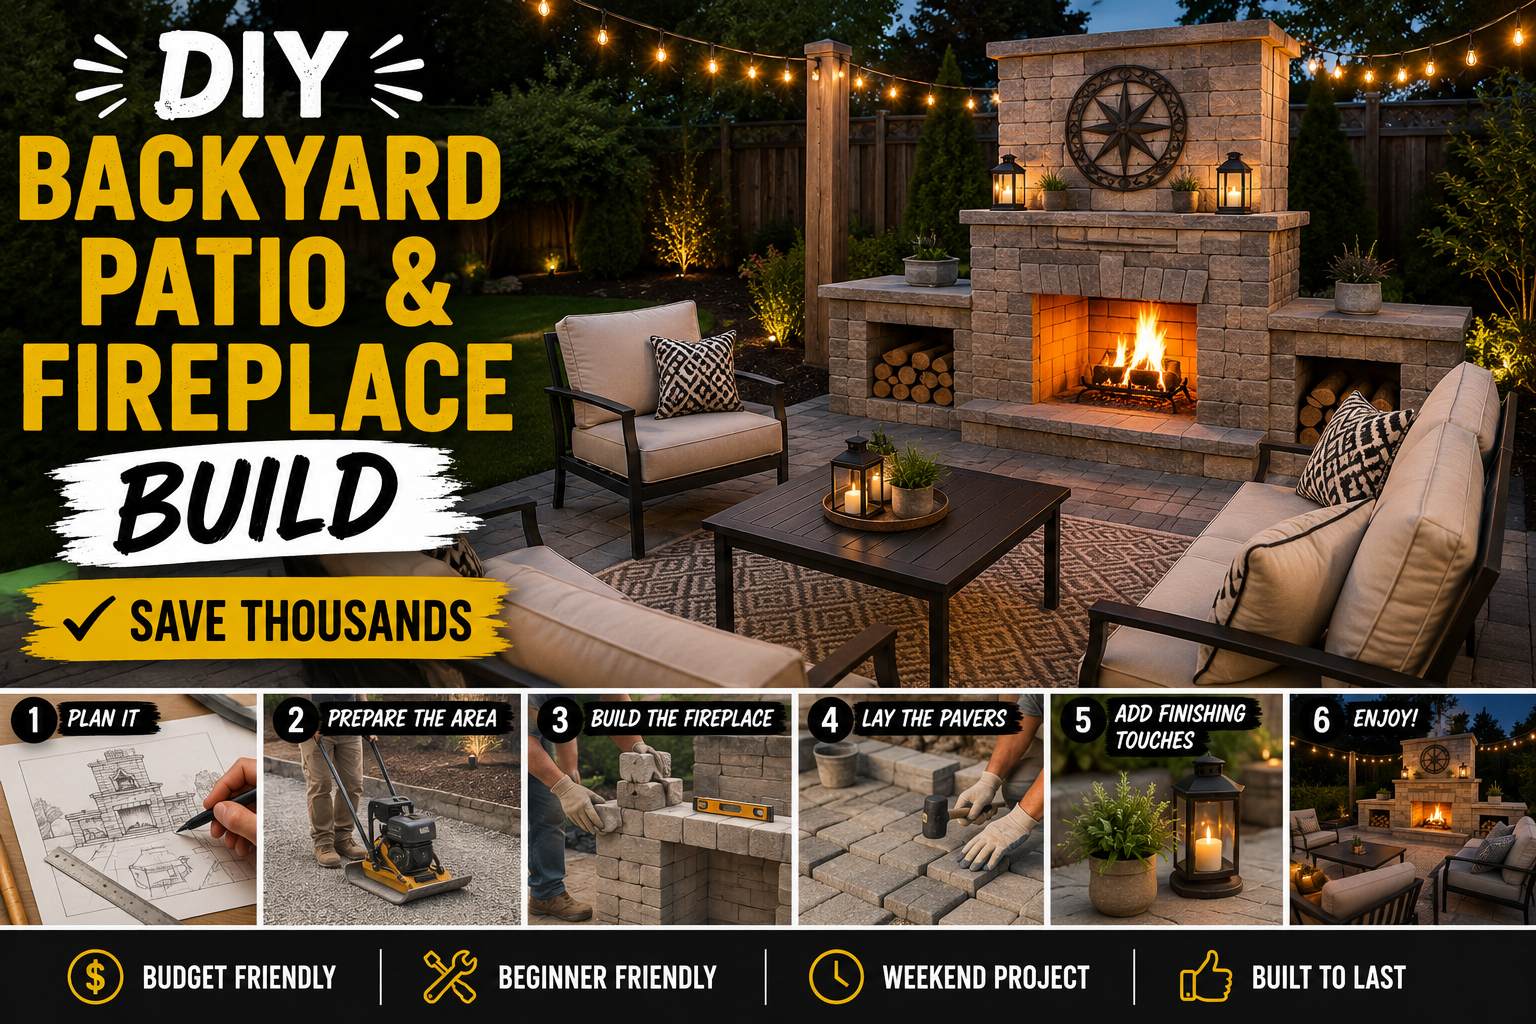
The takeaway here is simple: before you fall in love with a piece of land, walk it with a contractor and understand what it will take to make it build-ready. Site prep can be a few hundred dollars or tens of thousands — know your number before you commit. If you want to see how I approach big outdoor projects from scratch, my guide on DIY backyard patio and fireplace builds covers a lot of the same planning principles.
Foundation: Concrete Forms, Rebar, Vapor Barrier, and the Slab
For the foundation, I built my concrete forms using lumber salvaged from previous projects, so my lumber cost was effectively zero. I also used vegetable oil on the forms so I could strip and reuse those boards after the pour — a simple trick that saves real money. The footers run one foot deep and one foot wide with two continuous runs of rebar, which cost $248. I also installed a plastic vapor barrier underneath the slab to block moisture from wicking up through the concrete — that ran $138.
The slab itself is six inches thick, which exceeds the standard four-inch requirement, and I had fiberglass reinforcement mixed in for extra strength. The concrete came to $6,219. I hired professional concrete finishers for the pour and finish — that labor cost $1,050. Concrete finishing is a skilled trade and not the place to wing it. The finish quality of your slab affects everything built on top of it.
Plumbing Rough-In: Hire a Pro for What’s Under the Slab
The plumbing rough-in is the work that goes in the ground before the concrete is poured — and it has to be exactly right. If a pipe stubs up an inch or two off from where it’s supposed to be, you’re looking at a very expensive fix after the fact. This is one area where I hired a licensed plumber without hesitation, and I’d make the same call every time. Materials and labor for the rough-in plumbing ran $2,800, and while the plumber was already on-site with the machine, I had him dig the footers around the perimeter of the concrete forms at the same time.
Once framing was complete, the plumber came back for the top-out phase — finishing all the plumbing above the slab and getting the house ready for the rough-in inspection. That second visit, including materials and labor, came to $4,800. He also installed the tub, pub, and shower kit for the guest bathroom, which added another $788. Between both plumbing phases, I spent a total of $8,388 on plumbing — money well spent for peace of mind and a passed inspection.
The Steel Building: The Core of the 150 MPH Wind Rating
The house itself is a tubular steel building ordered from Safeguard Metal Buildings, and this is what gives it that incredible wind rating. Tube steel buildings go up fast, they’re resistant to termites, rot, and mold, and they’re engineered to handle 130 to 160 mph winds. For a home in a hurricane-prone or high-wind region, that kind of rating isn’t a luxury — it’s a necessity. The building package came to $15,500, which included shipping and on-site installation. The install crew was efficient and had the entire structure assembled in a single day.
I provided custom residential front doors for the crew to install. The three exterior doors totaled $971. I don’t love carrying keys everywhere, so I upgraded to electronic deadbolts — the deadbolts and exterior door hardware cost an additional $226. Energy-efficient vinyl windows from Lowe’s came to $1,389, plus $230 for J-channel window trim. The steel building package is the single biggest line item in the build, but it’s also the foundation of everything else — worth every penny.
Interior Framing: Lumber, Labor, and a Few Good Helpers
With the shell up and the rough plumbing in, it was time to frame the interior of the house. All the lumber for interior framing — including the 2×4s and all associated framing materials — came to $2,120. I pulled in a few friends and we had the entire interior framed in just a couple of days. Framing is one of the most satisfying phases of a build because you can literally watch the rooms take shape by the hour.
It’s also one of the more forgiving trades — if something is slightly off, it’s usually fixable without major consequences, unlike the plumbing that’s set in concrete. If you want to sharpen your framing and carpentry skills before tackling a project like this, I’ve put together a deep dive on cabinet building tips for beginners that covers a lot of the same measurement and cutting fundamentals.
HVAC and Electrical Rough-In: Know When to Call in Experts
Because I own an air conditioning company, I handled the HVAC and ventilation installation myself. All materials for the AC package unit, ductwork, thermostat, bathroom vents, stove hood vent, and dryer vent came to just under $7,000. If you’re not in the trades, expect to add labor costs on top of that — HVAC is not a DIY-friendly system for most homeowners.
For electrical, I had a buddy who’s a licensed electrician handle the rough-in. He gave me a discount on labor, and the total for all electrical materials and labor came to $8,000. Once the HVAC and electrical rough-ins were complete, I scheduled the rough-in inspection — and passed on the first try. That’s the reward for doing things right from the start. For more on electrical work you can manage yourself, check out my guide on shed electrical wiring for beginners.
Spray Foam and Insulation: The Smartest Money I Spent
Every metal building needs a serious moisture barrier and insulation system, and I went with closed-cell spray foam on the walls and roof — two inches of it — plus an additional four inches of open-cell insulation on the ceiling for extra thermal performance and noise reduction. Here’s something that surprised me: it’s actually cheaper to hire a professional spray foam contractor than to buy DIY kits. DIY kits cost almost twice as much per square foot of coverage, and you still have to do all the work. My spray foam contractor charged $9,300 total — and it was worth every dollar.
I also installed fiberglass insulation batts in the framed exterior wall sections and interior wall cavities for additional noise reduction. This brought my exterior wall R-value to R-26. The extra fiberglass insulation cost $1,154. Combined, the full insulation system is one of the most important investments in this build — it directly impacts energy bills, comfort, and long-term durability.
Ceilings: Beadboard for Speed and a Clean Look
For the ceilings, I went with primed plywood beadboard — also called bead board — sourced from Home Depot at a total cost of $595. This material installs much faster and cleaner than sheetrock, especially overhead, and it gives a nice finished look that works well with the style of this build. I got a few friends together and we had every ceiling in the house installed in a single day. Speed and simplicity are big wins on a project this size. If you want tips on getting a great finish on beadboard ceilings, I’ve got a full breakdown in my plywood beadboard ceiling painting tips post.
Interior Wall Finishes: LP Smart Side, Plywood, and Sheetrock
I took three different approaches to interior wall finishes depending on the room. In the living room, I used LP Smart Side panels — technically an exterior siding product with a tongue-and-groove system that eliminates visible joints between boards. It’s strong, durable, and saves time during installation. The LP Smart Side panels cost $640. In the guest bedroom, I tested 3/8-inch plywood for the walls — a durable and surprisingly attractive alternative to sheetrock. That cost $326.
In the remaining rooms, I used exterior-grade sheetrock, which has square edges rather than beveled ones. Instead of taping and mudding the joints, I’m planning to cover the butt joints with trim strips for a board-and-batten aesthetic — which saves a huge amount of time and mess. All the sheetrock came to just $135. Three different wall systems in one house gave me a real hands-on comparison of cost, effort, and finished look.
Paint: Covering Every Surface Efficiently
I sprayed 20 gallons of Glidden interior paint on the spray foam ceiling to make it all black — a bold and practical choice that hides the foam texture completely. Since the LP Smart Side panels and beadboard were already primed from the factory, I only needed to prime the sheetrock walls before painting all surfaces. Using an extendable roller stick made quick work of the walls and ceiling edges. All paint for the entire house came in at just under $1,000. That’s a very efficient number for a 1,500 square foot home with multiple wall finishes.
Interior Doors, Trim, Crown Molding, and Hardware
Most of my interior doors are 34 inches wide, which required custom ordering through a local door shop at $170 per door — a total of $850 for all interior doors, which I installed myself. Interior door knobs added another $65. Window stools and all interior window trim cost $256. Door casing and baseboards throughout the entire house ran $363 — I installed all of this trim myself, which is time-consuming but saves significantly on labor.
For Crown molding, I bought 1x4s from Home Depot, finished them with leftover stain and sealer to match the cabinets, and tacked them into place with a brad nailer using brad nails. Simple, fast, and effective — total cost for all the Crown molding was just $125. It’s one of those finishing touches that adds a lot of polish for very little money.
Custom Tile Shower and Concrete Floors
I hired a professional to build the custom tile shower, and this is one of those areas where professional work gives real long-term peace of mind. A poorly waterproofed shower can cause hidden moisture damage for years before you even notice it. The custom marble tile shower came to $483 for materials and labor combined — a very reasonable number for professional work. I also paid a professional to sand and seal the concrete floors throughout the house at a cost of $1,000. Sealed concrete floors are durable, easy to clean, and they look great in a modern build like this.
Custom Cabinets Throughout: Kitchen, Bathrooms, and Laundry
One of the decisions I’m most proud of is going with matching custom alder wood cabinets in every room — kitchen, bathrooms, and laundry room all coordinate. The full set of custom lower cabinets and upper cabinets came to $8,540 including installation. Since the cabinets arrived as unfinished wood, I spent an additional $200 on wood conditioner, stain, and sealer. I got some help to stain them all in one session, then came back and applied two coats of high-gloss sealer for a water-resistant, professional finish.
Quartz Countertops With Integrated Sinks
Choosing countertops was one of the hardest decisions of the entire build. I went with speckled black quartz because it’s man-made, non-porous, and has the lowest maintenance of any countertop material on the market. Natural stone requires regular sealing; quartz just doesn’t. After visiting the yard and reviewing all the available slabs, the speckled black quartz was the clear winner both aesthetically and practically. The quartz countertops including the integrated sinks came to $4,743 — a significant investment, but one that adds lasting value to the home.
Water Heater, Faucets, Toilets, and Bathroom Fixtures
I went with an instant tankless water heater for this build — it takes up very little wall space, costs less than a comparable tank unit, and delivers endless hot water on demand. The instant water heater cost $459. In the kitchen, I chose a sleek modern all-in-one faucet at $119. In the bathrooms, I went with brushed bronze faucets at $60 each for a total of $180.
For the tub and shower, I chose all-in-one valves that require only a single wall penetration and give a cleaner, more modern look — total cost for shower and bathtub faucets was $186. Toilets came in at $199 each for a total of $398. I also built out closet shelving for $200 and finished the bathrooms with shower curtain rods at $45 each, totaling $90. A soap dispenser is one of those small finishing touches that pulls a bathroom together without costing much.
Tips and Best Practices for Building a Wind-Rated Shop Home
Hire pros for the work that’s hidden forever. Plumbing in the slab and electrical rough-in are two areas where a mistake costs exponentially more to fix after the fact. Don’t try to save money in the wrong places.
Let the building do the structural work. With a tubular steel building, the shell itself carries the wind load — so you’re not relying on wood framing for structural integrity. This changes your interior framing approach and lets you get creative with wall finishes.
Spray foam over DIY kits, always. Hiring a spray foam contractor is cheaper than buying DIY kits for any significant square footage. The math works in favor of professional installation at scale.
Mix and match wall finishes strategically. Using LP Smart Side panels, plywood, and sheetrock in different rooms lets you control costs while experimenting with aesthetics. Not every room needs the same treatment.
Use a extendable roller stick for painting large surfaces. It cuts painting time dramatically on high walls and ceilings — especially useful when you’re covering a lot of square footage solo.
Use a laser level when installing cabinets and trim. A level line makes all the difference in getting a professional result without a professional price tag.
Frequently Asked Questions
How much does it cost to build a 150 mph wind rated shop home?
Based on my build, a 1,500 square foot, three-bed, two-bath tubular steel shop home rated for 150 mph winds came in at $88,200 total. This includes everything from site prep and foundation to cabinets, countertops, and all finishing touches. Your cost will vary based on your location, site conditions, and finish level, but this gives you a realistic benchmark to work from.
Is a tubular steel building a good choice for a residential home?
In my experience, yes — especially if you’re in a high-wind area. Tube steel buildings are resistant to termites, rot, and mold, and they’re engineered to handle serious wind loads. The shell goes up fast (mine was assembled in a single day), and you still have full flexibility to customize the interior just like any stick-built home.
Where can I save money on a shop home build?
The biggest savings come from providing your own labor on framing, trim, painting, and finishing work. I also saved by reusing lumber for concrete forms, using vegetable oil as a form release agent, and choosing beadboard ceilings instead of sheetrock overhead. Strategic DIY combined with professional work where it counts — plumbing, electrical, spray foam, concrete — is the formula that worked for me.
What type of insulation is best for a metal building home?
I used a combination of closed-cell spray foam (two inches on walls and roof) and open-cell spray foam (four additional inches on the ceiling), plus fiberglass batt insulation in the framed wall cavities. This combination gave my exterior walls an R-26 rating and provides excellent noise reduction — important in a metal building where sound can travel easily.
Final Thoughts
Building a 150 mph wind rated shop home for $88,200 is genuinely achievable — and the result is a home that’s more durable, more energy-efficient, and frankly more interesting than a lot of cookie-cutter stick-built houses at twice the price. The key is knowing where to put your money, where to swing a hammer yourself, and where to write a check and walk away. I made both kinds of calls throughout this build, and I’m happy with every one of them.
If you’re planning a similar project, start with a realistic site prep budget, get multiple quotes on your foundation and framing materials, and don’t underestimate the value of a great plumber and electrician. The rest — trim, paint, cabinets, and finishes — is where your personal style comes in, and that’s the fun part. If this project has you thinking about other big builds, check out my full guide on backyard tiny home building step-by-step for more inspiration. I’ll keep sharing what I’m building and what I’m learning — and I hope it helps you build something you’re proud of too.