I have officially caught the color bug again, and honestly? I couldn’t be happier about it. There is something so satisfying about grabbing a paintbrush and transforming a corner of your home in an afternoon. Paint is one of the most affordable, most reversible, and most impactful tools in any DIYer’s toolkit — and I think a lot of people sleep on just how easy it can be to add some color, personality, and joy to their space. I’m talking tiny projects, big results, and almost zero stress.
In this post, I’m walking you through every single paint idea and color makeover project I tackled recently — from striped door accents to dark trim upgrades to hanging long-overdue art in the kitchen. Some of these took me less than 30 minutes of actual hands-on work. A few of them changed how I feel about entire rooms in my house. And the best part? Most of them are completely beginner-friendly, and a couple of them don’t even require paint at all — which means renters, you’re covered too. If you’re looking for more inspiration before you dive in, I also rounded up a bunch of ideas in my post on budget home improvement DIY ideas that save thousands — definitely worth a read.
Whether you’ve been staring at a blank wall for months or you’re just ready to shake things up, these are the exact projects I did, exactly how I did them, and everything I learned along the way. Let’s get into it.
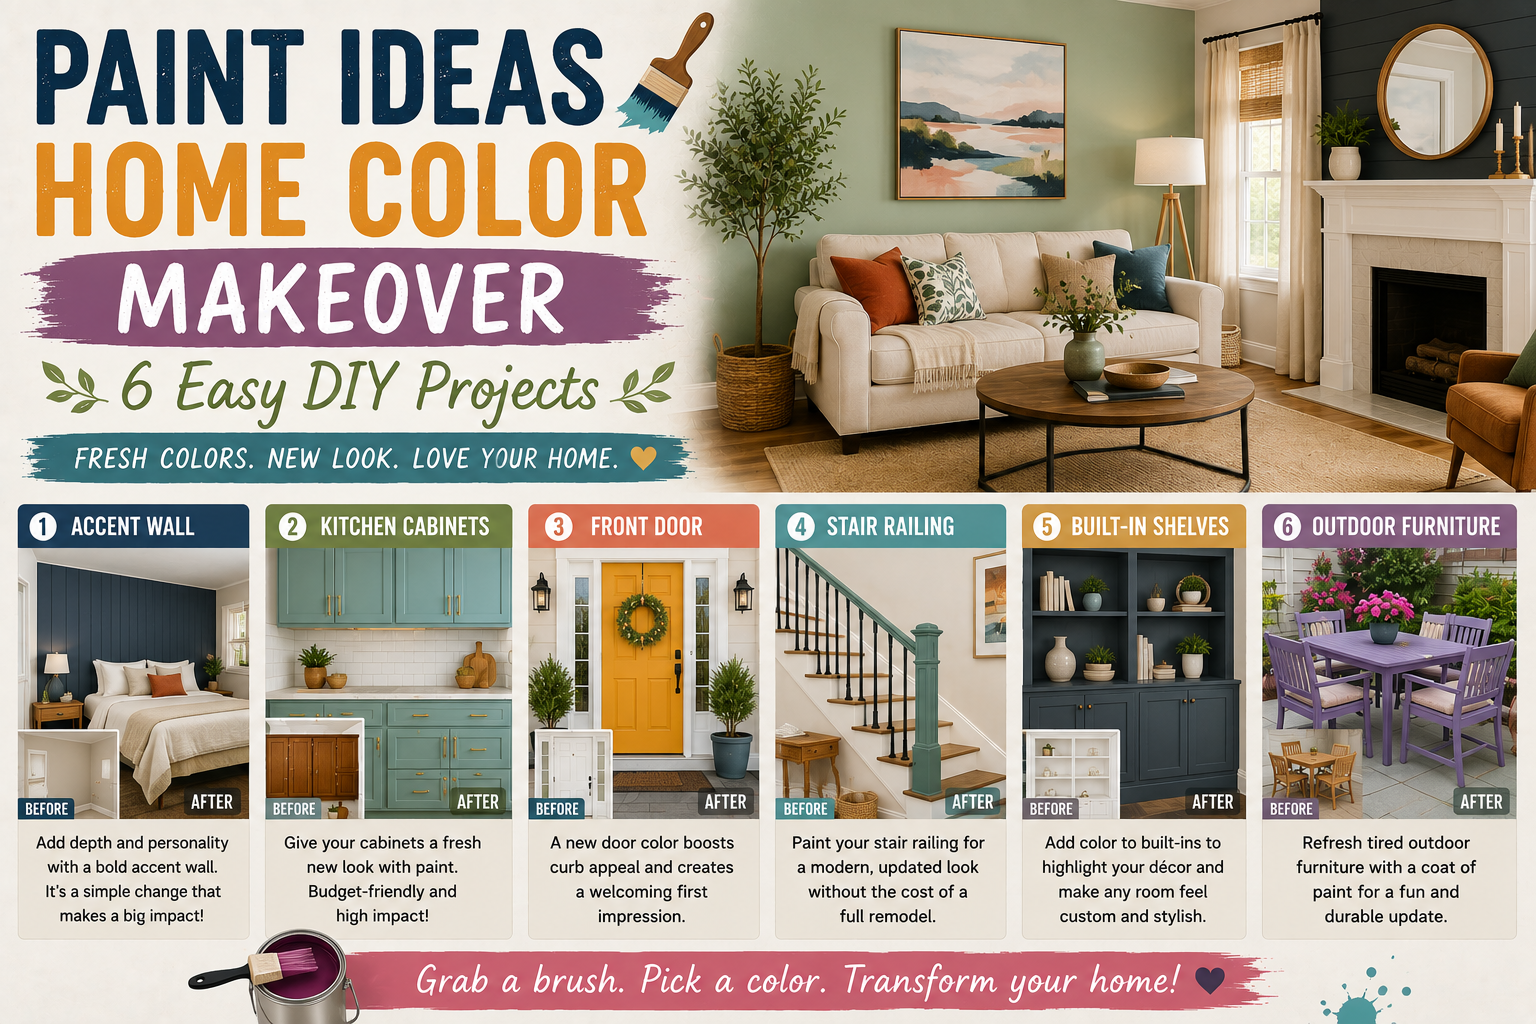
Project 1: Painted Stripes on the Side of the Door
This is the project I have been wanting to try for years, and I cannot believe I waited this long. The concept is simple: you tape off vertical stripes on the side edge of a door and paint them in a contrasting color. That’s it. The whole thing took me less than 30 minutes of actual work — about 5 minutes to apply the masking tape, a minute to apply the base coat seal, an hour to wait, a minute to apply the new color, another hour to wait, a quick second coat, one more hour of drying time, and then the most satisfying tape peel of my entire life.
The key decision upfront is whether you want your stripes to be the same width as the tape or double the width. I did a quick test by laying the tape out both ways and went with what looked best — and I’m so glad I took that 30-second moment to decide before committing. Once you’ve chosen your width, tape off the edges of the door first to protect the front and back faces, then lay your stripe tape down the side. Here’s the most important painting tip I want you to take away from this whole post: before you apply your new color, paint a thin layer of your base color over the tape lines first. This seals the tape edges so that any bleed-through happens in the same color as your base — completely invisible. It’s a game-changer for getting crisp, clean lines every single time.
I chose a bold red to complement some floral artwork nearby, and when I peeled that tape back? I literally screamed. It looked incredible. The stripes are graphic, cheerful, and high-impact in a way that feels almost too good for how little effort it took. I liked it so much I actually went back and did the same treatment on the other side of the door so it looks just as good whether the door is open or closed. If you’re looking for more ways to refresh a space with minimal effort, my roundup of affordable home improvement projects under $100 has a ton of similar quick wins.
Project 2: Choosing the Right Accent Color for Door Trim
My hallway has been color-drenched in one shade for years — and I’ve loved it. But lately I’ve been fantasizing about making the door trim really pop, and I finally decided to do something about it. I picked up two paint options: a dark moody blue and a dark forest green. Both were richer, deeper versions of colors already living in the space, but they each told a completely different story.
I painted a test swatch of each color directly on the trim so I could see them in context — in real light, next to the actual door and wall colors. The green felt like a natural evolution of my existing color-drenching concept, adding depth and dimension without completely changing the room’s identity. The blue was gorgeous too, moody and dramatic, but it felt like a bigger shift than I was ready to make. I gave myself a full day to sit with both options before deciding. My method for gaining perspective? I pulled out my camera and photographed the space as if I were shooting it for a magazine. Treating it like an editorial shoot forced me to step back from my familiarity with the space and evaluate it with fresh eyes — and I immediately felt more confident in my choice.
I went with the dark green, painted in a gloss finish, which I highly recommend for trim and doors. Gloss paint just looks so crisp and polished — it has a quality to it that flat or eggshell can’t match on architectural details. Taping the trim took about 20 minutes, first coat another 20 minutes, then a wait, second coat, another wait, touch-ups, and done. The result is clean, stately, and works beautifully with the new door stripes from Project 1. The whole hallway is starting to feel intentional and cohesive in a way it never did before.
Project 3: Using the “Magazine Photo” Trick to Commit to a Paint Color
Okay, this one isn’t really a painting project on its own — it’s a mindset trick and a practical method that I think deserves its own section because it genuinely changed how I approach color decisions. Here’s the problem I was having: I painted one door trim in the dark green, and even though I liked it, I kept second-guessing myself because it was so different from what I’d been looking at for years. I wasn’t sure if I actually didn’t like it or if I was just not used to it yet. Those are two very different problems.
So I grabbed my camera and started taking photos of the trim as if I were trying to get the best possible shot for a home design magazine or blog. Forcing myself into that editorial mindset — asking “does this look beautiful?” rather than “does this feel familiar?” — gave me the perspective I needed. When I looked at the photos, I loved what I saw. It clicked immediately. The trim looked sophisticated, intentional, and exactly right. And just like that, I was committed.
I want you to steal this trick. Any time you’re struggling to evaluate a paint color you’ve just applied, take out your phone and photograph it like you’re trying to make it look amazing. It separates your emotional attachment to how the space used to look from an honest assessment of how it looks now. It works every time, and it costs absolutely nothing.
Project 4: A Rental-Friendly Color Upgrade — Changing Your Bedding
Not everyone can paint their walls — I get it. If you’re renting, or if you’re just not ready to commit to a full paint project, there are still so many ways to add color to your home. One of the easiest and most impactful is simply changing your bedding. I know it might sound too simple to mention, but honestly, the right set of sheets and a duvet can completely transform a bedroom’s energy and color story.
I’ve been using Piglet in Bed sheets, and their new collection — A Season of Wonder — is built entirely around leaning into color experimentation and maximalism, which is basically my whole thing right now. What I love most is that you can mix and match individual pieces: a duvet in one color, a flat sheet in another, pillowcases in a third. When the colors and patterns play together, it’s stunning. A bedroom refresh this easy is one of my favorite low-commitment ways to explore a color palette before going bigger with paint. If you’re in a rental or just want low-stakes color, your bedding is the perfect place to start.

Project 5: Hanging Art You Already Own (Stop Waiting for “The Right Time”)
This project came out of a minor kitchen spiral when I got a new fridge and started rethinking the entire room. I realized I had been holding onto two pieces of beautiful kitchen art — one for four years, the other for nearly two — waiting until “the kitchen renovation is done” to hang them. And I finally had the realization: that is a terrible way to live. If the renovation is a year away, or two years away, or indefinitely away, why am I storing beautiful things in envelopes instead of enjoying them?
This is the “burn the good candle” philosophy applied to home decor, and I’m fully on board with it now. I found frames for both pieces — one from my existing thrift store frame stash, one pulled from my gallery wall — and hung them both in the kitchen. One went above the stove because it’s literally a painting of a stove, which is so funny and perfect. The other is a doodle my mom drew while explaining an idea, which I framed with a mat I already had. Both look incredible and cost me essentially nothing to put up.
My tips for doing this yourself: keep a stash of thrift store frames in various sizes, because you’ll always find a use for them. If you need a mat and don’t have one, heavy card stock cut to size works beautifully and gives the same sense of depth and drama. And if you’ve got art sitting in a closet or a drawer waiting for a renovation that hasn’t happened yet — go hang it up right now. Your home is worth enjoying today. Check out my post on budget home improvement DIY ideas for more ways to make big visual changes without big spending.
Project 6: Rearranging Furniture to Change How a Room Feels
This one snuck into the project list because it genuinely changed my entire experience of working in my office — and it cost me nothing. I moved my desk to the center of the room, facing outward instead of toward the wall with the door behind me. The difference is hard to overstate. I hadn’t realized how much low-level anxiety I was carrying from having the door at my back — that subtle, nagging sense of not knowing what was happening behind me, wondering if someone could see my screen. Now I’m sitting in what feels like a little cozy cave, looking out at the whole room, and I’m working more confidently and more comfortably than I ever have in this space.
The domino effect of this change led me to find a new pink couch on Facebook Marketplace for $80 — a functional, comfortable lounging couch to replace the elegant-but-narrow sitting couch I’d had for years. The new couch is wide enough to actually lay on, which matters a lot to me personally given that I deal with Ehlers-Danlos syndrome and need to change positions throughout the day. The point here isn’t about my specific situation — it’s about the fact that rearranging your furniture is completely free, and it can genuinely change how a room feels to be in. Before you spend any money on paint or decor, try moving things around. You might be surprised at how much a layout shift can transform a space, and it pairs beautifully with any of the paint ideas above.
Tips and Best Practices for Your Home Color Makeover
After going through all six of these projects, here are the biggest lessons I want you to walk away with. First, seal your tape lines with your base color before applying the new color — this single tip will eliminate bleed-through and give you crisp, professional results every time. Second, always test paint colors in context: apply swatches directly on the surface, in your actual lighting, next to your actual furniture and decor. Colors look completely different on a chip at the store versus on your wall at home.
Third, give yourself time to adjust. When I first painted that green trim, I didn’t love it — but that was familiarity bias, not an actual design problem. Sleep on big color decisions before you decide to change course. Fourth, gloss paint is your friend for trim and doors — it looks polished, is easier to clean, and highlights architectural detail beautifully. Fifth, don’t wait to hang your art or use your nice things. Your home is worth enjoying right now, not after some future renovation that may be years away. And sixth, rental-friendly color swaps are real and they work — bedding, art, furniture arrangement, and accessories can transform a space without a single drop of paint on a wall. For a deep dive into quick, high-impact changes, my post on home improvement projects that make a big impact fast is a great next step.
Frequently Asked Questions
How do I get crisp lines when painting stripes with tape?
The trick is to paint a thin layer of your base color over the tape edges before applying your new color. Any bleed-through happens in the base color, so it’s completely invisible when you peel the tape. This is the single best painting tip I’ve ever learned, and it works on every project where you use masking tape to create edges.
What finish should I use for painting door trim?
I recommend a gloss finish for all trim and doors. It looks crisp and clean, highlights the architectural details beautifully, and is much easier to wipe down and clean over time. Semi-gloss also works well if you want something slightly less shiny, but I personally love the look of a full gloss on trim.
How do I decide between two paint colors I like equally?
Paint both options directly on the surface and live with them for at least 24 hours — ideally a full day cycle so you see them in morning light, afternoon light, and evening lamplight. If you’re still unsure, try my magazine photo trick: photograph the space as if you’re trying to get the most beautiful editorial shot possible. It forces you to evaluate the color objectively instead of through the lens of familiarity, and it works surprisingly well.
Can I add color to my home if I’m renting and can’t paint?
Absolutely. Changing your bedding is one of the fastest and most impactful moves you can make. Hanging art, adding colorful accessories, using curtains in a bold color, and rearranging furniture can all dramatically change how a space feels — zero paint required. Thrift stores are your best friend for frames, mats, and accent pieces that add personality without permanence.
Ready to Add Some Color to Your Home?
Paint ideas for a home color makeover don’t have to be complicated, expensive, or even permanent. As I’ve shown through every single one of these projects, the most impactful changes are often the simplest ones — a stripe on a door edge, a darker trim color, a piece of art that’s been waiting in a drawer for four years. The biggest takeaway I want you to have is this: your home is worth enjoying right now, not someday when everything is perfect. Start with one small project this weekend and see how it feels. I promise you’ll be hooked.
If this got your creative wheels turning, go check out my post on peel and stick budget makeover ideas that WOW your home for even more low-effort, high-impact transformations. And if you try any of these projects, I’d love to hear how they turned out — drop a comment below and let me know which one you tackled first!