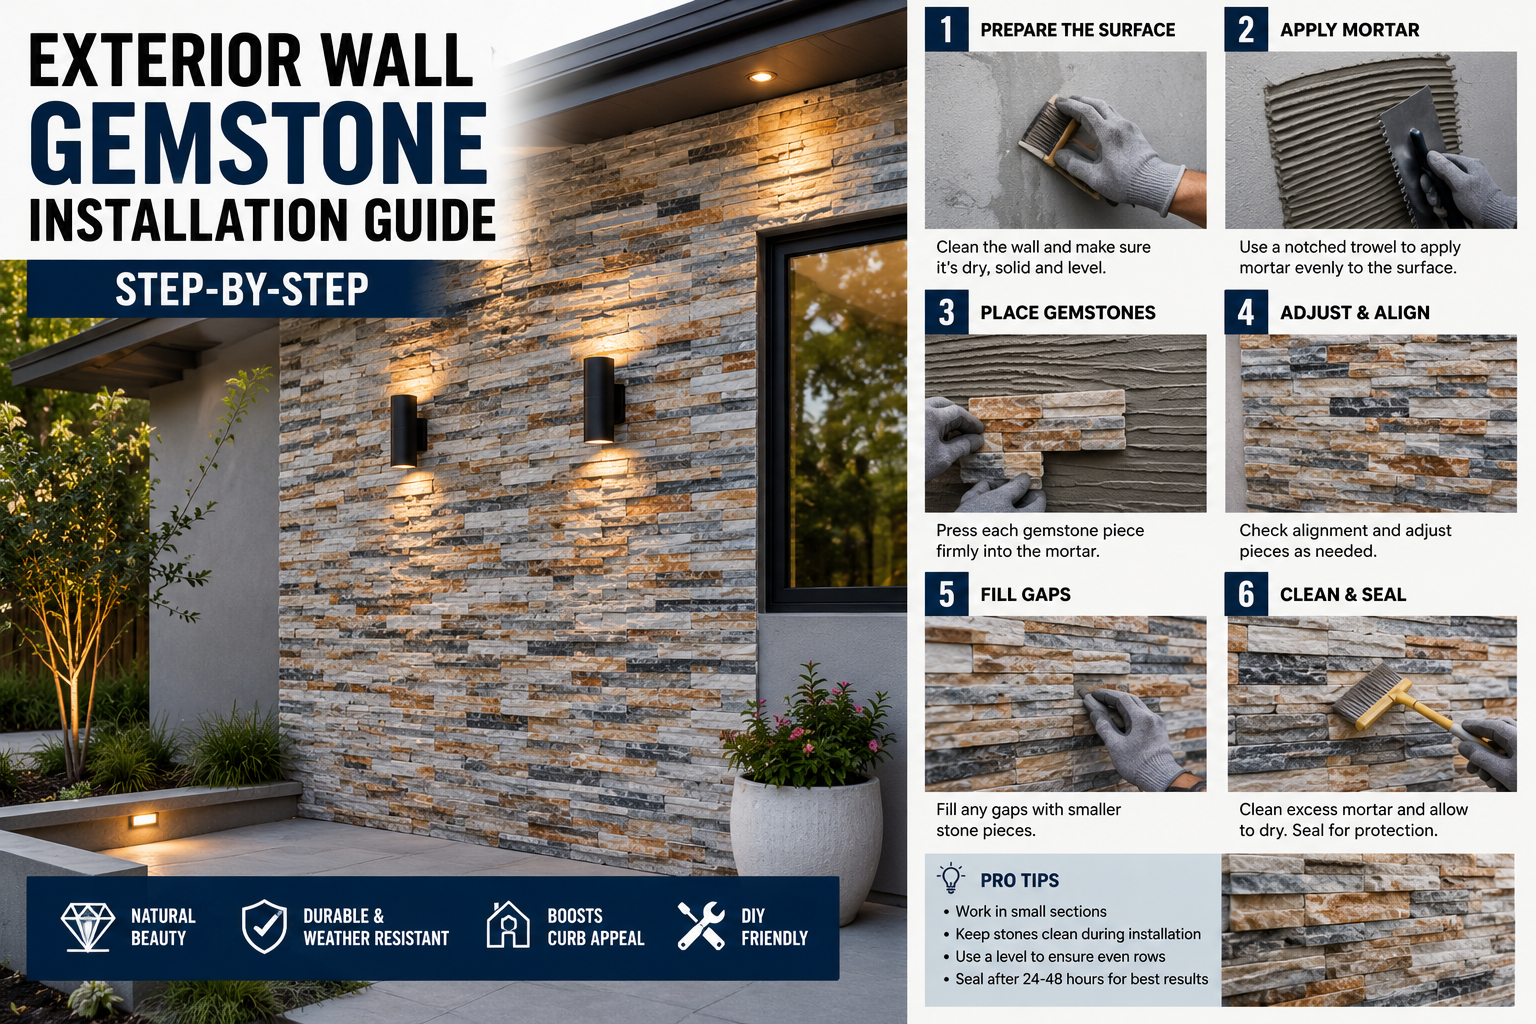
If you’ve been thinking about adding some serious curb appeal to your home with faux stone panels, you’re in the right place. I’ve put together this complete exterior wall gemstone installation guide to walk you through every single step of the process — from the moment your boxes arrive to the final touch-up coat of paint. Whether you’re doing a full exterior wall or a wainscoting-style accent, this guide covers it all.
Gemstone faux stone panels are one of my favorite ways to dramatically upgrade an exterior wall without a full masonry job. They look incredibly realistic, they’re designed to interlock with a shiplap system, and with the right prep work, they’ll hold up beautifully for years. I’ve broken this down into every step I’d take on my own project, so let’s get into it.
If you’re looking for more ways to boost your home’s exterior, check out my post on 5 DIY Outdoor Curb Appeal Projects You Can Do This Weekend — it pairs perfectly with this guide.
Step 1: Inventory Your Boxes and Check for Shipping Damage
The very first thing I do when my gemstone panels arrive is go through every single box and inventory what I received. I check that everything I ordered is there and that nothing was missed. This sounds like a small step, but it can save a massive headache down the road if you discover a missing piece mid-install rather than before you start.
I also check every panel carefully for any damage that may have happened during shipment. It doesn’t happen often, but occasionally a piece can crack or chip in transit. If you find anything broken, reach out to the supplier right away so they can get replacements shipped out to you before your project day arrives.
Step 2: Let the Panels Acclimate for 48 Hours
Once I’ve confirmed everything is intact, I let the panels sit and acclimate for at least 48 hours before installation. This is especially important for exterior projects where temperature fluctuations are a real factor. I try to time my install so I have a stretch of consecutive days with similar temperatures — this helps the panels settle properly and ensures the adhesive and caulk cure under consistent conditions.
Skipping this step might seem harmless, but materials expand and contract with temperature changes. Giving them time to acclimate to your environment before you lock them in place makes for a much more stable finished installation.
Step 3: Dry Fit the Panels and Plan Your Layout
Before I put a single screw in, I always dry fit the panels. Each gemstone panel has a small number molded into the corner — this number tells you which of the four molding patterns it came from. Since there are four different molds, I use these numbers to mix and match panels intentionally so I’m not putting two panels from the same mold right next to each other, which would create a noticeably repetitive pattern.
For example, I wouldn’t want to put a panel marked “4” directly next to another “4.” Instead, I’d pair a “1” with a “3” to keep the layout looking natural and varied. Even panels from the same mold can have some color variation, but it’s still worth taking the time to step back and plan out what looks best before committing. This dry fitting stage is where I save myself a lot of grief later — it’s also the perfect time to identify where I’ll need to make cuts.
Step 4: Gather the Right Tools — Including Construction Adhesive for Exterior Projects
My installation guide includes a full tool list for both interior and exterior projects, and most of the tools overlap. The big difference for an exterior installation is that I need a quality construction adhesive. My go-to is Loctite PL3X Premium, which is a polyurethane-safe adhesive that bonds incredibly well to exterior surfaces. Any comparable polyurethane-safe adhesive will also do the job.
For fasteners, I use non-corrosive decking screws when going through Tyvec into wood framing. If I’m mounting into concrete or masonry, I swap those out for Tapcon or another masonry drill bit-compatible concrete screw. Having the right fastener for your specific substrate is critical — the wrong screw can work loose over time, especially on an exterior wall exposed to weather. I also keep a good tape measure and laser level on hand throughout the entire install.
Step 5: Measure the Wall Height and Snap a Chalk Line
Getting the first course perfectly level is the single most important thing I do in this whole project. I measure the height of my corner, mark it, and then snap a chalk line across the wall rather than trying to go level off the floor. The floor almost always has some variance — even a tiny fraction of a degree can cause your panel seams to drift out of alignment as you work your way up.
By snapping a true level chalk line, I’m giving myself an accurate starting reference point that keeps everything straight from course one all the way to the top. It takes maybe five extra minutes and saves hours of frustration. A laser level makes this even easier if you have one available.
Step 6: Apply the Construction Adhesive in an S-Pattern
When it’s time to start setting panels on an exterior wall, I apply my Loctite PL3X construction adhesive to the back of each panel in an S-pattern. The reason for the S-pattern is simple — it allows the adhesive to spread out across a larger surface area when the panel is pressed against the wall, creating a much stronger bond than a straight line would.
This stuff cures incredibly hard — like concrete — so I make sure I’m happy with my placement before pressing each panel firmly into position. I loop the adhesive around the perimeter and then work through the center in that S shape to get full, even coverage. Once it dries, it is not coming off, which is exactly what I want on an exterior wall that needs to hold up to the elements year-round.
If you’ve been on the fence about upgrading your tool collection, this post is about to make that decision a whole lot easier. DeWalt 20 Must-Have Tools.

Step 7: Apply Big Stretch Caulk Between Every Panel
Along with the adhesive, I use Big Stretch caulking in the shiplap joint between every panel as I go. This caulk comes with my order, and it serves as the weatherproof seal that keeps water, bugs, and debris from getting behind the panels. On an exterior install, this step is non-negotiable — it’s my first line of defense against moisture infiltration.
I run the caulk along the shiplap portion of the panel before setting the next one in place, so the joint gets fully sealed as the panels lock together. If any caulk squeezes out the side, I grab a damp paper towel and wipe it clean right away — it’s easy to remove wet and can be touched up with paint later if needed.
Step 8: Secure Panels With Screws — Standard and Face Screws for Problem Areas
My standard fastener throughout the install is a two-inch non-corrosive decking screw. Once all panels are in place and I’ve done a final check of the entire wall, I go back through and test each panel for any movement or give. If a panel has any flex, I drive a couple of additional screws right through the face to lock it down.
When I’m face-screwing, I try to position the screw in what I call a “shadow rock” — one of the stones that sits a little deeper or recessed compared to its neighbors. Burying the screw head in that shadow makes it much easier to cover up during the touch-up phase with caulk and paint. For the ledger, I switch to a two-and-a-half-inch screw since the ledger is thicker than the standard panels, and I inset it slightly deeper to leave room for caulk coverage over the screw head.
Step 9: Measure and Cut Gap-Filling Pieces, Recreating the Positive and Negative Shiplap
This is where dry fitting really pays off. On most walls, especially around corners, the full panels won’t end perfectly at the edge — I’ll have a gap that needs a custom-cut filler piece. I measure the gap carefully, then cut a piece from a spare panel to fill it. The key is that I also need to recreate the positive and negative shiplap on that cut piece so it interlocks properly with the panels on either side and stays flush.
To do this, I measure in one inch on each side — one inch for the positive shiplap and one inch for the negative shiplap. I score the cut line first so I have a guide, then use a hand saw to make the cuts. A circular saw or jigsaw can make this go faster on a big project. For smaller gap pieces, I make sure to apply extra adhesive and drive additional screws since smaller cuts don’t have as much surface area to grip the wall — I want them just as secure as a full panel. I install these gap pieces first, then set my corner panels back on top of them.
Step 10: Install the Ledger Cap With Corner Ledgers on Each Side
Once my panels are all in place, I cap the installation with a ledger along the top. I start with a quarter ledger piece at the corner, screw it in, then run the full ledger piece across the wall and meet another quarter ledger on the opposite corner. Before setting the ledger, I run a bead of caulk directly on the ledger itself to create a tight seal between it and the top of the panel course.
I mark where each corner ledger ends so I can measure and cut the center ledger piece to fit exactly between the two corner pieces. On this part of the project, I love reusing the scrap piece from my first cut — a lot of the time it fits perfectly for the opposite side section, which minimizes waste. For a wainscoting-style project like this one, I typically go three to four panels high and then cap it all off with the ledger for a clean, finished look.
Step 11: Paint Exposed Cut Edges to Prevent Yellowing
Any edge that I’ve cut and that isn’t butting up against existing trim or a corner needs to be painted. Raw cut edges on exterior panels will yellow over time from UV sun exposure if left unpainted — and that yellowing is very noticeable against the stone finish. This is a quick step but an important one for the long-term appearance of the installation.
I use the paint kit that came with my order to match the color of the panels as closely as possible. A paintbrush gives me the most control on cut edges, especially in tight spots. Taking care of this detail now means I won’t be looking at yellowed edges in a couple of years wishing I’d addressed it during the install.
Step 12: Mix the Color-Match Touch-Up Caulk Kit
This is one of my favorite parts of the process because it’s where everything really comes together visually. The touch-up kit that comes with the order includes color-match paint, tintable caulk, a syringe, a cap for the caulk tube, and a thickening agent. I pour the paint into a small bowl to make loading the syringe easier, fill the syringe slowly to the 30-milliliter mark — going slow prevents air bubbles — and then inject that paint directly into the caulk tube through the cap.
After that, I shake the caulk tube for about a minute to a minute and a half until the color fully distributes through the caulk. Then I add the thickening agent, shake it again for another minute or so, and let the whole thing sit for 30 minutes before using it on the wall. I prepare all three colors at the same time using the same process — it’s just repeating the syringe-fill-shake-thicken routine for each one. After 30 minutes, the caulk is the perfect consistency for detailed touch-up work.
Step 13: Touch Up Screw Heads, Gaps, and Cut Edges With Color-Match Caulk and Paint
With my color-match caulk loaded into the caulking gun, I go through the entire wall and cover every exposed screw head — particularly on the ledger where I was screwing through the face. I start with my darkest color and work toward the lighter tones to build up the depth that mimics the natural look of the stone.
After applying the caulk, I dab it with a slightly damp paper towel to texture it and give it that same depth and dimensionality that the surrounding stone already has. A flat blob of caulk will look out of place, but a little texturing blends it right in. For fine detail work around cut edges or in tight spots between stones, I switch to a paintbrush — the paint from the kit works perfectly for this. I step back from the wall regularly to assess the overall picture and decide where additional touch-ups are truly needed versus where the finish is already looking great.
Step 14: Register Your Warranty, Download the Care Guide, and Handle Returns
Once the installation is complete and the touch-ups are done, there are a few final administrative steps I always take. I open the post-purchase guide that came via email, download the care guide for long-term maintenance reference, and register for the product warranty. These take just a few minutes and protect my investment for years down the road.
If I have any leftover panels that are undamaged and unused, I can contact the supplier to arrange a return — which is a great option if I over-ordered to be safe. Having those extra pieces during the install gave me the flexibility to be selective about panel placement and cuts, and returning the extras keeps the overall project cost in check.
Tips and Best Practices for Exterior Gemstone Panel Installation
Always dry fit before you commit. I cannot stress this enough — spending 20 minutes arranging panels and identifying where cuts are needed will save hours of rework. Use a chalk line, not the floor, as your level reference. Even a slight floor variance compounds dramatically as you work upward across multiple panel courses.
Apply adhesive in an S-pattern for maximum coverage. Straight lines leave gaps in adhesion. For smaller cut pieces, use more adhesive and more screws — they have less surface area and need extra securing. Bury face screws in shadow rocks wherever possible to make touch-ups easier. Mix and let your color-match caulk sit for the full 30 minutes before applying — it needs that time to reach the right consistency. And always check your work from a distance before calling the project done — stepping back gives you the full picture that close-up work can’t.
For more projects that can dramatically change your home’s appearance, my guide on 10 Home Renovation Ideas on a Budget for a Dated House has some great companion upgrades worth considering alongside a stone panel installation.
Frequently Asked Questions
Do I need construction adhesive for an exterior gemstone panel installation?
Yes — construction adhesive is one of the primary differences between an interior and exterior installation. For exterior projects, I always use a polyurethane-safe adhesive like Loctite PL3X applied in an S-pattern on the back of each panel. Combined with non-corrosive decking screws, the adhesive creates a bond that’s built to withstand outdoor weather conditions for the long term.
How do I recreate the shiplap on a cut panel piece?
When cutting a gap-filling piece from a full panel, I measure in one inch from each side and cut out both the positive and negative shiplap profiles. I score the cut line first for accuracy, then use a hand saw or circular saw to make the cuts. This allows the filler piece to interlock properly with the adjacent full panels so everything stays flush and aligned.
Why do I need to let the panels acclimate before installation?
Letting panels acclimate for 48 hours before installation allows them to adjust to the temperature and humidity conditions of their installation environment. Materials expand and contract with temperature changes, and acclimating beforehand minimizes the chance of panels shifting, gapping, or warping after they’re secured to the wall — especially important on exterior projects where temperature swings are more extreme.
How do I cover screw heads and gaps after installation?
The touch-up kit that comes with the order includes color-match paint, tintable caulk, a syringe, and a thickening agent. I mix 30ml of the matching paint into the caulk tube, shake it for about 90 seconds, add the thickener, shake again, then let it sit 30 minutes before use. I apply it with a caulking gun and then texture it with a damp paper towel or paintbrush to match the surrounding stone depth.
Ready to Transform Your Exterior Wall?
This exterior wall gemstone installation guide covers every step I take on a project like this — from unboxing and acclimating panels all the way through the final color-match touch-ups. The key to a great result is in the prep: dry fitting, snapping a true chalk line, mixing your adhesive carefully, and taking the time to recreate proper shiplap on every cut piece. Follow these steps and you’ll end up with an exterior wall that looks like a professional masonry job at a fraction of the cost.
If this project inspired you to keep the momentum going outside, my post on DIY Paver Patio Installation Guide: Save $10,000+ is a natural next step for completing your outdoor transformation. Go give it a read — and if you have questions about your own gemstone install, drop them in the comments below. I’d love to see how yours turns out!