If you’ve ever stared at a cramped entryway, a chaotic hallway, or a tiny bedroom and thought “there has to be a better way,” I promise you — there is. I’ve been obsessing over IKEA hacks for small space storage for years now, and the results have genuinely transformed some of the most frustrating corners of my home. The best part? Most of these projects cost well under $100, and several of them started with a single $10 IKEA piece.
I’m Michael, and on The DIY Journey I share the projects I’ve actually built, tested, and lived with — not just ideas that look pretty on Pinterest. Whether you’re a total beginner looking for a quick weekend win or someone who’s ready to break out the miter saw and go all-in, I’ve got something for you in this list. I’ve personally done every single one of these hacks, and I can tell you exactly what works, what to watch out for, and how to make each one look like it was custom-built.
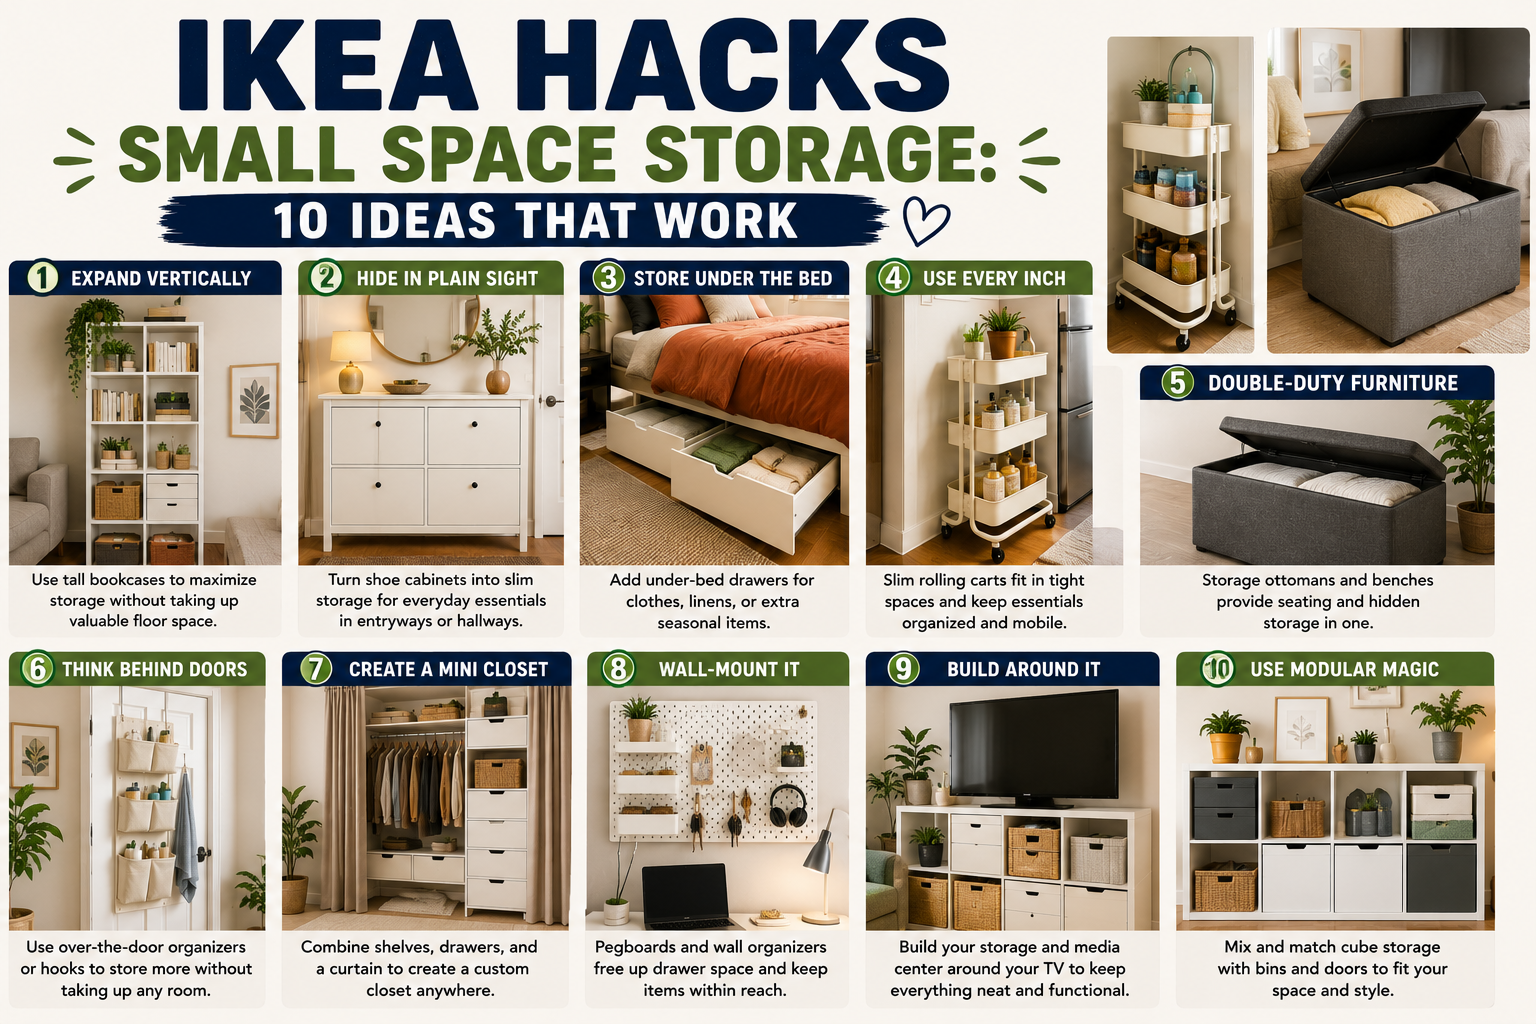
I’ve pulled together my 10 absolute favorite IKEA storage hacks for small spaces below. From entryway organizers to a hidden home office setup, these ideas have changed the way I live in and enjoy my home — including my tiny lake house. Let’s get into it.
1. Entryway Picture Ledge Organizer with Rotating Hooks
This is one of the simplest hacks on the list, and it might be my favorite for sheer ease and impact. I grabbed an IKEA picture ledge for just $10 — I use these things constantly — and paired it with a rotating hook system from Amazon. The hook has an adhesive backing, so installation is literally peel, stick, and hold for a few seconds. I placed mine on the bottom right of the picture ledge, then mounted the whole thing in my hallway.
What I love most is that this setup sticks less than 5 inches out from the wall, which makes it perfect for narrow hallways. On top of the ledge I placed a faux plant and some artwork that matches my aesthetic, and I use the surface for small everyday items like lip gloss and sunglasses. The rotating hook on the bottom holds car keys and mail keys, and I added a curtain command hook on the bottom for a bag or purse. It’s tidy, functional, and took maybe 15 minutes to put together.
2. IKEA Brimnes Cabinet Built-In Entryway Closet (Under $300)
This one is honestly one of my proudest DIY moments. My tiny lake house had a really small entry with zero storage, and I found the IKEA Brimnes cabinet for under $200.Caulking the seams is genuinely the most important trick to making any IKEA piece look high-end and intentional.
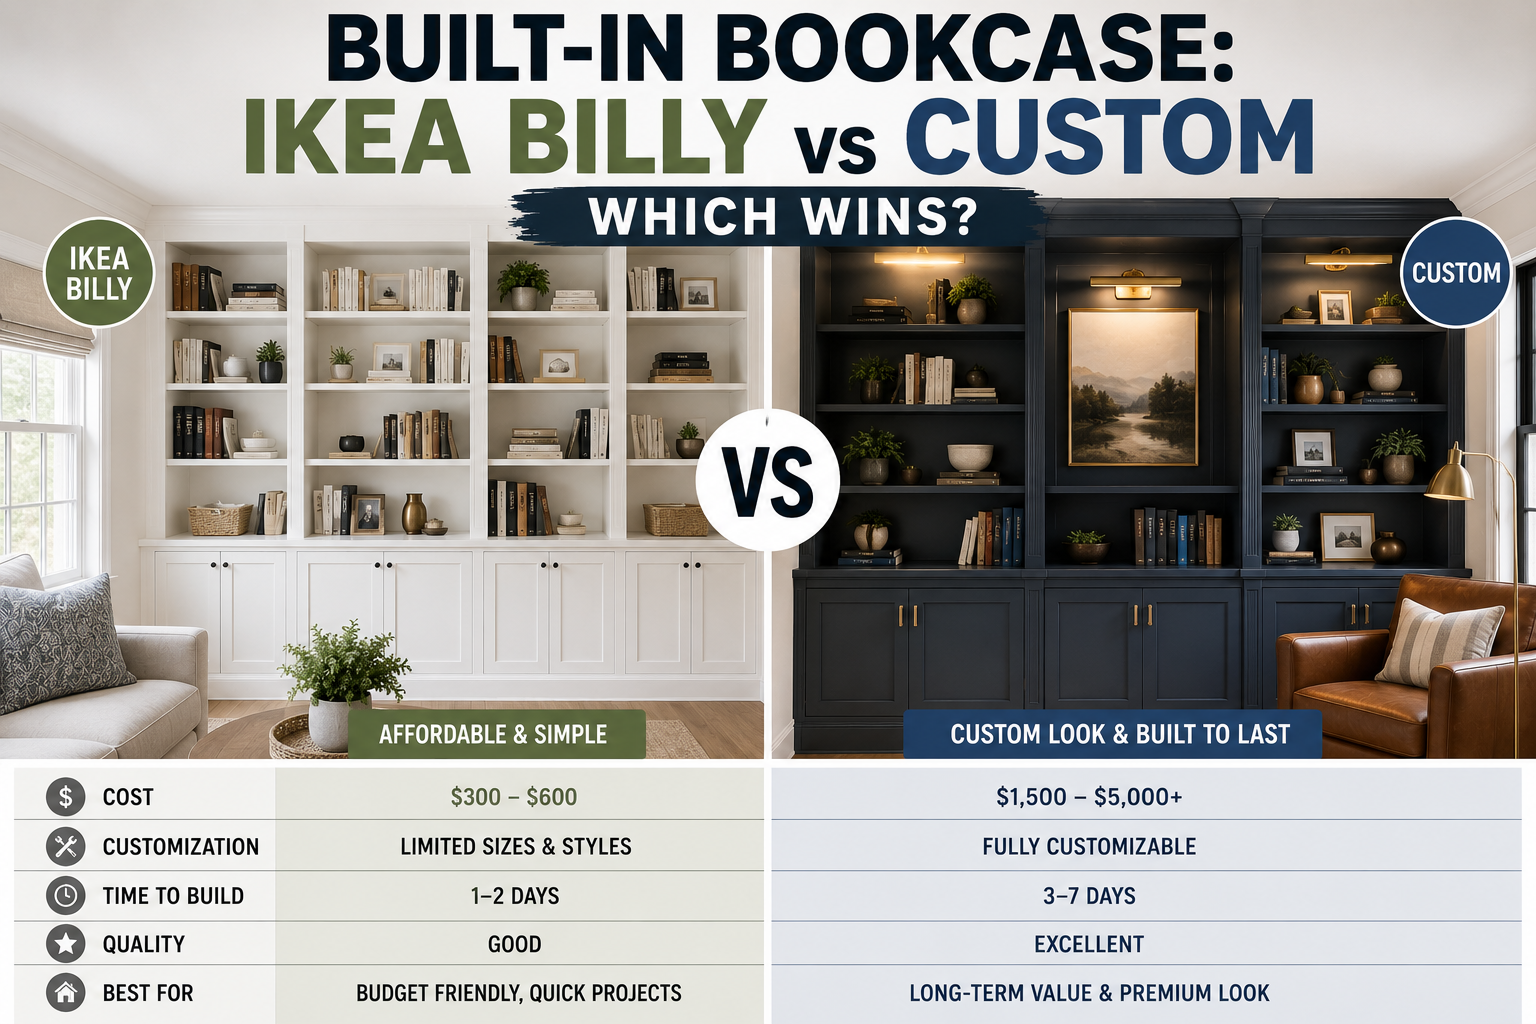
I also added Crown molding all the way around the top, which elevated the whole look dramatically. Because there was a gap between the cabinet top and the ceiling, I bought some stylish storage bins from Amazon and lined three of them up in that space — now that awkward gap is actually useful. Inside the cabinet I store jackets, cleaning supplies, and even a vacuum. I finished it off with thin black cabinet handles from Amazon, and the whole thing looks like it was always meant to be there. If you love this kind of built-in look, you might also enjoy my post on Built-In Bookcase: IKEA Billy vs Custom where I dig into how these two approaches compare.
3. IKEA Rattan Under-Bed Storage Baskets
The space under your bed is prime real estate, especially in a small home. Most people ignore it entirely and let dust bunnies take over, but I’ve learned to treat it like bonus square footage. In my tiny bedroom, you can see under the bed clearly, so I wanted something that actually looked good — not just a plastic tub shoved under there.
IKEA’s rattan baskets are perfect for this. I picked up three, assembled them quickly, and slid them right under the bed. They add texture and warmth to the room while keeping things organized. I use mine to store linens and extra towels, but these baskets work for anything — off-season clothing, extra bedding, kids’ toys, you name it. They match almost any aesthetic, which makes them one of the most versatile storage finds I’ve come across at IKEA.
4. Dining Bench Made from IKEA Over-the-Fridge Cabinets
I made this hack years ago and I still use it every single day — that tells you everything you need to know. I took two 30-inch-wide IKEA over-the-fridge cabinets (24 inches deep, which is perfect bench depth) and built a simple base out of 2×4s on the floor. I didn’t attach the base to the wall because I wanted the flexibility to move it if needed. The cabinets sit on top of the base, and I added baseboards to the base and painted everything to give it a cohesive, built-in appearance.
You can add a piece of plywood on top of the cabinets for extra longevity depending on who will be sitting on it — mine has been totally fine for 7 years without it, but it’s a smart addition for heavier use. I made a simple cushion using Amazon foam and some indoor-outdoor fabric, sewing it on my machine — it was genuinely easy. The inside of the cabinets stores all my serveware that I don’t use daily: trays, cake stands, and entertaining pieces. It’s a comfy bench, a storage solution, and a piece of furniture that looks completely intentional. I absolutely love it.
5. IKEA Stall Shoe Cabinets with Board and Batten Trim
With five people in my family — including three daughters — shoes were taking over our narrow hallway. It was chaos. When I found the IKEA Stall shoe cabinet, I knew it was the answer. It’s thin, it’s functional, and it holds a ton of shoes without jutting far into the hallway. I wanted mine to look completely custom though, so I scuff-sanded, primed, and painted them the exact same white as the trim work in my hallway. That color-matching step alone makes a huge difference.
After mounting the cabinets on the wall, I added board and batten paneling around them, topped it with baseboards, and used a finishing nailer and caulk on all the seams before painting everything. The result looks like the shoe storage was built into the wall from day one. If you’re dealing with a cluttered entryway and want more ideas, my roundup of 20 Budget Home Improvement Ideas You Can Do in 30 Minutes has some quick wins that pair perfectly with this kind of project.
6. IKEA Hemnes TV Stand as an Entryway Storage Bench
The IKEA Hemnes TV stand is not just for TVs — I repurposed mine as an entryway storage bench and it’s been a hit, especially with guests at my lake house. The key to using it as seating is to assemble it really well and add strong wood glue to all the seams for extra stability. Once it’s solid, it functions beautifully as a bench.
I painted mine a cheerful yellow color, then placed it in the hallway and built out the wall above it with beadboard and a DIY shelf using IKEA’s $3 Sandel brackets — which I genuinely love and use for so many projects. After caulking and painting everything, I added hooks for jackets, bags, and shoes. The nooks in the TV stand hold all sorts of items, the drawers keep smaller things organized, and the shelf above holds baskets and accessories. It’s one of the highest-storage-per-dollar hacks I’ve ever done.
7. IKEA Sandel Brackets Over-the-Toilet Shelves
Speaking of those $3 Sandel brackets — here’s another use I love. The space above the toilet in a small bathroom is almost always wasted, and it’s actually a fantastic spot for storage and décor. I paired IKEA’s shelves with the Sandel brackets and installed them directly over the toilet. It took maybe 20 minutes and cost almost nothing.
On the shelves I store extra toilet paper, some thrifted finds, and a few textured baskets. It functions as both a practical storage spot and a little décor moment in a room that often gets overlooked. If your bathroom is on the smaller side and you’re trying to squeeze every bit of storage out of it, this is one of the easiest wins on the entire list.
8. IKEA Kallax Window Seat with Built-In Storage
If you want a custom window seat without hiring a carpenter, the IKEA Kallax system is your best friend. I used this in my daughter’s bedroom and it came out beautifully. I placed two square Kallax shelves on either side of her window and one long narrow Kallax unit underneath the window — it was a perfect fit for that 10-foot-wide space. If your window is a different size, a little trim work on either side will make everything look seamlessly built-in.
I added simple cushions on top of the center unit to create a cozy reading nook, and the cubbies hold everything from clothing to toys to craft supplies. I also added IKEA picture ledges on either side of the window for art displays and even more storage. This is one of those hacks that looks like it took a professional to build, but it’s genuinely approachable for a DIYer at any skill level. For more ideas on maximizing a small bedroom, check out my guide to Kids Bedroom Closet Built-In Organizer for Under $600.
9. IKEA Bekväm Spice Racks + Hultarp Rail Drop Zone
This hack saved my sanity in the entryway of my lake house. I already had a great storage bench in that entry, but I needed a dedicated drop zone for pet supplies — doggy bags, leashes, toys, and that kind of thing. My solution was to grab two IKEA Bekväm spice racks, assemble them, and screw them together into one unit. Then I attached IKEA’s gold Hultarp rail underneath — it fits perfectly and looks really intentional.
I mounted the whole assembly to the wall using drywall anchors and a laser level to make sure everything was perfectly straight. The spice racks on top hold pet essentials and small items, and the Hultarp hooks on the rail hold coats, bags, and leashes. It’s compact, attractive, and incredibly functional. The gold hardware gives it a finished, intentional look that feels much more expensive than it actually is.
10. IKEA Pax Wardrobe Home Office with Floating Desk
This last hack is my favorite for anyone who works from home but doesn’t have a dedicated room for an office. The idea is simple but the result looks absolutely stunning. I placed two IKEA Pax wardrobes on either side of a living room wall, added trim pieces to each side, and then laid a desktop — a solid piece of plywood from the home improvement store — across the top of the middle space between them. Suddenly there’s a full desk flanked by two massive storage towers.
Inside the Pax wardrobes you can configure absolutely anything: clothing rods, shelves, drawers, whatever your space needs. I added a mirror and a light fixture to the setup, which makes it feel polished and purposeful. This hack genuinely gave me a full home office without sacrificing a whole room. If you love the idea of a built-in workspace, my post on Small Bedroom Office Conversion Ideas: Built-In Desk & Shelves goes even deeper into this kind of transformation.
Tips and Best Practices for IKEA Small Space Storage Hacks
Always caulk your seams. This is the single biggest trick to making any IKEA hack look custom and built-in. Run a bead of caulk along every seam where the piece meets the wall, floor, or ceiling, then smooth it with your finger and paint over it. The difference is night and day.
Match your paint exactly. Whether it’s trim white or wall color, painting your IKEA pieces to match their surroundings is the fastest way to make them look intentional. I always bring a paint chip or existing trim piece to the store so I can color-match precisely.
Add real hardware. Swapping out stock IKEA hardware for something more stylish — thin black handles, gold pulls, brushed nickel knobs — instantly elevates any piece. It’s a $20–$40 upgrade that makes a $150 cabinet look like it cost $500. Pair that with concealed hinges for a truly seamless, furniture-quality finish.
Use a level every time. Nothing ruins the look of a storage hack faster than crooked shelves. I always use a laser level and take my time getting everything perfectly straight before committing to any installation. A tape measure and masking tape for marking positions are also must-haves.
Don’t overlook vertical space. In small homes, the wall above the toilet, the wall above a bench, and the space between cabinets and the ceiling are all valuable real estate. Think upward as much as outward, and use IKEA’s modular systems to fill those gaps with useful storage.
Frequently Asked Questions
What is the best IKEA piece for small entryway storage?
In my experience, the IKEA Brimnes cabinet is one of the best options for a small entryway because it offers enclosed storage, it’s affordable (under $200), and it takes really well to trim and paint upgrades that make it look completely built-in. The Stall shoe cabinet is another top pick specifically for shoe storage in narrow hallways.
How do I make IKEA furniture look built-in?
The three key steps I always follow are: caulk every seam where the piece meets the wall or ceiling, add trim or molding around the edges (MDF trim and Crown molding work great), and paint everything — the piece and the surrounding wall — in matching or complementary colors. Upgrading the hardware also makes a big difference.
Are IKEA hacks beginner-friendly?
Absolutely — that’s one of the things I love most about them. Hacks like the picture ledge organizer or the over-the-toilet shelves require almost zero tools and can be done in under an hour. More involved projects like the window seat or the Pax home office take more time and a few basic tools like a hammer and a tape measure, but they’re still very manageable for a first-time DIYer.
How much do IKEA storage hacks typically cost?
Most of the hacks I’ve covered here fall in the $10–$300 range depending on how involved the project is. The picture ledge hack costs about $10–$20 all-in. The Brimnes built-in closet came in under $300 total including trim and paint. Even the Pax wardrobe home office — which looks like a high-end custom installation — is achievable for a few hundred dollars. These are some of the best dollar-for-impact projects I know of.
Ready to Hack Your Small Space?
There you have it — my 10 favorite IKEA hacks for small space storage, all personally tested and living in my own home (and vacation rental). Whether you start with the $10 picture ledge this weekend or take on the full Pax wardrobe office build, I promise you’ll be amazed at what a little creativity and some IKEA basics can do for even the most challenging small spaces.
If you want to keep the momentum going, I’d love for you to check out my post on 10 IKEA Small Space Hacks Ideas That Actually Work for even more inspiration. And if you’re on a tight budget, my Affordable Home Improvement Projects Under $100 roundup is packed with ideas that pair perfectly with these IKEA projects. Drop a comment below and let me know which hack you’re trying first — I read every single one!