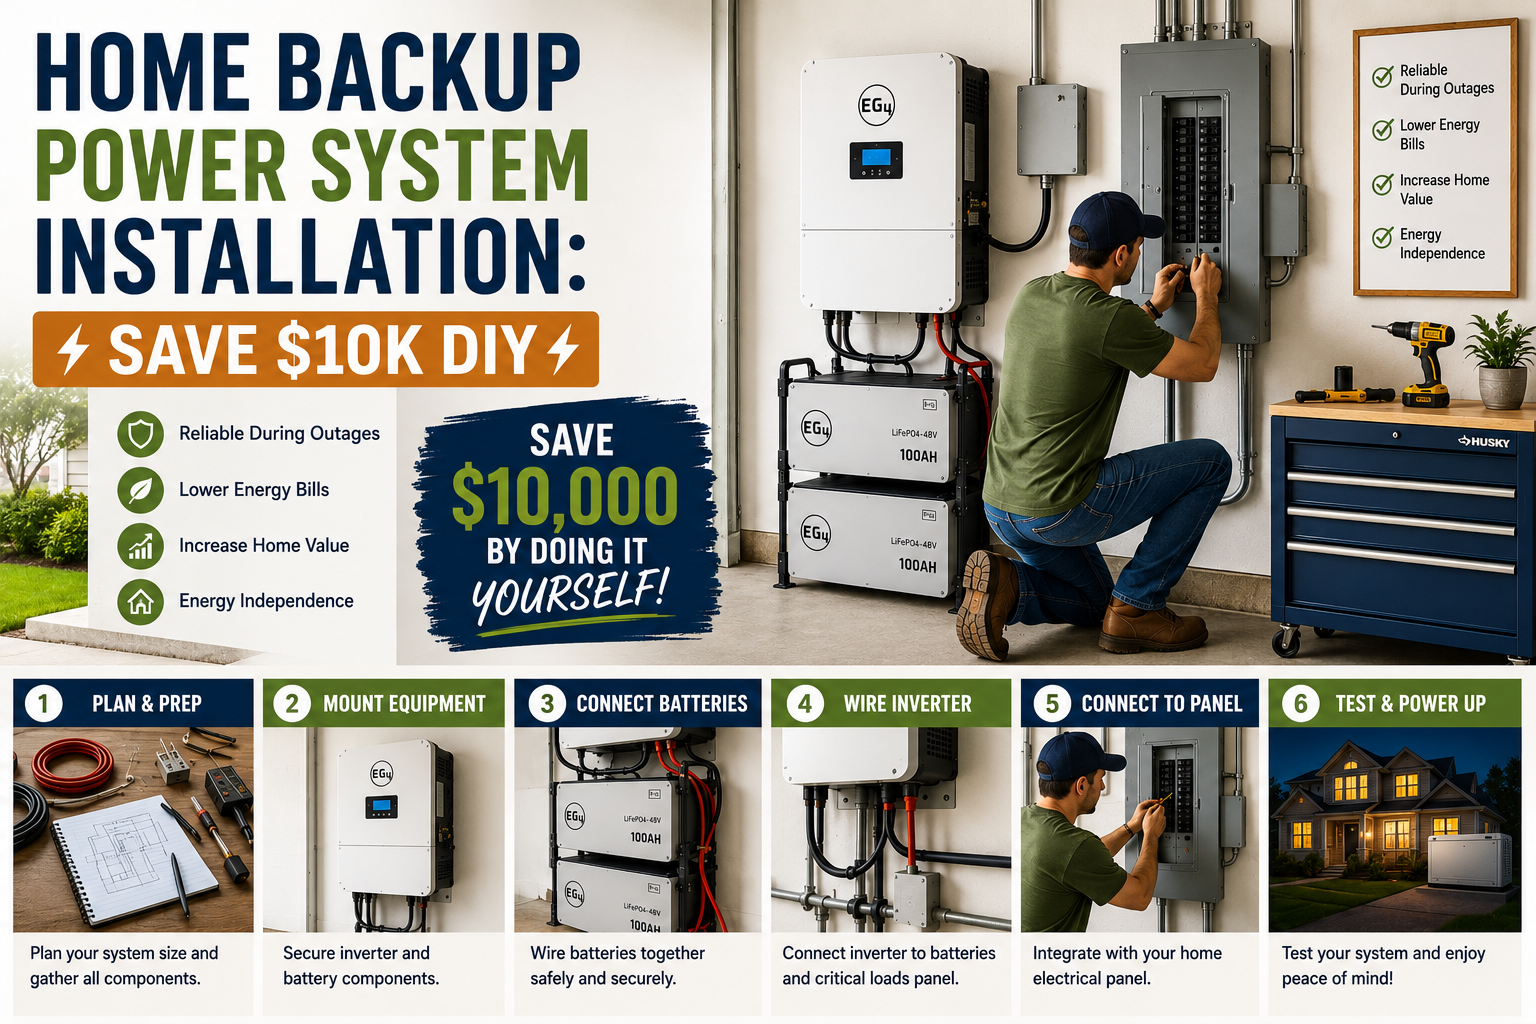
If you’ve ever sat in the dark during a storm, watching your fridge slowly warm up and wondering what you’re going to do, you already know exactly why I finally tackled this project. A few years back, I got a quote for a whole-home standby generator installed — $12,000. And honestly, I imagine it’s even more expensive now. That number sent me straight to the DIY drawing board, and I’m so glad it did.
I ended up building out a complete home backup power system installation for a fraction of that cost, and in this post I’m walking you through every single step — from choosing the right portable generator, to hiring an electrician for the power inlet box, to installing the critical safety component my electrician actually forgot, to building a custom cedar-roofed generator shed from scratch to protect my investment from the elements. If you’ve been putting this project off, consider this your sign to finally get it done.
I’ve tackled a lot of projects on this blog, including a full basement finishing on a budget and plenty of budget home improvement DIY ideas that save thousands, but this one might be the most practically valuable thing I’ve ever built. Let’s get into it.
Why I Chose a Portable Generator Over a Whole-Home Standby Unit
The math here is pretty simple. When I got that $12,000 quote for a whole-home standby generator installed by a professional, I knew there had to be a better way. I ended up going with a portable generator that cost me about $2,500 — and with the electrical work to connect it properly, I came in around $3,100 total. That’s a savings of nearly $9,000 right out of the gate, and my system works beautifully.
Now, a portable generator isn’t a perfect drop-in replacement for a whole-home unit. There are trade-offs and problems to solve, and I’m going to walk you through every single one of them. But if you’re willing to put in the work, the savings are absolutely worth it. In my case, the generator powers my mom’s portion of our shared home — lights, refrigerator, and even the 3.5-ton AC unit — which I’ll prove later in this post when I go check the watt meter.
Hiring an Electrician to Install the Power Inlet Box
One of the first things I had to solve was how to get power from the generator sitting outside the house into the home’s electrical panel. Sure, you could run a bunch of extension cords to your most critical devices, but that severely limits what you can power and creates a messy, potentially dangerous situation. I wanted a real, clean solution.
I hired a licensed electrician to install a power inlet box on the exterior of the house. This is the connection point where you plug in the 50-amp cord running from the generator. Along with the inlet box, the electrician installed a dedicated 50-amp generator breaker in the panel and provided the 50-amp cord — the whole job came out to about $600. That single connection is what transforms a portable generator into something that functions like a whole-home standby generator. It’s worth every penny to have that done professionally and up to code.
Installing the Generator Interlock Kit — The Safety Component My Electrician Forgot
Here’s the part of the story that could have ended very badly. After my electrician finished the job, I discovered he had failed to install one absolutely critical safety component: a generator interlock kit. This is not optional. Without it, your generator can backfeed power into the utility lines, which could seriously injure or kill a lineman who’s out there working to restore power to your neighborhood. That’s not a risk I’m willing to take with anyone’s life.
Fortunately, my nephew Tyler was able to come install the interlock kit for me. Here’s how it works: the interlock kit is a physical sliding mechanism on your electrical panel that makes it mechanically impossible to have both the main breaker and the generator breaker switched on at the same time. So when I want to run the generator, I flip the main breaker off first — which disconnects my home from the utility grid — and only then can I slide the interlock over and switch the generator breaker on. It’s a simple, elegant, mechanical safety system, and it’s non-negotiable for any home backup power system installation. If your electrician didn’t install one, call them back or hire someone who will.
Choosing a Dual Fuel or Tri-Fuel Generator
When you’re shopping for a portable generator for a setup like this, I strongly recommend going with at least a dual fuel generator — ideally tri-fuel if you can find one. The reason is fuel flexibility and storage. If you store gasoline in a generator’s tank and don’t use it for a few months, it can go bad, gum up the carburetor, and leave you with a generator that won’t start right when you need it most. Then you have to drain it, treat it with stabilizer, or deal with a repair bill. It’s a headache.
My generator is dual fuel, meaning it runs on either gasoline or propane. I love being able to use propane because it doesn’t go bad sitting in a tank. I can use the small portable propane tanks you can pick up anywhere, or — even better in my situation — I’ve connected my generator directly to my buried propane tank on the property. That means I essentially have a massive fuel reservoir ready to go at any time with zero fuel storage hassles. If you have access to natural gas, a tri-fuel generator that can also run on natural gas is even better.
Testing the Generator: Lights, Refrigerator, and the AC Unit
I’ll be honest — I wasn’t 100% sure the generator would handle everything I needed it to handle until I actually fired it up and tested it. There’s always that moment of truth when you flip the switches and see what happens. So we turned the generator on, connected it through the inlet box, and went inside to check what was running.
The lights came on. The refrigerator kicked on. And then we tested the big one — the 3.5-ton AC unit. After a brief reset delay (which is totally normal for AC units), it fired up and was blowing cold air. We ran over to the watt meter to see how much we were pulling, and the reading was about 4,300 watts — which is roughly half the capacity of this generator running on propane. That’s a great sign. It means I’ve still got plenty of headroom for other devices, and the generator isn’t being pushed anywhere near its limits.
Why You Can’t Leave a Portable Generator Outside (Learn From My Mistake)
Here’s the painful lesson I learned the hard way, and I’m sharing it so you don’t have to repeat it. I actually owned a portable generator before this one. I bought it for exactly this purpose — backup power for the house. But I had nowhere to store it, so it just sat outside exposed to the weather for about two years. When I went to use it, it was completely ruined. Corroded, deteriorated, basically a pile of junk. A $2,500 piece of equipment gone because I didn’t have a proper shelter for it.
I was not about to let that happen again with my new generator. So before I even really committed to this whole system, I knew that building a proper generator shed was part of the project. It’s not optional — it’s part of protecting your investment and making sure the system is actually there and functional when you need it most. Everything I’m covering in the next several sections is about how I built that shed.
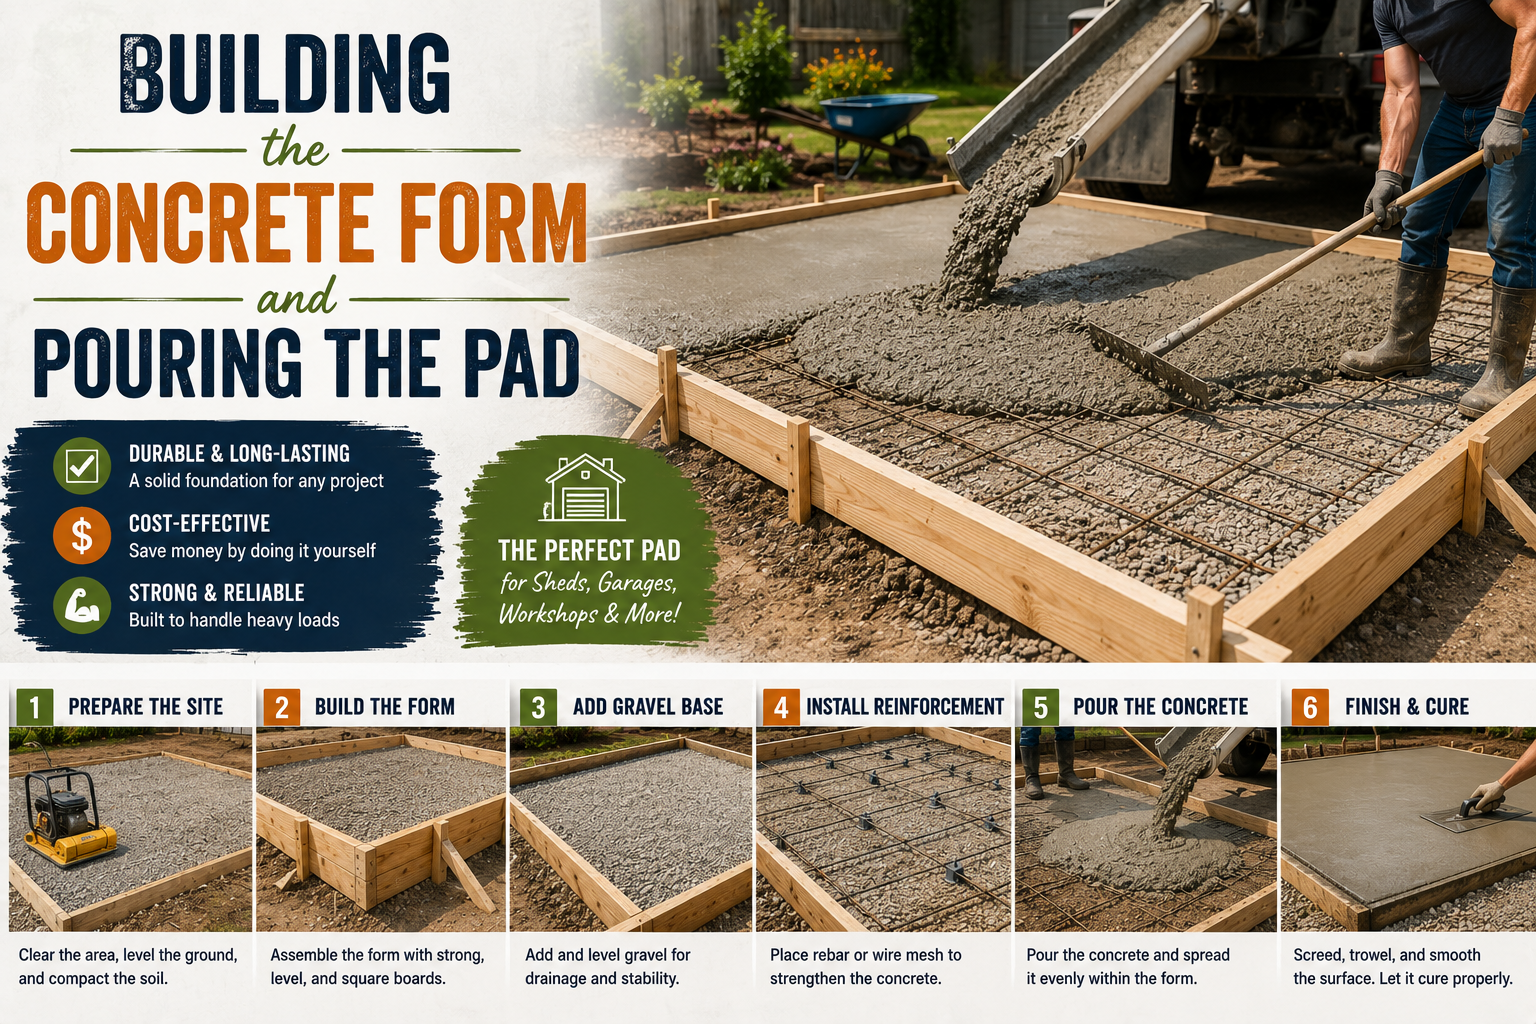
Planning and Laying Out the Generator Shed Location
I decided to build the generator shed right up against the exterior wall of the house, close enough to the power inlet box for easy connection. The only obstacle was an ugly overgrown bush sitting exactly where I wanted the shed to go. My solution? I tied a rope around the base of the bush, attached the other end to my vehicle, and pulled it right out of the ground. Quick and satisfying.
For laying out the location of the concrete pad, I used a tool that genuinely impressed me — the Mileseey S50 green beam laser distance meter. I’ve used a lot of laser measuring tools over the years, and most of them are completely useless in direct sunlight. The S50 uses patented power burst technology that gives it four times the visibility of a red beam laser, and I could clearly see both the laser dot and the display reading in bright direct sunlight. It measures up to 400 feet, has a 2.4-inch IPS screen that adapts to light conditions, and is accurate in any temperature. Working by myself, this tool saved me a ton of time laying out the pad location without fighting a tape measure that keeps falling.
Building the Concrete Form and Pouring the Pad
For the concrete base, I built a simple form out of old 2x4s I had on hand — no need to buy new material for the form itself. I leveled the form carefully, checking the bubble at multiple points, and once it was level and square I cut the stakes flush with the top edge of the form. One important thing I almost forgot: apply release wax to the inside of the form before you pour. I nearly skipped this step, and while it probably would have come off anyway, the wax makes it so much easier to strip the form cleanly after the concrete cures.
I mixed the concrete using a mud mixer, which is incredibly handy for a pad this size — much faster than mixing by hand in a wheelbarrow. After the pour, I let it cure for 24 hours, and then kept the surface wet for a period afterward to help the concrete reach its full strength. This is a step a lot of DIYers skip, but keeping fresh concrete moist during the curing process genuinely adds strength to the finished slab. Don’t rush it.
Framing the Generator Shed With Pressure-Treated Lumber
For the shed frame, I used pressure-treated 2x4s throughout. Since this structure is going to sit on a concrete pad outside and be exposed to moisture over the years, pressure-treated lumber is the right call — it resists rot and insect damage in a way that standard framing lumber simply doesn’t. I built the bottom plate, top plate, and wall studs as a simple stud-wall frame, assembling the panels on a flat surface before standing them up.
One thing I ran into during the framing process was a measurement issue with my siding panels. I had planned for the wall height to work out to exactly 48 inches so I could get two pieces out of one sheet of siding — but because of the roof angle, it actually came out to 48 and 3/8 inches, which meant I couldn’t get two full pieces from a single sheet without losing material to the saw blade kerf. It’s the kind of thing that sounds minor until you’re standing there doing the math on the fly. I worked around it, but the lesson is always — always — account for your saw blade width and your angles before you commit to your dimensions.
Installing Ventilation: Exhaust Fan and Air Intake Vent
A generator shed needs proper ventilation — this is not a nice-to-have, it’s essential for safe operation. Running a generator in an enclosed space without adequate airflow is dangerous and can also cause the generator to overheat. My ventilation setup has two components working together.
On one side of the shed, I installed an exhaust fan with louvered vents. The louvers stay closed when the fan isn’t running, which keeps weather and critters out, and when the fan is on, it actively draws hot exhaust air from inside the shed to the outside. On the opposite side, I installed a passive air intake vent. This allows fresh, cool air to flow in as the exhaust fan pulls the hot air out, creating a continuous airflow through the shed. I positioned the exhaust vent at about 21 inches up on the wall — high enough to be near the warm air that rises, which maximizes the ventilation effectiveness. I also ordered an exhaust extension kit from Amazon to direct the generator’s exhaust properly, though I’ll note it didn’t fit perfectly out of the box and required some modification with an angle grinder to make it work.
Sheeting and Painting the Exterior Siding Panels
For the exterior walls of the shed, I used exterior-grade siding panels, sheeting from end to end with the edges landing on the 2×4 framing. The back panel needed to overlap the framing on adjacent walls, so I accounted for the thickness of both the 2×4 and the siding when cutting it to size — about 4 inches of overlap on each side. Getting this right meant the exterior corners would be clean and weather-tight.
Once the panels were cut, my helper Brian got them painted before assembly. I also cut and painted 1-by material for the trim pieces. At this stage of the build, with everything pre-painted and pre-cut, the assembly went quickly and almost felt like it was putting itself together. I pre-drilled the pressure-treated 2×4 bottom plates with a paddle bit so I could follow up with a masonry bit and drive Tapcon concrete screws through the frame and into the concrete pad, anchoring the entire shed structure securely to the slab so it can’t shift or blow over.
Building the Lift-Up Roof With Strut Supports
This is the part of the build I’m most proud of, and it’s what gives this generator shed its “twist” I mentioned during the planning phase. Instead of a fixed roof, I built a lift-up roof — like a giant hinged lid — so I can raise the entire roof panel to access the generator easily for maintenance, refueling, or startup. Think of it like the hood of a car, but for your generator shed.
I started by cutting a piece of 3/4-inch exterior-grade plywood to the roof dimensions, then applied reflective insulation roll to the underside of the plywood before building the roof frame on top of it. I used Pocket hole joinery to assemble the frame because it’s strong, fast, and perfect for a project like this. To hold the roof open, I used 88-lb gas struts — the same type I’ve used on a secret bookcase room door and on a tiny camper build. Finding the right weight strut took some trial and error (the lighter ones I tried first weren’t close to strong enough), but the 88-lb struts lift the roof effortlessly and hold it open solidly. Watching that heavy roof panel lift up on its own the first time was genuinely satisfying.
Applying Roof Underlayment, Flashing, and Cedar Shingles
With the roof structure built, I needed to weatherproof it properly. I wrapped the edges of the roof panel with metal flashing to keep water from getting under the edges, then rolled out roof underlayment across the top surface — I had a roll of this on hand, but standard roofing felt works just as well if that’s what you have available.
For the actual shingles, I went with cedar shingles from Home Depot. These are underside course shingles — not premium shingles I’d put on my house — but they’re perfectly appropriate for a small shed, and I know from experience they hold up well. I used the same ones on a rabbit hutch a couple of years ago and they still look great. The installation process is straightforward: your first course needs to be a double course (two layers at the bottom edge), and then you stagger and stack subsequent rows, nailing them as you go. At the very top where the final flashing piece goes, I applied Lexel water sealant over every nail head and ran a full bead along the flashing edge to ensure a completely waterproof seal at the most vulnerable point of the roof.
Adding Interior Reflective Insulation and Final Finishing Details
On the inside of the shed walls, I added more reflective insulation — the same material I used on the underside of the roof panel. My main goal here wasn’t sound deadening (this is an inverter generator, so it runs fairly quietly to begin with) but rather heat management. Keeping radiant heat off the wood interior helps protect both the shed structure and the generator itself, especially in the summer months.
For security and weatherproofing, I installed toggle latches on each end of the roof to keep the lid firmly down when closed, and a gate latch lock in the middle of the double doors. The double doors went together well, though they did need a little trimming to swing freely — something I half-expected given the tight tolerances involved. I also applied flashing tape along the top edge of the door opening for an added layer of weather protection where the doors meet the roof structure. With the doors latched, the latches locked, the ventilation system in place, and the lift-up roof secured — the generator shed was complete.
Tips and Best Practices for Your Home Backup Power System Installation
After going through this entire project, here are the most important lessons I’d pass along to anyone planning their own home backup power system installation:
Always install a generator interlock kit. This is the most important safety item in the entire system. Never connect a generator to your home’s panel without one — it prevents deadly backfeeding onto utility lines. Go dual fuel or tri-fuel. Propane doesn’t go bad, and connecting to a buried tank gives you virtually unlimited fuel supply. Get the power inlet box done by a licensed electrician, but make sure they install the interlock kit — don’t assume they will. Build or buy a generator shed before you need it, not after. Exposure to the elements will destroy an expensive generator faster than you’d believe. Use pressure-treated lumber for any outdoor structure sitting on concrete or near ground level. Ventilation is non-negotiable — your shed needs both an active exhaust fan and a passive intake vent for safe generator operation. Use gas struts for a lift-up roof — they make accessing your generator for maintenance and refueling dramatically easier. And finally, test your system before you need it — fire up the generator, check the watt meter, and make sure everything runs as expected while you still have time to troubleshoot.
If you’re interested in more DIY electrical and workshop projects, check out my guide on shed electrical wiring for beginners — a great complement to the outdoor shelter side of this project.
Frequently Asked Questions
Do I need a permit for a home backup power system installation?
It depends on your local jurisdiction. The electrical work — specifically installing the power inlet box and the generator breaker in your panel — almost certainly requires a permit in most areas, which is one reason I recommend hiring a licensed electrician for that portion. The generator shed itself may or may not require a permit depending on its size and your local building codes. Always check with your local permit office before starting either part of the project.
What size generator do I need to power my whole home?
That depends heavily on what you want to run simultaneously. A 3.5-ton AC unit alone pulls about 4,300 watts at startup. Add in a refrigerator, lights, and a few other devices and you can quickly approach 6,000–8,000 watts. My generator has about 8,500–9,000 watts of capacity on gasoline, somewhat less on propane, which is plenty for the portion of my home I’m powering. Calculate your critical loads first — HVAC, refrigerator, lighting, and any medical equipment — and size your generator to handle those with some headroom to spare.
Is it safe to run a generator in a shed?
Yes, but only if the shed has proper ventilation. You should never run a generator in a fully enclosed space without active airflow. My shed has an exhaust fan that pulls hot air out and a passive intake vent that pulls fresh air in, creating continuous airflow. The generator itself also has an extended exhaust to direct fumes properly. Carbon monoxide buildup is the danger with enclosed generator operation, so ventilation is absolutely critical — not optional.
How much does a home backup power system installation cost DIY vs. professional?
In my case, a professional whole-home standby generator installation was quoted at $12,000. My DIY portable generator system — including the generator itself, the electrician’s work for the inlet box and breaker, the interlock kit installation, and building the generator shed from scratch — came in well under $4,000 total. That’s a savings of over $8,000. Individual costs will vary based on your generator choice, local electrical labor rates, and shed materials, but the DIY route offers massive savings for anyone willing to put in the work.
Conclusion
A complete home backup power system installation doesn’t have to cost $12,000 or more. With a quality dual-fuel portable generator, a proper power inlet box and interlock kit, and a custom-built generator shed to protect it all, I built a system that keeps the lights on, the fridge cold, and the AC running — for a fraction of the professional quote. The generator shed alone — with its ventilation system, lift-up roof, cedar shingles, and security latches — is something I’m genuinely proud of, and it’s the kind of project that makes a real, practical difference every time a storm rolls through.
If you’re tackling similar projects around the house, I’d love for you to explore some of my other guides — including my full breakdown of garage organization ideas on a budget, which pairs perfectly with creating a dedicated equipment storage space like this. Have questions about any part of my backup power setup? Drop them in the comments below — I read every single one. And if you found this post helpful, share it with a neighbor or family member who’s been thinking about backup power. You might just save them $10,000.