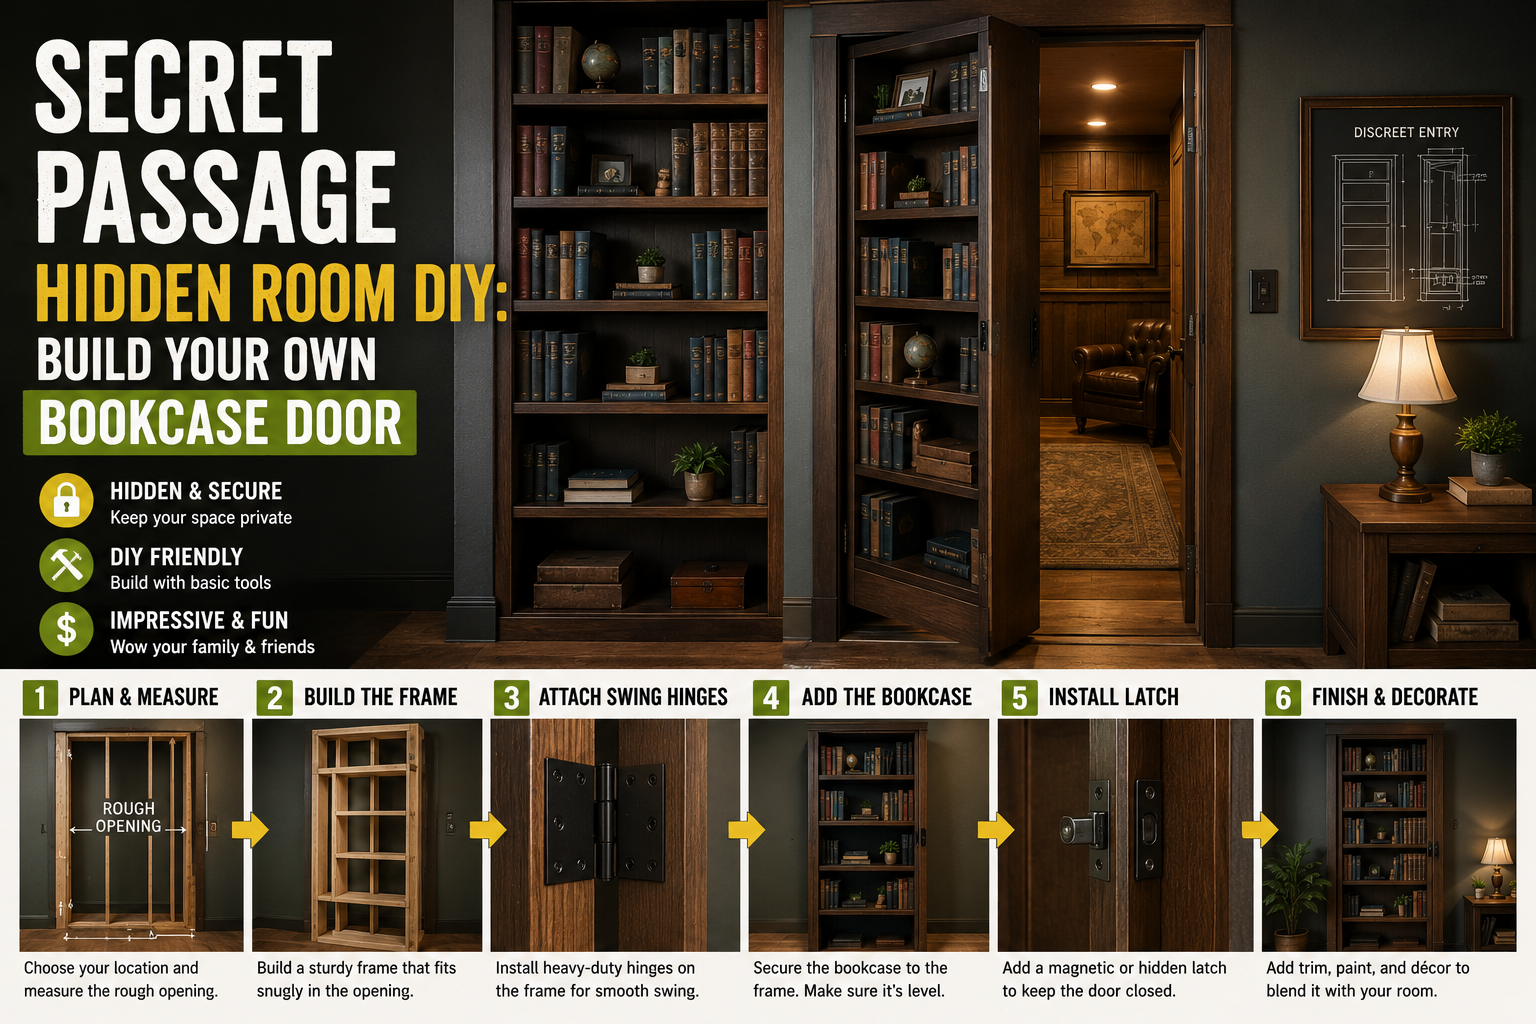
Ever since I was a kid watching Indiana Jones and Raiders of the Lost Ark with my dad, I’ve been completely obsessed with secret passageways, hidden doors, and concealed rooms. I mean, what’s cooler than that? For years I could never quite figure out how to actually pull it off in my own home — until now. I’m a former professional cabinet and furniture builder with nearly 20 years of experience, and I finally tackled the secret passage hidden room DIY project I’ve been dreaming about my whole life.
The concept sounds simple: build a bookcase that doubles as a secret door. But my situation came with a major twist — the room has carpet. A regular swinging door would either scrub the carpet and leave a permanent line (dead giveaway) or need a gap underneath it (also a dead giveaway to any experienced treasure hunter). My solution? The door had to lift, just like the gull-wing doors on that flying Camaro from the 80s cartoon Mask. In this post, I’m walking you through every single step of how I made it happen.
If you love projects like this, you might also want to check out my guide on budget home improvement DIY ideas that save thousands — there are plenty of ways to add wow factor to your home without breaking the bank. Now let’s get into the build.
Choosing the Right Location for the Secret Door
The first thing I had to do was figure out where this secret passage was actually going to go. I walked through the space testing a few different walls and door options — and honestly, it took a little trial and error. Most secret doors operate like a regular door: they either swing in or swing out. Swinging in is generally easier; swinging out is a bit more complicated. I landed on a door in my bedroom next to a clothes hanger area that made the most sense structurally.
The carpet situation was the real challenge. A door that swings freely needs a gap underneath it, but that gap is an instant giveaway. Taking the door all the way down to the carpet means it scrubs and drags, plus it leaves a permanent line in the carpet fibers — another dead giveaway. That’s what forced me into the lifting mechanism design, which honestly ended up being the most impressive part of the whole build. Once I committed to that direction, everything else fell into place around it.
Removing Door Stop and Prepping the Door Casing
Before any building could start, I needed to prep the existing door casing. I removed all of the door stop from the casing, and then I filled in every single nail hole with Bondo body filler and sanded everything smooth. This step is easy to overlook, but it matters a lot for the finished look — any bumps or holes left in the casing will show through paint and make the whole illusion fall apart.
Taking the time to get a clean, smooth casing sets the stage for the bookcase to sit flush and look like it’s always been there. I can’t stress enough how important this prep work is. The secret to a convincing secret door is that nothing looks out of place, and that starts with the very first step of getting your surfaces clean and even.
Cutting the Cabinet Box Parts and Using a Dado Stack
With the casing prepped, I moved on to cutting out all the pieces for the door/cabinet box. Once all the parts were cut, I needed to swap out the blade in my table saw for a dado stack. If you’re not familiar, a dado stack is literally a set of saw blades stacked together that cuts a wide groove in plywood or solid wood. When you cut that groove on the edge of a board, it’s called a rabbet — when it’s in the middle, it’s called a dado. I honestly have no idea why they have different names, but there you go.
By rabbeting the back edges of the cabinet box, I was able to drop in the plywood back panel, which helps square up the entire cabinet and adds a significant amount of structural strength. For the back panel I used 1/2-inch plywood — thick enough to be really strong but not so heavy it would add unnecessary weight to the door. Every pound matters when you’re engineering a lifting mechanism.
Assembling the Cabinet Box with Pocket Hole Joinery
To hold the cabinet box together, I relied on my trusty Pocket hole joinery jig — honestly one of the best tools I own for fast, strong cabinet assembly. Before driving any pocket screws, though, I first secured everything with 18-gauge narrow crown staples. The staples act as a clamp of sorts, preventing the boards from shifting out of alignment when the pocket hole screws go in and pull things together. It’s a small trick but it makes a huge difference in getting tight, square joints.
For the top box section, I didn’t run the back panel all the way across because I needed to maintain access inside to install the hinge hardware later. I stopped the back panels at strategic points that would still help keep the box square while leaving me room to work. Once the back was in and the box was confirmed square, I marked out and installed all the 3/4-inch shelves. This is the part that makes it look like a real bookcase — because it is one.
Building the Face Frame from Poplar Wood
The face frame is what makes a cabinet look finished and polished. I used poplar for the face frame material, which is honestly my go-to for painted cabinetry. Poplar is easy to work with, takes paint beautifully, and is widely available. Maple would be a more durable choice, but it’s harder to work with and the added durability isn’t necessary for a painted face frame like this one.
To figure out the rail widths, I placed my stiles side by side and measured across them. My overall face frame dimension needed to be 30 and 1/4 inches, and my stiles measured 4 and 7/8 inches combined, which left me with rails at 25 and 3/8 inches. I assembled the face frame using the same Pocket hole joinery method as the cabinet box, clamping the stiles to the edge of my workbench so they couldn’t pop up when the screws pulled everything together. Using a framing square throughout kept everything perfectly aligned.
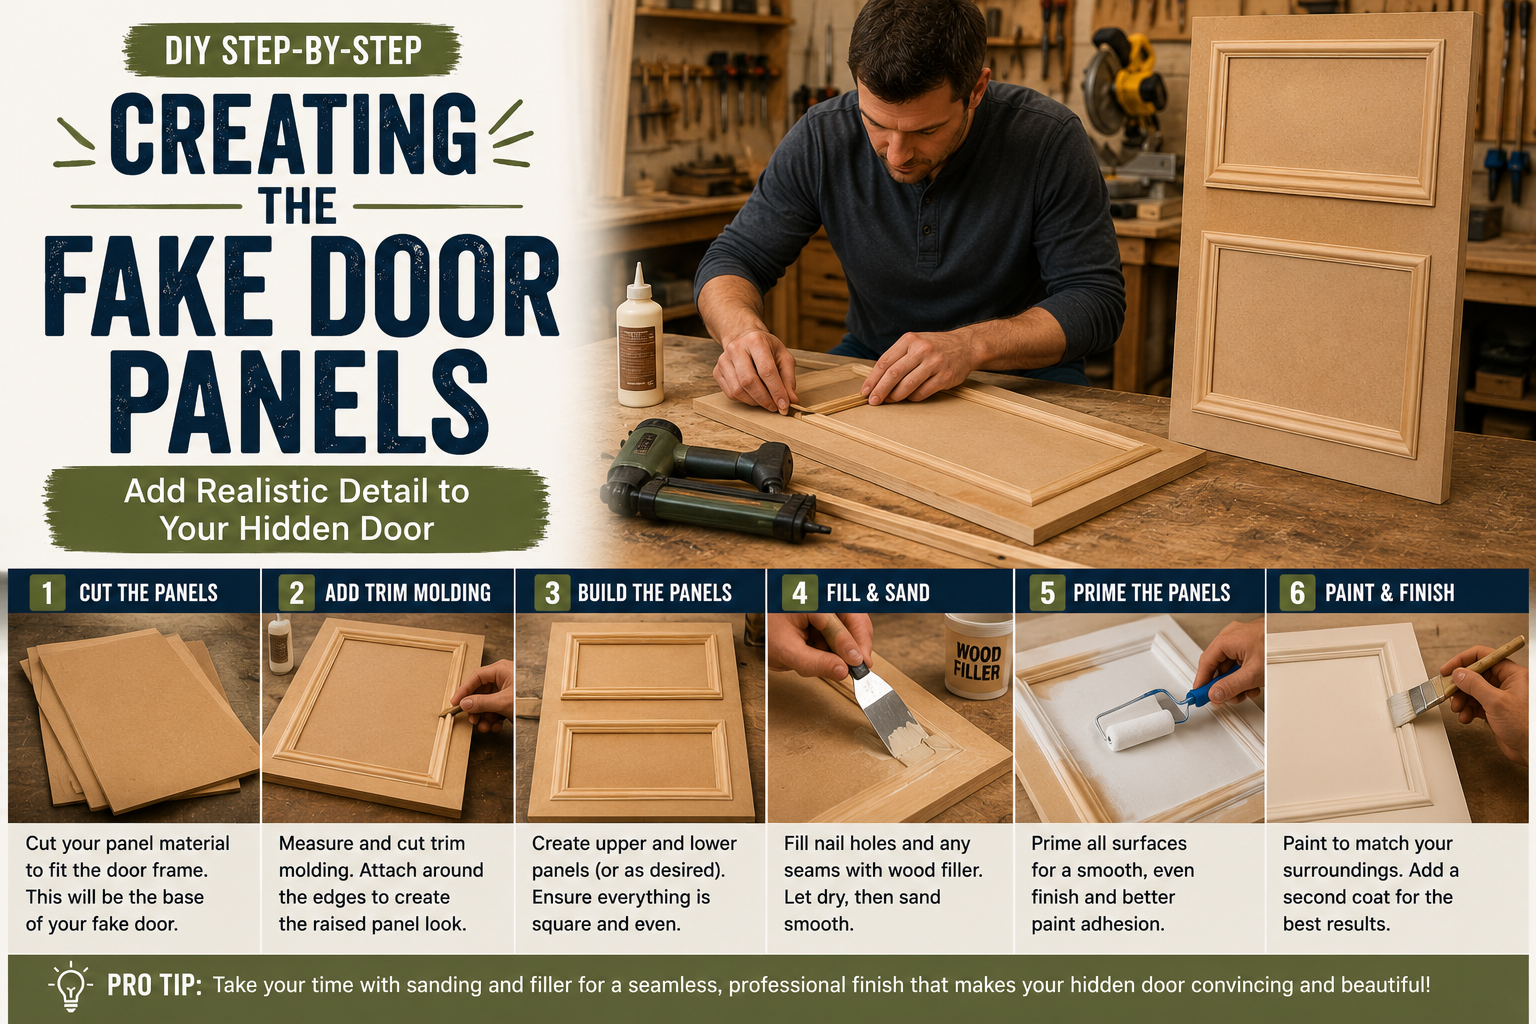
Creating the Faux Door Panels for Camouflage
Here’s where the real illusion-making starts. Because the bookcase door has to split open somewhere, I needed a way to disguise that seam. My solution was to design the face frame to look like two cabinet doors side by side — that way the split where the door opens looks completely intentional and natural. Anyone looking at it just sees a cabinet with two doors. Nothing suspicious.
I built two smaller faux door frames and then routed the back of each one so I could drop a flat panel in from behind. I wasn’t building these like real raised-panel doors — just a recessed panel from the back to give them that door-like appearance. To secure the panels in place, I used a framing points nail gun, which is typically used in the picture framing industry. A little unconventional, but it worked perfectly. The face frame was designed to sit flush with the existing door casing, and I cut a small chamfer on the edge to make sure there was no reveal where the two surfaces met.
Selecting and Mortising the Concealed Hinges
This was one of the most technically demanding parts of the entire secret passage hidden room DIY build. A standard butt hinge was out of the question because the barrel would always be visible on the front — no way to hide it. Instead, I used a Soss hinge, which is a completely concealed hinge designed for doors. I was using it in a slightly unconventional way to allow the door to swing/lift rather than just swing, but the principle is the same.
To properly recess these hinges, I needed a lot of solid blocking wood above and below. I pre-glued up some 2x4s to create thick mounting blocks that fit inside the upper box, giving me enough material to mortise into cleanly. The mortising process required careful layout using the manufacturer’s template — I used a hole punch to mark my center points and then used a Forstner bit to remove most of the material before cleaning up with a chisel. Getting the mortise depth exactly right is critical: too deep and the hinge won’t function; too shallow and the door won’t close flush. Nail the depth and you’re golden.
Test Fitting the Hinge Assembly and Troubleshooting
After mortising both the top and bottom hinge locations, I did a test fit before committing to final installation. The door swung, but it was noticeably tight. Looking closely at the hinges, I could see that the mortises on the top piece were set very slightly closer together than the ones on the bottom piece, which was causing the hinges to pull toward each other and create binding. It was a small error but it mattered.
A little careful adjustment to the mortise positions fixed the binding and got things moving smoothly. This is exactly why test fitting before final installation is so important — catching a small alignment issue at this stage is a 10-minute fix. Catching it after everything is painted and assembled can mean hours of rework or worse. Always test fit. Always. After the adjustment everything swung nicely and I was ready to get the top box installed in the wall opening.
Installing the Top Cabinet Box in the Door Opening
Getting the top box into the door opening required a little persuasion — or as I like to call it, “gentle influencing.” I secured it with 3-inch screws, making sure it was level and plumb before committing. With the box in place, I also measured the face frame and trimmed it to the correct height, which worked out to 86 and 3/4 inches. Rather than trying to cut the last tiny fraction of an inch precisely, I put a large round-over on the bottom edge of the face frame so it would glide more smoothly over the carpet surface when opening and closing without leaving a mark.
With the top box secured, I had to do something I’ll admit was my own fault: because I hadn’t thought ahead to attach the lower hinge brackets while the cabinet was still on the workbench, I now had to insert them while the whole assembly was in the air, supported. It was awkward and a little ridiculous, but it worked. Lesson learned — attach everything you possibly can before installation.
Engineering the Gas Strut Lifting Mechanism
This is the part that makes the whole build truly special — and the part I was most nervous about. To lift and hold the door open, I needed gas struts (also called gas springs or gas lifts). I ordered struts rated at 1,100 Newtons, which I could not compress no matter how hard I tried. After entering the cabinet dimensions and estimated weight into the strut manufacturer’s online configurator, it gave me mounting point locations and confirmed the strut rating needed.
Unfortunately the company forgot to ship my mounting brackets, so I improvised by making my own from square steel tubing with pre-punched holes, which I picked up at my local Home Depot. I enlarged some of the holes for better access to the bolt heads during installation. The 1,100 Newton struts turned out to be way too strong — the door flung open aggressively and held at full open with almost no way to push it back down. I swapped them for a lighter-duty set, and the moment of truth arrived: the door lifted smoothly, held open at a perfect angle, and closed back down with just enough resistance. Absolutely satisfying.
Adding Push-Button Lights for the Hidden Room Illusion
Once the mechanism was working perfectly, I shifted focus to the finishing details that really sell the illusion. I picked up some push-button LED lights to add inside the bookcase and the hidden room area. These lights have a clever little trick beyond just being push-button — they’re motion-activated in a secondary mode, which means they can light up automatically when the door opens. It’s a small detail but it makes the reveal feel genuinely magical.
Details like this are what separate a “pretty good” secret door from one that makes people’s jaws drop. Think about the experience you want someone to have when they discover it — or when you show it off. Lighting, the weight and feel of the door movement, the sound (or lack thereof) when it opens: all of these sensory details add up to an experience. Take the time to get them right.
Loading the Bookcase and Finalizing the Illusion
The final step was loading up the bookcase with real books — a classic book collection, in my case. And here’s something I didn’t expect: because the door sits at a very slight angle when fully closed (due to the weight distribution of the lifting mechanism), all the books stay perfectly in place without being glued or strapped down. Nothing is fixed. It just works. That was a genuinely pleasant surprise.
Standing back and looking at a fully loaded bookcase that absolutely nobody would guess was a secret door is one of the most satisfying things I’ve ever built. The faux door panel design on the face frame completely disguises the opening seam, the carpet shows zero evidence of movement, and the whole thing looks like it’s always been part of the room. This project is proof that with the right approach, a secret passage hidden room DIY is absolutely achievable for a skilled home builder. For more ambitious room conversion projects, check out my full guide on attic home theater conversion DIY — another project where hidden details make all the difference.
Tips and Best Practices for Building a Secret Passage Hidden Room DIY
Plan your hinge type before you build anything else. The hinge choice dictates how much blocking and structural wood you need, and retrofitting that after the fact is a nightmare. Soss hinges or other concealed hinges require mortised recesses, so plan your wood thickness and blocking accordingly from day one.
Use a gas strut configurator to size your struts correctly. Don’t guess on strut Newton ratings. Enter your cabinet dimensions and estimated weight into the manufacturer’s online tool and let it tell you what you need and where to mount it. Getting this wrong means a door that won’t stay up or one that launches itself open and can’t be pushed closed.
Think about the carpet (or flooring) situation early. If you have carpet, a lifting door is your best option to avoid visible drag lines or gaps. If you have hard flooring, a swinging door may be possible — but you’ll still need to think carefully about clearance and whether the arc of the swing is fully hidden.
Design the face frame to camouflage the split. The seam where a secret door opens is the hardest thing to hide. Designing the face frame to look like two cabinet doors (so the split looks intentional) is one of the most effective disguise techniques available. Pair it with matching door hardware for a completely convincing look.
Test fit everything before final installation. Small alignment errors in mortises or hinge positions are easy fixes before everything goes up — and major problems afterward. Build in test-fit checkpoints at every major stage of the assembly.
Use poplar for painted face frames. It’s easy to work with, machines cleanly, and takes door paint beautifully. Use Painters Tape and a quality sherwin williams paint for a smooth, professional finish. An extendable roller stick makes rolling larger flat surfaces much easier and faster.
Add lighting for the full experience. Push-button or motion-activated LED can lights inside the hidden room make the reveal feel genuinely dramatic. It’s a small cost for a huge payoff in the “wow” factor. You could also add sconces inside the hidden room to make it feel like a finished, inviting space.
If this kind of creative room project has you thinking about other hidden potential in your home, my post on basement finishing on a budget is a great next read — lots of ideas for turning unused space into something really special.
Frequently Asked Questions
What type of hinge works best for a secret bookcase door?
For a secret bookcase door, I recommend Soss hinges or other fully concealed hinges. Standard butt hinges always show the barrel on the front face, which immediately gives away the door. Soss hinges mortise completely into the wood and are invisible when the door is closed. The trade-off is that they require precise mortising and a lot of solid blocking wood to mount into — but the result is worth it.
How do I keep a secret door from scraping or marking carpet?
The best solution for carpet is a lifting door mechanism using gas struts. Instead of swinging across the carpet (which leaves drag marks and visible gaps), the door lifts straight up on a hinge point. This allows the bottom of the door to clear the carpet completely during operation while still sitting flush and gap-free when closed. Sizing your gas struts correctly using the manufacturer’s configurator is critical for smooth, controlled operation.
What wood should I use for building a secret door bookcase?
For the cabinet box structure, 3/4-inch plywood is the standard choice — strong, stable, and easy to work with. For the face frame (the visible front framework), I use poplar because it’s affordable, easy to machine, and takes paint very well. If you plan to stain rather than paint, consider maple or hard maple for the face frame since poplar has a greenish tint that doesn’t stain evenly. Use Pocket hole joinery throughout for fast, strong assembly.
How much does a secret passage hidden room DIY project cost?
The cost varies widely depending on the size of the door, the hardware you choose, and whether you already own tools. For a project like this one — a full-height bookcase door with a gas strut lifting mechanism and concealed hinges — you can realistically expect to spend somewhere between $400 and $900 in materials. The biggest cost variables are the gas struts (which can range from $50 to $200+ depending on rating and quantity), the concealed hinges, and lumber. Keeping an eye out for sales on plywood and buying your door hardware strategically can keep costs on the lower end.
Conclusion
Building a secret passage hidden room DIY bookcase door is genuinely one of the most rewarding projects I’ve ever tackled. It combines real cabinetry skills, creative problem-solving, and a little bit of engineering — and the payoff is a feature in your home that absolutely nobody will ever find unless you show them. From prepping the door casing and building the cabinet box, to mortising concealed hinges and dialing in the perfect gas strut weight, every step of this build taught me something new.
If you’ve been thinking about a secret door for your own home, I want to encourage you to go for it. Yes, the hinge mortising is fiddly and the gas strut sizing requires a little research — but none of it is beyond a motivated DIYer with basic woodworking skills. Start with a solid plan, test fit at every stage, and don’t skip the details that sell the illusion. The look on people’s faces when they find out your bookcase is actually a door makes every hour of work completely worth it.
Have questions about your own secret passage hidden room DIY build? Drop them in the comments below — I read every single one and I’m happy to help you troubleshoot. And if you build one, I’d absolutely love to see it!