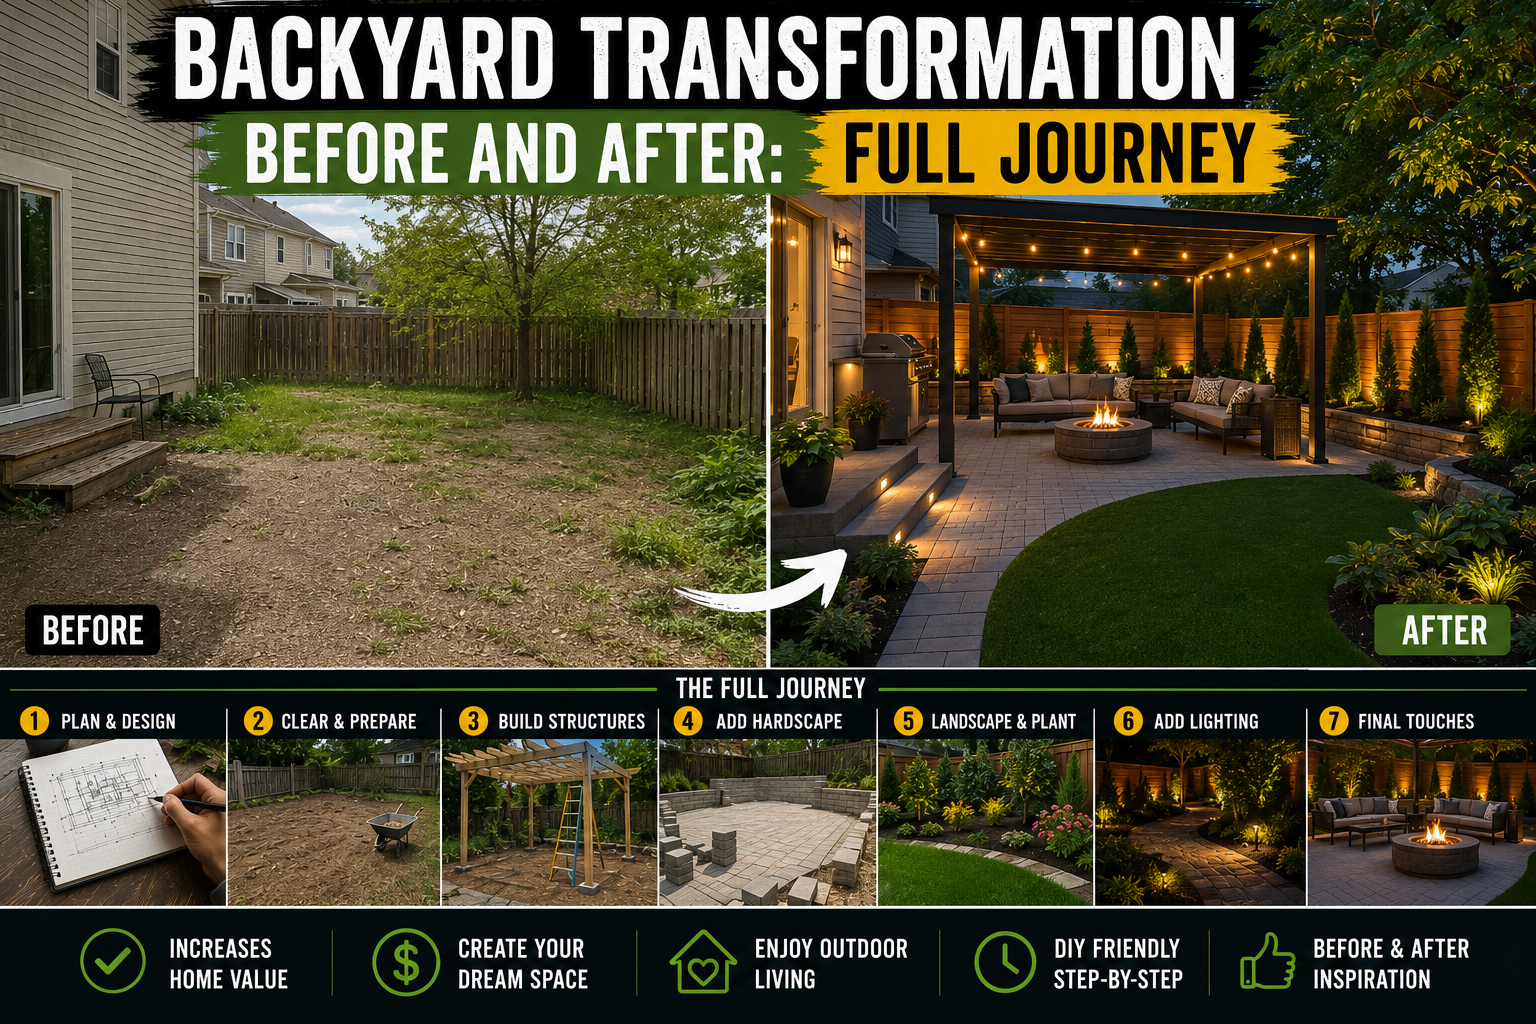
If you’ve ever looked at your backyard and thought, “I don’t even know where to start,” I want you to know — I’ve been exactly there. When I first moved into my home back in 2019, the backyard was a blank slate. No shade, no privacy, no personality. And now? It’s a full-on outdoor oasis that I’m genuinely proud of. But getting here took years of work, a lot of money, some serious setbacks, and more than a few moments where I wanted to just give up entirely.
This post is my honest, complete breakdown of this backyard transformation before and after — every phase, every project, every dollar spent, and every hard lesson I learned along the way. Whether you’re just starting out with a tight budget or you’re mid-project and wondering if it’s all worth it, I hope this motivates you to keep going. I promise you, the end result is worth every headache.
If you love budget-friendly outdoor projects like this, you might also enjoy my post on DIY Backyard Patio & Fireplace Build: Save Thousands — it’s packed with ideas for making your outdoor space feel like a true extension of your home.
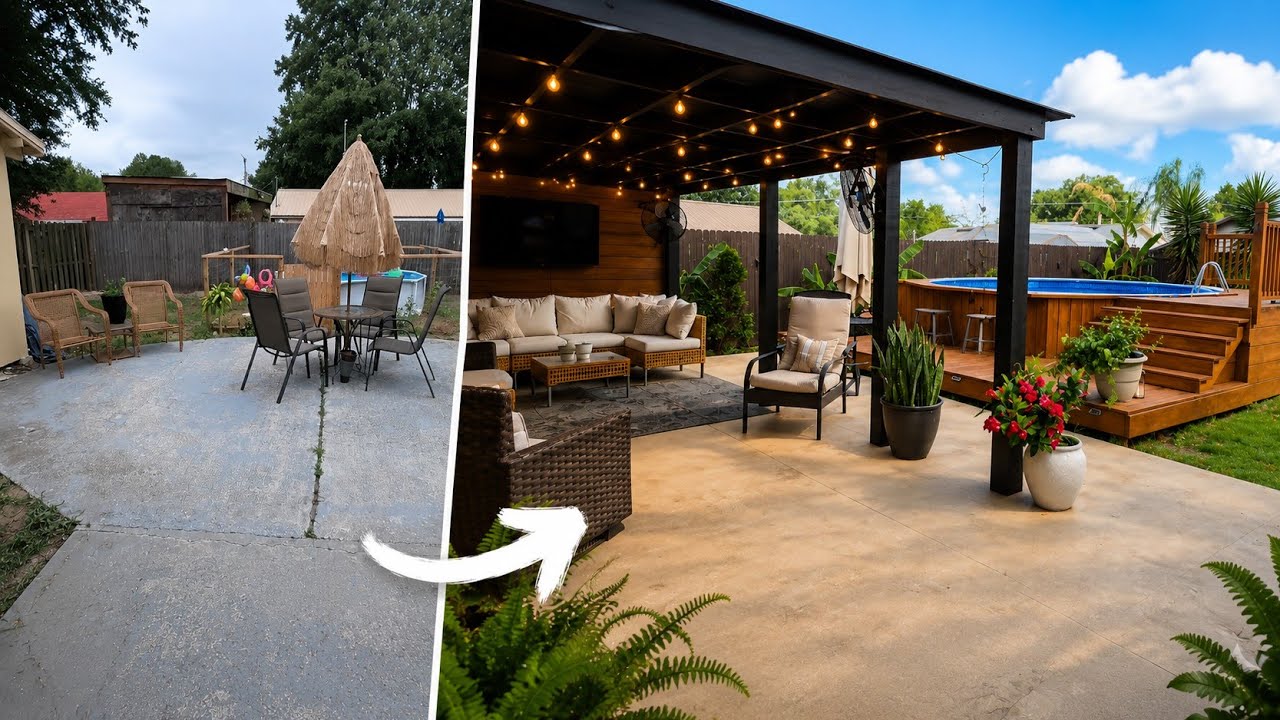
Starting From a Blank Slate: The Backyard in 2019
When I first bought my house in 2019, the backyard was about as plain as it gets. There were just a couple of random furniture pieces, a large round patio slab out back (I always assumed they covered up a pool, but nope — they just liked a round patio), and an existing shed that doubled as our laundry room. That was it. No shade, no privacy, no real outdoor living space to speak of.
One of the first things I did was add some pots with posts to string lights between them. It was a small, affordable touch, but it instantly made the space feel cozier and more intentional. Even on a minimal budget, little details like that make a huge difference in how you feel about spending time outside.
Adding the First Privacy Fence (~$500)
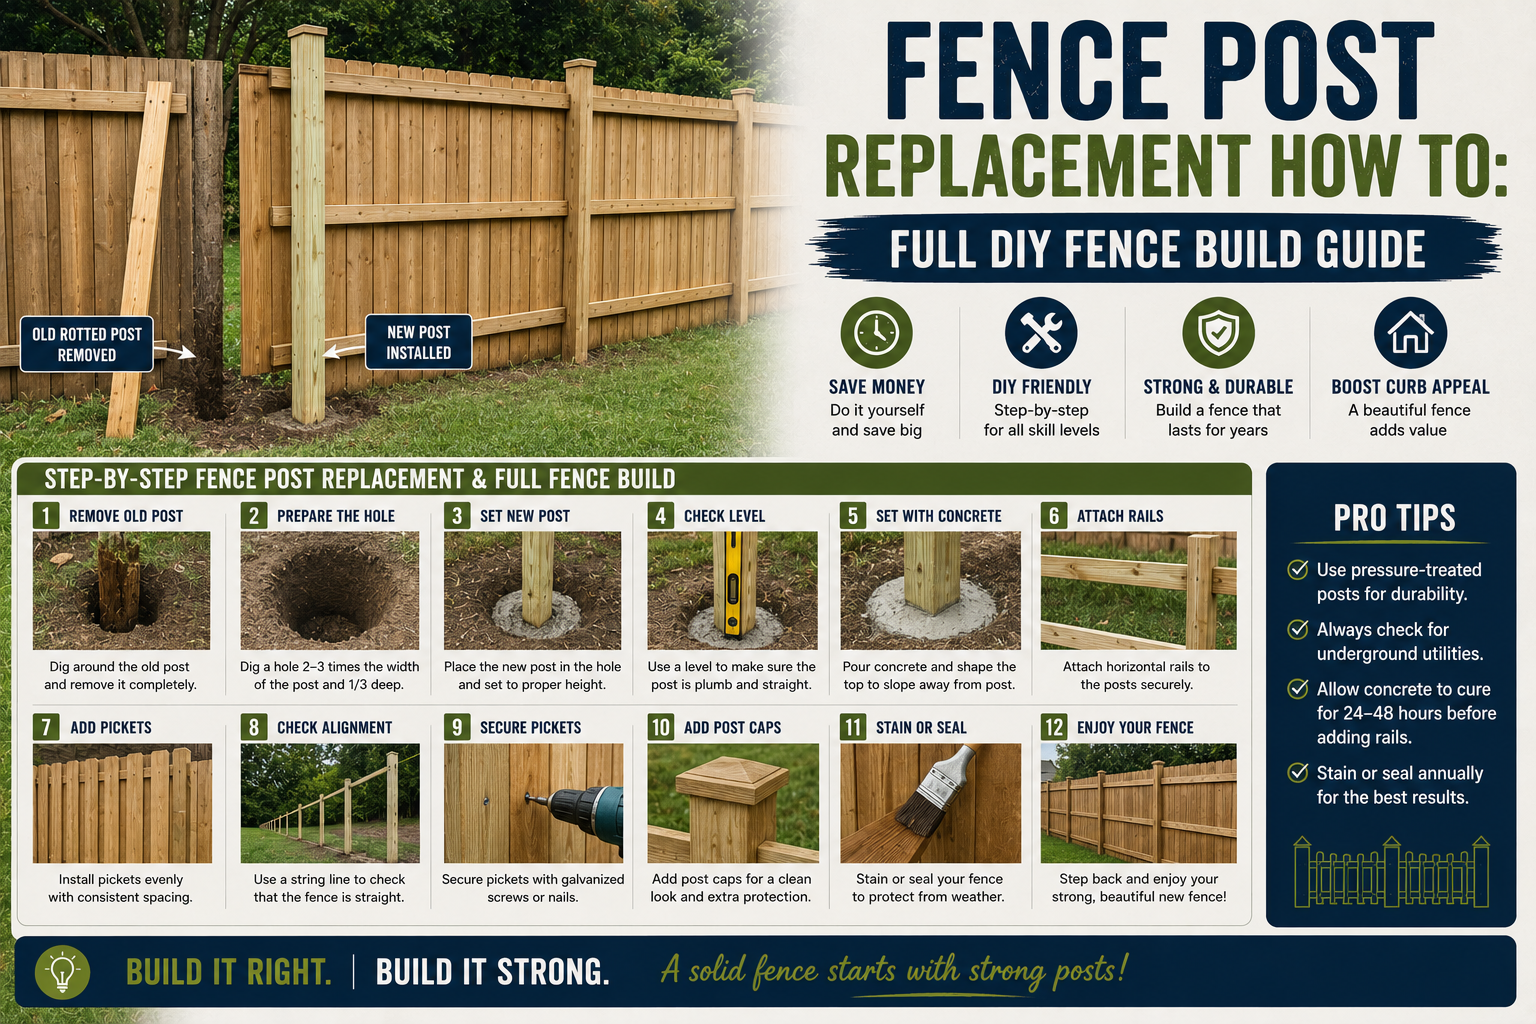
Pretty early on, I realized that the chain-link fence separating my yard from the neighbor’s wasn’t going to cut it. They could see everything happening in my yard and I just wasn’t comfortable with that. So, one of the very first projects I tackled was adding a privacy fence along that back section. It cost me right around $500 to do that one section, and I’ll be honest — it was one of the hardest things I had done at that point. My husband Dylan and I had never built a fence before, and we swore up and down we’d never do it again.
Spoiler alert: we absolutely did it again. But more on that in a minute. The point is, even that first small fence made the space feel so much more private and livable. If you’re thinking about a fence project, check out my full guide on Fence Post Replacement How To: Full DIY Fence Build Guide — it covers everything from post setting to finishing touches.
Getting the First Pool and Building a Pool Fence (~$300)
Living in Florida means summers are no joke. The heat is brutal, and once our kids were old enough to want to splash around, getting a pool became a priority. I started with a small above-ground pool since the kids were still little and just learning to swim. My son in particular was a total daredevil in the water, so safety was everything.
That meant building a pool fence around it, which I pulled off for right around $300 by keeping things super budget-friendly. And honestly, it turned out really cute — plants grew up around it, vines filled in the fence, and the whole setup looked like it belonged. We ended up swapping out the pool inside the fence a couple of times as the kids grew, but that fence served us well for a long time. When you don’t have a huge budget, you get creative, and I’m proud of how that turned out.
Building the First Patio Cover (The Viral One!) — ~$450
This was the project that changed everything for me — not just for the backyard, but for my entire channel. I saved up and built my first patio cover from scratch using basic 4x4s and 2×4s to create a simple 10×10 gazebo structure over the existing patio space. The whole thing cost right around $450, and I have a full video on it if you want to see the complete build process.
If you live anywhere with intense summer heat, you already know that being in direct sun is just not an option for outdoor entertaining. The umbrellas I had been using weren’t cutting it anymore, so I did my research and came up with this solution. It wasn’t complicated — it was just solid, functional shade that made the backyard actually usable. That video ended up going viral, and it blew me away because we put so much heart into it. If you’re still watching from that original video, thank you — seriously.
The Tree and Grass Experiment That Didn’t Go as Planned (~$500 Down the Drain)
Not every project is a win, and I want to be real with you about that. At one point, I decided to invest in a bunch of trees and bushes that were supposed to grow fast and give us more privacy and greenery. I spent about $500 on trees alone. None of them survived. Not a single one. The grass seed I also put down did grow beautifully, but those trees? Total loss.
It was disappointing, but it taught me something really important: not every improvement you make will stick, and that’s okay. You dust yourself off, figure out what went wrong, and try something different. The yard still looked good at that point with the grass growing in, but I kept wanting more — which, looking back at old footage, maybe I should have just left it alone for a while!
The Big Neighbor Dispute and the Second Privacy Fence (~$1,000)
Here’s where things got a little dramatic. A conflict with a neighbor escalated — it involved our dogs, their dogs, and some tension that had been building for a while — and suddenly we needed a full privacy fence, and we needed it fast. Within a single weekend, I dropped $1,000 on a new privacy fence. Yes, after swearing I’d never build another one.
We ended up removing the old pool, taking out the old pool fence, and putting up this new privacy barrier that really closed off the yard and gave us a fresh start. And honestly? After all the chaos of that period, the yard looked genuinely beautiful. There’s a part of me that watches the old footage and thinks, “Why did I keep going? It looked great!” But I’m a DIYer — I can’t leave well enough alone, and I think most of you reading this are the same way.
Installing a Metal Shed for Storage (And Why It Wasn’t the Right Fix)
As our family grew and our house started to feel smaller, I knew we needed more storage. So I added a metal shed to the yard. It seemed like a practical solution at the time, but the layout ended up being really awkward based on where we placed it in relation to the existing shed. It created a cluttered, disorganized feel rather than solving the problem.
And then — to make things worse — that original laundry shed started rotting out from the inside. Because it housed our laundry room, there were drainage issues that had gone unaddressed for too long, and the structure was compromised. It was clear that a band-aid fix wasn’t going to work. Something bigger had to happen.
The Big Decision: Tearing It All Out and Starting Over
Instead of just replacing the old shed with another small one, I started thinking bigger. If the cost of replacing both sheds was going to be significant anyway, why not just rip everything out and replace it with one large, functional building? The math actually made sense. And once I started researching steel buildings — the kind you can convert into a barndominium or tiny home style space — I was sold on the idea.
The vision was exciting: a proper laundry room, additional living space, and a structure that could eventually serve as an additional dwelling unit — whether that’s for one of my kids, a parent who needs to move in, or a rental situation down the line. It was an investment in the future of this property, and I believed in it. Of course, the road from vision to reality was anything but smooth.
The Full Yard Demo: Tearing Down Fences, Sheds, and Concrete
Before anything new could go up, everything old had to come down. That meant tearing out both sheds, pulling fences, and busting up that old concrete slab. I want to give a huge shoutout to my brother, because without him and his tractor, this would have been nearly impossible. That original laundry shed was built incredibly well — even with rotting floors — and it took real force to bring it down. He had to push it, pull it, and literally stab it with the tractor before it finally came down.
One of the coolest moments was watching him navigate his tractor through a tight gap in our side yard — around the corner of the shed, under the patio cover — without hitting a thing. He also lifted the patio cover with the tractor and relocated it so we’d still have shade during the rebuild. That was a lifesaver. The demo phase was loud, messy, and chaotic, but it was also necessary. You can’t build something great without clearing out what’s not working first.
Dealing With Complaints, Code Officers, and a Surprise Easement
Here’s the part nobody tells you about when you do big outdoor projects: the neighborhood drama. During our demo phase, someone called and complained about the construction mess in our front yard — even though we were actively working and had a dumpster there for a reason. A code officer came out, then came back a second time taking photos and asking about permits. I had everything in order, so that went nowhere, but it was stressful.
And then came the discovery that really threw me: we have a 7.5-foot easement on both sides of our property. That meant the building had to come in seven full feet from our side fence — and I had already purchased the steel building by the time I found out. I panicked, called my brother, called Dylan, and my brother came out with stakes and tape measure to map it all out and confirm that we could still make it work. He marked the placement with spray paint so we could see exactly where the building would go. It was tight, but it worked out.
Pouring the Concrete Slab and Waiting for the Steel Building
After all the planning and staking, the team came out to form the concrete slab. It felt like it took forever to get to that point, but once the forms were set, they came back the following day to pour the concrete. I didn’t get a lot of footage of that part, unfortunately, but the finished slab looked great. While I was waiting for the building to be delivered and installed, I decided to lay sod because I simply could not deal with the dirt anymore. That small act of moving forward — even while waiting — helped me stay motivated during a very slow phase of the project.
Installing the Steel Building (Two Days, Built On-Site)
When the crew finally came to build the steel structure, I assumed they’d just show up and assemble pre-cut pieces like a kit. I was wrong. Watching the footage back, I realized they actually cut every individual piece of steel right there on-site. That’s why it took a full day and a bit more — it was essentially built from scratch in my backyard. The result was impressive. The crew did a great job, and the building went up cleanly and solidly.
I opted not to have a door installed at that point because it would have cost extra and they didn’t offer the French door style I wanted anyway. We did budget for a door separately and got that installed quickly to keep bugs out and the space sealed. From there, it was a slow, month-by-month build-out as our budget allowed.
Insulating the Steel Building (Double Insulation Is a Must)
This is the tip I cannot stress enough if you’re ever considering a steel building or metal shed as a living or working space: double insulate it. I added foam board insulation first, then layered in roll insulation on top of that. Without both layers, that building would have been unbearable in the Florida heat. With both? It actually stays cooler than my main house. I’m not exaggerating.
There were moments during the finishing process where I wanted to quit — where I thought, “Just throw some sheets on the walls and call it done.” But I pushed through, and the insulation phase was one of the most important decisions I made. If you’re building any kind of backyard studio, she shed, or tiny home add-on, please don’t skip the insulation. It will change the entire usability of the space. For more on building out a backyard structure efficiently, my post on Shed Studio Build: Save $6,000 With This 3-Day DIY has a ton of practical advice.
The Real Cost Breakdown: What This Backyard Journey Actually Cost
Okay, let’s talk numbers because I know this is what everyone wants to know — and I want to be honest about it even though it’s a little painful to say out loud. The original plan was to spend about $15,000 on the building itself (after taxes and fees) and then another $10,000 over the course of a year to finish it out — insulation, trim, flooring, all the interior work. So a $25,000 total budget.
We ended up spending an extra $5,000 on top of that due to hidden costs, things we had to hire out, and tools we hadn’t accounted for. Tools are something people never budget for and they add up incredibly fast. So the grand total came out to right around $30,000 for the full project start to finish. For comparison, adding an addition onto our actual house was quoted at $55,000–$65,000 by an engineer, so even at $30K, we came out significantly ahead. And we paid for everything out of pocket — no credit cards, no debt. If we had the money that month, we worked. If we didn’t, we waited. It was slow, but it was ours.
The Pool Upgrade: Adding a Heat Pump for Year-Round Use
One of the most exciting upgrades in this whole backyard journey was finally being able to make the pool truly usable year-round. Living in Florida, you’d think the pool is always perfect — but the reality is the water temperature is either freezing cold in winter or feels like a giant hot tub in the middle of summer. Neither is great for actually enjoying it.
The solution was adding a pool heat pump that can both heat and cool the water depending on the season. The installation process was straightforward — it came with everything needed including hose adapters and a conversion kit — and it plugs into a standard outlet. It’s designed specifically for above-ground pools, which made it feel realistic and attainable for a backyard setup like mine rather than something only built for custom in-ground installations. It runs super quietly (around 38–48 dB, which is basically a quiet conversation), and it uses significantly less electricity than traditional electric heaters. For a budget backyard transformation like mine, being able to add something that elevates the pool experience without a huge ongoing energy bill is exactly the kind of win I’m always looking for.
Tips and Best Practices for Your Own Backyard Transformation
After years of doing this, here’s what I’d tell anyone starting their own backyard transformation before and after journey:
Start with function before aesthetics. Privacy fencing, shade structures, and proper drainage matter more than pretty plants. Get the bones right first. Budget for hidden costs and tools. Whatever number you have in your head, add at least 20% for surprises — permits, easements, tool purchases, and things you have to hire out will eat into your budget fast. Pay as you go if possible. I never put a single project on a credit card. It made things slower, but I never had debt hanging over my head. Double insulate any metal or steel structure — foam board plus roll insulation makes a dramatic difference in comfort. Know your property lines and easements before you buy anything. That discovery nearly derailed my entire building project, and learning it earlier would have saved me a lot of stress. Don’t underestimate the emotional toll. There will be moments where you want to quit. Push through — the before and after payoff is real. Get the right help. Whether it’s a brother with a tractor or a trusted contractor for specific tasks, know when to ask for support. And finally, document everything — photos, videos, receipts — because looking back at where you started is one of the most motivating things you can do on a hard day.
Frequently Asked Questions
How much does a full backyard transformation cost?
It really depends on the scope of your project. My journey spanned several years and included fencing, pools, shade structures, a full steel building with insulation, concrete work, landscaping, and more — coming in at around $30,000 total for the building phase alone, plus several hundred to a couple thousand dollars across earlier phases. If you’re working on a smaller scale — a patio cover, fence, and basic landscaping — you can do a meaningful transformation for $1,500–$5,000 depending on how much DIY labor you contribute. The key is to do it in phases and pay as you go if possible.
Is a steel building a good backyard addition?
In my experience, absolutely yes — especially if you need additional living or storage space and can’t afford a traditional home addition. My steel building came in at about half the cost of a conventional addition, and it gives us a proper laundry room, bonus living space, and future ADU potential. The critical thing is to insulate it thoroughly. Without proper insulation (I used both foam board and roll insulation), a metal structure in a hot climate is nearly unlivable.
What should I do first in a backyard transformation?
I’d start with the projects that provide the most immediate functional impact: privacy fencing if you need it, shade if you’re in a hot climate, and any drainage or structural issues that could cause bigger problems later. From there, layer in the aesthetics — plants, lighting, furniture, and decorative touches. Check out my post on 5 DIY Outdoor Curb Appeal Projects You Can Do This Weekend for some quick wins that make a big visual impact right away.
How do I stay motivated during a long backyard renovation?
Keep photos of where you started and look at them regularly. Progress can feel slow when you’re in the middle of it, but comparing your current space to a photo from six months ago is incredibly motivating. Also, break the project into small phases with clear goals and budgets so you always have something to work toward. Celebrate every win, even the small ones — a new fence section, a finished shade structure, or freshly laid sod all deserve a moment of appreciation.
Ready to Start Your Own Backyard Transformation?
Looking back at everything — the blank slate yard in 2019, the first string lights, the viral patio cover, the fence drama, the rotting shed, the steel building marathon, and now a full outdoor oasis — I can honestly say every single moment was worth it. This space tells the story of years of hard work, creativity, problem-solving, and not giving up even when everything felt impossible.
Your backyard transformation before and after story is waiting to be written too. You don’t need a huge budget or professional help for most of it — you just need a plan, some patience, and the willingness to get your hands dirty. Start small, stay consistent, and remember that every big transformation happens one project at a time. I’m rooting for you — now go build something amazing.
If you’re looking for more inspiration to get started, my post on Backyard Resort DIY Build: Save $50K Without a Contractor is packed with ideas for creating a true outdoor retreat on a real-person budget.