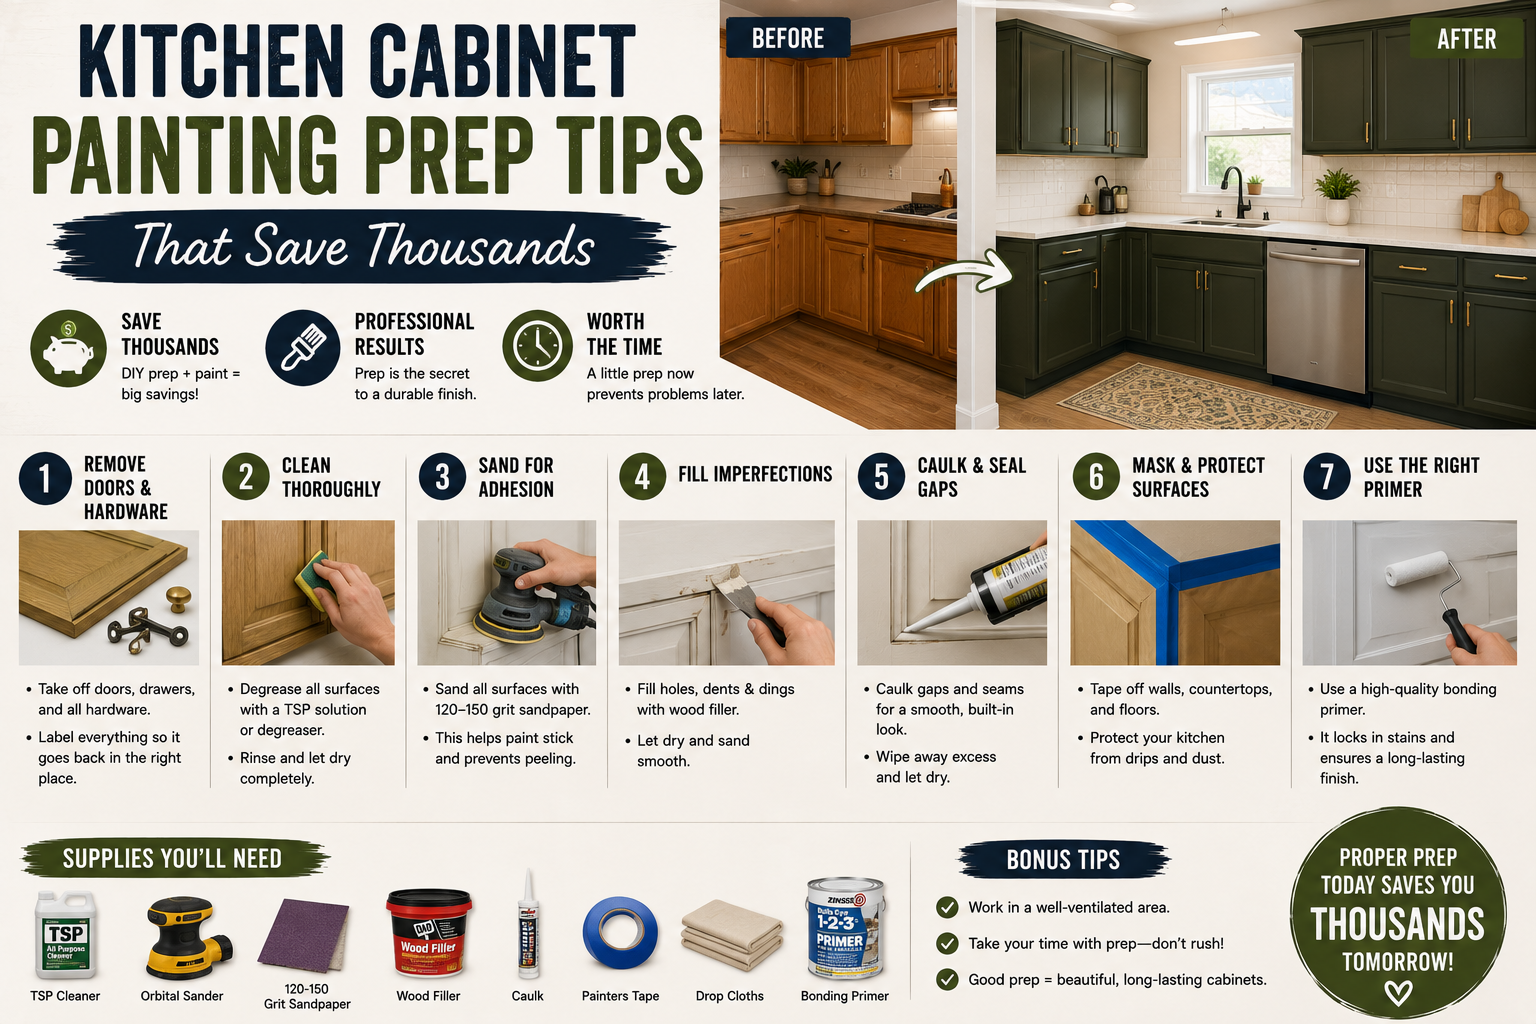
If you’ve ever started painting kitchen cabinets and suddenly noticed every flaw you’d been ignoring for years, you’re not alone. That’s actually one of the things I love about a paint project — it forces you to deal with every little problem you’ve been putting off. Paint has a funny way of making everything look worse before it looks better, and that’s actually a good thing. It means you’re catching issues that need fixing before they turn into bigger, more expensive headaches.
I’ve been through this process enough times to know that the prep work is where most people either make or break a cabinet painting project. Rushing past it almost always means you’re painting over problems that will come back to haunt you. The tips I’m sharing here come from hands-on experience rebuilding, repairing, and refinishing kitchen cabinets in homes that had seen better days — and the results speak for themselves. If you’re also thinking about tackling other areas of the kitchen at the same time, check out my post on budget kitchen renovation under $5000 for a broader roadmap.
Let’s walk through every step of the prep process, from dealing with silicone contamination to rebuilding cabinet structure, fixing drawers, sanding properly, and getting the surface truly ready for a final coat. There’s a lot to cover, so let’s get into it.
1. Understand That Paint Exposes Every Problem — And That’s a Good Thing
Here’s the thing about painting kitchen cabinets: you’re almost never doing it on a brand-new kitchen. You’re working with an existing space that has years of wear, quick fixes, and questionable decisions baked into it. The moment you start rolling paint onto those surfaces, every dent, drip, silicone smear, and patched hole jumps out at you like it’s been waiting for its moment.
I’ve come to see this as a feature, not a bug. When I’m doing kitchen cabinet painting prep, I actually use the first coat of paint as a diagnostic tool. It shows me exactly where the problems are hiding so I can address them before the final coat goes on. Going in with that mindset — expecting to find issues — means you won’t get discouraged when you do. You’ll be ready to fix them.
2. Identify and Deal With Silicone Contamination Immediately
Silicone is one of the most frustrating things to encounter during a cabinet paint project, and it shows up more often than you’d think. If you notice paint literally crawling away from a spot on the cabinet surface, refusing to stick and pooling around it, that’s silicone. Whoever did the original installation may have had silicone on their hands, and anything they touched became a problem. It creates a repellent barrier that standard paint simply cannot bond to.
The fix I’ve found that works best is a spray oil-based stain-sealer primer — specifically the product called Kills (sometimes spelled Kilz). It has a slight yellow pigment to it, so don’t expect it to cover up a stain and leave you with a bright white surface. What it does do is bond to silicone and create a paintable surface over it. It runs about eight to ten dollars a can, and I think it’s one of the most valuable things you can keep in your DIY toolkit. Spray it on any silicone-contaminated area, let it dry, and then proceed with your regular primer and paint over it. Problem solved.
3. Fill Holes With Spackling — and Know When to Use It Generously
Holes in cabinet surfaces are something I can’t stand leaving unfilled. A small dent you can sometimes live with, but an actual hole needs spackling before any paint goes on. If your cabinets are made from MDF (medium-density fiberboard), be especially careful — you can’t just dent MDF back into shape the way you might with solid wood. Any attempt to do so usually makes things worse and creates more surface problems.
With spackling, I’ve learned not to be stingy. Apply it liberally, filling the hole completely and slightly overfilling it. The product I use turns from pink to white as it dries, which makes it easy to know when it’s ready to sand — no guessing involved. Once it’s fully white, sand it smooth and you’ll have a clean, paintable surface. Being a little generous with the caulk and filler at this stage means fewer surprises when the final coat goes on.
4. Replace Particle Board Components With Solid Wood Wherever Possible
This is one of those kitchen cabinet painting prep tips that goes beyond just surface prep — it’s about making sure what you’re painting is actually worth painting. If your cabinets have particle board components like drawer backs, door panels, or base supports, I’d strongly recommend replacing them with solid wood before you pick up a paintbrush.
Particle board doesn’t hold fasteners well once it’s been stressed, it swells and falls apart when it gets wet, and it’s nearly impossible to do quality touch-up repairs on later. Solid wood, on the other hand, gives you the ability to do proper spackling, touch-ups, and even significant repairs down the road. When I’ve swapped out particle board for solid wood 2×4 framing and 1×4 supports, the difference in durability is immediately obvious. Yes, it costs a bit more upfront — maybe a couple hundred dollars — but it’s a fraction of what full cabinet replacement would run you, which can easily be $3,000 to $5,000 or more just for materials, and another $3,000 to $5,000 in labor if you hire it out.
5. Rebuild the Cabinet Base and Toe Kick for Proper Ergonomics
Here’s something that doesn’t get talked about enough in cabinet painting tutorials: if the toe kick at the base of your cabinets isn’t set back far enough, you’re going to be leaning forward at an awkward angle every single time you stand at the sink or counter. The standard toe kick should be about 3 inches back from the face of the cabinet so your feet can slide underneath naturally while you stand upright. It sounds minor, but after years of standing at that counter, your back will definitely notice.
When I rebuilt the base of one cabinet run, I used 1×4 lumber to create a simple box structure that transferred the weight of the countertop down through the floor joists properly. I used brad nails to attach the face panels cleanly so I didn’t end up with large screw holes to patch. Getting the toe kick right before painting means you’re not dealing with structural weirdness after the job is done — and it makes the whole kitchen feel more finished and intentional.
6. Use a 1×4 Support System to Carry Countertop Weight Properly
If you’re dealing with an older cabinet where the internal support structure has been compromised — whether from water damage, rot, or just cheap original construction — you need to address the load path before anything else. I’ve seen cabinets where the screws holding the countertop straps were doing all the heavy lifting with no real structural backup beneath them. That’s a problem waiting to get worse.
The fix I used was running a 1×4 board across the back of the cabinet to span between wall studs, then building a small box frame that would sit on two solid points of contact and transfer the countertop load into the wall framing. A second 1×4 caps the front of the box for a clean finished look. This kind of work happens before the paintbrush ever comes out, but it’s what makes the difference between a kitchen that holds up for another decade and one that has problems six months after the paint job.
7. Add a Shelf in the Cabinet Base to Maximize Functionality
While I had the base of the cabinet torn apart, I added a 12-inch pre-made shelf across the interior. This is a simple addition that adds real usable storage, and because I sized it at 12 inches, it sat entirely in front of the plumbing lines running along the back wall — no cutting, no jigging, no headaches. The shelf drops right in and gets fastened down with brad nails for a clean, invisible connection.
When making the cut for the shelf, I make it a habit to mark and score slightly wide of my pencil line first, then walk the material toward the blade until I’m right on the mark. This prevents the weight of the material from binding on the blade and causing kickback — a circular saw safety tip that’s saved me from more than a few close calls. The shelf gets pinned to the cabinet back and face frame so everything is tied together as a solid unit.
8. Diagnose and Rebuild Broken Drawers Before Painting
I cannot tell you how many times I’ve seen people paint over cabinet boxes without checking whether the drawers actually work. If your drawers are sticking, coming off track, or just plain broken, paint isn’t going to fix that. In older cabinets especially, the drawer boxes are often made from thin particle board held together with staples — and once those staples lose their grip, the whole box becomes floppy and frustrating.
When I rebuilt the drawer boxes on this project, I pulled the old particle board apart, removed the staples carefully (the trick is to pinch the staple about an eighth of an inch above the surface, push and wiggle to pop it out the other side, then pry it back — way less damage than trying to pull it through), and rebuilt the box from solid 1×4 lumber. Every time someone pulls on that drawer handle now, they’re pulling on solid wood, not flimsy particle board held together by a few tired staples. That’s a night-and-day difference in feel and durability.
9. Add End Panels to Cap Off Cabinet Sides for a Finished Look
If the exposed sides of your cabinets look rough — thin hardboard paneling, visible staples, mismatched finishes — adding a proper end panel is one of the best investments you can make before painting. I bought half-inch MDF panels cut to 2×4 feet and painted them along with the new cabinet doors so everything matches perfectly.
These end panels get applied over the raw cabinet sides and can even overlap your tile backsplash at the edges. You can also add a valance along the top to dress the whole thing up and give your kitchen that custom, built-in look without the custom price tag. It’s the kind of detail that makes painted cabinets look intentional rather than like a quick refresh. Pair that with new door hardware and the transformation is significant.
10. Sand Paint Drips and Ridges With the Right Grit
One of the most common problems after the first coat of paint on cabinets is drips and ridges — spots where the paint built up too thick and dried with a bump or run. These are easy to miss while the paint is still wet, but they stick out like a sore thumb once it’s dry. I’ve found that starting with 60-grit sandpaper on enamel-based paint takes those ridges down quickly without requiring you to sand for an hour, but it can be aggressive, so check your progress frequently.
For smaller bumps and general surface smoothing between coats, 220-grit is the right tool — especially if you’re working by hand rather than with a power sander. The key reason to use hand-sanding at this stage is control: it’s very easy to strip all your paint off with a power sander if you’re not careful. A light pass with 220-grit by hand knocks off the rough edges without cutting through your paint layer. This is also a good time to run your fingers along every surface and feel for rough spots — your hands are often more sensitive than your eyes when it comes to catching texture problems.
11. Sand for Smoothness, Not Just Adhesion
A lot of tutorials will tell you to sand between coats for adhesion. That’s true, but there’s another equally important reason: smoothness for the people who will actually use these cabinets. Rough, sharp paint edges on cabinet interiors can actually catch on your hands when you’re reaching in for dishes or pots. I always make a pass around every edge and interior surface with a folded piece of 220-grit sandpaper just to knock off any sharp paint ridges that formed during the coat.
Pay special attention to areas where you used the oil-based primer over silicone spots. Even after that primer dries, it can leave a slightly rough texture that will telegraph through your topcoat if you don’t knock it down first. A light sand over those spots — just enough to feel smooth under your fingertips — is all it takes. It’s one of those small steps that separates a paint job that looks rushed from one that looks professional.
12. Clean the Area Thoroughly Before the Final Coat
This is a step that’s easy to skip and absolutely shouldn’t be. By the time you’ve done all your structural repairs, sanding, spackling, and priming, your workspace is covered in dust. Sanding dust is the enemy of a smooth final paint coat — if dust particles settle into your wet paint, you end up with a gritty, bumpy finish that no amount of sanding will fully fix.
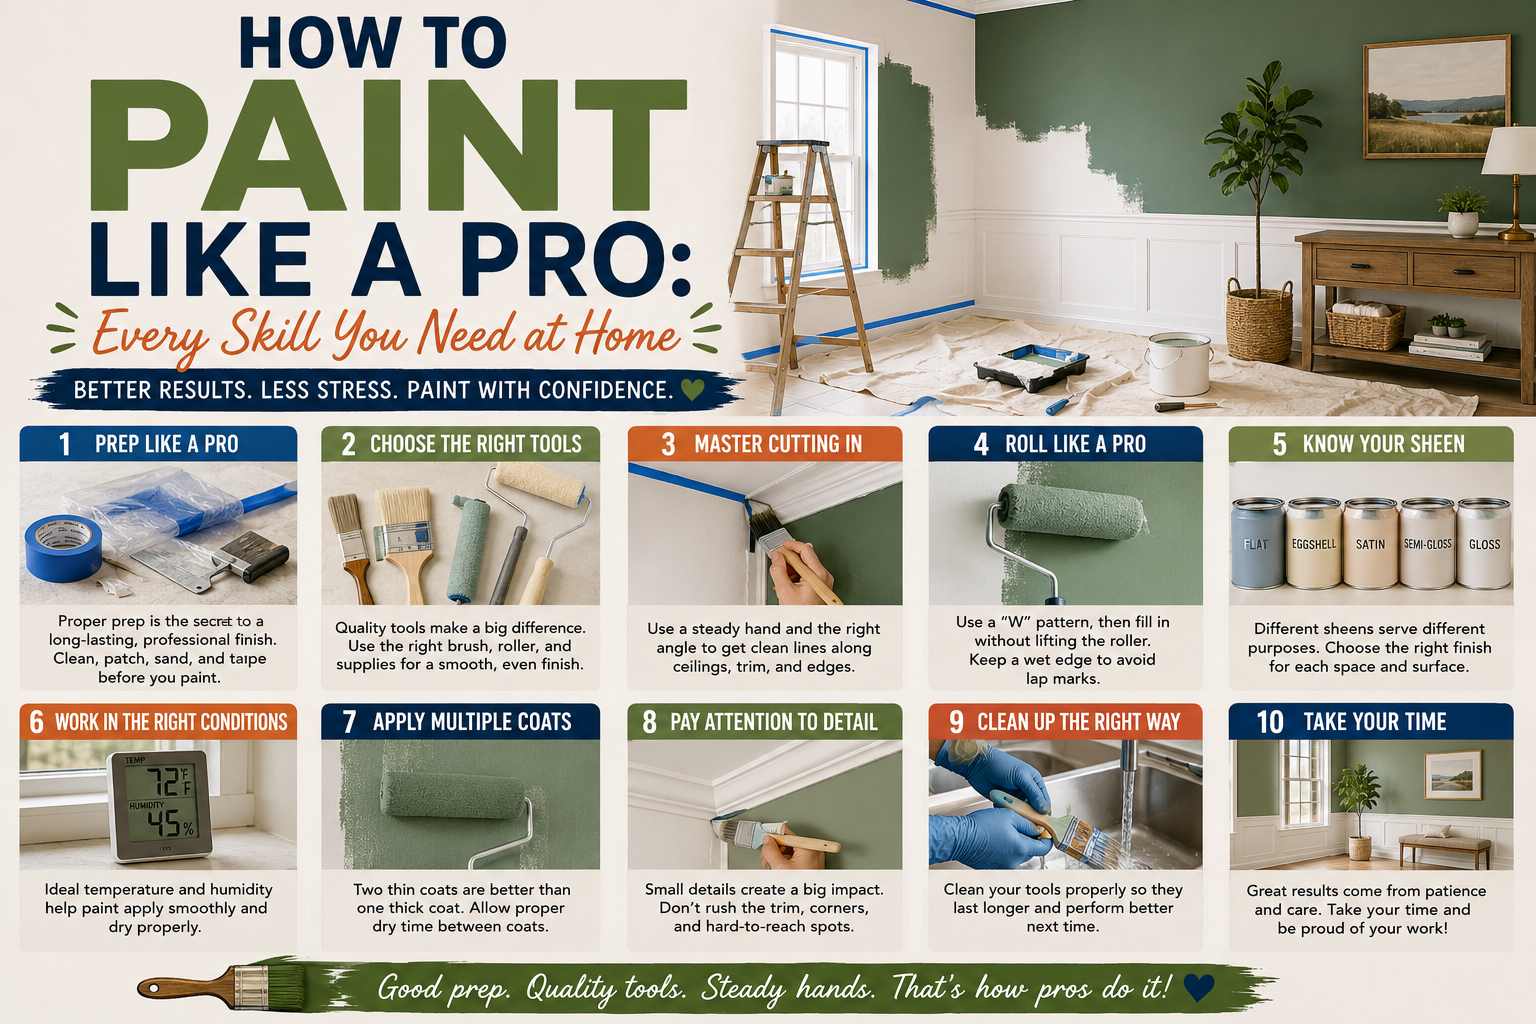
Before I put on any final coat of paint, I sweep the entire area, vacuum every surface including inside the cabinet boxes, and let the dust settle for at least a couple of hours. I’ll also wipe down the cabinet surfaces with a microfiber cloth to catch any remaining dust before picking up the paintbrush. If you painted and sanded in the same dusty environment, those particles got into your first coat — so this cleanup step before the final coat is especially important. For more ideas on getting a professional finish, my post on how to paint like a pro covers every skill you need at home.
13. Use Two Coats Strategically — The Final Coat Is Your Last Chance
Two coats of paint on kitchen cabinets isn’t just about coverage — it’s about giving yourself a chance to fix everything you missed the first time. The first coat reveals problems. The prep work in between coats (sanding, patching, cleaning) fixes them. The second coat is your opportunity to make everything look perfect. Going to a third coat is possible, but at that point you’re adding a lot of thickness to the paint film, which can cause its own issues with chipping and cracking over time.
I’ve found that Benjamin Moore and Sherwin Williams paint both offer excellent cabinet-specific enamel formulas that level out beautifully and are durable enough for daily use. Treat that second coat as precious — do all your prep work right, get the dust out of the air, and apply it carefully. That’s how you get a finish that looks like the cabinets came out of a factory rather than someone’s garage. If you enjoyed this project, you might also want to check out my cabinet building tips for beginners for the next level of DIY cabinetry work.
Tips and Best Practices for Kitchen Cabinet Painting Prep
After going through this entire process, here are the most important things I’d tell anyone about to start a cabinet painting project:
Always use an oil-based stain-sealer spray (like Kilz) on any silicone-contaminated spots before priming. Regular paint will not stick to silicone no matter how many coats you apply. Kilz bonds to the silicone and gives your paint something to grab onto.
Replace particle board components with solid wood before you paint. Particle board looks fine under paint for a while, but it won’t hold up to the wear and moisture that kitchen cabinets deal with. Solid wood can be repaired, touched up, and refinished repeatedly.
Don’t skip the toe kick rebuild if it’s not set back properly. Three inches of clearance at the base changes the entire ergonomics of working at your kitchen counter — it’s worth the extra hour of work.
Use 60-grit for sanding down significant drips and ridges, 220-grit for everything else. Hand-sanding between coats gives you more control and prevents accidentally stripping your paint layer.
Clean aggressively before the final coat. Sweep, vacuum, wipe down, and wait a couple of hours for dust to settle. This single step is the difference between a gritty finish and a smooth one.
Think of the first coat as a diagnostic tool. It shows you where the problems are hiding so you can fix them before the final coat goes on. Going in with that mindset makes the whole process less frustrating and more productive.
Frequently Asked Questions About Kitchen Cabinet Painting Prep
How do I know if I have silicone contamination on my cabinets?
The most obvious sign is paint that crawls away from a specific spot and refuses to bond — almost like water beading on a waxed surface. If you see paint pulling away and pooling around a particular area even after multiple coats, that’s almost certainly silicone contamination. The fix is to use an oil-based stain-sealer primer spray like Kilz directly over that spot before your next coat of paint.
Do I really need to replace particle board components, or can I just paint over them?
You can paint over them, but I wouldn’t recommend it for anything structural. Particle board cabinets that are just cosmetically worn can be painted and look fine for a while. But if any particle board components are load-bearing — like drawer boxes, base supports, or shelf substrates — replacing them with solid wood will give you a far more durable result and make future repairs much easier.
What’s the right sandpaper grit for sanding between coats on kitchen cabinets?
For sanding down drips, runs, or significant ridges, start with 60-grit to knock them down quickly without spending an hour on them. For general smoothing between coats, 220-grit used by hand is ideal — it smooths the surface without cutting through the paint layer the way a power sander might. Always sand by hand for this step unless you have a very light touch with power tools.
How much can I really save by doing this myself versus hiring a contractor?
The savings can be substantial. Replacing cabinet components yourself might cost a couple hundred dollars in materials. New cabinets installed by a contractor can run $5,000 or more just for the cabinets, plus another $3,000 to $5,000 in labor. Even buying and installing new cabinets yourself typically runs $3,000 to $4,000. Repairing, rebuilding, and painting your existing cabinets with quality materials and proper prep work is by far the most cost-effective path — and in many cases produces results that are just as good or better.
Wrapping It Up
Kitchen cabinet painting prep is genuinely where the magic happens. The actual painting is almost the easy part — it’s the structural repairs, the silicone fixes, the sanding, the rebuilding, and the cleaning that determine whether your finished cabinets look like a professional job or an amateur one. I hope these tips give you the confidence to tackle this project knowing exactly what to expect and how to handle everything that comes up along the way.
If you found this helpful and want more project ideas and tutorials, browse through my other posts on DIY home improvement projects on a budget — there’s a lot more where this came from. Drop any questions you have in the comments below, and let me know how your cabinet project turns out. I’d love to see your before and after photos!