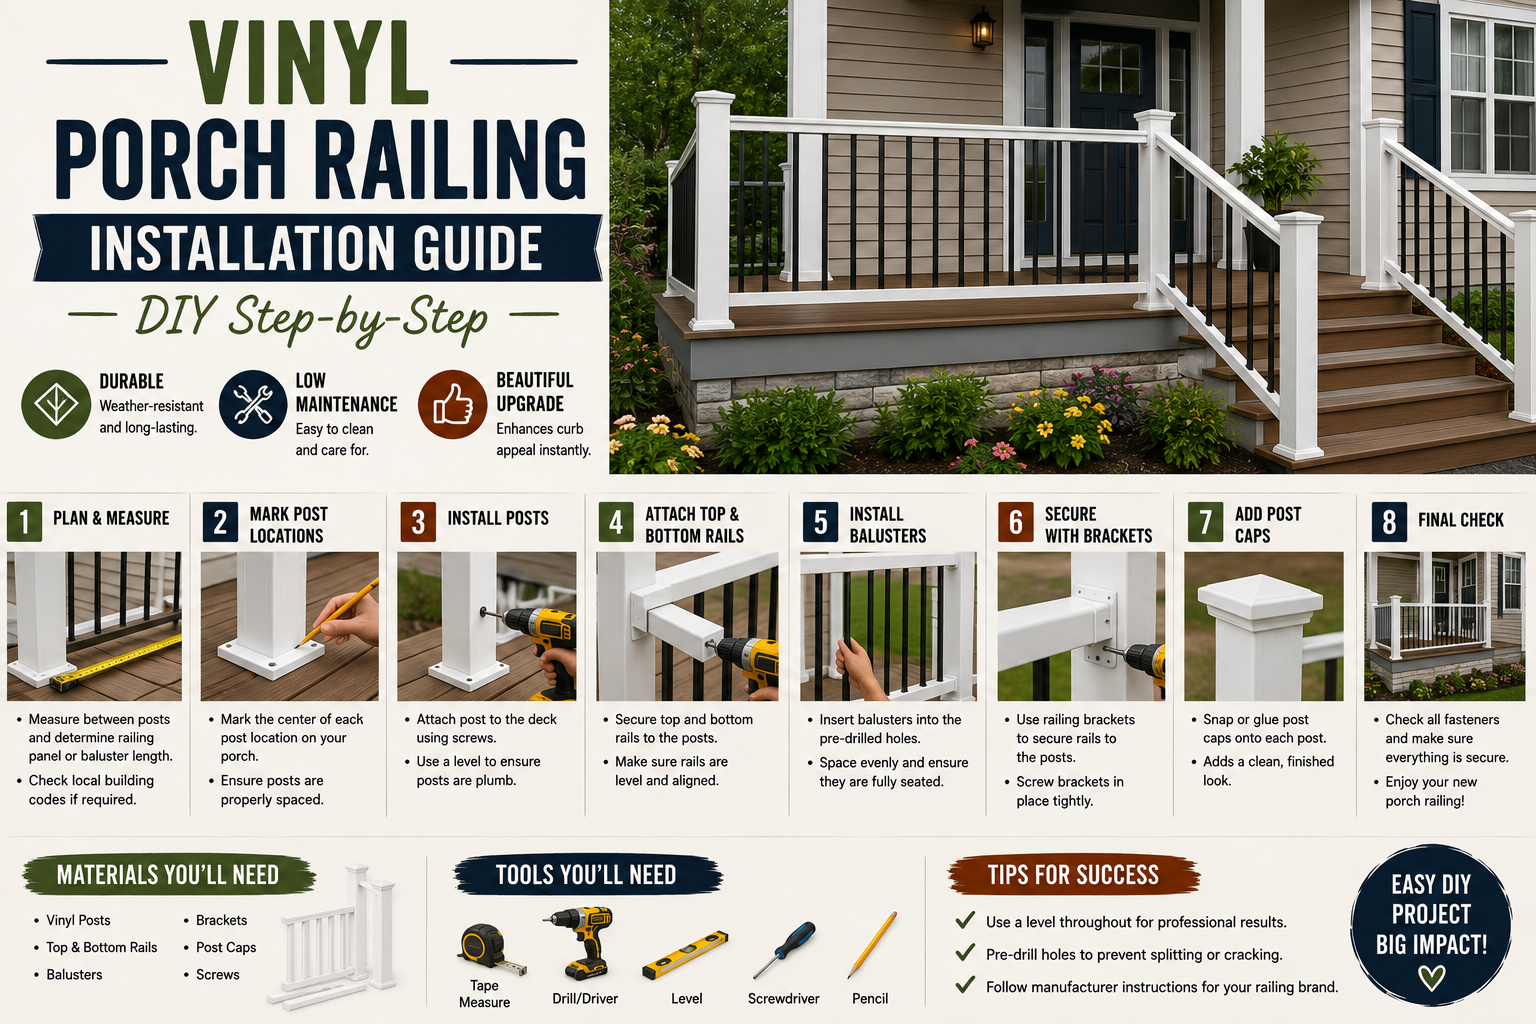
If your front porch railing is peeling, rotting, or just plain ugly, I can tell you from experience — it’s one of those projects that’s been nagging at you long enough. I finally tackled my own porch railing replacement, swapping out tired, deteriorating wood for a clean vinyl system, and the transformation was dramatic. This vinyl porch railing installation guide walks you through every step I took, every mistake I made, and every lesson I learned along the way so your project goes smoother than mine did.
Vinyl railing has some serious advantages over wood that made it an easy choice for me. It’s low maintenance, UV stable, splinter-free, easy to clean, stronger than traditional wood, and even fire resistant. Best of all, it works with just about any home style and gives your curb appeal a real boost. If you’re thinking about other weekend upgrades while you’re at it, check out my post on 5 DIY outdoor curb appeal projects you can do this weekend for more ideas to make your home’s exterior shine.
Fair warning: this project has more steps and more potential hiccups than it looks like on the surface. I ran into broken anchor bolts, wrong parts from the hardware store, and had to rent equipment I didn’t own. I’m sharing all of that here so you go in with realistic expectations — and come out with a porch you’re proud of.
Step 1: Assess the Existing Railing and Demo Day
Before anything else, take a hard look at what you’re working with. In my case, the old wood railing had serious paint peeling and actual wood rot — there was no saving it. Once I confirmed it all had to go, demo day became the most satisfying part of the whole project. Grab a hammer and a reciprocating saw and start pulling the old railing system apart. Work carefully around your porch deck so you don’t damage any surrounding structure you’re planning to keep.
After demo, do a thorough cleanup before moving on. I swept everything up carefully — you don’t want large wood pieces and debris getting into your mulch beds or leaving a trip hazard on the porch. A clean workspace makes every subsequent step easier and keeps you from accidentally building on top of leftover debris. Take this moment to inspect your porch floor, columns, and supports so you know exactly what condition everything is in before you start installing new material.
Step 2: Choose Your Vinyl Railing System
There are several vinyl railing systems on the market, and I went with a premium quick-rail system that includes post wraps, railings, balusters, and all the necessary hardware. The post wrap component is particularly clever — each wrap comes in two pieces that fit together around your existing structural support and are secured with adhesive, giving you a clean, square column look without having to replace the actual post.
When ordering your system, be very precise about your measurements. I ordered through my local home improvement store and they got the length wrong on one piece, which delayed my project by two weeks while I waited for the correct part to come in. Measure everything twice — or better yet, three times — and write it all down before you place your order. If possible, have a store associate review your measurements with you before the order is submitted. That extra five minutes can save you weeks of waiting.
Step 3: Prepare and Install the Post Wraps
With your existing structural supports in place, you’ll need to add small blocks of wood inside the support to give the vinyl wrap something solid to fasten to. This step is easy to overlook but critical — without backing blocks, the wraps won’t have anything to screw into and they’ll feel flimsy. Use a tape measure to get the exact height of each column, then mark and cut your wrap pieces using a jigsaw.
Remember the old saying: measure twice, cut once. I actually handed off my measurements to a second set of eyes before cutting — that double-check saved me from at least one costly mistake. Each post wrap comes in two halves that fit around the existing post and get glued together. Apply the adhesive carefully, staying in the groove and using as little as possible, because excess glue will seep out when you clamp the pieces together. Use brad nails to secure while the glue dries, then use caulk in white to cover the nail holes rather than more glue — I found the glue far too messy for that finish work. Painters tape helps hold everything in position while it sets, and larger clamps from the hardware store give extra security while it dries.
Step 4: Install the Railing Brackets and Bottom Rail
Once your post wraps are cured and solid, it’s time to start on the railing itself. The system includes a bracket that you install two inches up from the porch floor on each column — this is where the bottom rail will sit. Use a laser level to make sure the bracket is perfectly level before you fasten it. A railing that’s even slightly off-level is going to look crooked and drive you crazy every time you look at it.
With the bracket secured, take your bottom rail, center it on the bracket, and mark your cut line. A circular saw works well for making these cuts cleanly and quickly. Fit the rail into the bracket and confirm everything sits flush and level before moving forward. Getting this foundation piece right sets up the rest of the railing installation for success — don’t rush it.
Step 5: Drilling Into Concrete — The Trickiest Part
If your porch steps have concrete bases where the newel posts need to anchor, get ready for the most challenging part of this whole project. I learned a lot of lessons here the hard way. First, use a masonry nail to start your pilot hole before bringing in the drill bit. Second, work your way up through bit sizes — start with a smaller diameter bit and step up gradually to your final size. This makes the drilling much easier and protects your bits.
Use a masonry drill bit and, if at all possible, rent or borrow a rotary hammer drill rather than a standard drill. I tried doing this with a regular drill first and it took forever and ultimately failed — all four of my anchor bolts broke during installation. The rotary hammer (sometimes called an impact hammer drill) makes a world of difference. If you hit what feels like a rock while drilling, don’t force your bit through it — use a masonry nail and a hammer to break it up first. A trick for controlling your drill depth: wrap masking tape around your drill bit at the exact depth you need so you always know when to stop.
Step 6: Dealing With Broken Anchor Bolts (And How to Avoid It)
I’m going to be blunt here: I had all four of my anchor bolts break during my first attempt. I was using 1/4-inch masonry bits with 1/4-inch by 3-inch screws, and they snapped at roughly the same point on each one. It was a frustrating setback that cost me another weekend. If this happens to you, don’t panic — the fix is to relocate the bracket slightly and start fresh holes.
The real lesson is to use stronger anchor bolts than whatever comes in the kit. After my failure, I purchased heavier-duty anchor bolts separately, and combined with the rotary hammer drill, the second attempt went smoothly. Clean out all debris from your drilled holes before inserting the anchors — any leftover concrete dust weakens the hold. Install your leveling bolts, confirm both sides are level, then tighten your anchor bolts fully. Once they’re set, your post base is solid and you can build the railing up from there with confidence.
Step 7: Install the Staircase Railing Posts
The staircase section of a porch railing is more involved than the flat porch section because the posts have to be set at an angle that follows the stair pitch. For setting posts in ground adjacent to concrete steps, an auger or earth drill can speed up the process significantly if you’re dealing with soil. Consider using PostSaver sleeves on any posts that go into the ground to protect them from rot and extend their life dramatically.
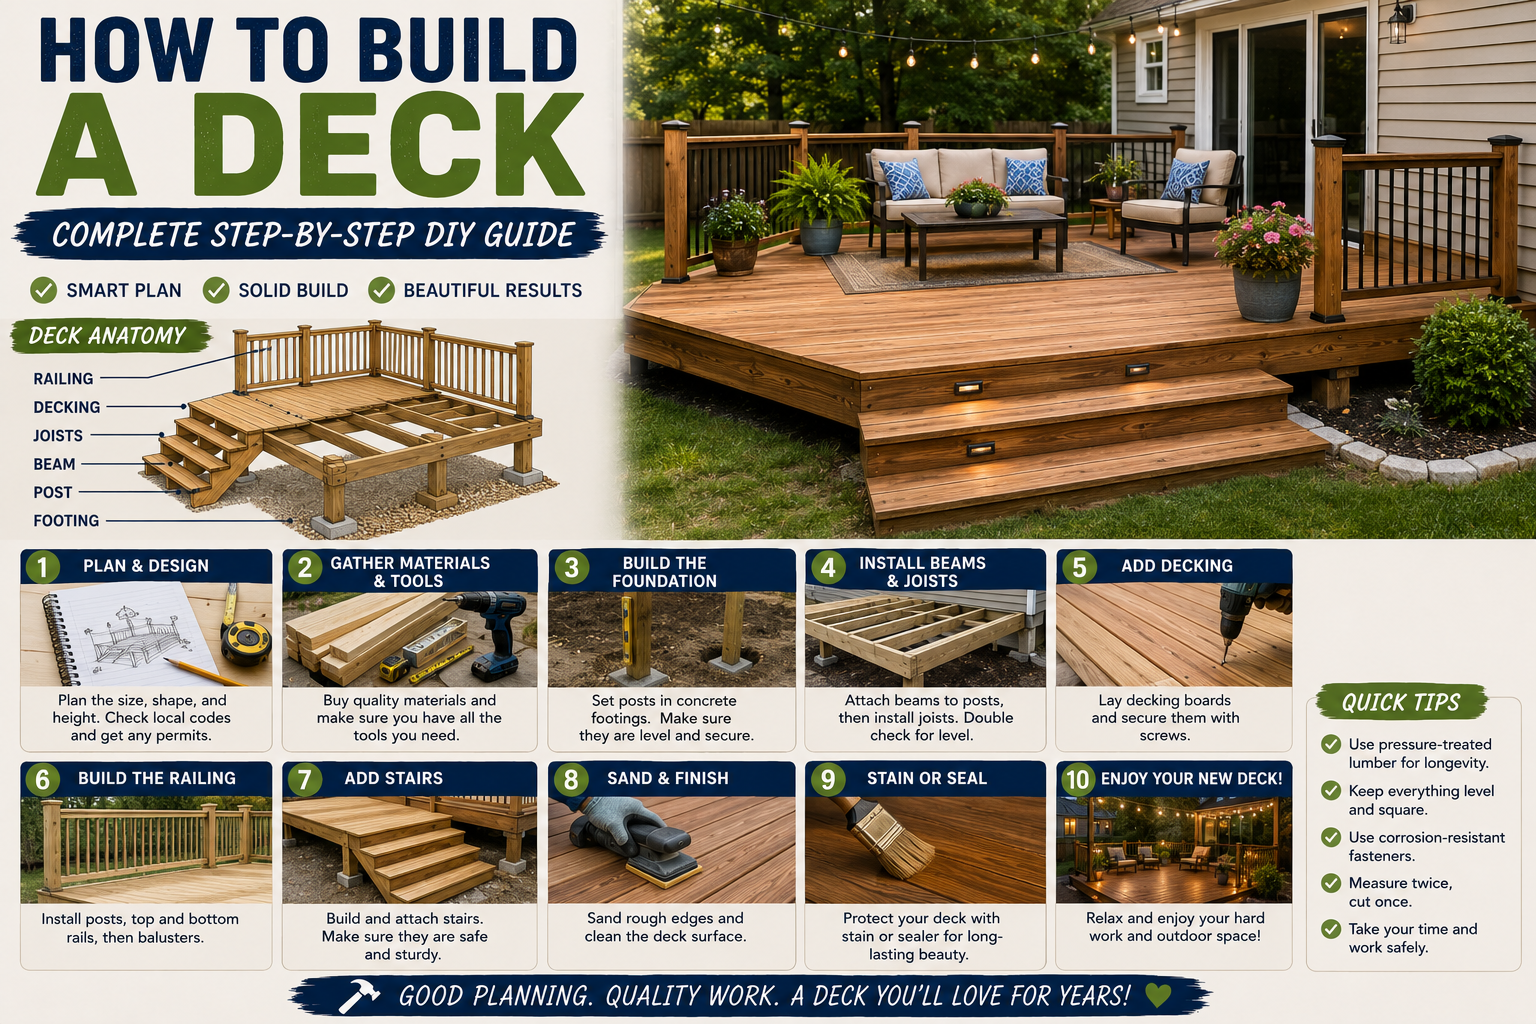
Take your time positioning each post and confirming the alignment before you commit to securing it. A laser level is invaluable here. Once the posts are set and plumb, the rest of the stair railing assembly follows the same basic process as the main porch section — brackets, rails, and balusters all fitting together according to your system’s instructions. If you enjoy structural outdoor projects like this one, my guide on how to build a deck covers a lot of complementary skills.
Step 8: Assemble and Install the Top Rail and Balusters
With bottom rails in place on both the porch and the staircase, you’re ready for the balusters and top rail. Most vinyl railing systems are designed to snap or slide together, making this part more satisfying than the earlier concrete work. Space your balusters evenly — your system will likely include a spacing jig or instructions for the correct gap, and you’ll want to follow those to meet building code requirements in most areas.
Secure the top rail once all balusters are in position. Use liquid nail sparingly at connection points where specified by your system, and finish any exposed nail heads or small gaps with white caulk for a clean, professional look. Step back and admire the difference — this is usually the moment when the whole transformation really clicks.
Step 9: Final Cleanup and Finishing Touches
Once all the railing sections are installed, go around the entire porch with a critical eye and a tube of white caulk to fill any gaps, nail holes, or seams that need touching up. A clean finish makes the difference between a railing that looks DIY and one that looks professional. Wipe everything down with a microfiber cloth to remove any dust, adhesive smudges, or fingerprints from the vinyl surface.
One of the best things about vinyl railing is how easy it is to keep clean long-term — a simple wipe-down is usually all it takes. No painting, no staining, no annual maintenance headaches. If you’re planning to decorate your refreshed porch for the season after the railing is done, check out my ideas for summer home decor DIY ideas to refresh your space — there’s a lot you can do to make a porch feel like an outdoor room once the railing gives it that clean, finished structure.
Tips and Best Practices for Vinyl Porch Railing Installation
Here’s a quick summary of the most important things I learned from this project that I’d want anyone else to know before they start:
Rent a rotary hammer drill for concrete work. A standard drill will frustrate you and may fail entirely. The rotary hammer makes concrete drilling manageable and dramatically reduces the chance of broken anchor bolts.
Use masking tape as a depth guide. Wrap masking tape around your masonry drill bit at your target depth so you never drill too deep or too shallow.
Buy stronger anchor bolts than the ones in the kit. The included hardware is often just barely adequate. Upgrading to heavier-duty anchors is cheap insurance against broken hardware and wasted weekends.
Use caulk instead of glue for finish work. White caulk is much cleaner and easier to control than adhesive when you’re covering nail holes or seams on the post wraps.
Keep your work area in the shade if possible. Vinyl expands slightly in heat, and working in direct summer sun makes the material harder to handle precisely. A shade canopy or beach umbrella over your work zone makes a real difference on a hot day.
Double-check every order before it ships. Verify lengths, quantities, and part numbers carefully — a wrong piece can delay your project by weeks while you wait for a replacement to arrive.
Use a laser level at every bracket installation. A laser level is worth every penny on this project. An off-level bracket compounds into a visibly crooked railing, and fixing it after the fact is miserable.
Have a jigsaw and circular saw on hand. You’ll need a jigsaw for the post wrap cuts and a circular saw for the rails. Having both ready before you start saves multiple trips to borrow or buy tools mid-project.
Frequently Asked Questions
How long does it take to install vinyl porch railing?
For a typical front porch with a staircase, plan for two full weekend days minimum if everything goes smoothly. My project stretched over several weekends because of supply delays and the concrete drilling challenges. If you have all your tools, all your parts, and no concrete anchor issues, an experienced DIYer can do a small porch in one solid day. First-timers should budget more time and give themselves grace for the learning curve.
Do I need special tools for a vinyl railing installation?
Yes — this project requires more than basic hand tools. At minimum, you’ll need a jigsaw, a circular saw, a laser level, a tape measure, a hammer, and a masonry drill bit set. If you’re anchoring into concrete, I strongly recommend renting a rotary hammer drill — it’s the single most important tool for this project and most people don’t own one.
Is vinyl railing better than wood railing?
For a front porch in most US climates, vinyl wins on almost every practical metric. It doesn’t rot, doesn’t need painting, resists UV damage, is easier to clean, and is typically stronger than comparably priced wood options. The upfront cost may be slightly higher than basic wood, but the long-term savings in maintenance time and materials make vinyl the smarter investment for most homeowners.
Can I install vinyl porch railing myself, or should I hire a contractor?
It’s absolutely a DIY-able project, but it’s not a beginner-level one. The post wrap installation, railing assembly, and baluster spacing are all manageable for a confident DIYer. The concrete anchor work is where things can get complicated and frustrating. If you’re not comfortable with masonry work or don’t have access to a rotary hammer drill, that specific part might be worth hiring out — or at minimum, getting help from someone with experience. The labor savings from doing it yourself are significant, so it’s worth trying if you’re reasonably handy.
Wrapping Up My Vinyl Porch Railing Installation
This project genuinely transformed the front of my home. Going from peeling, rotting wood to clean white vinyl columns and railing is one of those upgrades where you can’t believe you waited so long to do it. Yes, I ran into broken anchor bolts, supply delays, and had to rent equipment — but every one of those obstacles had a solution, and the end result was absolutely worth it.
If you’re on the fence about whether to DIY this or hire it out, my honest take is: do it yourself if you’re willing to take your time and do the prep work properly. This vinyl porch railing installation guide gives you everything I wish I’d known going in. Take the measurements seriously, invest in (or rent) the right tools, and don’t try to rush the concrete anchor steps. Do those things and your porch railing project will go far smoother than mine did on the first attempt.
I’d love to hear how your project turns out — drop a comment below and let me know. And if you found this guide helpful, share it with a friend who’s been putting off their own porch upgrade. More DIY guides like this one are always in the works here at The DIY Journey.