If you’ve been staring at a leaning, rotting fence and wondering whether to just live with it one more season, I’m here to tell you — don’t. I let my old fence limp along way too long, and by the time I finally tackled the replacement, the posts had completely failed, pickets were hanging loose, and the gates could barely stay closed. It was well past time to tear it all out and start fresh. And honestly? I’m so glad I finally did it.
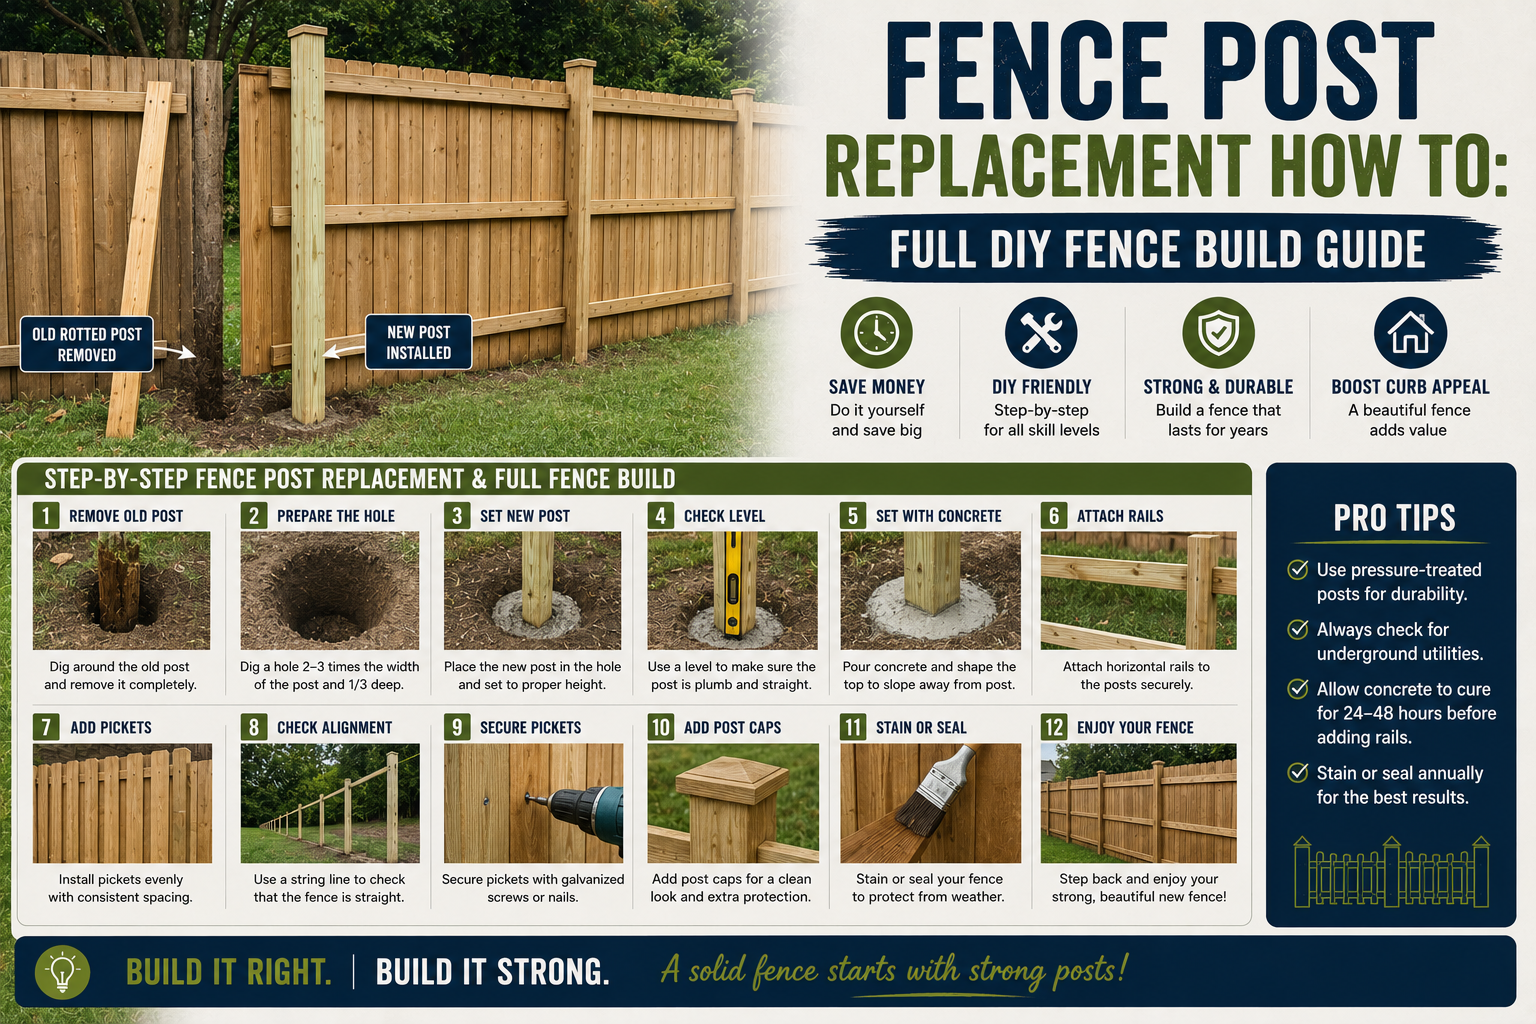
In this post, I’m walking you through the entire fence post replacement process from demo day all the way to staining the finished cedar panels. This was a big project — I’m talking a full property fence line — but I saved nearly $12,000 by doing it myself instead of hiring a contractor. The quote I received from a local company was $18,700. My total came in just under $6,700. That kind of savings makes every hour of work feel very worth it. If you want even more ways to save big on outdoor projects, check out my post on 5 DIY outdoor curb appeal projects you can do this weekend.
I had my buddy Pete come help me out with demo and post holes, which made a huge difference on the physically demanding parts. Let me break down every step of this build so you can do it yourself too.
Step 1: Demo the Old Fence Panels Fast and Smart
The first thing I did was grab a couple of reciprocating saws and cut each fence panel out, leaving the posts standing in the ground. Cutting the panels into sections first made everything so much easier — they stacked up neatly out of the way while we worked, and then loading them onto the trailer for the dump run was painless. Don’t underestimate this step. A clean, organized demo sets the tone for the whole project.
Just the two of us — me and Pete — took out the entire fence and had it loaded for the dump in about three hours. That’s pretty fast for a full fence line, and it proved that with the right approach, demo doesn’t have to be the miserable slog it sounds like.
Step 2: Pull the Old Concrete and Posts with a Truck and Chain
We started trying to dig the old concrete footings out by hand with shovels, and let me tell you — that was going nowhere fast. It was taking way too much time and energy, so Pete and I decided to work smarter. We wrapped a chain around the base of each post and used Pete’s truck to simply yank them straight out of the ground, concrete and all.
It worked like pulling carrots out of the garden. Each post popped right out with almost zero effort, and the concrete broke clean off the post once it was out — which actually gave me a perfect opportunity to inspect the old posts and see exactly where the rot had occurred. Spoiler: it was right at the ground line, which became a critical piece of information for how I set the new posts.
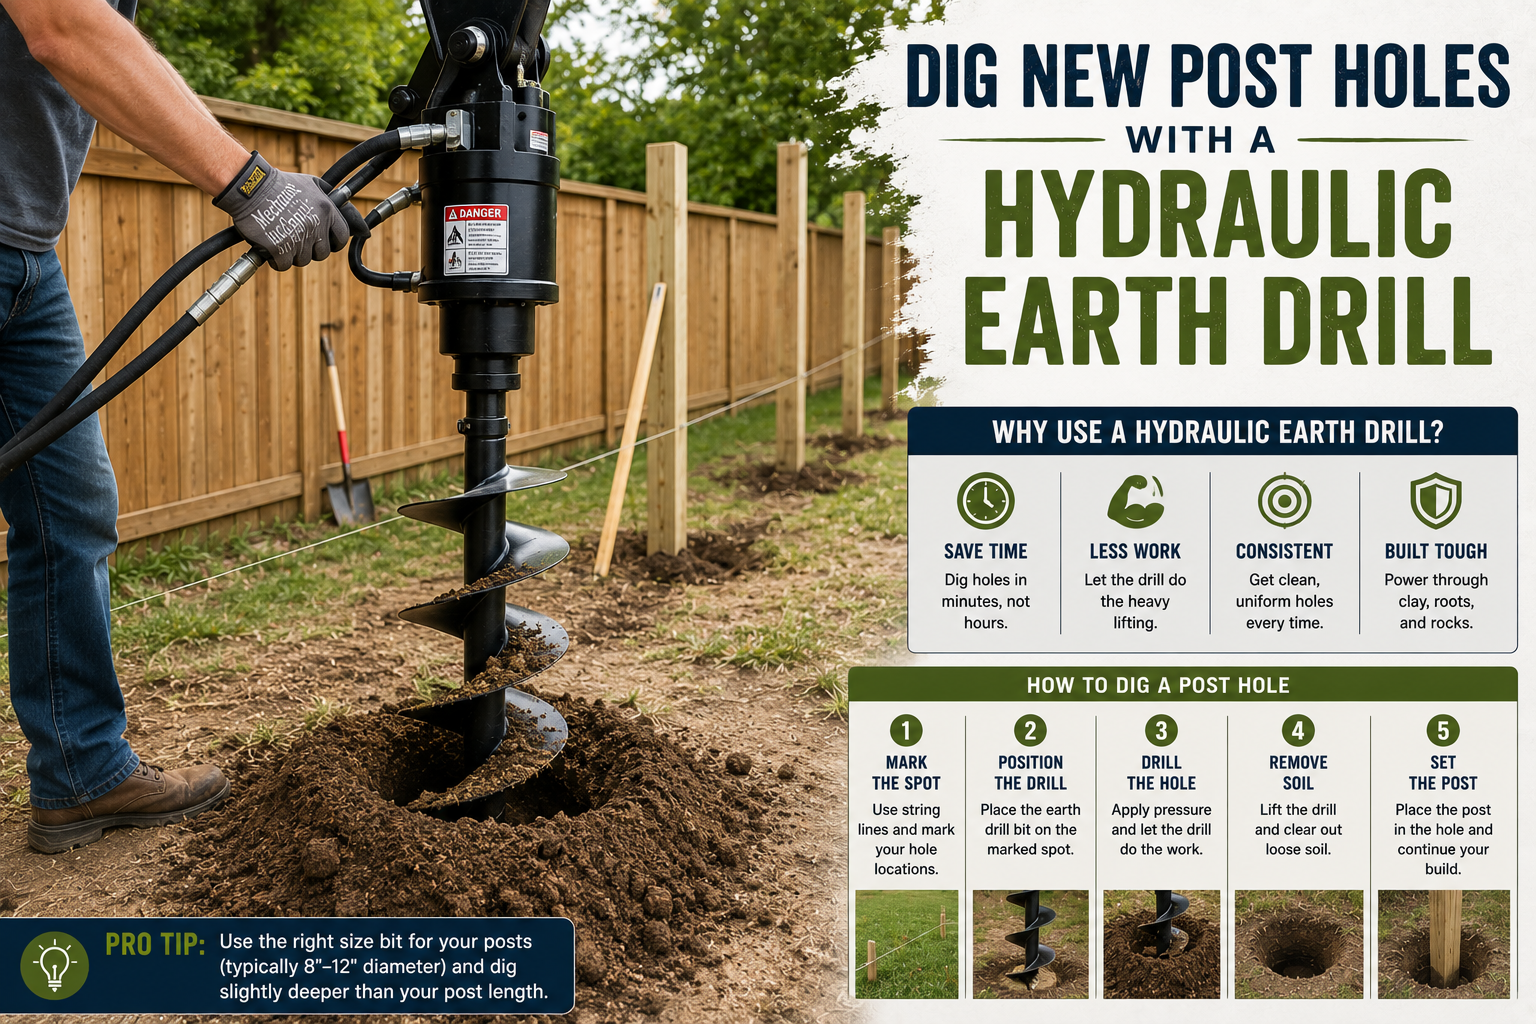
Step 3: Dig New Post Holes with a Hydraulic Earth Drill
Once the old posts were out, I ran a string line to mark exactly where the new holes needed to go. I’d previously tried a small auger on a different project and it was a frustrating experience. For this build, I leveled up and rented a one-man hydraulic auger called an earth drill. It handles easily, digs fast, accepts different auger bit lengths, and it’s towable behind your vehicle — making it easy to get right to your project site.
I spaced my posts six feet apart, so that’s how I spaced the holes. One very important reminder before you ever put a bit in the ground: always call 811 before you dig and get your utilities marked. Hitting an electrical or gas line is a bad day you do not want to have.
Step 4: Protect New Posts with Post Saver Sleeves at the Ground Line
When I pulled one of the old posts and cracked the concrete off, I could see clearly that all the rot had happened right at the ground line — not below it, not above it, but exactly where the post met soil and moisture. That’s the zone I needed to protect on every new post.
I used PostSaver sleeves, which wrap around the post and have a tar-like liner that heat-shrinks directly to the wood, creating an airtight, watertight seal. Here’s my process: I set each post in the hole, marked the ground line, then measured about two inches above that line as my sleeve placement mark. I wrapped the sleeve around the post at that mark, pressed the sticky side down, and then used a propane torch to heat-shrink all four sides. I followed up immediately with a wet roller on each side, which cools the sleeve and pushes the inner protective layer out slightly — that’s what’s called the black ring of confidence, and it tells you the seal is set. I added a few inches of small gravel to the bottom of each hole first to help with drainage and keep the post bottom away from standing moisture.
Step 5: Set Posts Plumb and In-Line Using a String Line and Braces
A crooked post is a crooked fence, full stop. So I took my time here. I drove stakes at both ends of my fence run and stretched a tight string line the full length. The string is slightly offset from the posts so I’m not accidentally bumping it as I work and throwing the line off. Once I set each post in its hole with the PostSaver sleeve in place, I strapped on a post level, manipulated the post until it was perfectly plumb and aligned with the string, and then locked it into position by screwing temporary 2×4 brace arms into stakes in the ground.
With the post held plumb and in line, I filled each hole using a fast-setting concrete mix. The fast-set kind doesn’t require mixing in a separate container — you dump the dry mix in and add water. I did give it a few quick stirs with a rod just to make sure there were no dry pockets, and I shaped the top of the concrete to slope away from the post so water sheds away rather than pooling around the base.
Step 6: Cut All Posts to the Same Height Using a Story Stick
Once the concrete cured and the braces were off, all my posts were set but at slightly different heights. I needed them all cut to exactly eight feet — that’s the maximum my city allows without a permit, so that’s what I built to. Here’s the method I used to get every post perfectly matching without measuring each one individually.
I used a laser level to shoot a horizontal reference line across the middle of all the posts — this became my control line. I marked that line on every post with a pencil, then measured and marked an 8-foot cut line on the shortest post. I then transferred both marks onto a long, straight scrap board — this is called a story stick. I moved the story stick down the line, lined up the control marks, and transferred the 8-foot cut mark to every single post. Then it was just a matter of making two quick horizontal cuts with a circular saw at each post. Clean, consistent, and fast.
Step 7: Build the Horizontal Rail Frame Between Posts
With all the posts cut to height, I started building the frame that would tie everything together. I marked level lines across the bottoms of the posts and hammered on galvanized fence rail brackets — attached to the inside of each post, flush with the front face. I measured the bay width, cut a treated 2×4 to length, slid it into the brackets, and secured everything with galvanized screws.
At the top, I ran the rails slightly differently for extra strength. On every other post, I cut out a small shoulder notch the width of a 2×4, then attached rail brackets beside it. This let me run a single 12-foot rail that ties three posts together at once rather than stopping at every post — which stiffens the whole fence and keeps everything straighter over time. After framing the top and bottom rails in every bay, I also cut and installed a center vertical support in each bay. This gives the horizontal pickets a third attachment point in the middle, which keeps them from ever bowing out or drifting over the years.
Step 8: Install the Cedar 2×6 Top Cap
Before any pickets went on, I installed the cedar 2×6 top cap — and I want to make a point about this detail because I think it makes a massive visual difference. A beefy top cap is one of the biggest things that separates a basic fence from a fence that looks really well built and intentional. I ran another string line to keep the top cap perfectly straight along the run, then screwed it straight down into the posts and frame with exterior screws. If you’re building your own fence, don’t skip the top cap — it’s worth every penny and every extra minute.
Step 9: Attach Pickets Using the Board-on-Board Method
This is a board-on-board fence, which means the pickets go on in two layers — a back layer first, then a front layer that overlaps to ensure 100% privacy with zero gaps even as the wood moves seasonally. I started by placing the top picket right up against the top cap and securing it with stainless steel ring shank nails into the posts. I built a simple spacer jig to quickly and consistently space out the back layer — a trick I picked up from my friend April Wilkerson’s board-on-board fence build.
For the front layer, my pickets are 5½ inches wide, so I marked a reference line ¾ of an inch into the back layer boards. That gave me ¾ of an inch overlap on each side, which is enough to guarantee no gaps. Every few rows I checked for level and made micro-adjustments before nailing down, which kept me from drifting off course. Once all the pickets were on, I went back and secured them to the center vertical support boards using exterior trim head screws — I used trim head fasteners here because that middle section won’t be covered by trim, so a low-profile screw head looks much cleaner. I only screwed the front layer at the center support since the back layer is already held firmly in place by the front boards sandwiching it.
Step 10: Handle Inside Corners with Notching and an Extra Vertical Board
When I got to a corner where two fence runs intersect, I needed a clean transition. For the bottom rail layer, I notched the corner board to fit around the intersecting top rail — just a quick cut with a saw. I ran the full bottom layer just like normal, and then the last board on the corner also got a notch for the intersecting rail below. I then attached an extra vertical board at the corner itself so the pickets coming in from the new direction had a solid attachment point. The top layer goes on just like every other bay, and the result is a corner that looks seamless and intentional. I was really happy with how clean it came out.
Step 11: Build the Gate Frame with an Anti-Sag Gate Kit
I built two gates for this fence and I was determined that neither of them would ever sag. I used an anti-sag gate kit for the frames — it comes with four heavy-duty metal brackets with welded-on hinges and all necessary hardware. I measured my gate opening, cut treated 2x4s to the four lengths needed, and screwed the kit’s brackets to the parts to form the frame. I did swap out the included screws for beefier Torx-head screws because I wanted maximum strength in those bracket connections.
I held the frame up to height with scraps and clamps, then screwed the hinges to the 4×4 post with just a couple of screws first to confirm the swing clearance was right before committing fully. Once everything looked good, I drove the rest of the hinge screws. I added a center vertical support just like the fence bays, then attached pickets using trim head screws — no nails here since the gate won’t have trim covering the fasteners, so I wanted the cleanest look possible.
Step 12: Install the Gate Latch Hardware
I went with a simple, modern gate latch and I love how it looks. To install it, I cut an opening in the end of the appropriate picket using my table saw and a multi-tool so the square hardware body would sit flush. I drilled a through-hole for the internal rod that connects both sides of the handle. I’ll be real — my hole measurement was just slightly off, so I removed the picket, installed the handles directly, and then reattached the picket around them. Sometimes you adapt. The connecting rod was also a bit longer than my 2×4 frame width, so I glued together a couple of scrap slats on the back side to make up the difference. The latch catch screwed easily to the post, and the whole thing works and looks great.
Step 13: Add a Stainless Steel Anti-Sag Gate Brace
Even with a solid anti-sag frame kit, my gates are tall — and tall gates are more prone to sagging over time. So I added a stainless steel adjustable gate brace as extra insurance. This is a telescoping stabilizer that both prevents sag from the start and lets you dial it in if sag ever does develop later. I put the telescoping parts together, set it in the gate opening to find the right length, then locked the two sections together with the included self-drilling screws. I screwed the threaded adjustable end into the top hinge-side of the gate, then attached the hardware to the middle and bottom. Done. If the gate ever settles even slightly, I can loosen the top bolts and raise it right back up — no drama.
Step 14: Install Cedar Trim to Cover Seams and Complete the Look
The trim step is one of my favorites because it’s the moment the fence goes from looking like a construction project to looking like a finished, polished build. I used 1×4 cedar boards, screwed in place with trim head screws directly over every seam between the fence panels and posts. Taking the time here to make sure every trim board is plumb is absolutely worth it — a slightly crooked trim board is very visible and will drive you crazy every time you look at the fence. I also cut a gate top cap to match the fence top cap, with a couple of notches on the hinge side so the gate can swing fully open without binding.
Step 15: Stain and Seal the Entire Fence with an Airless Sprayer
The last step was applying a stain-sealer combo in a cedar tone to protect all that beautiful wood. For application I used the Wagner Control Pro 170 airless sprayer with their 413 spray tip, which is designed specifically for stains. The sprayer pulls directly from a 5-gallon bucket, which made it incredibly efficient for a project this large. The coverage was fast and consistent, and overspray was reduced significantly compared to a standard airless setup.
My technique was to overlap each pass by about half for full even coverage, then go back with a lint-free rag a few minutes later to wipe off any unabsorbed stain. The sprayer made this process exponentially faster than brush application would have been. The finished result — warm cedar tones, clean modern lines, tall board-on-board privacy — genuinely transformed the feel of my entire backyard.
Full Cost Breakdown of This Fence Build
Here’s exactly what I spent on this project, broken down by category. Posts and 2x4s came to $1,150. Pickets were $1,950. Trim and top cap was $1,000. Concrete ran $580. Hardware — nails, 3-inch screws, and brackets — was $370. Both gates combined totaled $350. Stain was $475. PostSaver sleeves were $300. The hydraulic auger rental was $300. And the dump charge for hauling away the old fence was $80. The grand total came to just under $6,700.
The contractor quote I received for the exact same full property fence line was $18,700. Doing this myself saved me approximately $12,000. That is a life-changing amount of savings for a project that, while it takes time and effort, is completely within reach for a determined DIYer. If you’re looking for more ways to maximize your renovation budget, my post on budget home improvement DIY ideas that save thousands is worth a read.
Tips and Best Practices for Fence Post Replacement
After going through this entire build from start to finish, here are the most important lessons I’d want you to take away before you start your own fence post replacement project.
Always call 811 before digging. Getting your utilities marked is free and takes minutes. Hitting a gas or electrical line is not a recoverable mistake. Don’t skip this step under any circumstances.
Protect posts at the ground line. That’s where rot happens — not in the concrete, not in the soil, but right at the transition zone where the post meets air and moisture. PostSaver sleeves are one of the best investments on this project.
Rent the right equipment. A hydraulic one-man auger turns a full day of brutal digging into a morning’s work. Equipment rental is money very well spent on a project this size.
Use a story stick for consistent post heights. Measuring each post individually opens the door to small errors that compound down the line. A story stick gives you a single reference that transfers accurately to every post.
A string line is your best friend throughout this build. Use it for post placement, rail alignment, and keeping your top cap straight. It’s free and it works.
Use stainless steel ring shank nails for pickets. Regular fasteners will rust and streak your cedar in a few years. Stainless steel hardware costs a bit more and is completely worth it. You can find more ideas for making outdoor projects last in my guide to no-dig privacy fence installation ideas that last forever.
Frequently Asked Questions
How deep should fence post holes be for an 8-foot fence?
A general rule is that your post hole should be at least one-third of the total post length, and ideally below the frost line in your region. For an 8-foot fence, you’ll typically want your posts to be 10 to 12 feet long with 2 to 4 feet in the ground depending on your soil type and local frost depth. Always check your local building codes for specific requirements before you dig.
What is the best way to keep fence posts from rotting?
The most important thing you can do is protect the post at the ground line — the zone where post meets soil is where nearly all fence post rot originates. I use PostSaver sleeves, which heat-shrink directly to the post and create an airtight, watertight seal right at that critical zone. Choosing pressure-treated lumber, adding gravel at the bottom of the hole for drainage, and sloping your concrete footing so water sheds away from the post also go a long way toward maximizing post longevity.
Do I need a permit to replace fence posts or build a new fence?
It depends entirely on your city or municipality. In my case, I could build up to 8 feet tall without a permit, which is why I chose that height. Some areas require permits for any fence over 6 feet, or for fences along certain property lines. Always check with your local building department before you start — it only takes a phone call and it protects you from having to tear down work later.
What is a board-on-board fence and why is it better for privacy?
A board-on-board fence uses two overlapping layers of pickets instead of one. The back layer is spaced out, and the front layer is offset to cover those gaps. Because the pickets overlap rather than butting up edge to edge, there are no gaps for eyes to see through — even as the wood naturally expands and contracts with seasons. It provides 100% privacy, it’s structurally stronger than a single-layer fence, and in my opinion it simply looks better. The overlapping texture adds visual depth that a standard privacy fence just doesn’t have.
Final Thoughts: Why This Fence Build Was Worth Every Minute
Looking at my old fence versus what’s standing in my backyard now genuinely makes me happy every time I walk outside. The board-on-board cedar design with the chunky top cap and cedar trim is exactly the look I wanted — modern, clean, private, and built to last. Both gates latch, lock, and swing perfectly. The PostSaver sleeves mean I’m not going to be dealing with rotted posts again in a few years. And knowing I saved $12,000 doing it myself makes every aching muscle from demo day feel like a badge of honor.
If you’re staring at a failing fence and wondering whether fence post replacement is something you can tackle yourself, the answer is yes. It’s a big project, but it’s not a complicated one. Take it step by step the way I laid it out here, use the right tools and materials, protect those posts at the ground line, and you’ll end up with a fence you’re proud of for decades. You’ve got this.