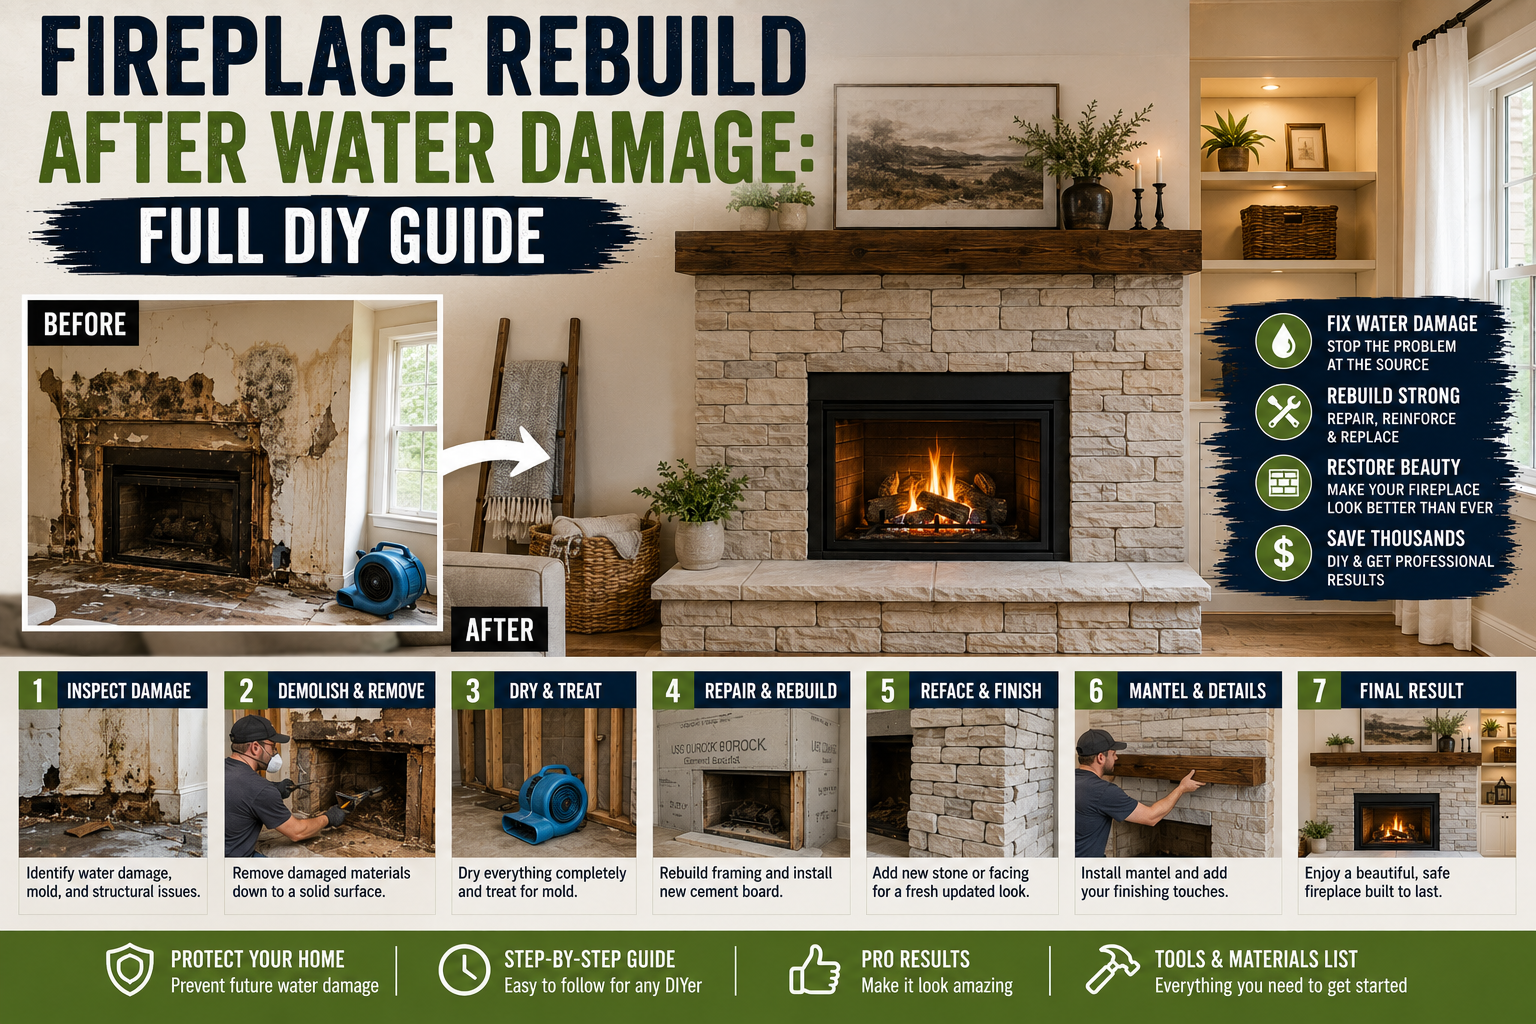
A burst pipe on my second floor is not exactly how I planned to spend my time, but that’s exactly what happened — and it flooded my entire living room. I had to tear everything out, and honestly, it was one of the most overwhelming moments I’ve had as a homeowner. But here’s the silver lining: it gave me the perfect opportunity to rebuild something better. What you’re about to read is my complete, step-by-step process for a full fireplace rebuild after water damage, taking a damaged, outdated hole-in-the-wall all the way to a stunning feature fireplace that extends out into the room.
If you’ve been dealing with water damage or you just want to upgrade an old fireplace, I want to show you that this project is more approachable than it looks. I’m going to walk you through every phase — from building the base, to framing the middle and upper sections, running gas and electrical, installing the fireplace unit itself, and finishing with backer board for stone. If you enjoy projects like this, you’ll also want to check out my guide on DIY Backyard Patio & Fireplace Build: Save Thousands for even more fireplace inspiration. Let’s get into it.
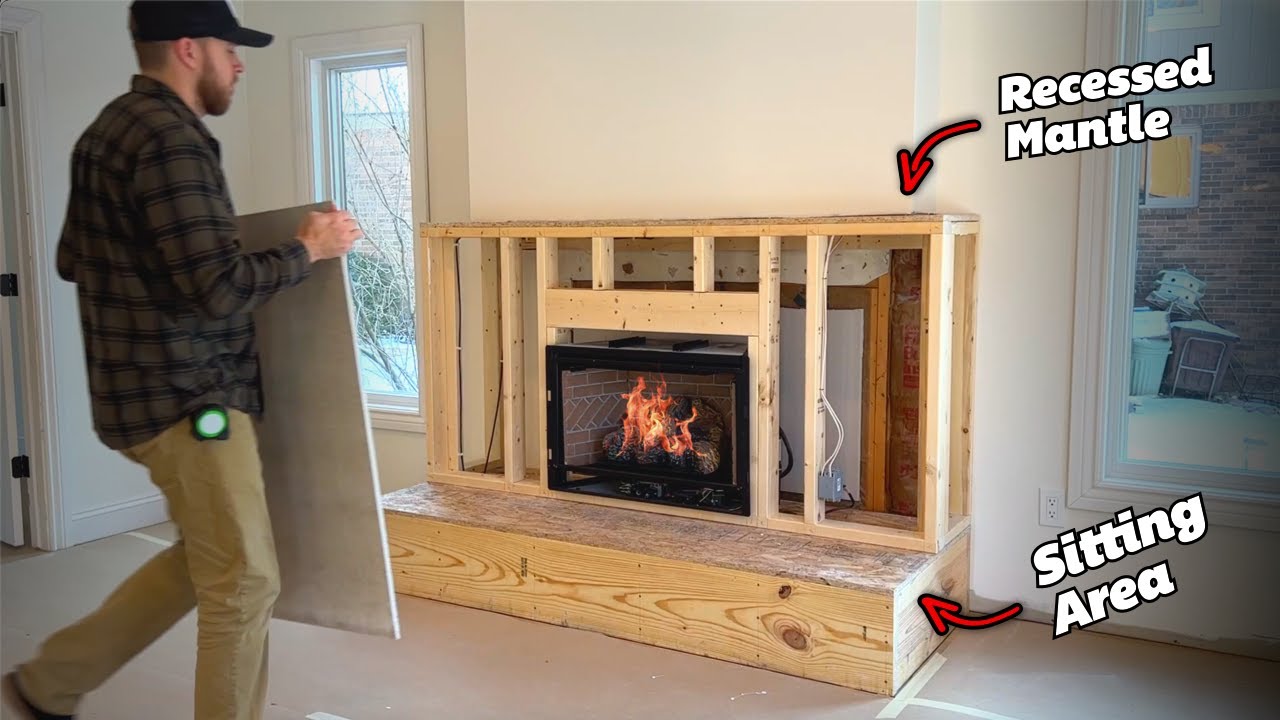
Before anything else, here’s a quick overview of how this fireplace is structured, because it’ll make everything that follows make a lot more sense. The whole build is divided into three sections: the base (which forms the hearth and supports everything), the middle section (where the fireplace unit slides in), and the upper section (which is set back slightly so the mantle can wrap around it). Keep those three sections in mind and this entire project becomes much more logical as you work through it step by step.
Step 1: Build the Base of the Fireplace
The base is the foundation of the entire build, so I wanted it to be rock solid. I chose 2×12 construction grade lumber for this — yes, it’s a bit overkill, but it gave me the right hearth height and I wasn’t willing to cut corners on the foundation. I cut everything down to final size in the garage using my miter saw, then brought the pieces inside to assemble them in the living room.
Assembly is pretty straightforward once everything is cut. I marked joist locations on the front and back boards, then pre-started all my screws before assembly — this is a habit I swear by because starting a screw on a flat board is so much easier than doing it when the board is standing on its edge. With those screws pre-started, I just lined everything up, dropped the joists into place, and drove them all home. In no time, the base was complete and solid as a rock.
Step 2: Close Off the Old Fireplace Opening in the Wall
Here’s a bit of backstory: the original fireplace was recessed flush into the wall, and frankly my wife and I never loved that look. The whole reason I seized on this water damage rebuild as an opportunity was to create something that extends out into the room and becomes a real focal point. But before I could build the next section, I had to close off that old opening in the wall first.
I did that with a couple of 2×4s — simple and quick. I also knew I’d need to insulate this area later in the build because the old fireplace used to literally freeze on the front face in winter. The original brick behind it offers almost no insulation value, so this was a detail I wasn’t going to skip.
Step 3: Extend the Existing Gas Line
Since there was already a fireplace here before, I had an existing gas line to work with — I just needed to extend it. The new fireplace unit I purchased has its gas inlet on the opposite side from where the original line exited, so I had to swing the line over and get it to exit through the base of the new structure.
Full disclosure: I’m not a licensed plumber and I don’t work with gas lines professionally. But I was comfortable taking on this smaller job. Whenever I work with gas, I use a combination of Teflon tape and pipe dope on every joint — probably overkill, but when it comes to gas, overkill is completely fine with me. I ran the line over, added a 90-degree elbow and about a 10-inch riser or nipple so it would extend up out of the base, then capped the end until I was ready to connect the fireplace. I also added a block to support the pipe so it wouldn’t move around over time.
To test for leaks, I filled a spray bottle with soapy water and sprayed every joint I made. If you see any bubbling, you’ve got a leak. I had zero bubbles — which meant I was good to go. I finished by pressing some epoxy putty (basically like Silly Putty) around where the pipe exits the wall to stabilize it and seal any gaps that bugs could sneak through from the old chimney. If any of this feels beyond your comfort level, please hire a professional — gas is not something to wing.
Step 4: Insulate the Wall Behind the Fireplace
Before I could slide the base into its final position, I took care of something that the original fireplace never had: proper insulation. That brick wall behind the old unit was basically a cold bridge straight to the outdoors, and I could feel the effects of it every winter. With the wall now open and accessible, this was the perfect time to get insulation in there.
Once the insulation was in place, I slid the base into position. I drilled a hole in the plywood top so the gas line riser could pass through cleanly, then spent time making sure the base was perfectly level. I cannot stress this enough — level the base carefully, because once everything is built on top of it, you cannot go back and adjust it. A few shims got me there, and then I secured the base to the wall with 2½-inch screws driven into the studs.
Step 5: Cut and Install the Plywood Top on the Base
To finish off the base, I cut a piece of plywood to act as the top surface — this is what the hearth material will eventually sit on and what the middle section will be built on top of. I cut it to size using my table saw and a track saw, then measured and drilled a hole for the gas line to pass through.
Lining up the hole for the gas pipe is simple: just set the plywood in place, use a square to draw a line back from the pipe’s position, measure how far off the wall it sits, mark the intersection, and drill. Once the hole was drilled, I slid the plywood over the pipe and the base was 100% complete.
Step 6: Frame the Middle Section
With the base done, I headed back to the garage to cut all the pieces for the middle section. This section is framed out just like a wall, using 2×4s throughout — except for the header above the fireplace opening, where I used 2x6s for extra support. The middle section has three parts: a front wall with the fireplace opening cut into it, and two small side walls.
The front wall is where you’ll need to customize based on your specific fireplace unit. Always reference the instruction manual that comes with your fireplace — it will tell you the exact rough opening dimensions, clearances from the mantle, and how far the unit needs to be from the back wall. Don’t guess on these measurements. Once I had the front wall built, I did a quick square check — and honestly it wasn’t perfectly square, which came back to bite me slightly during installation. I was able to work through it, but save yourself the hassle and check square carefully before moving on.
To install the middle section, I drew two level reference lines going straight up from the base, positioned the side walls along those lines, and got them plumb before securing them. I left them slightly loose so I could make adjustments when the front wall came in. Once the front wall was in place and everything was aligned, I squared it all up — I had to remove the header temporarily to flex the front wall back into square, but it worked out perfectly in the end.
Step 7: Add the Plywood Top and Back Support to the Middle Section
Just like the base, the middle section needed a plywood top. To support it at the back wall, I used a 2×6 as a reference across the top and then a 2×4 running beneath it, aligned perfectly with the top of the two side walls. I marked stud locations on the 2×6 and transferred them to the 2×4, pre-started my screws, and then installed the back support against the wall.
The plywood top piece I needed actually came from the cut-off leftover from the base — it was just the right size, which was a nice little win. Once it was cut and dropped into place, the middle section was completely done and ready for the upper section to be built.
Step 8: Run Electrical for the TV (Optional but Recommended)
Before building the upper section, I decided to run electrical up into it so I’d have power for a TV that I planned to mount above the fireplace. If you’re not doing a TV, feel free to skip this step — but if you are, this is the time to do it, not after everything is framed and drywalled.
I found an existing electrical line that used to power the old fireplace blower, running just above the middle section. I removed some drywall to expose it, then planned to reroute it up into the upper section. At minimum, I needed one outlet to plug the fireplace unit into, plus a second outlet up top for the TV. I’m not a licensed electrician, so I’m not going to go deep into the wiring details here — if you’re not comfortable with this, call a professional. If you enjoy electrical DIY projects, my post on Shed Electrical Wiring for Beginners covers a lot of the fundamentals in an approachable way.
Step 9: Frame the Upper Section
The upper section is built almost identically to the middle section — one small side wall on each side and a front wall, all framed with pre-cut 2×4s. The key difference with this section is that it’s set back slightly from the front face of the middle section, which allows the mantle to wrap around the entire fireplace once it’s installed.
I marked out all my stud locations, screwed everything together, and then secured the upper section by screwing it into the ceiling above and down into the middle section below. With the final screw driven in, the entire fireplace was completely framed. It’s a genuinely satisfying moment when all three sections are standing together as one solid structure.
Step 10: Complete the Electrical (Outlets and Cable Runs)
With framing done, I could finish up the electrical work. I also decided to run a coaxial cable and an Ethernet line up to the back of where the TV would mount — doing this inside the wall now meant I’d never have to deal with visible cables later. I drilled a hole straight down through the base into the basement, then another up into the top section, and fished both cables up to the same electrical box location.
Originally I had installed a single gang box, but after the drywall crew came in (more on that in a moment), I switched to an old-work box — these are great because you just cut a hole in the drywall, slide the box in, and tighten screws that clamp tabs against the back of the drywall to hold it in place. Then it’s just a matter of wiring the outlet and terminating the cable and Ethernet lines. Clean, professional, and hidden.
Step 11: Have the Ceiling and Upper Section Drywalled
Shortly after I finished the framing and rough electrical, I had a drywall crew come in to hang drywall on the living room ceiling and on the upper section of the fireplace. If you’re a confident DIYer, you could absolutely hang drywall yourself — but I chose to bring in pros for this step to keep things moving efficiently.
It’s worth mentioning that the timing here matters. Get your electrical rough-in done, your cable and data lines run, and any other in-wall work completed before drywall goes up. Once those walls are closed, accessing anything inside becomes a much bigger headache.
Step 12: Install the Natural Gas Fireplace Unit
This was the moment I’d been working toward — actually getting the fireplace unit into its new home. I chose a ventless natural gas fireplace specifically for two reasons: it requires no exterior venting (a huge simplification), and the depth of the unit was just right so it wouldn’t stick out too far into the room.
I added some simple supports inside the opening for the unit to rest on, and then slid it into place. Honestly? This was the easiest part of the entire build. It dropped right in, fit perfectly, and looked great. Off camera I connected the gas line and plugged the unit into the outlet I’d installed. This particular fireplace also came with a surround that frames the face of the unit — I slid that into place last, and the fireplace was fully operational.
Step 13: Install HardieBacker Board for the Stone Veneer
For the finished look of the base and middle section, I’m planning to use cultured stone — but that’s a project for a future video. What I did complete in this build was installing the HardieBacker board (cement backer board) that the stone will adhere to. You cannot put stone directly on drywall or plywood, so this step is essential.
Cutting HardieBacker is simple once you know the method. Use a scoring knife with a carbide tip, score along a straight edge several times, then snap it over the edge of a table — it breaks clean right on the score line. I cut all my pieces to cover the entire lower portion of the fireplace, aiming to minimize seams and gaps as much as possible. Then I installed the pieces using screws specifically designed for cement board. It went up quickly and now the fireplace is completely ready for the stone veneer whenever I tackle that next phase. If you love the idea of building a fireplace surround to match, I’ve got a detailed walkthrough in my DIY Fireplace Surround Build Tutorial as well.
Tips and Best Practices for a Fireplace Rebuild After Water Damage
Always level the base perfectly before building up. Once the upper sections are on, you cannot adjust the base. Spend the extra ten minutes with shims — it’s worth it every time.
Pre-start your screws before assembly. Driving a screw into a board lying flat on the ground is ten times easier than doing it once the board is vertical. This simple habit speeds up every framing step significantly.
Read your fireplace manufacturer’s instructions before you frame the opening. Every unit has specific requirements for rough opening size, clearances from combustibles, and distance from the wall. Frame to their specs, not your best guess.
Use the soap-and-water spray test on every gas joint. It takes two minutes and could save your life. No bubbles means no leaks — it’s that simple.
Run your electrical, cable, and data lines before drywall. Planning a TV above the fireplace? Do all your rough-in work now. Retrofitting wires through a finished wall is a nightmare compared to doing it at the framing stage.
Insulate behind the fireplace. Brick offers almost no thermal resistance, and you’ll feel it every winter if you skip this step. With the wall open during a rebuild, there’s no excuse not to insulate properly. For more ideas on budget-smart renovations like this, check out my post on Budget Home Improvement DIY Ideas That Save Thousands.
Frequently Asked Questions
Can I do a fireplace rebuild after water damage myself, or do I need a contractor?
Most of the framing, electrical rough-in, and backer board work is very DIY-friendly if you have basic carpentry skills. The one area I’d be cautious about is the gas line work — I was comfortable extending mine because it was a relatively simple job, but if you’ve never worked with gas lines before, hire a licensed plumber for that portion. Everything else in this build is achievable for a motivated DIYer.
What type of fireplace is best for a rebuild like this?
I went with a ventless natural gas fireplace for two big reasons: no exterior venting required, and the compact depth kept it from protruding too far into the room. If you have an existing chimney and flue, a vented unit is also a great option. The key is to choose your unit before you frame, so you can size the opening correctly from the start.
How do I test a gas line for leaks after connecting a fireplace?
The simplest method is what I use: fill a spray bottle with water and a squirt of dish soap, then spray every joint and connection. If you see bubbles forming, you have a leak and need to retighten or reseal that joint. No bubbles means you’re good to go. Always turn the gas off again after testing and before proceeding with construction.
What goes between the framing and the stone veneer?
You need cement backer board (like HardieBacker) as the substrate for any stone or tile work. Never apply stone directly to drywall or plywood — it won’t bond properly and the weight could cause it to fail over time. Score and snap the backer board to size, then install it with cement board screws before applying your stone or tile adhesive.
Wrapping It Up
A fireplace rebuild after water damage is one of those projects that feels intimidating until you break it down into manageable steps — and that’s exactly what I’ve tried to do here. Build the base, close the wall, run the gas, frame the middle section, frame the upper section, handle the electrical, install the unit, and prep for your finish material. Thirteen steps, one incredible result.
What started as one of my most stressful homeowner moments turned into one of my favorite projects. The fireplace is now a true focal point of the living room, and I saved a significant amount of money by doing it myself instead of hiring it out. If I can do it, you can too — and I hope this walkthrough gives you the confidence to take it on. Drop your questions in the comments below, and make sure you’re subscribed so you don’t miss the cultured stone installation and the mantle build — both coming soon!