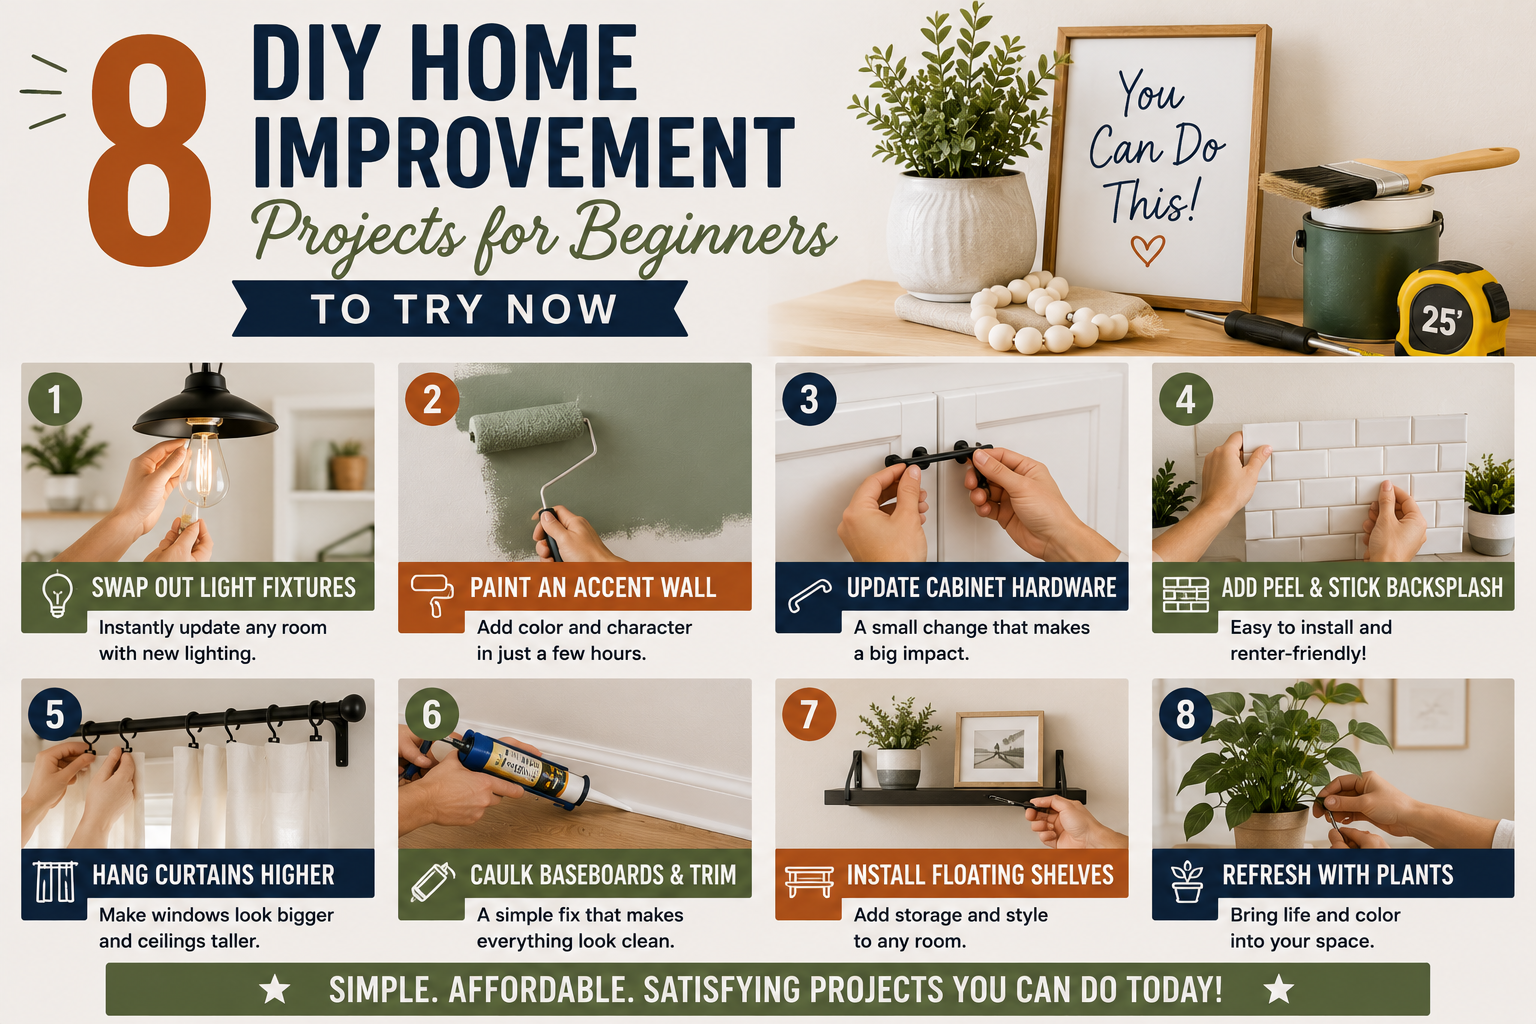
If you’ve been putting off those nagging little home projects since you moved in — you’re not alone. Between life getting busy, family visiting, and the constant distraction of new ideas, it’s so easy to let small updates pile up. But here’s the thing: tackling even a handful of these projects in a single week can completely change the way your home looks and feels.
That’s exactly what this post is all about. These are real DIY home improvement projects for beginners — no contractor required, no giant budget needed. We’re talking painting walls, updating switch plates, hanging mirrors, creating gallery walls, and finishing off a brand-new door. Each one is approachable, satisfying, and makes a surprisingly big visual impact.
Whether you’re prepping for the holidays, trying to create flow throughout your home, or just finally ready to check things off the list, these projects are the perfect place to start. If you’re looking for even more quick wins, check out these budget home improvement ideas you can do in 30 minutes — they pair perfectly with everything here. Let’s dive in!
1. Paint Your Kitchen Walls to Create Flow Throughout the House
If one room in your home feels disconnected from the rest — darker, heavier, or just off — paint is almost always the fastest fix. In this case, the kitchen was painted a dark sage green while every other room in the house was white and bright. The result? A space that felt detached, dim, and visually chopped off from the open-concept floor plan around it.
The solution was simple: paint the kitchen the same white as the rest of the house. The color used here is West Highland White by Sherwin-Williams, and it’s available at Sherwin-Williams directly or can be color-matched at any paint store for a more affordable option. The finish matters too — an eggshell enamel was used here because it’s durable and easy to wipe clean, which is exactly what you want in a kitchen.
The transformation was dramatic. Within a few hours, the kitchen felt brighter, more open, and finally connected to the rest of the home. Walking through the front door no longer felt like moving between separate zones — it all flowed. Sometimes you need to strip things back to a blank canvas before you can truly envision what you want the space to become. If you love the idea of a budget-friendly transformation like this, you’ll want to read about this Florida home makeover on a budget for even more inspiration.
2. Use an Extendable Roller to Paint Faster and Smarter
This one sounds small, but it’s genuinely a game-changer for any painting project. When you’re rolling paint onto walls — especially in a larger kitchen or open hallway — an extendable roller stick saves you an enormous amount of time and effort. Without it, you’d be constantly climbing up and down a ladder to reach the upper half of your walls.
The pro technique here is to cut in your edges and corners first with a paintbrush, getting all the tricky spots done before you ever pick up the roller. Once that’s done, rolling the rest of the wall goes incredibly fast. With this approach, an entire kitchen was painted in just a few hours from start to finish. It’s one of those tools that once you use it, you’ll never go back.
3. Extend Your Paint Into Adjacent Hallways and Spaces
When you repaint a room, don’t stop at the doorway. If your new color flows into a hallway, a utility area, or even a small laundry nook, take it all the way. In this project, the dark sage green carried from the kitchen into a back hallway that housed closets, a staircase, and laundry. That hallway used to feel like a dark tunnel between bright spaces.
Painting it the same bright white turned it from a dim, forgotten passageway into a cohesive part of the home. It’s one of those details that nobody points out — but everyone feels. The continuity it creates makes the whole house feel more intentional and polished. Don’t underestimate the impact of a unified color palette moving through your connected spaces.
4. Cover Outdated Toggle Switch Plates With White Outlet Covers
After painting your walls a fresh, clean white, the old beige toggle switch plates suddenly become very obvious. Replacing them entirely might seem like the logical next step, but if your home still has the older toggle-style switches, swapping them out typically requires an electrician to re-hardwire the box. That’s time and money you might not want to spend right now.
The easier solution? Outlet covers that fit right over the existing toggle, snapping into place to create a clean white look without any electrical work. They’re a temporary but effective fix that makes those plates disappear into the wall. You can even paint right over them for an even more seamless look. Just note that if you have a box with two toggles and a dimmer, you’ll need a specific cover for that configuration — a quick trip to Home Depot can sort that out.
5. Paint an Interior French Door to Match Your Room’s Trim and Walls
Adding a door to a home office or any room is a fantastic way to create privacy without closing off the space entirely — especially with a French door with glass panels. But the door isn’t truly finished until it’s painted. An unpainted door, even a beautiful one, looks incomplete and out of place.
For this project, the interior side of the door was painted in Frosted Toffee in a semi-gloss finish to match the existing wall color and trim. Semi-gloss is ideal for doors because it’s durable and easy to clean. A helpful tip: if your door still has the protective film on the glass panels, leave it on while you paint — it acts as a natural mask. If the film is already removed, use liquid tape, which you brush on, let dry, and peel off cleanly. It’s much faster than taping around every individual glass pane. You can find more inspiration for spaces like this in this guide to small bedroom office conversion ideas with built-in desks and shelves.
One more pro tip: when painting a door, don’t just paint the face. Open the door and paint the edge too — that’s the side that’s visible when the door is open inside the room, and skipping it leaves the project looking unfinished.
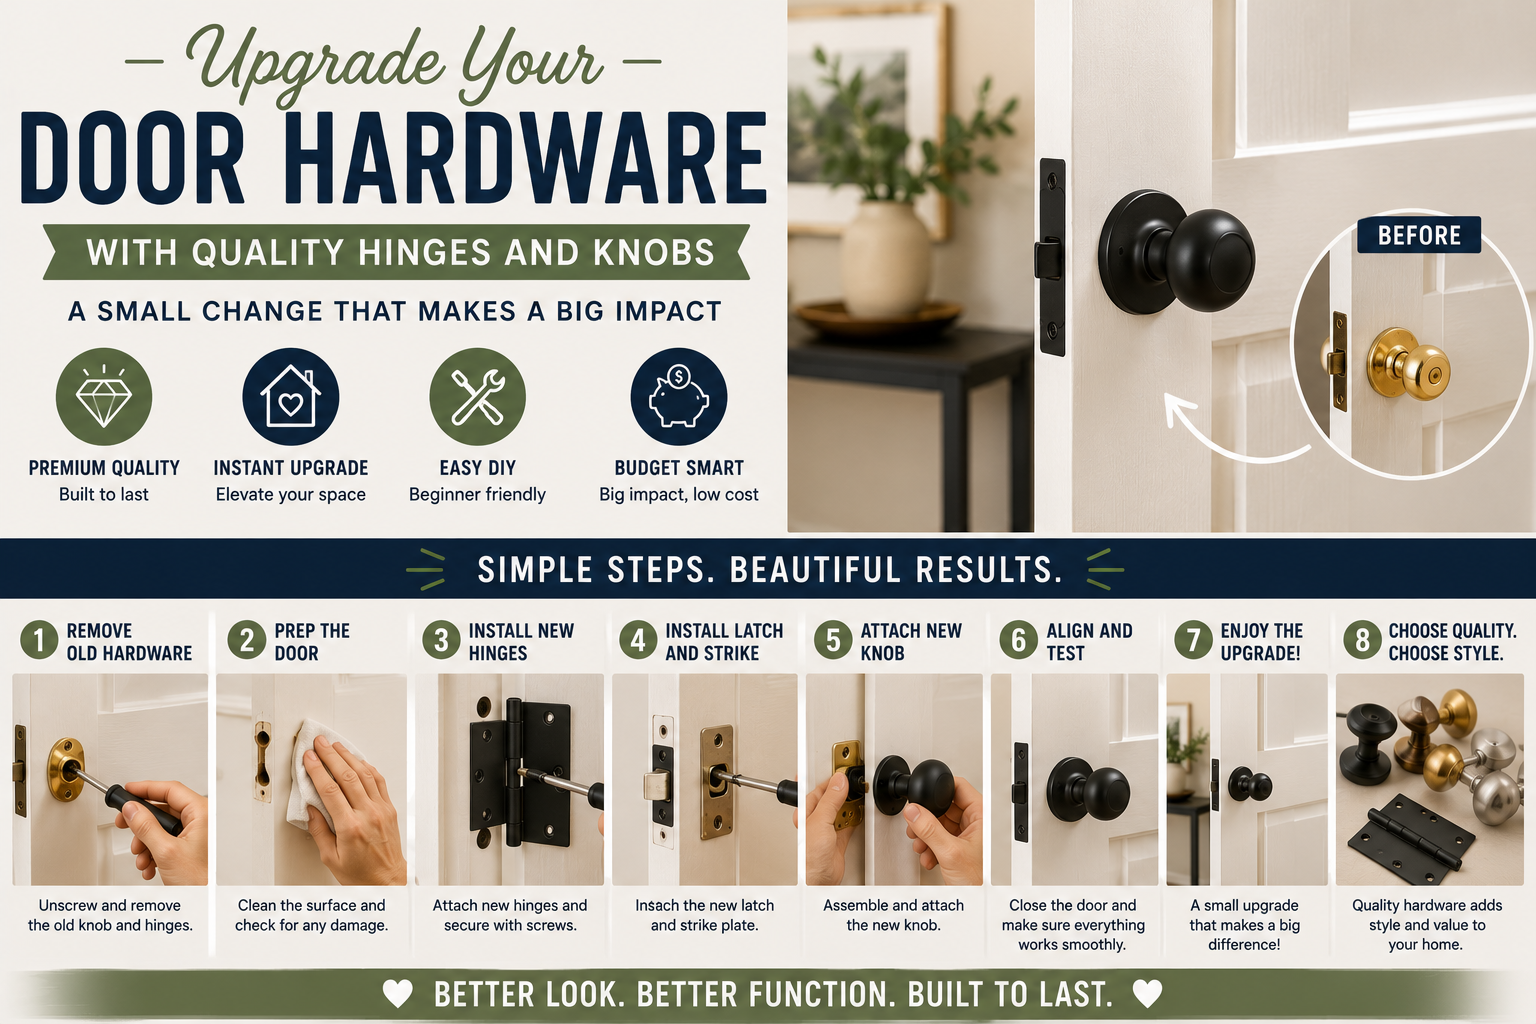
6. Upgrade Your Door Hardware With Quality Hinges and Knobs
The hardware you choose for a door — the knobs, the hinges, the finish — makes an enormous difference in how finished and intentional the space feels. For this French door installation, unlacquered brass hardware was chosen specifically because it ages beautifully, developing a natural patina over time rather than looking cheap or overly polished.
The hardware selected here was a New York plate with a Homestead door knob (oval, comfortable in the hand) paired with ball-tip hinges for a decorative detail. These kinds of finishing touches are what separate a home that feels “done” from one that still feels like a work in progress. They don’t have to be the most expensive option — look for a middle ground between quality and price, and always make sure to communicate installation specifics clearly to whoever is doing the install. If a detail matters to you, say it out loud.
7. Hang a Mirror on a Slim Wall to Bounce Light and Fill Space
A well-placed mirror can do a lot of heavy lifting in a room. In the kitchen-to-family-room transition wall, a simple white oak-framed mirror was hung vertically on a slim wall section. The vertical orientation balanced the visual weight of a tall cabinet on the opposite side, and the mirror itself reflected light from a nearby sunroom — essentially adding the feeling of another window to the space.
For hanging, 3M Claw drywall picture hangers are a great beginner-friendly tool. They come with marking dots that you press against the back of your art to transfer the exact hanger placement onto the wall, so you get it right the first time — no tools required. Always make sure the hanger weight rating exceeds the weight of your mirror or art piece. The standard hanging height is to center the piece at 57 to 59 inches from the floor, which puts it at natural eye level for most people.
8. Create a Cozy Gallery Wall Corner With Small Art Pieces
Empty corners and small gaps on walls don’t need to stay empty. One of the easiest and most charming DIY home improvement projects for beginners is building a mini gallery wall using small art you already own. In a guest room corner with a chair and a floor lamp, a collection of small pieces was arranged in a diagonal, organic layout rather than a rigid grid — which felt more natural given the corner placement.
Between two windows on the same wall, a pair of hand-painted framed pieces were hung to add warmth and color. The result was a layered, intentional corner that felt cozy and complete without spending a dime on new art. Grouping small art pieces is one of those tricks that looks elevated but is totally beginner-friendly. It’s also endlessly flexible — swap pieces out for the holidays, add new finds over time, or rearrange whenever the mood strikes. If you love decorating ideas like this, you’ll enjoy these summer home decor DIY ideas to refresh your space for even more room-by-room inspiration.
Tips and Best Practices for DIY Home Improvement Projects Beginners Should Know
Work in stages. You don’t have to tackle every project at once. Finishing one room or one wall at a time lets you see progress and stay motivated — and sometimes one finished project reveals the next obvious step.
Use the right finish for the right room. Eggshell enamel works beautifully for kitchen and bathroom walls because it’s washable. Semi-gloss is ideal for doors and trim because it’s durable and reflects light well. Knowing this before you buy saves a trip back to the paint store.
Cut in before you roll. Always paint your edges, corners, and detail areas with a brush first. Then rolling goes much faster and looks cleaner. Pair this with an extendable roller and you’ll cut your painting time in half.
Invest in small hardware details. Door knobs, hinges, switch plates, and mirror frames are relatively inexpensive, but they make a significant visual impact. These are the things people notice even when they can’t put their finger on why a room feels polished.
Be specific when hiring help. If someone is installing hardware, hanging a door, or doing any detailed work in your home, spell out every preference clearly — even the ones that seem obvious. Miscommunication is common and much easier to prevent than to fix after the fact.
Hang art at eye level. Center your art at 57 to 59 inches from the floor. This is the gallery standard and works in virtually every room. It makes a space feel intentional and professionally styled.
Frequently Asked Questions About DIY Home Improvement Projects for Beginners
What’s the easiest DIY home improvement project for a complete beginner?
Painting walls is almost always the best place to start. It requires minimal tools, is very forgiving, and creates one of the biggest visual transformations of any project. Start with one room, use the right finish for the space, and cut in your edges before rolling. You’ll be amazed at how much it changes the feel of your home in just a few hours.
Do I need an electrician to replace my light switch plates?
If you have older toggle-style switches and want to update the look without rewiring, you don’t need an electrician. Outlet covers that snap over the existing toggle are a great temporary solution that requires no electrical work at all. If you want to fully replace the switch mechanism itself, that’s when you’d bring in a professional.
How do I hang a mirror or artwork without making mistakes?
Use 3M Claw drywall picture hangers — they come with positioning markers that transfer your hanger placement directly onto the wall so you don’t end up with extra holes. Always center your piece at 57 to 59 inches from the floor for that perfectly balanced, eye-level look. For heavier pieces, make sure your hanger’s weight rating exceeds the weight of the item.
What paint finish should I use in different rooms?
As a general rule: use eggshell or satin for walls in living areas and kitchens (easy to clean, not too shiny), semi-gloss for doors and trim (durable and reflects light nicely), and flat or matte for ceilings. Choosing the right finish makes your paint job look more professional and last longer.
Ready to Start Your Own DIY Home Improvement Projects?
As you can see, you don’t need a massive renovation budget or professional contractor to make your home feel fresh, bright, and put-together. These are the kinds of DIY home improvement projects beginners can absolutely tackle in a weekend — or even an evening. From painting a kitchen to hanging a gallery wall to snapping on a new switch plate cover, every single one of these projects moves the needle in a real, visible way.
The key is to just start. Pick one project, get the supplies, and do it. That first finished project builds the momentum to tackle the next one, and before you know it, your whole home starts feeling like the one you always imagined. For more ideas to keep the momentum going, browse through these affordable home improvement projects under $100 — they’re full of practical, beginner-friendly updates that make a big impact without breaking the bank.
Which of these projects are you most excited to try first? Drop a comment below and let us know — we’d love to cheer you on!