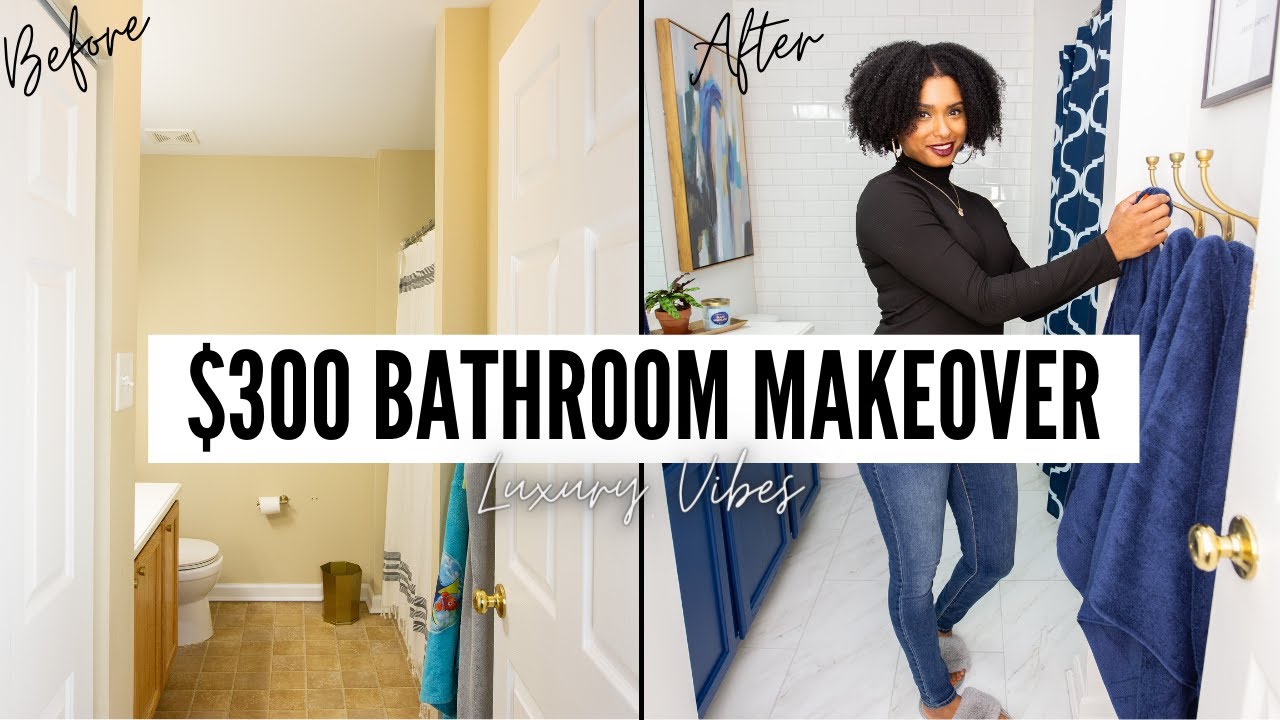
I’ve been putting off this project for over a year, and I’m so glad I finally got around to it. My kids’ slash guest bathroom was stuck in a beige time warp that made everything look yellow and dated, and I knew I could fix it without spending a fortune. This complete bathroom makeover under 300 dollars covers everything — paint, cabinet transformation, subway tile, new flooring, and grouting — all done by me, with easy-to-find tools and a little elbow grease.
If you’re looking for inspiration before diving into your own bathroom refresh, I’ve got a great roundup of affordable home improvement projects under $100 that pairs perfectly with this kind of weekend makeover. And if you love the idea of a moody small bathroom makeover, you’ll definitely want to check that out too — there are some great color ideas over there.
In this post I’m going to walk you through every single step I took, including all the little tips and tricks I picked up along the way. Whether you’re a complete beginner or you’ve tackled a few DIY projects before, I promise this is more doable than it looks. Let’s get into it.
Step 1: Prepping and Protecting the Bathroom Before You Touch a Drop of Paint
Before I did anything else, I covered everything I didn’t want paint on. I used a lightweight plastic sheeting — the kind that’s easy to cut and tape — to cover the bathroom cabinet, mirrors, and toilet. Garbage bags work just as well if that’s what you have on hand. Paint splatters everywhere when you’re rolling it onto the wall, so don’t skip this step.
I also removed all the accessories: light switch covers, tissue holder, towel ring, bath towel hooks, and shower curtain hooks. I dropped all the screws and small pieces into a clear zip-lock bag so nothing got lost. It takes time to prep properly, but trust me — I’ve learned the hard way in other rooms — it saves you so much cleanup time in the end. Since I was also redoing the floors in this project, I didn’t need to cover them, but if you’re skipping the floor portion, make sure you lay down drop cloths.
Step 2: Choosing the Right Paint and Roller Kit
For paint supplies, I grabbed a roller pack from Home Depot for about $11. It came with two roller covers, a wire frame for the roller, a two-inch angle brush, a metal tray, a tray liner, and a three-inch trim roller with frame. Honestly, it’s such a good deal that I buy one of these every time I start a new painting project and just toss it when I’m done — no fuss, no cleanup.
I was not a fan of the existing beige color in this bathroom. It made everything look yellow, and I wanted something with a cooler tone. I went with a color called White Pepper from the Behr Ultra line, sold exclusively at Home Depot. It’s an extremely light gray that actually looks white when it first goes on the wall, but once it dries next to a true white surface, you can clearly see the difference. It’s subtle, clean, and exactly the vibe I was going for in a bathroom without a window. I used a Benjamin Moore-quality approach to coverage, but stuck with Behr for this project because the price point was right.
Step 3: Painting the Walls with a Satin Finish and No Primer Needed
I chose a satin finish for the walls because it holds up really well in bathrooms — slight sheen, great coverage, easy to wipe down. The paint I used is called Behr Ultra Stain Blocking Paint and Primer in One, so I didn’t need a separate primer. It’s a huge time saver and the coverage is excellent. For the color selection, durability, and price, I think this line is hard to beat.
Instead of taping off the ceiling with painter’s tape (I’ll be honest, I’m too lazy for that), I invested in a Wooster angle brush to cut into the corners near the ceiling. The arm is flexible, it gets right into the grooves without accidentally painting the ceiling, and it only costs about three dollars. I’d used this color before in a foyer that got tons of natural light, and it looked gorgeous there. In this bathroom with no window, it still delivers that clean, calm feeling I was after.
Step 4: Cleaning and Prepping the Vanity Cabinet for Paint
Once the walls were painted, I moved on to the cabinet. I removed all three cabinet doors and brought them to my dining room where I had more space to work. Before painting anything, I cleaned all the surfaces using a DIY solution of half water, half vinegar, and one teaspoon of Dawn dish detergent. I sprayed it on and scrubbed with the scouring side of a sponge, really working it into the grooves and crevices. I also wiped under the cabinet with Comet just to make sure everything was clean.
This natural cleaning solution is my go-to for prepping any painted surface. I’ve tried other cleaners, but nothing works as well as this simple recipe. It removes all the grime and leaves a slightly tacky surface that helps the paint adhere better. One important tip: do not use Brillo pads or steel wool on wood cabinets. If small metal particles get into the wood, they’ll rust over time and show through the paint. Use the scouring side of a regular sponge instead.
Step 5: Painting the Vanity Cabinet with a Durable Color
For the cabinet, I switched from the Behr Ultra line to the Behr Marquee line because of its extra durability. Since this cabinet sits right next to the toilet, I needed a paint that could handle regular cleaning without the finish getting damaged. The color I chose is called Inked Blue — it’s just one step up from navy and it looks absolutely stunning.
For the initial coats on the cabinet base, I used a foam brush from the dollar store to apply the paint. Foam brushes don’t leave streak marks the way regular bristle brushes do, which makes them perfect for furniture and cabinet projects. For the side panels — which are wider — I switched to a foam roller brush to get a more even coat. I let each coat dry for a few hours before coming back to apply the next one.
Step 6: Spray Painting the Cabinet Doors for a Professional Finish
For the cabinet doors themselves, I used a Wagner Flexio 4000 paint sprayer. The kit comes with a large sprayer cup for bigger areas and a smaller 20-ounce detail cup, which is the one I used for the doors. I started with the inside panels first, spraying in even strokes all in the same direction, making sure all the wood was covered and the edges were hit too.
Between coats, I lightly sanded with 180-grit sandpaper and then used tack cloth to remove any dust or debris before the next coat. Tack cloth has a slightly sticky film that picks up even the finest particles, and it’s what gives you that ultra-smooth, professional-looking finish. I did three coats total on each side. There were a couple of bugs that landed on the wet paint while I was working in the garage, but a little fine sandpaper and a wipe with tack cloth took care of it. The end result was incredibly smooth — way better than brush painting alone.
Step 7: Cleaning the Cabinet Hinges with a Crockpot DIY Solution
Here’s one of my favorite little hacks from this whole project. Instead of buying new hinges, I cleaned my existing ones using my crockpot. I added four cups of water and a quarter cup of Dawn dish detergent, dropped in all the hinges and screws, set it to high, and let them soak for hours. When I came back, the water had turned brown from all the buildup — and the hinges looked brand new.
I poured out the dirty water, rinsed the hinges, scrubbed off any remaining residue, and set them on a paper towel to dry. This works just as well for kitchen cabinet hinges as it does for bathroom ones. Once they were dry, I reinstalled them on the freshly painted cabinet doors. Combined with the gold knob hardware I had picked up from Target about a year prior, the almost-navy cabinet with gold accents looked absolutely gorgeous. That gold really pops against the deep blue.
Step 8: Installing Subway Tile on the Feature Wall
This was the part I was most excited about. Instead of just painting the one wall next to the tub, I decided to tile the entire thing with white subway tiles. I used a simple anvil tile cutter — about $22 — to score and snap the ceramic tiles. I marked the halfway point on each tile, drew a line with a Sharpie (which wipes off easily with water or alcohol), and then snapped them along the score line.
For adhesive, I used Type 1 tile adhesive from Lowe’s, applied with a trowel from Home Depot, and kept 1/8-inch tile spacers in place as I went. I laid the tiles in an offset brick pattern, starting with a half tile in the corner and then alternating full tiles for the rest of each row. The subway tiles I used were $15 per box of 100 tiles — an incredible deal. One important tip: wipe off any tile adhesive that drips onto the face of the tiles immediately. Once it dries, you need a nylon brush on a drill to get it off, and that’s just not worth the hassle. Wipe as you go and save yourself the headache. If you want more ideas on where subway tile and similar materials can work wonders, check out my post on 8 DIY home improvement projects on a budget that transform your space.
Step 9: Installing Peel-and-Stick Vinyl Flooring
For the floors, I went with a Grecian marble vinyl peel-and-stick flooring tile, also from Lowe’s. These are a fantastic option for a bathroom makeover on a budget — way less mess than traditional tile, and incredibly easy to install. I started in the corner to get a solid reference point, used a ruler to measure, and then scored along the cut line with a utility knife. The tile bends and snaps right along the scored line.
Because my existing linoleum was in good condition, I didn’t need any extra adhesive — the backing on these peel and stick vinyl floor planks is seriously strong. I tried to reposition one tile after I placed it and it was nearly impossible to lift. I also cut pieces to fit along the trim edges, and the whole floor went down quickly and cleanly. The marble look really elevated the space and tied in beautifully with the white subway tile. I’ve also used luxury vinyl plank flooring in other rooms, but for a small bathroom like this, the peel-and-stick option is my top pick.
Step 10: Grouting the Subway Tile
Once the tile adhesive had dried and the floors were in, I came back to grout the subway tile wall. I used Bright White grout from Home Depot. Fair warning: the grout dries a shade darker than it looks on the label, but I was actually happy about that — I wanted some contrast so the tile pattern would really show up against the light gray wall.
Instead of using the traditional grout float tool, I prefer to apply grout with my hands and a glove. I feel like I have way more control that way, especially when trying to work grout into the narrow joints between tiles. After spreading the grout, I used a grout sponge and a bucket of clean water (sitting in the tub) to wipe the excess off the tile faces. I also ran my finger along each grout line to make sure the grout was set into the joint and not just sitting on top of the tile. It takes a while, but doing it right means way less cleanup later.
Tips and Best Practices for a Bathroom Makeover Under 300 Dollars
Here are the key takeaways I’d want you to remember from this project:
Prep is everything. Covering surfaces, removing hardware, and cleaning before painting will save you hours of cleanup. Use the vinegar-water-Dawn solution on cabinets — it outperforms most commercial cleaners and leaves a better surface for paint adhesion. Always keep a microfiber cloth nearby while you work.
Use the right paint for the right surface. Wall paint and cabinet paint aren’t the same. I used Behr Ultra for the walls (paint and primer in one) and stepped up to Behr Marquee for the cabinet because it’s near the toilet and needs to hold up to cleaning. And always use foam brushes or a paint sprayer on cabinets — no bristle brush streaks. A quality paintbrush is worth it for trim and corners though.
Subway tile is a budget superstar. At $15 for 100 tiles, white subway tile is one of the best value upgrades you can make in a bathroom. The brick offset pattern looks intentional and high-end even though it’s completely beginner-friendly. Use a tape measure to plan your layout before you start and pre-cut your half tiles to speed up the process. And always wipe tile adhesive off the face of tiles immediately — don’t let it dry on there.
Don’t underestimate peel-and-stick flooring. The right peel-and-stick product over a clean, flat surface holds incredibly well and looks amazing. It’s my favorite low-mess flooring option for bathrooms. Just make sure your subfloor or existing floor is in good shape and clean before you stick anything down.
Reuse and refresh before you replace. Those gold cabinet knobs from Target? I reused them. The cabinet hinges? Cleaned in a crockpot and reinstalled. You don’t always need to buy new hardware — sometimes a good clean and a coat of paint is all it takes to make everything look brand new.
FAQ: Bathroom Makeover Under 300 Dollars
Can I really do a full bathroom makeover for under $300?
Yes, absolutely — and this project proves it. By combining a fresh coat of paint on the walls and cabinets, affordable subway tile, peel-and-stick vinyl flooring, and reusing existing hardware, I transformed my kids’ bathroom without going over budget. The key is being strategic about where you spend and where you save.
Do I need special tools to install subway tile?
Not really. An anvil tile cutter (around $22) handles straight cuts on ceramic subway tile just fine. For cuts around outlets or fixtures, you’d need a wet tile saw, but for a simple feature wall, the manual cutter is all you need. A basic trowel and tile spacers round out your supply list.
What’s the best paint finish for a bathroom?
I always recommend satin finish for bathroom walls. It has a slight sheen that makes it easy to wipe down, holds up to moisture better than flat or eggshell, and still looks clean and classic. For cabinets, go semi-gloss or use a line like Behr Marquee that’s specifically formulated for high-traffic surfaces.
Is peel-and-stick flooring durable enough for a bathroom?
In my experience, yes — as long as the existing floor is clean, flat, and in good condition. The adhesive on quality peel and stick vinyl floor planks is really strong. I could barely lift a tile once I’d placed it. For a bathroom that doesn’t flood regularly, this is a durable, beautiful, and budget-friendly flooring option.
Conclusion: Your Bathroom Can Look This Good for Under $300
I am genuinely thrilled with how this bathroom turned out. The light gray walls, the navy blue cabinet with gold hardware, the white subway tile feature wall, and the marble-look vinyl floor all work together to create a space that looks like it cost thousands — not hundreds. My son’s reaction when he saw it said it all: “It looks like bricks, Mommy!” That’s a win in my book.
If this kind of transformation is possible on a tight budget in a windowless kids’ bathroom, imagine what you can do in your space. And if you’re looking for even more ways to stretch your renovation dollars, my guide on budget home improvement DIY ideas that save thousands is a great next read. You’ve got this — grab that roller and get started!