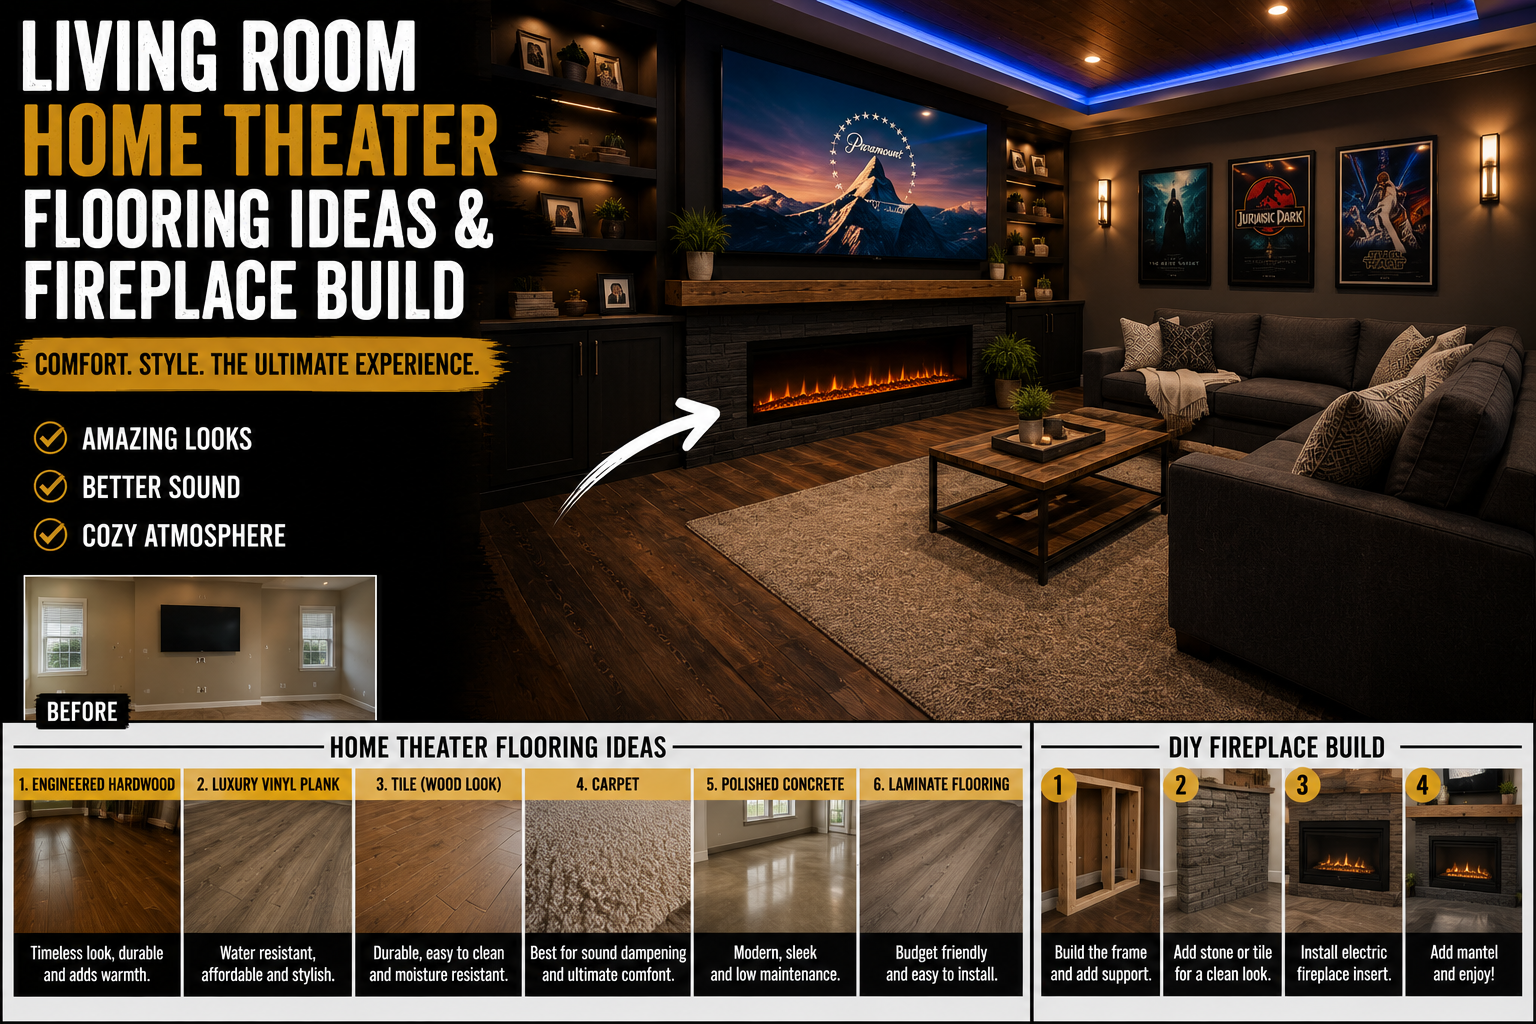
If you’ve been following along with my home renovation journey, you know I’ve been grinding through this older house one project at a time. Well, friends — we now have an IMAX theater in our living room, and I could not be more excited to share the full story. From refinishing original hardwood floors to building a full fireplace surround from scratch, this space has completely transformed into something I’m genuinely proud of.
In this post, I’m walking you through every step of this project: the flooring reveal, the fireplace design and planning process, framing, finishing, and finally mounting what I can only describe as a cinema-worthy TV. Whether you’re here for living room home theater flooring ideas or you want to tackle your own fireplace build, I’ve got you covered. And if you love budget-friendly renovations, be sure to check out my post on budget home improvement DIY ideas that save thousands — it pairs perfectly with everything I’m doing here.
This project was such a joy to work on, and it reminded me why I fell in love with woodworking in the first place. Let’s get into it.
Revealing the Original Hardwood Floors From the 1950s
Okay, let’s start with the moment that honestly set the tone for this entire room transformation. The floors in this living room were hiding underneath floating laminate the whole time — and when I had a local flooring professional come in to refinish, restore, and stain the original hardwood from the 1950s, I was absolutely blown away. These floors look so good it’s almost unfair.
The vibe I was going for in this room was dark floors and bright walls, and these refinished hardwoods delivered exactly that. They’re rich, they’re warm, and they bring so much character to a space that had been hidden under outdated flooring for who knows how long. If you’re considering your own living room home theater flooring ideas, I’d strongly encourage you to check what’s already underneath your existing floors before you go buying anything new — you might be sitting on a gold mine. For more flooring inspiration, peel and stick budget makeover ideas are also worth a look if refinishing isn’t in the cards for your space.
Planning the Fireplace Design on the iPad
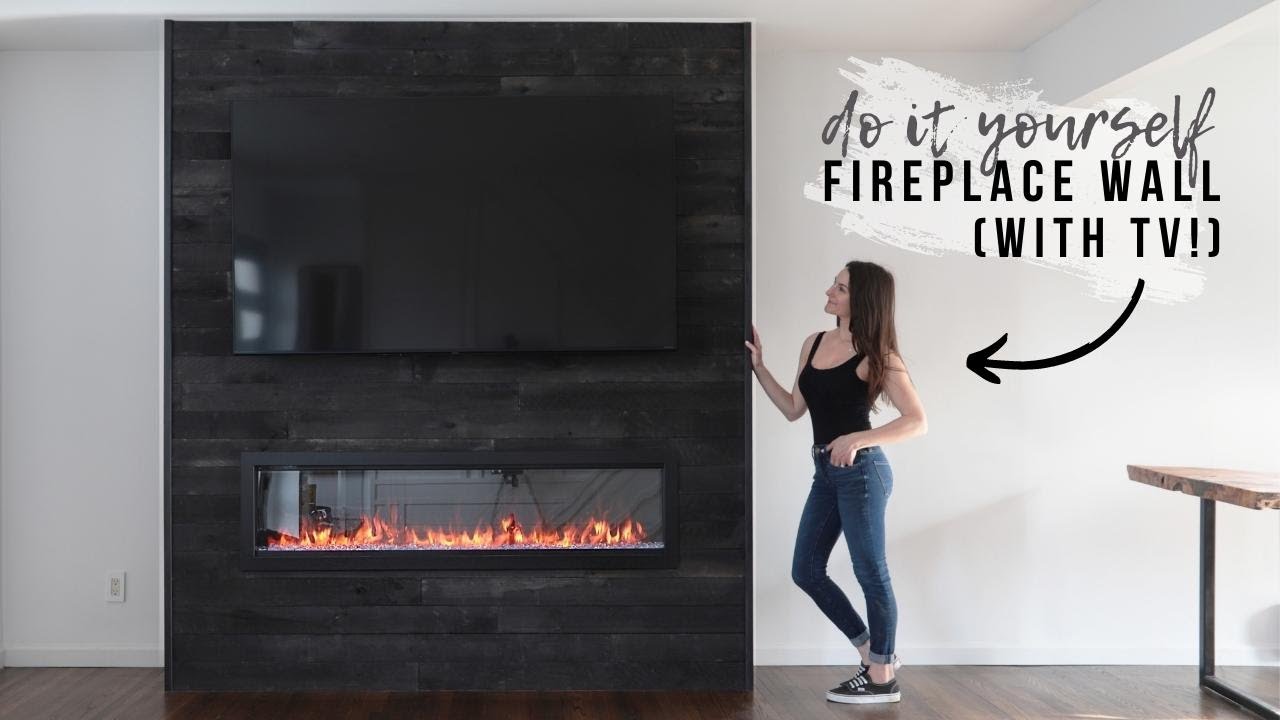
Once the floors were done and looking absolutely delicious, my focus shifted completely to the fireplace wall. My partner Chris and I had talked about wanting a fireplace to hang our TV on since before we even bought the house — it was one of those dream-house wishlist items. So I took photos of the space, brought them into my iPad, and started sketching out what I wanted it to look like.
The design goals were clear: large and in charge, a real focal point, and a black rustic wood aesthetic that felt moody and intentional. This is the first wall you see when you walk into the house, so it needed to make a statement. I wasn’t totally sure about a mantle yet (more on that later), but I knew the overall vibe I was going after. Planning this out visually before touching a single piece of wood saved me a ton of headaches down the line.
Choosing an Electric Fireplace Insert Over Gas
Here’s a decision I want to be really transparent about because it could save you thousands of dollars. Our house actually has a gas hookup, so a gas fireplace insert was totally on the table. But the wide format inserts we wanted were running anywhere from $4,000 to $8,000 — and that just wasn’t in the budget. So I made the call to go with an electric fireplace insert instead.
Yes, I splurged a little on the electric unit I chose, but it was still significantly cheaper than the gas alternatives. And honestly? The result is stunning. The insert I ordered is very wide — wide enough that it may have influenced a certain someone’s TV size request — but we’ll get to that. If you’re building your own home theater setup and want to keep costs in check, the electric route is absolutely worth considering.
Measuring the Space With a Digital Laser Measure
One thing I’ve learned the hard way living in an older home is that nothing is straight. The walls aren’t plumb, the floors aren’t level, and if you assume they are, your project will fight you the whole way. That’s why having the right measuring tools made such a difference on this build.
I used the Dremel Home Solutions 3-in-1 Digital Laser Measure throughout this project, and it was a genuine lifesaver. It has a laser measuring mode for distance and area, a tape adapter for short distances, and a wheel adapter for measuring uneven surfaces — which was perfect for my not-so-level floors. I was able to get measurements accurate to within an eighth of an inch, which meant I could cut my frames to exactly the right height without scraping the ceiling. I also used it to determine the ideal width of the fireplace. I originally planned for 70 inches wide to accommodate the 60-inch insert, but after measuring to the nearest studs, I ended up going with 82 inches — and I’m so glad I did.
Building the Fireplace Frame With 2x4s
With my measurements locked in, it was time to start framing. I built the two sidewalls first, using regular wood screws, and then attached them directly to the wall through the studs. I used a level constantly during this process — with uneven floors and walls, you can’t just eyeball it and hope for the best. Once the side walls were secured, I built the large front framed wall separately, which included the opening for the fireplace insert based on the specs that came with the unit.
One thing I’d strongly recommend to anyone doing a similar build: double, triple, and quadruple check the dimensions of your specific fireplace insert before you start framing. Every unit is different, and the last thing you want is to finish your frame and discover the insert doesn’t fit. I also built in a small nook at the top of the front wall to house all the entertainment system components that would sit behind the TV — a practical detail that made a huge difference in keeping the finished look clean. You can grab 2×4s for this kind of framing project easily online or at your local hardware store.
Painting the Frame Before Adding Planks
Here’s a pro tip I’m really glad I didn’t skip: paint your frame before you attach the wood planks. The reason is simple — if there are any small gaps between boards after you install them, you won’t see the bare wood underneath because the frame behind it is already painted to match. It’s a small step that makes a big visual difference in the finished product.
I had my friend Jocelyn come over to help with this step, and honestly, it turned one of those tedious solo tasks into one of the highlights of the whole project. Teamwork seriously makes the dream work. We knocked out the painting so much faster together, and having good company while you work on a big project is genuinely underrated. I used leftover sample paint I already had in my closet, which also meant this step cost me essentially nothing.
Adding the Black Rustic Wood Planks
This was the moment I had been most excited about — adding the charcoal black wood planks to the face of the fireplace. I mixed up all the boxes before starting so that I was pulling boards randomly, which prevented any obvious patterns from forming across the surface. I used a level on every single row to make sure everything stayed straight as I worked my way up.
For cuts, I used my Dremel Ultra Saw cordless compact saw, and being battery-operated meant I wasn’t tripping over cords in my makeshift kitchen workshop (my actual workshop isn’t set up yet in the new house). I attached the planks using my brad nails straight into the two-by-four studs behind them. I started with just the bottom half first so I could still reach around to install the fireplace insert before finishing the top — smart sequencing that saved a lot of frustration.
Installing the Electric Fireplace Insert
Installing the actual fireplace insert was definitely a two-person job — this thing was heavy. I called in my dad for backup, and I’m so glad I did. I’m not going to go into all the specifics of how we installed it because every unit will have its own process and requirements, but the key takeaway is: don’t try to muscle a heavy insert in by yourself. Get help, take your time, and make sure it’s properly seated before you finish the surrounding planks.
Once the insert was in, I went back and finished installing the upper half of the planks around it. Seeing everything come together at this stage was one of those moments in a project where you just stop and stare because it’s actually starting to look real. I had to do a happy dance — it’s basically mandatory at that point.
Handling the Corners With Color-Matched Molding
Here’s something I didn’t anticipate: the boards I was using were warped enough that mitered corners weren’t going to look great. So instead of fighting that, I picked up some corner moldings from the hardware store and had the planks color-matched there to get three different shades of blacks and grays.
I painted those corner pieces in those varying shades to add texture and make them look like aged, weathered wood — similar to the main planks. After installing them, I stepped back and felt like they were a touch lighter than I wanted, so I went back in with a dry brush dipped in dark black paint to add more depth and texture. They blended in beautifully. I also framed out the entertainment nook and painted any exposed edges for a clean, cohesive finish. It’s those little details that take a project from “looks DIY” to “looks intentional.”
Building the Hidden Access Panel
Okay, this is one of my favorite little details on the whole build. Behind the fireplace, there’s a gap between the structure and the wall, and I wanted to be able to access that space if I ever needed to — whether for wiring, components, or (most importantly) snack storage. So I left three rows of planks unattached, connected them together using some 1×2 boards on the back (similar to how I’ve built custom signs before), and created a removable access panel.
It just slides right in and out of place. It doesn’t line up with surgical precision, but I left extra wiggle room on purpose in case anything shifts over time. And honestly, you’d never know it was there — it’s wedged between the wall and the fireplace, and there’s a plant going in front of it anyway. Practical, hidden, and just a little bit fun.
Adding Extra Studs for TV Mount Support
In the middle of the night (because that’s when all the best project ideas hit), I woke up realizing I needed to add some extra stud support behind the area where the TV mount would go. Even if the existing framing was solid, I wanted extra insurance for mounting what was shaping up to be a very large screen.
So the next morning I doubled up on supports in that section, painted them to blend in, and then got back to finishing the planks. It was a small extra step, but peace of mind when you’re hanging a massive TV is absolutely worth the 30 minutes it took. If you’re building your own home theater wall, always overbuild your TV mount support — you won’t regret it. For more ideas on media wall builds, check out my post on the family room makeover with dark accent shelves and media wall build.
Mounting the TV — The IMAX Theater Moment
So. I let Chris choose the TV size. That’s all I’ll say about that decision-making process. We now have what I can only describe as an IMAX theater screen in our living room. I’m still on the fence about the size, but the wall and fireplace surround? Absolutely not on the fence about those. They look incredible.
A large-format TV mounted above a dramatic fireplace surround, flanked by those dark rustic wood planks, against bright walls, over refinished 1950s hardwood floors — this room has become exactly the moody, cinematic living space we dreamed about. If you’re building out your own living room home theater setup, this combination of materials and design choices delivers serious bang for your buck.
Tips and Best Practices for Living Room Home Theater Flooring and Fireplace Builds
Check under your existing floors first. You may have original hardwood hiding underneath laminate or carpet that can be refinished for a fraction of the cost of new flooring. It’s worth pulling up a corner to look before you buy anything.
Plan your design visually before cutting anything. Sketching on an iPad, paper, or even a napkin helps you catch proportion issues before they become expensive mistakes. Take photos of your space and doodle over them.
Use a digital laser measure in older homes. Nothing in an old house is level or plumb. A laser measure gives you accuracy that a standard tape measure simply can’t match in uneven spaces.
Paint your frame before installing planks. Any small gaps between boards will reveal dark, painted framing instead of bare wood — a small step with a big visual payoff.
Mix your plank boxes before installing. This prevents obvious repeating patterns and gives your finished wall a natural, random look that feels more authentic.
Overbuild your TV mount support. Doubling up on studs behind the mount area adds almost no time or cost but gives you serious peace of mind when hanging a heavy TV.
Get help for heavy installs. A fireplace insert is not a solo job. Call a friend or family member — it’s safer, faster, and more fun.
Frequently Asked Questions
What is the best flooring for a living room home theater?
Original hardwood floors refinished to a dark stain are my top pick — they look stunning, are durable, and add real value to your home. If refinishing isn’t an option, luxury vinyl plank is an excellent alternative that’s waterproof, durable, and easy to install yourself. It handles the heavy foot traffic of a home theater space really well and comes in beautiful dark wood tones that complement a dramatic media wall.
Is an electric fireplace insert a good choice for a home theater wall?
Absolutely. Electric fireplace inserts are significantly less expensive than gas inserts, especially in wider formats. They’re also easier to install (no gas line required), come in a huge range of sizes, and many include ambient lighting effects that enhance the home theater atmosphere. Just make sure you read the dimensional specs carefully before building your surround frame.
How do I make sure my TV mount is secure on a DIY fireplace wall?
The key is hitting actual studs — or in my case, adding extra framing specifically for the mount. I doubled up on supports behind the mounting area before finishing the planks, which gave me a solid, beefy anchoring surface for even a very large TV. A laser level is also invaluable for making sure your mount goes up perfectly straight.
How do I match corner trim to dark rustic wood planks?
Take a plank sample to your hardware store and ask them to color-match paint in multiple shades — I went with three different blacks and grays. Paint the corner molding in those varying shades with a dry brush technique to add texture, then after installing, go back in with dark black paint on a dry brush to add depth and blend. It takes a little patience but the result looks like genuinely aged wood.
Ready to Build Your Own Living Room Home Theater?
This project — from the refinished hardwood floors to the custom-built fireplace surround to the cinema-sized TV — has completely transformed our living room into the kind of space we always dreamed about having. And the best part? I did the vast majority of it myself, with a little help from my dad, a good friend, and a very unhelpful dog named Titan.
If you’re inspired to tackle your own living room home theater flooring ideas or fireplace build, I hope this walkthrough gave you the confidence to go for it. Start with what’s underneath your floors, plan your design before you cut anything, and don’t be afraid to build something big and bold. If you want more inspiration for transforming spaces on a budget, my guide on attic home theater conversion DIY is packed with ideas, and my home improvement projects that make a big impact fast post will keep the momentum going.
Until next time, friends — happy DIYing!