If you’ve ever dreamed about having a hidden room tucked behind what looks like a solid wall, I’m here to tell you it’s absolutely doable — and it doesn’t have to look like something out of a haunted house movie. I recently tackled one of my favorite builds to date: a secret room hidden shelf wall made from reclaimed heart pine, complete with a biometric fingerprint lock. The result looks like a stunning offset wooden panel wall, and you’d never guess a door is hiding in plain sight.
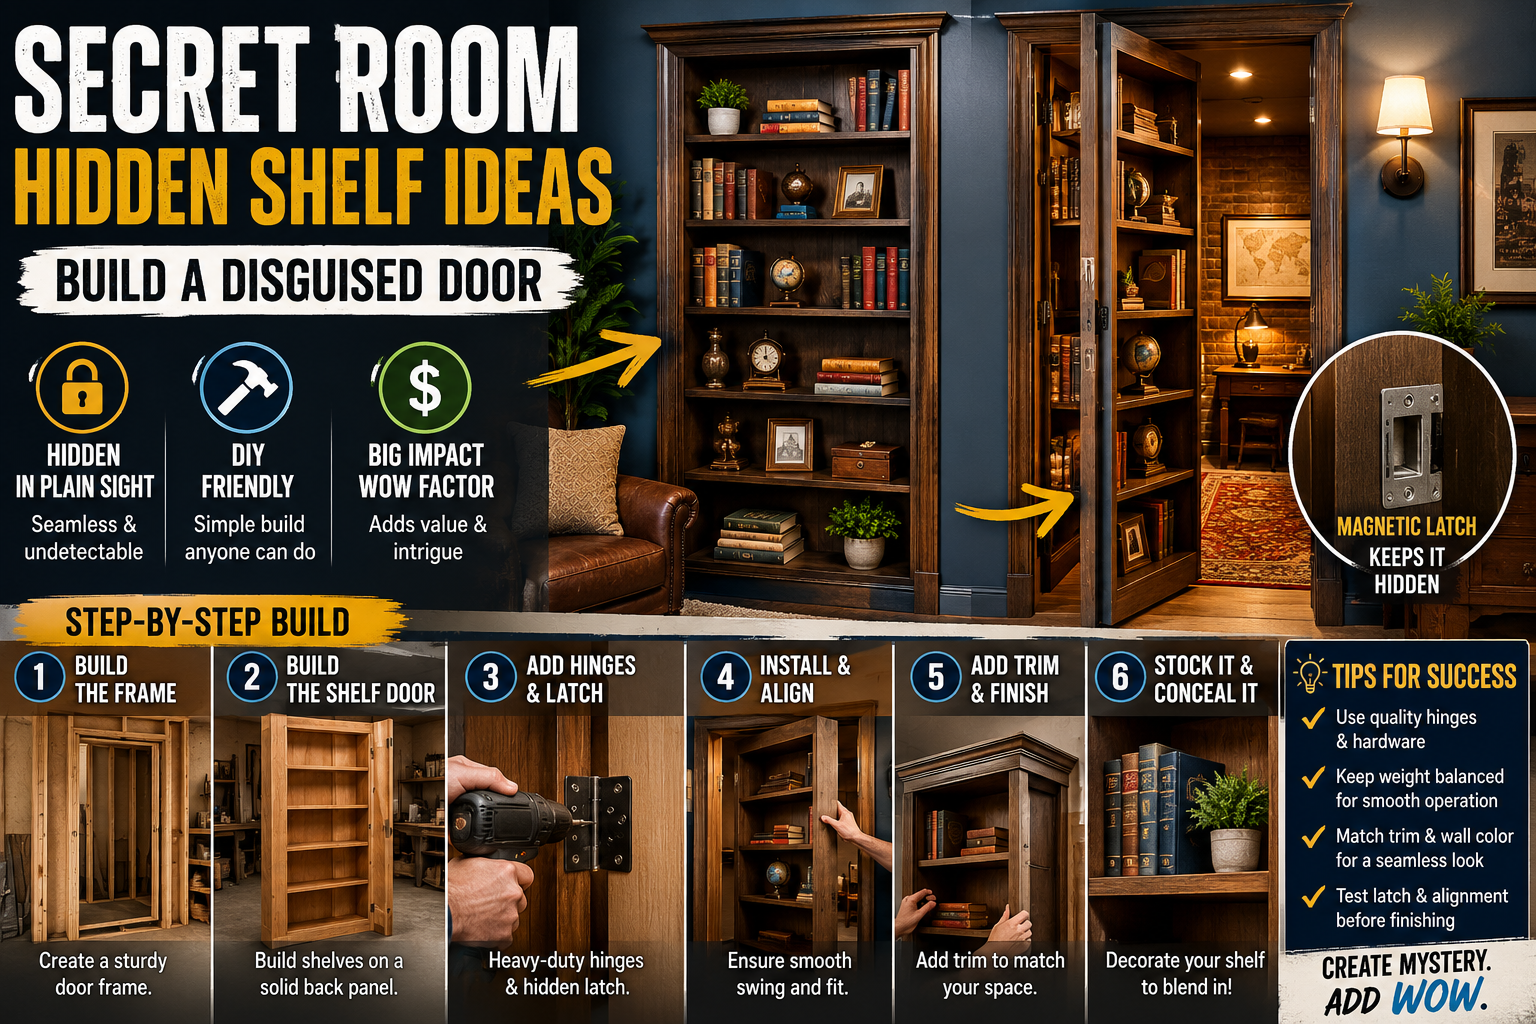
This project grew out of a storage room I had already framed up in my workshop space. I had always planned to turn it into an office someday, but I figured — why do something normal when you can do something awesome? Instead of hanging a pre-made door, I decided to completely disguise the entrance as a decorative wood panel wall. If you love the idea of maximizing hidden space in your home, you might also want to check out my guide on Secret Passage Hidden Room DIY: Build Your Own Bookcase Door for another approach to this concept.
Below I’m walking you through every step of this build — from framing the pivot door to cutting the half-lap notches to hiding the fingerprint reader inside a fake knot in the wood. There’s a lot of detail here, so settle in. Let’s get into it.
Planning the Hidden Room Concept
Before I touched a single board, I had to decide what kind of hidden door I actually wanted. Most secret room builds you’ll find online rely on a bookshelf that swings open — which is cool, but I wanted something that looked completely different. My goal was a wall made of solid offset wooden panels where a door would magically appear with zero visual indication that anything was there. No handles, no hinges, no hardware visible from the outside.
The space I was working with was already framed up with a rough opening sized for a standard pre-hung door. My first step was to rethink that opening entirely. I decided to make the door smaller — closer to a restroom door in size — and to frame it in a completely non-standard way. Instead of building the frame the traditional way, I oriented the framing sideways. That single decision is what makes the whole visual trick work: the door only protrudes an inch and a half from the wall plane when it swings open, rather than a full three and a half inches. That slim profile is what allows the offset panel boards to overlap seamlessly without revealing the door’s presence.
Framing the Pivot Door the Right Way
The framing for this door is what I’d call unconventional, and it’s the most critical part of the entire build. Because I wanted the wall boards to run horizontally across both the door and the surrounding wall with minimal visible gap, the door itself had to pivot rather than swing on standard hinges. That meant building the frame so the door rotates on a pivot point rather than hanging from the edge.
I built the door frame flat — laying it out on the floor and using Pocket hole joinery to connect the cross boards. The key framing detail is a deliberate inch gap on one side. When I framed the wall, I left that gap between the door stop and the adjacent stud so the door has enough clearance to pivot outward without catching on the corner of the framing. If you close that gap up, the door will bind every single time you try to open it. I also used washers and spacers above and below the door — leaving about a half-inch of clearance top and bottom — to account for any warping in the reclaimed wood.
For the door itself, I added a vertical center board in addition to the horizontal boards, because I knew some of those longer horizontal slats would need to land on something in the middle. I reinforced that center board with pocket holes at each end to keep the weight manageable, since all of this reclaimed heart pine is extremely dense and heavy.
Choosing Reclaimed Heart Pine for the Wall Panels
I sourced reclaimed heart pine for this entire wall, and I cannot recommend this material enough for a project like this. Virgin-growth heart pine is one of the densest domestic woods you can find — it weighs nearly four pounds per square foot. The reason for that density is the incredibly tight growth rings and high resin content. When I compared a three-quarter-inch piece of heart pine to a standard inch-and-a-half 2×4, the heart pine had over ten growth rings in that narrow slice, while the 2×4 had only five. All that space between growth rings in standard lumber is sapwood — that’s what makes regular pine soft, light, and prone to warping.
The trade-off with heart pine is weight. This wall ended up being genuinely heavy, which is why the pivot framing and door reinforcement were so important. I did a light skip planing pass on the reclaimed pieces to clean them up while keeping the rustic character and patina intact. I wasn’t going for a perfectly smooth look — I wanted the texture and history of the wood to show through.
Ripping and Cutting the Panels to Size
Once I had my material selected, I ripped everything down to a consistent five-and-a-half-inch width on the table saw. Consistent width is non-negotiable here — if your boards vary even a little, you’ll end up with irregular gaps that break the illusion of a solid wall. Since the reclaimed material had varying widths to begin with, this step took some time but was absolutely worth it.
I ended up with eight different length cuts for this wall, ranging from around 18 inches to just over 41 inches. I laid out a sacrificial board across the saw as a reference and marked all eight measurements on it before processing my pile, so I could quickly identify whether any offcut was long enough to be reused elsewhere. To make all the crosscuts, I used a jobsite miter saw — and was genuinely surprised at how well it held up through 200-plus cuts on a single battery charge. For a battery-powered tool cutting dense heart pine, that’s impressive performance.
Cutting the Half-Lap Notches — The Secret to a Seamless Door
This is the detail that makes the whole hidden door concept actually work, and it took me a bit of experimentation to figure out. If you just butt-joint your horizontal boards flush across the door and wall, there’s no room for the door to swing open — the boards will collide. The standard solution used in most bookshelf-style hidden doors is to use trim pieces to cover the gap at the door’s edge. I wanted to avoid any visible trim line, so I went a different route: a modified half-lap joint on the ends of every board.
I cut notches on the ends of each board using a half-inch dado stack on my table saw. Some notches face outward and some face inward, depending on whether that board belongs to the door or the fixed wall. When the door is closed, the notched ends interlock and the wall looks completely continuous. When the door pivots open, those notched ends slip past each other cleanly, leaving only a tiny gap that actually looks intentional — like a design detail rather than a door seam. I ended up with eight different board sizes, each needing specific notch orientations, so staying organized during cutting was critical.
Installing the Boards From the Bottom Up
Installation starts at the bottom and works up, beginning at the pivot edge of the door where the tolerances are tightest. That’s your reference point — everything else has to align to that edge. I worked my way across both the door and the fixed wall simultaneously, constantly checking that the interlocking notches were lining up correctly as I went higher.
One issue I ran into near the top of the door opening: the header. Any board that extends above the header height will catch when the door swings inward. I caught this mid-installation and had to rip down an entire row by about a quarter inch. Not a huge deal, but it’s something to plan for before you start installing rather than after. Measure your header height carefully and account for it in your cut list from the start.
Adding Trim and Finishing the Wall
With all the horizontal slats in place, I added trim pieces in the corners and along the top to give the wall a clean, finished look. The goal was to make the whole assembly look like an intentional architectural feature — a decorative offset panel wall — rather than something built to hide a door. When you step back and look at it, that’s exactly what it reads as. There’s nothing that says “door here.” It just looks like a really cool wood feature wall.
If you enjoy built-in wood feature walls and want to see more approaches like this, my post on Built In Bookshelves Home Office Storage: Full DIY Guide covers a lot of similar woodworking and installation techniques that translate well to projects like this one.
Installing the Biometric Fingerprint Lock
A hidden room needs a hidden way to open it, and I didn’t want a visible keypad or handle breaking the illusion. I landed on a biometric fingerprint reader — not because it’s strictly necessary, but because it’s genuinely cool and keeps the exterior of the wall completely clean. The challenge with fingerprint readers is that they’re round, visible devices. You can’t just surface-mount one and call the wall hidden anymore.
My solution was to follow a natural crack in the wood panel with an oscillating saw and carve out a small recessed pocket just large enough for the reader. I installed a tiny hinged access door over that pocket — it blends into the wood grain almost perfectly. The reader itself is mounted from the back: I bored a hole the same diameter as the reader into a scrap piece of wood, ran the reader through it, and fastened the whole assembly from behind. From the front, all you see is a subtle panel in the wood. The wire runs down to the locking mechanism concealed inside the door assembly.
The Lesson I Learned the Hard Way: Install an Interior Reader Too
Here’s a mistake I made that you absolutely need to avoid: I installed the latch mechanism and got it dialed in perfectly — so well, in fact, that it latched while I was standing inside the room with no tools and no interior release. I locked myself inside my own hidden room. The fingerprint reader was on the outside only, and I had no way to get out.
After getting out (with help), I worked with a locksmith contact to find the right solution. The answer is to install linked fingerprint readers on both the interior and exterior, wired to two locks that both readers can activate. That way you can enter and exit using your fingerprint from either side. I’ll link to the specific hardware bundle I used in the resources below — if you’re building anything like this, don’t skip the interior reader. Learn from my mistake.
Tips and Best Practices for Building a Secret Room Hidden Shelf Wall
After completing this build, here are the key takeaways I’d pass along to anyone attempting something similar. Frame your door sideways — it’s the single most important structural decision and the reason the wall can look seamless. Always leave clearance gaps at the top, bottom, and pivot side of the door for wood movement and swing clearance. Cut a consistent board width before anything else; inconsistent widths will haunt you during installation. Plan your notch orientations on paper before cutting — with eight different sizes and two notch directions, it’s easy to cut a batch wrong if you’re not methodical.
For the locking system, always install readers on both sides — inside and outside. Use a Pocket hole joinery system for assembling the door frame flat, which makes it far easier to keep everything square. When working with reclaimed wood, do a light skip-plane pass to normalize the thickness without losing the character of the material. And finally — test your door swing completely before installing the final row of boards at the top. Catching a header clearance problem at row two is much easier than catching it at row twelve.
Frequently Asked Questions
How hard is it to build a hidden pivot door wall like this?
It’s an intermediate-to-advanced DIY project. The framing and door construction require careful planning and precise cuts, but there’s nothing here that requires professional carpentry skills. If you’re comfortable with a table saw, a miter saw, and basic framing techniques, you can pull this off. The most important thing is understanding the pivot framing concept before you start — once that clicks, the rest follows logically.
Can I use regular lumber instead of reclaimed heart pine?
Absolutely. Standard lumber will work fine and will be significantly lighter, which is actually easier on your pivot hardware and hinges. The trade-off is aesthetic — reclaimed heart pine has a character and density that’s hard to replicate with new lumber. If you go with standard pine or cedar, consider a distressing technique or a stain to add some visual depth. Just make sure whatever you use is dried and stable before you install it, since a warped board in a door assembly is a real headache.
What kind of lock works best for a hidden room door?
For a truly seamless look, a biometric fingerprint reader hidden behind a recessed access panel is my top recommendation — it keeps the wall surface completely clean. RFID card readers are another great option since they’re small and can be concealed fairly easily. Whatever system you choose, make sure it has both interior and exterior access capability. A latch that only releases from one side is a serious problem — as I found out firsthand.
How do I hide the gap between the door and the wall?
The half-lap notch system I used is the most visually seamless method I’ve found. By cutting interlocking notches on the ends of each horizontal board — some facing outward, some inward — the boards appear continuous across the door seam when closed. The tiny gap that remains when the door is open actually reads as an intentional design detail in the wood. The key is consistent board width and precise notch depth so everything lines up flush across the entire wall surface.
Conclusion
This hidden room build is one of those projects that looks incredibly complex from the outside but breaks down into very manageable steps when you approach it systematically. The pivot framing, the half-lap notch system, and the concealed biometric reader are all clever solutions to specific problems — and once you understand why each decision was made, the whole thing makes perfect sense. I’m genuinely thrilled with how the finished wall turned out. It looks like an architectural feature, not a door — which was exactly the goal.
If this kind of creative hidden-space project excites you, I’d also recommend checking out my write-up on Built-In Bookcase: IKEA Billy vs Custom — Which Wins? for another angle on built-in storage that doubles as a statement piece. And if you’re thinking about finishing out a larger hidden or bonus space, my guide on Basement Finishing on a Budget: How I Did It for Under $10K has a ton of practical advice that applies to any below-grade or tucked-away room build.
Have questions about any part of this build? Drop them in the comments — I read every one. And if you’re planning your own hidden room project, I’d love to see what you come up with.