If you’ve ever wanted to know how to paint like a pro without spending half your day wrestling with blue tape and still ending up with a mess, you’re in the right place. I’m Michael, and I’ve been painting walls, trim, ceilings, and everything in between for years — and I’m here to tell you that painting is genuinely the number one easiest skill you can learn as a homeowner. It also happens to be one of the highest-return investments you can make in your home. Whether it’s your interior walls, kitchen cabinets, or exterior siding, a great paint job transforms everything.
What I love about painting is that you don’t need a truck full of gear or a contractor’s license. My entire rig fits in a backpack. In this post, I’m going to walk you through every single technique I use — from loading a brush for the first time to perfecting that second-coat precision cut — so you can walk away with the skills and confidence to tackle any paint job in your home. If you want even more ways to level up your home on a budget, check out my guide to budget home improvement DIY ideas that save thousands.
No fluff, no tape traps — just real technique. Let’s get into it.
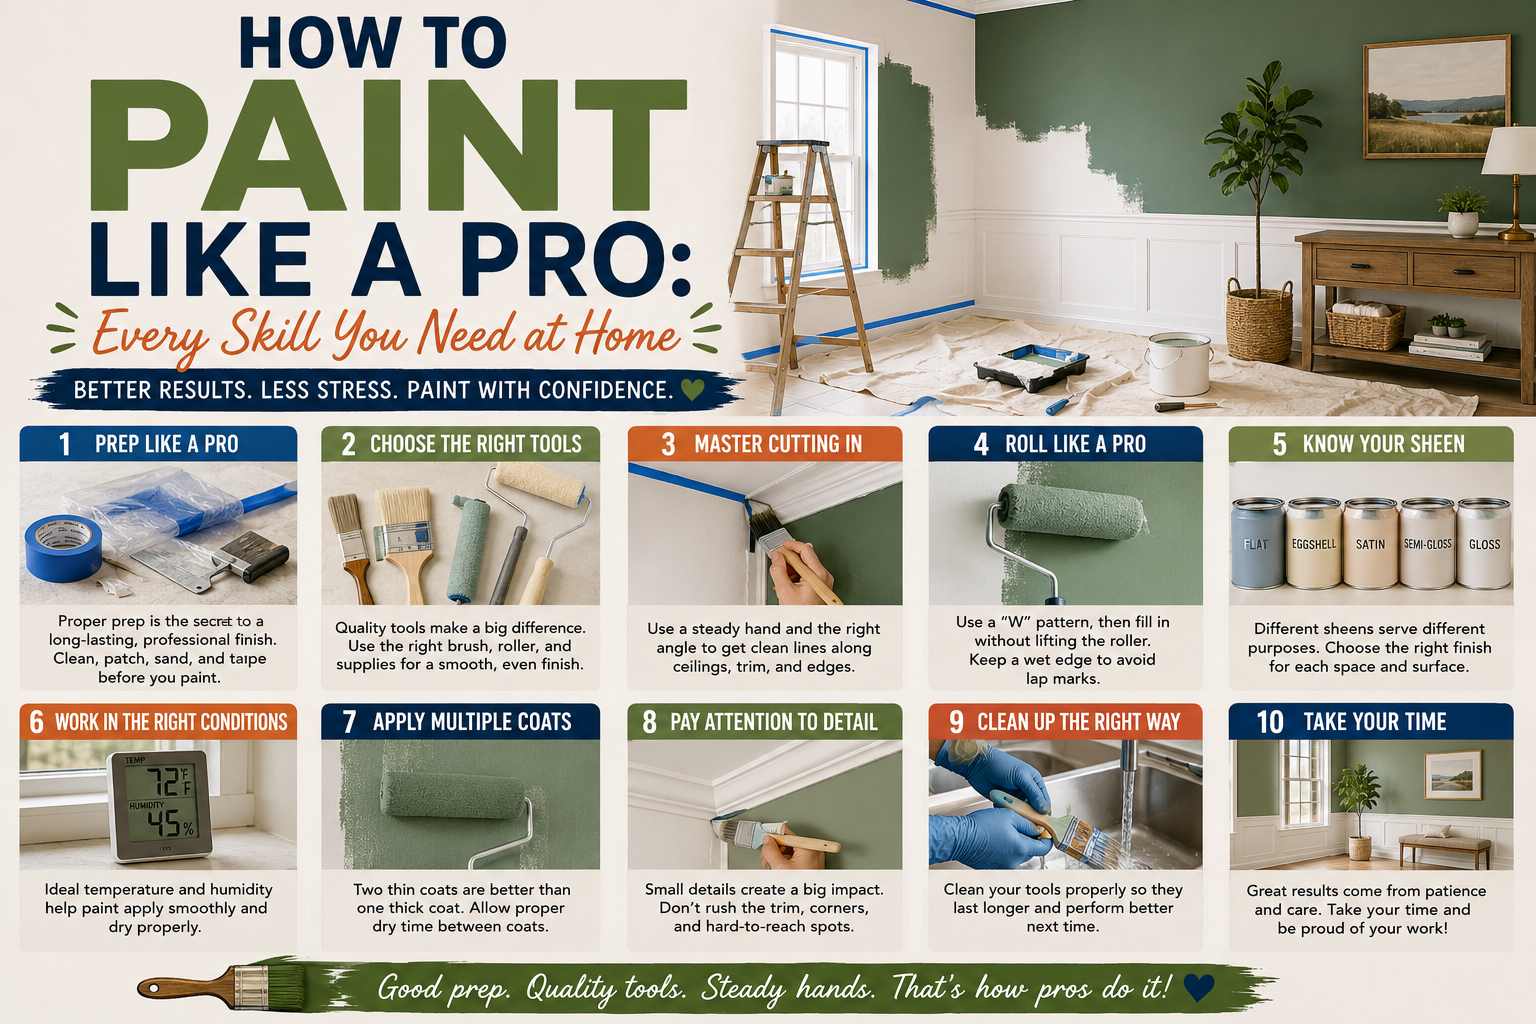
The Essential Tools You Need to Paint Like a Pro
Before I touch a wall, I make sure I’ve got the right rig. Here’s what I consider non-negotiable: a paint tray with a liner (the liner means you can throw it away when you’re done instead of scrubbing everything clean), a quality roller cage — I use the Wooster Sherlock handle, which locks in place so the handle never spins off mid-stroke — and a good roller sleeve. I personally use an 18-mil microfiber cloth sleeve because it gives the smoothest, most even finish.
You’ll also want a 3-inch angle paintbrush — you don’t have to spend a fortune, around $20 gets you a solid one. A 5-in-1 tool is incredibly useful: it works as a scraper, a screwdriver, and at the end of the day it’ll clean the extra paint out of your roller sleeve so you get nearly a quart of paint back into the can for touch-ups later. Round it out with a utility knife, a ladder if you need one, and a sanding pad. That’s the whole rig. Pack it in a bag and you’re ready to go.
Why the Extendable Roller Stick Is a Game Changer
This is the thing the painting industry never tells homeowners, and I genuinely don’t understand why. That extendable roller stick reduces your workload by 60 to 70 percent. I’m not exaggerating. When you paint by hand — holding the roller up at shoulder height like they show in every paint commercial ever made — you’re fighting gravity, straining your forearms, and working twice as hard as you need to.
With a roller stick, you keep your hands below your heart, you use two hands for control, and you get a far more even distribution of paint on the wall. This stick costs about $20 and it changes everything about how painting feels. You can work top to bottom in one smooth stroke without a ladder, and the whole job becomes genuinely enjoyable. Anyone who says they hate painting is almost certainly doing it without a stick.
Choosing the Right Paint for the Job
The single biggest thing that separates a good paint job from a bad one is the material — the paint itself. I’ve been using C2 paint for years and absolutely love it. It has high washability, great durability, and it’s perfect for high-traffic areas like hallways. What makes it special is that C2 uses a proprietary polyway hardener instead of oil-based resins, which means no supply issues and very low VOCs. Your house won’t smell like a paint factory for a week after you’re done.
If you’re shopping around, Benjamin Moore is another premium option worth considering. And if budget is a concern, Sherwin Williams paint is widely available and consistently performs well. The bottom line: don’t cheap out on paint. Good quality paint won’t drip, covers better, and dries faster. You get what you pay for.
Preparing the Room Before You Paint
Here’s where a lot of homeowners skip steps and pay for it later. Before I ever open a can, I clean the space, lay down a tarp, and — this is critical — I remove every single cover plate from the outlets and switches. Get out your knife, back out all the screws, and take them off. Do not paint around cover plates. It looks terrible and it’s just not the right way to do things.
I also take care of any areas where old paint has bled onto trim or ceilings. If there’s wall paint on your trim from a previous job, touch that up with trim paint first, even if it gets on the wall a little — you’ll be cutting a clean line over it anyway. Same goes for the ceiling. Start with a clean palette. It might feel like extra work upfront, but it’s what makes the final result look sharp and professional. For a deeper look at full room makeovers, my post on paint ideas for a home color makeover has plenty of inspiration.

Sanding: The Step Nobody Tells You About
I’m going to be real with you: the painting industry rarely teaches homeowners to sand, and I think that’s a mistake. Sanding between coats is one of the most important things you can do for the quality of your finish. Walk into any home and run your hand along the walls — if it feels gritty instead of smooth as a baby’s bum, it wasn’t sanded. That rough texture is a dead giveaway.
You don’t need expensive equipment for this. A simple sanding sponge works perfectly. Sand the walls before your first coat to smooth out any rough patches left by the previous builder (and trust me, most builders skip this step entirely). Then sand again between your first and second coats. The difference in feel and appearance is remarkable. Feel the wall before and after sanding and you’ll understand immediately why this step matters so much.
How to Cut In at the Ceiling Without Blue Tape
This is the part that makes most homeowners nervous, and it’s also the part where I see people waste hours taping off everything in sight. Here’s the truth: you don’t need blue tape if you know how to use a brush properly. On the first coat, I don’t try to nail the precision line right away. I load the brush, work about a quarter inch from the ceiling, and get the paint on without stressing over perfection. Why? Because when you’re painting a new washable paint over old flat paint, the paint doesn’t slide freely on that first coat. Trying to be too precise too early just makes a mess.
The key is patience and a light touch. Hold the brush steady, keep a consistent distance from the ceiling, and work in smooth long strokes. If the brush marks are visible after, just dust them out lightly with the tip of the brush. The precision cut comes on the second coat — I’ll cover that in detail later. This technique alone will save you massive amounts of prep time on every room you paint.
How to Cut Outside Corners Like a Professional
Outside corners are sharp edges, and a lot of people make them messier than they need to be. My technique is simple: use the heel of your brush — the wide back edge — and set it right on the corner. It’ll fan out naturally and give you a controlled ridge of paint. Draw it about a quarter inch away from the actual edge first, then come back and push that paint right up to the corner edge.
Never use a roller on an outside corner. When you stand on the other side of the wall looking back, you’ll see two different colors or textures if the corner wasn’t cut with a brush. The heel technique gives you a clean, defined edge every single time. Practice it a couple of times and it becomes second nature — no tape required.
How to Cut In at the Baseboards and Trim
Cutting in at the bottom of the wall along the baseboards is just like cutting in at the ceiling, only upside down. Get low, get your eye level close to the floor so you can see the line clearly underneath the brush, and draw that line about a quarter inch out from the trim first. Make sure you don’t have too much paint loaded in the brush for this step — excess paint will blob and spread.
Once you’ve got that initial line, come back and push the paint right down to the trim edge. If you collect too much paint at any point, pull the brush away and start that section over. Clean, patient strokes are the key. The same principle applies to any other trim in the room — window casings, door frames, all of it. Brush the areas around switches and outlet covers too, since you never want your roller getting too close to electrical boxes. Paint-splattered outlets are the surest sign of a rushed job.
How to Load and Roll Paint Correctly
Loading the roller properly takes a minute, but it matters. Push the roller into the paint tray and work it back and forth until the sleeve is fully saturated and evenly loaded. Be patient with this step — a well-loaded roller means fewer passes on the wall, better coverage, and no dry streaks. If you’re using good quality paint it won’t drip, even on a fully loaded roller.
For rolling technique, the motion is straight up and down — not a W or an M pattern like some videos suggest. Start at the top, work all the way to the bottom in one stroke, then roll back over the same section to pick up any excess paint. Stay about a half inch away from your cut-in edge so the texture blends naturally with the brushwork. Keep the roll consistent, keep the pressure light, and let the paint do the work. You’ll be amazed how much easier it is compared to painting without a stick.
Maintaining the Wet Edge While Rolling
This is one of the most important rules in painting, and it’s one I see broken all the time. There’s a concept called the wet edge — it’s the leading edge of paint that you’ve just applied, and it needs to stay wet while you’re working. If you stop mid-wall to answer the phone, make a coffee, or take a break, that edge will start to dry in just a few minutes. When you come back and roll over it, you’ll get a visible ridge line that’s incredibly hard to fix without sanding it down.
So here’s my rule: once you start rolling a wall, finish it. Don’t stop. If the phone rings, let it go to voicemail and call back when the wall is done. Modern acrylic paints can dry in as little as 20 minutes on the wall, even if the can says two hours. Those can instructions are written for worst-case conditions. In a room with air conditioning or a fan running, your working window is much shorter than you think. Keep moving, keep the wet edge alive, and the result will be seamless.
Never Change the Direction of the Roller on a Wall
This one surprised me when I first learned it, but once you know it you’ll never forget it. When you roll paint, you create a grain — a subtle texture direction in the finish. As long as you always roll in the same direction, it’s invisible. But the moment you change direction — say you go vertical on most of the wall and then switch to horizontal on a narrow section near a window — that change shows up in the finished paint. You can see it in the texture, especially in raking light.
The fix is simple: always roll in the same direction, no matter what. Even if you’re working in a tight spot next to a window with only a foot of wall space, still roll vertically with short strokes. Do not flip to horizontal just because it’s easier in that moment. Keeping that grain consistent is the difference between a paint job that looks polished and one that looks patchy.
Back Rolling to Create Consistent Texture
Back rolling is the technique of going back over a section you’ve already painted with a nearly-dry roller to pick up any excess paint and even out the texture. I do this regularly while the paint is still wet, especially if I see any saggy spots, thick areas, or places where the texture looks different from the surrounding wall.
As the roller dries out during a session, it actually becomes more effective at back rolling because it picks up excess paint from the surface rather than depositing more. The goal is to make the texture look identical across the entire wall — same sheen, same finish, same everything. Take your time with this. Painting isn’t a race. I’d rather do it slowly and get it perfect than blast through it and have to sand and repaint entire sections.
Wash Your Brush During the Job — Not After
Here’s a pro tip that most hobby painters learn the hard way: wash your brush mid-job, not just at the end. Modern acrylic paints have a lot of technology in them and they dry quickly — including in your brush. If you do all your cutting in, set the brush down, and then roll the whole room before coming back to wash up, your brush might already be compromised. The bristles stiffen, the paint starts to cure, and what was a great $20 brush is now a paperweight.
My habit is to wash the brush as soon as I’m done cutting in and before I start rolling. It takes two minutes, and it keeps the brush performing perfectly for the second coat. A good brush should last you years if you treat it right. Don’t let laziness at the end of a session cost you a tool you need for the next one.
How to Sand Between Coats for a Flawless Second Coat
About an hour after your first coat — assuming you have air conditioning or a fan running — you can sand and move to the second coat. Don’t skip this sanding step. Run your hand over the dried first coat and you’ll feel the difference from when you started. Even a smooth first coat will have some texture variation or raised fibers from the wall that need to be knocked back down.
Use a light touch with your sanding pad. After sanding, look down the wall at an angle with the light raking across it — you’ll actually be able to see where you sanded because the surface changes slightly. This is completely normal and nothing to worry about. The second coat will cover all of it. This is the secret to a finish that genuinely looks and feels like professional work. Feel the difference before and after sanding and you’ll understand why I make such a big deal about it.
The Precision Cut on the Second Coat
The second coat cut is where you get your crisp, clean lines — this is the moment where the job goes from looking good to looking great. The technique is different from the first coat because the surface now has a layer of washable paint on it, which means there’s less resistance and the brush slides much more freely. That’s actually a good thing, but it means you need less paint in the brush, not more.
Load the brush, then clean off the excess paint so the paint is loaded inside the bristles rather than sitting on top of them. Now push the brush right into the corner — the crease between the wall and the ceiling — and draw your line with the tip of the brush. Use light, consistent pressure. Don’t push too hard or move too fast or you’ll push paint up onto the ceiling. But with the right amount of paint inside the brush and a steady hand, those bristles will sit right in the corner and give you a line that looks like it was cut with a laser. This is how the pros do it — no tape, just skill.
Tips and Best Practices for Painting Like a Pro
Always remove cover plates before painting — never paint around them. Use a paint stick (extendable roller handle) on every job; it’s the single biggest improvement you can make to your technique and your comfort. Sand before you paint and between coats — this is non-negotiable for a smooth, professional finish. Never change the direction of your roller on a single wall. Keep the wet edge alive — finish the wall before you take any breaks. Wash your brush mid-job, not just at the end. Use a liner in your paint tray for easy cleanup. Invest in quality paint — the coverage and durability difference is worth every penny. And finally, do your precision cut on the second coat, not the first — that’s where your clean lines come from.
For more ideas on transforming your home with paint and simple DIY upgrades, my post on affordable home improvement projects under $100 is a great next read.
Frequently Asked Questions About How to Paint Like a Pro
Do I really need to use blue tape to get clean lines?
No — and I’d actually argue that tape slows you down and gives you a false sense of security. A 3-inch angle paintbrush and a steady hand will give you cleaner results than tape, especially once you understand the two-coat cutting technique I described above. Tape has its place in very specific situations, but for standard interior wall painting it’s mostly just wasted time and money.
How long should I wait between coats?
With modern acrylic paints and decent air circulation, about an hour is usually enough. Don’t go by the can instructions alone — those are written for worst-case conditions like old plaster walls with no climate control. In a conditioned space with a fan running, the paint dries fast. Run your hand over it and if it feels dry and no paint transfers, you’re good to sand and recoat.
What’s the best paint for high-traffic areas like hallways?
You want something with high washability and durability. C2 paint is my current favorite for this — it uses a polyway hardener instead of oil-based resins, which gives it excellent hardness and scrub resistance without the supply issues or strong fumes. Sherwin Williams paint and Benjamin Moore are also strong choices in the premium category.
Why does my paint job look uneven or patchy?
The most common causes are inconsistent roller pressure, changing the direction of the roller mid-wall, not maintaining the wet edge, or skipping the sanding step between coats. Back rolling with a nearly-dry roller to even out the texture also makes a huge difference. If you’re still seeing issues after two coats, give it a light sand and apply a third coat — sometimes certain colors or surface conditions just need the extra pass.
Final Thoughts
Learning how to paint like a pro is genuinely one of the most valuable skills you can develop as a homeowner. The return on investment is unmatched — a fresh coat of paint transforms a room faster and more affordably than almost any other project. And now that you know the real techniques — the roller stick, the two-coat cut method, the wet edge rule, sanding between coats — you have everything you need to get results that look like you hired a professional.
If this post got you fired up to tackle more projects around your house, check out my full guide to home improvement projects that make a big impact fast — there’s plenty more where this came from. Now go grab that brush, load up the roller, and get painting. You’ve got this.