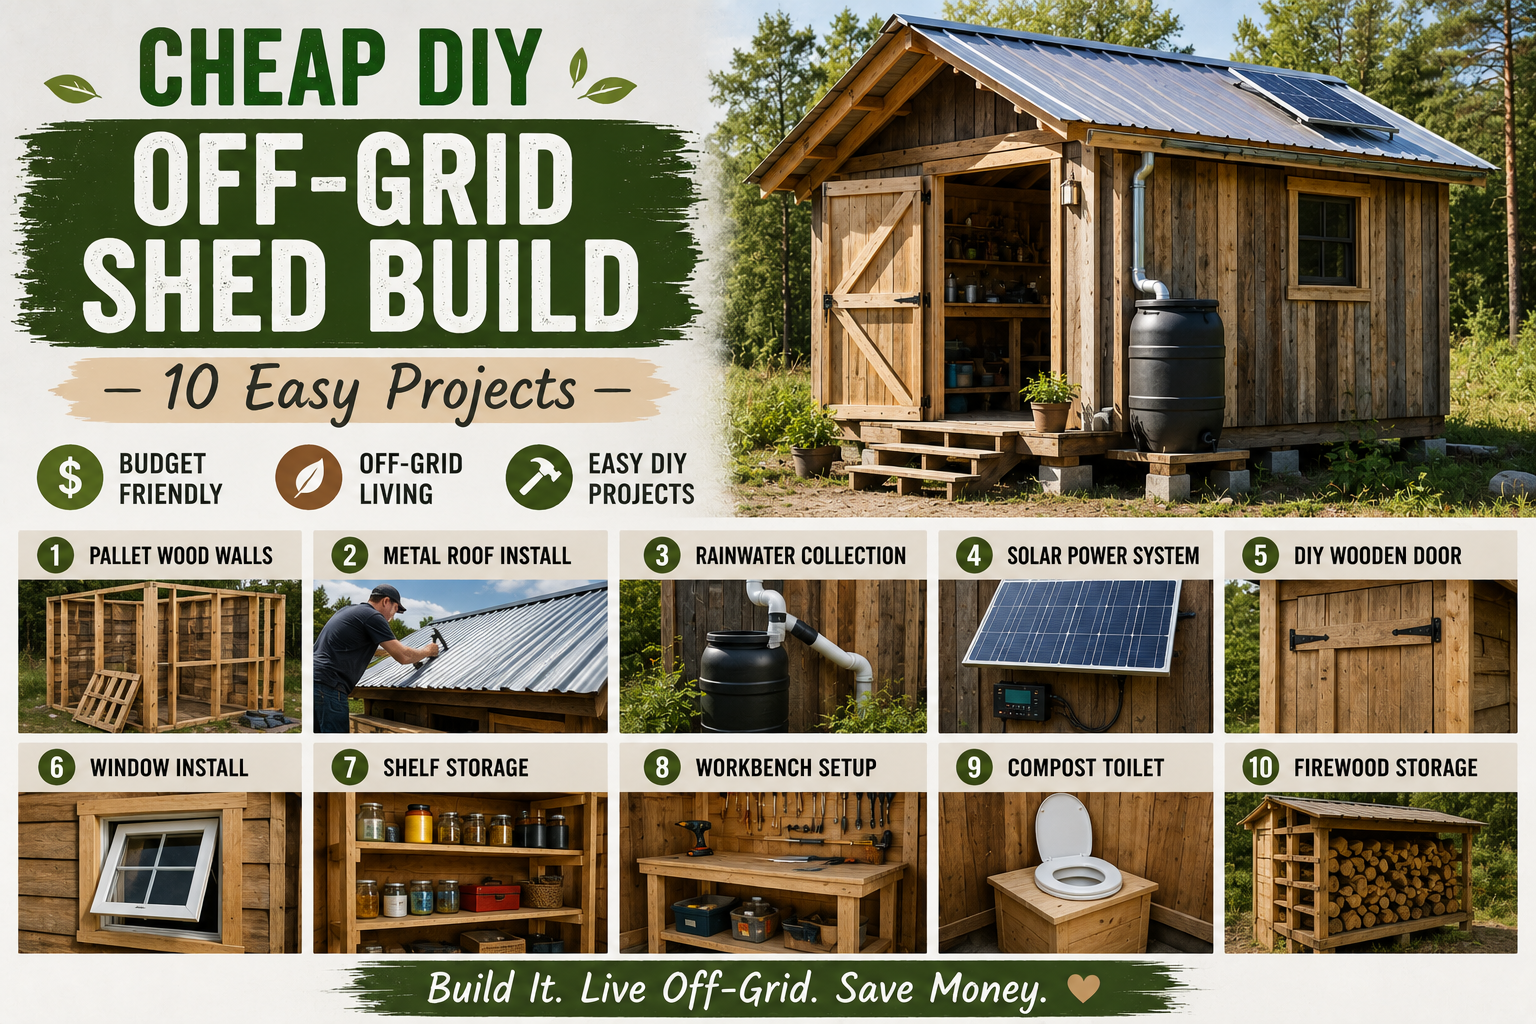
If you’ve been dreaming about going off-grid but feel overwhelmed by the cost or complexity, I’m here to tell you it doesn’t have to be that way. I’ve spent years studying and documenting the most cost-effective off-grid builds out there — from stick frame sheds to underground cisterns to DIY solar setups. In this post I’m walking you through 10 of the best cheap DIY off-grid projects so you have everything in one place.
In this post, I’m walking you through 10 cheap and easy DIY off-grid projects that I’ve actually built and use every single day. Whether you’re just starting out or looking to level up your homestead, these ideas will give you a solid foundation without draining your bank account. If you’re into budget builds, you might also love my guide on Backyard Tiny Home Build DIY: Complete Step-by-Step Guide for even more inspiration.
Let’s dig in — here are all 10 projects, straight from my own property.
1. Stick Frame Shed — The Cheapest Off-Grid Shed Build You Can Do
This is the one that started it all for me, and it’s honestly about as cheap and easy as a shed build gets. I used 18 4×4 posts spaced every eight feet so they line up naturally with the sheeting — no cutting required. I just stacked the sheets right on top, used scrap material for studs across the frame, and threw the sheets over it. That’s it.
This shed has been standing for a couple of years now out here in Arizona, surviving winds that occasionally hit over 100 miles per hour. I also built my shop over there in a very similar fashion. The lesson here is simple: you don’t need a complicated engineered structure to build something that lasts. For the frame itself, picking up some quality 2×4 lumber where needed and using joist hangers for added structural support can make a real difference on a build like this. If you want more ideas on cheap shed organization once your build is done, check out my post on 13 Cheap Shed Organization Ideas That Actually Work.
2. Rainwater Harvesting — Simple and Nearly Free
Rainwater harvesting sounds complicated but I promise it’s not. On my property, I’ve got a surface on the roof of my shed to collect rainwater. It drops into a gutter that runs all the way across the back, and that gutter slopes down to a tube that feeds directly into an IBC tote. That water then connects to my aquaponics system, which holds hundreds of gallons. All of it runs off that one simple harvesting setup.
The key details that make this work are small but important. Where the rain gutter meets the downspout, I placed a wire mesh to keep out rodents and debris. Where the downspout connects to the storage tank, I put a sock over it to catch fine particles like dust and dirt. After a while, you just pull the sock off, dump out about an inch of collected gunk, and pop it back on. The whole system is built almost entirely from scrap material, which is kind of my signature move at this point.
3. Fencing and Animal Pens — Start Simple, Upgrade Later
My current animal pen started as my very first garden. I’ve got a goat, a pig on one side, and two pigs on the other, all enclosed with simple wire mesh around the perimeter to keep mice out. I’ll be real with you — if you have a cat, you probably don’t even need the wire mesh to deal with mice and snakes. I just hadn’t been out here long when I built it and wanted the extra peace of mind.
The takeaway is to start simple and expand over time. A basic enclosure made from wire mesh and posts gets the job done on day one. You can always upgrade as your homestead grows. A good Post Pounder makes setting fence posts way faster, and if you’re dealing with harder ground, an earth drill or auger will save your back.
4. Off-Grid Garden — Grow Food in Native Soil Right Away
One thing that surprised me when I first got out here is that the native soil was good enough to plant and grow a bunch of things right away. I didn’t have to wait or do a ton of prep. The key is to just start — get a simple little garden going and then upgrade as you learn what works on your land.
One upgrade worth doing early is a hoop house, which extends your growing season well into winter. I also built a geothermal growing space that stays temperature-regulated so I can grow all year round. You can also start collecting manure from livestock — or cow pies already on your land — mix it with leftover straw, and build a compost pile. Keep turning that compost into your native soil and you’ll have a rich growing medium before you know it.
5. Swales for Water Management and Passive Irrigation
Swales are one of the most underrated tools on a homestead. My property slopes down on one side toward a pond, and I’ve built swales all the way around — along the driveway, across the fence line, and back down around to the pond. These swales direct rainwater around the homestead and put it to work instead of letting it run off.
In one section I threw sorghum seed into a swale that ran about the full length of the area, and it grew like crazy without me doing much watering at all. I also added six rows for potatoes, and my plan is to run the swale from one side of the property across to trickle down and water all six rows passively, with any overflow going to the pond. It’s free irrigation powered entirely by gravity and good planning.
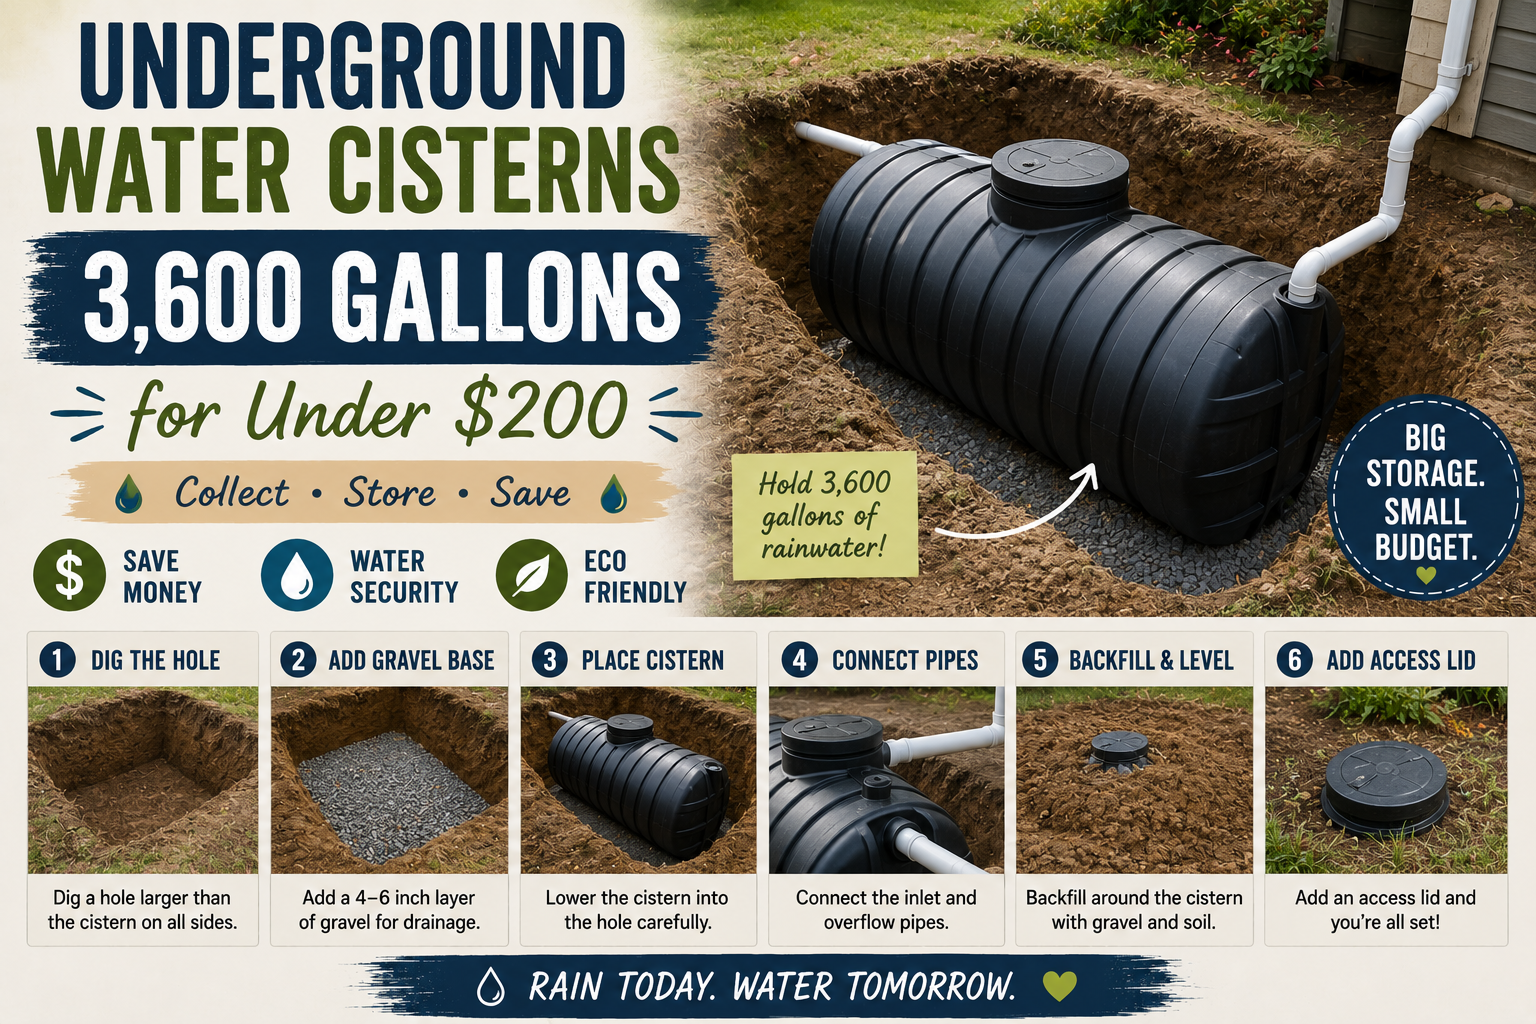
6. Underground Water Cisterns — 3,600 Gallons for Under $200
This is one of my favorite builds because the results are so impressive for the cost. I built a 3,600-gallon water cistern that’s 16 feet long, six feet wide, and five feet deep. I lined the inside with a vinyl liner, laid timber across the top with a gap for a manhole, covered everything with another liner, and then buried the whole thing in dirt. The bottom liner comes up and the top one goes down to create a sealed capsule for water storage underground.
Here’s the kicker — I made three of those cisterns for under $200 total. I have one 3,600-gallon system on each side of my property, and additional IBC totes for overflow. For water treatment, I add about a quarter cup of bleach per 330-gallon container when it’s full. That’s actually less than the CDC recommends for storage but more than enough to neutralize viruses and bacteria — and it’s still far less chlorine than what comes out of a city tap.
7. DIY Water Filtration System — Sand, Gravel, and Charcoal
Once my water is stored and treated, I run it through a homemade Berkey-style gravity filter before drinking it. The build is incredibly simple: all you need is sand, gravel, and charcoal — activated charcoal if you can get it. I actually made my own activated charcoal, which is a whole other project worth exploring.
My layering goes like this — about three inches of gravel, three inches of sand, six inches of activated charcoal, then three more inches of sand, and three more of gravel. The water flows through the whole system, I open the tap, and fill up a five-gallon container that I keep in rotation. One of these lives under the sink in my van. The activated charcoal strips out nearly all of the residual chlorine before it ever reaches my cup. It’s clean, it’s cheap, and it works.
8. Solar Power Setup — Start Small, Build Up
Solar power doesn’t have to be a massive expensive system to be useful. My current main setup is an all-in-one power station that sits right on the countertop. It charges in an hour or two off my 1,400-watt solar array, and from that one small system I run Starlink internet, my phone, my laptop, and everything else I need on the homestead.
If you want to build your own solar system from scratch, here’s the simple parts list: solar panels, a charge controller, an inverter, and a battery bank. For anyone on a budget, I strongly recommend starting with a 12-volt system. Four 100-amp-hour batteries in a 12-volt setup gives you 400 amp hours of storage — plenty to run a small homestead. If you went with a 48-volt system using those same four batteries, you’d only get 100 amp hours. The battery bank is always the most expensive part, so maximize your storage value by going 12-volt first, then expand from there. You might also want to check out my full guide on Home Backup Power System Installation: Save $10K DIY for a deeper dive.
9. Root Cellar — Built Just Like the Cisterns
I built my root cellar using the exact same method as my water cisterns — it’s basically just a hole in the ground with some structure around it. I dug it eight feet by eight feet and ten feet deep, built sandbag walls inside, added some shelving, laid timber across the top, threw a tarp over it, put in a manhole, and added ventilation. That’s the whole build.
The temperature difference inside is remarkable. In winter it stays 30 to 40 degrees warmer than outside, and in summer it stays 20 to 30 degrees cooler. I think if I had dug a little deeper it would perform even better — I was going by hand with a shovel and decided to stop where I did. My plan is to build up the surrounding area with retaining walls and stack the earth higher so the whole thing stabilizes around 50 degrees year-round, which is ideal for food storage.
10. Van Build — Off-Grid Living Shelter for Under $1,600
I’ve been living in my van for close to five years now, and I want to be honest with you — it’s been genuinely comfortable. The big upgrade that made it feel like a real home was a full interior build I did for under $1,600. I lined the entire inside with cedar pickets from the hardware store, built a countertop, installed a queen-size bed that folds up into two couches, added a sink and stovetop into the countertop, and built a closet.
It’s not going to be everyone’s answer to off-grid shelter, but as a cheap and practical solution when you’re first getting started, it’s hard to beat. The van gave me a comfortable base while I built out the rest of the homestead over time. For the interior work, tools like a circular saw, a tape measure, and some brad nails are all you really need to get a clean result on a build like this.
Bonus Ideas — Tire Changer, Blacksmithing, and More
I also tossed a tire changer setup into my shed so I can change my own tires on-site — a surprisingly handy thing to have when you’re living remotely. Beyond that, blacksmithing is a great off-grid skill to develop. Building an anvil, getting a forge set up, and learning to smelt, cast, and fabricate your own metal parts is the kind of self-sufficiency that pays for itself over and over again on a homestead.
The point is there’s no shortage of projects you can do. Every skill you build and every system you create adds another layer of independence to your off-grid life.
Tips and Best Practices for Cheap DIY Off-Grid Builds
Use scrap material whenever possible. Almost everything I’ve built out here started with leftover lumber, reclaimed timber, or materials I already had on hand. It’s remarkable how far you can get before spending a dime if you’re resourceful.
Start with water. Before anything else on your off-grid property, get your water storage and filtration sorted. Rainwater harvesting, cisterns, and a simple gravity filter should be your first priorities. Everything else is easier once water is handled.
Go 12-volt for your first solar setup. I can’t stress this enough. You’ll get more usable amp hours out of your battery bank and spend less money doing it. Upgrade to a larger system later once you understand your actual power needs.
Build in stages. Don’t try to do everything at once. Start with a basic shed, a simple garden, and a water source. Then layer in swales, a root cellar, and more complex systems as you go. A build like my Shed Studio Build: Save $6,000 With This 3-Day DIY is a great example of how far a staged approach can take you.
Create income from your homestead. Building a website around your skills and knowledge — whether that’s homesteading, welding, gardening, or anything else — can turn your off-grid lifestyle into a sustainable income source. I sell products and courses through my own site, and I think every homesteader should consider doing the same.
Frequently Asked Questions
How much does a basic DIY off-grid shed build cost?
It depends on your materials, but my stick frame shed cost very little because I used scrap lumber and basic sheeting. If you source materials creatively — checking Facebook Marketplace, salvage yards, or leftovers from other builds — you can put up a functional shed for a few hundred dollars or less. The key is using a simple post-and-sheet design rather than over-engineering it.
Do I need a permit to build a shed off-grid?
Permit requirements vary a lot depending on your county and the size of your structure. In many rural areas, small accessory structures under a certain square footage don’t require a permit. I’d always recommend checking your local zoning rules before you build, but many off-grid properties are in areas with minimal restrictions.
What’s the easiest way to get water on an off-grid property?
Rainwater harvesting is the simplest and cheapest starting point. All you need is a collection surface (like a shed roof), a gutter, a downspout, and a storage container. Add a wire mesh at the gutter junction and a sock filter at the downspout, and you’ve got a functional system. For drinking water, run it through a DIY gravity filter made from sand, gravel, and activated charcoal.
How many solar panels do I need to run a small off-grid homestead?
For a starter setup, a 400-watt to 1,000-watt solar array paired with 400 amp hours of battery storage in a 12-volt system is a solid foundation. I personally run a 1,400-watt array and it charges my power station in one to two hours. Start small, track your actual usage, and expand your system as your needs grow.
Conclusion
Going off-grid doesn’t have to mean spending a fortune or having years of construction experience. Every single project I’ve walked you through here — from the cheap DIY off-grid shed build to the underground cisterns to the DIY solar setup — was built by me, mostly from scrap materials, on a tight budget, in the middle of the Arizona desert. If I can do it, so can you.
Start with the basics: shelter, water, and power. Build in stages, use what you have, and don’t be afraid to learn as you go. Each project builds on the last, and before you know it, you’ll have a homestead that runs almost entirely on your own two hands. If you’re looking for more ways to save money on your builds, my post on Budget Home Improvement DIY Ideas That Save Thousands is full of practical ideas you can apply right away.
Drop a comment below and let me know which of these 10 projects you’re planning to tackle first — I’d love to hear what you’re building!