Every kit I looked at for a pergola, gazebo, or pavilion was either outrageously expensive, embarrassingly cheesy, or — lucky me — a combination of both. So I did what any self-respecting DIYer would do: I decided to build my own. I’m calling this my “poor man’s timber frame gazebo,” and honestly, I think it came out better than anything I could have bought off a shelf. If you’ve been dreaming about a backyard shelter without the sticker shock, this is the build for you.
This project came together as part of a bigger backyard transformation that also includes a concrete patio and an outdoor kitchen — so if you want the full picture, stick around. I’ll walk you through every single step of this DIY timber frame gazebo build, from pouring the concrete base all the way to screwing down the ridge cap while trying not to think about heights. Fair warning: there were a few moments where I questioned my life choices. But the finished result? Absolutely worth it.
I also want to mention that I’m not a professional builder — I’m just a guy who hates paying someone else to do something I can figure out myself. If you’re in the same boat, you’re going to love this one. And if you want more backyard project inspiration, check out my guide on building a DIY backyard patio and fireplace to save thousands — it goes hand in hand with everything I’m doing here.
Why I Skipped the Kit and Built My Own Gazebo From Scratch
Let me be real with you: I spent a solid chunk of time browsing pergola and gazebo kits online, and not a single one checked all the boxes. Either the price made me choke on my coffee, or the thing looked like it would blow over in a stiff breeze. That combination pushed me to design my own version — something I’m calling a “poor man’s timber frame” because I’m using materials that are actually available at your local hardware store at a reasonable price.
Instead of having a sawmill cut expensive actual timbers, I went with 6×6 pressure-treated posts. They’re beefy enough to look substantial, they’re widely available, and they cost a fraction of true timber. I almost went with 4x4s, but I’m glad I didn’t — they would have looked dinky compared to the scale of this build. If you’re planning a structure like this, go bigger on your posts. You’ll thank yourself later.
Pouring the 9×9 Concrete Base
Before any framing goes up, I needed a solid foundation. I built a form measuring 9 ft by 9 ft, set fiberglass rebar inside, and poured the slab about 4 inches thick across the main field. On the corners, I came in about a foot and went a foot down to give extra mass right where the posts would sit. This keeps everything stable and helps prevent frost heave over time.
I used a mud mixer for this pour — hands down one of the best tools for the concrete DIYer. If you want a deeper dive into the whole concrete pouring process, I covered it in my previous video. I also stained this pad to match the concrete patio I built around the fire pit, so the whole outdoor space has a cohesive look. Details like that make a big difference in the finished product.
Setting the 6×6 Posts With Screw Anchors and Brackets
Once the concrete cured, it was time to get those posts standing. I used 4-inch screw anchors paired with post base brackets to anchor everything to the slab. This approach keeps the posts from shifting or twisting and gives the whole structure a solid mechanical connection to the foundation rather than just sitting on top of it.
I’ll be honest — those 6×6 posts were freshly pressure-treated and soaking wet, which made them significantly heavier than I expected. Wrangling them into position in the summer heat was its own adventure. Stay hydrated out there, seriously. But once they were plumb and anchored, the structure already started looking like something real, and that feeling makes all the sweating worth it.
Cutting the Interlocking Beam Notches (North/South and East/West Beams)
For the top beams, I planned an interlocking notch system. The north and south facing beams got a half-inch notch cut on top and a one-and-a-half-inch notch on the bottom. This allows them to interlock cleanly with the east and west beams, creating a tight, traditional timber-frame style joint without any complicated joinery tools. I was also using 10×10 beams here, cut down to 9 feet to allow for a 6-inch overhang on all sides.
I had ordered a beam saw attachment for my circular saw to make these deep cuts easier, but the universe conspired against me — a missing bolt from the first vendor, a late shipment from the second, and then UPS lost the overnight package entirely. Three separate failures. So I cut everything the old-fashioned way and got it done. Measure at least three times before you cut, especially when you’re working with expensive lumber that you really don’t want to waste.
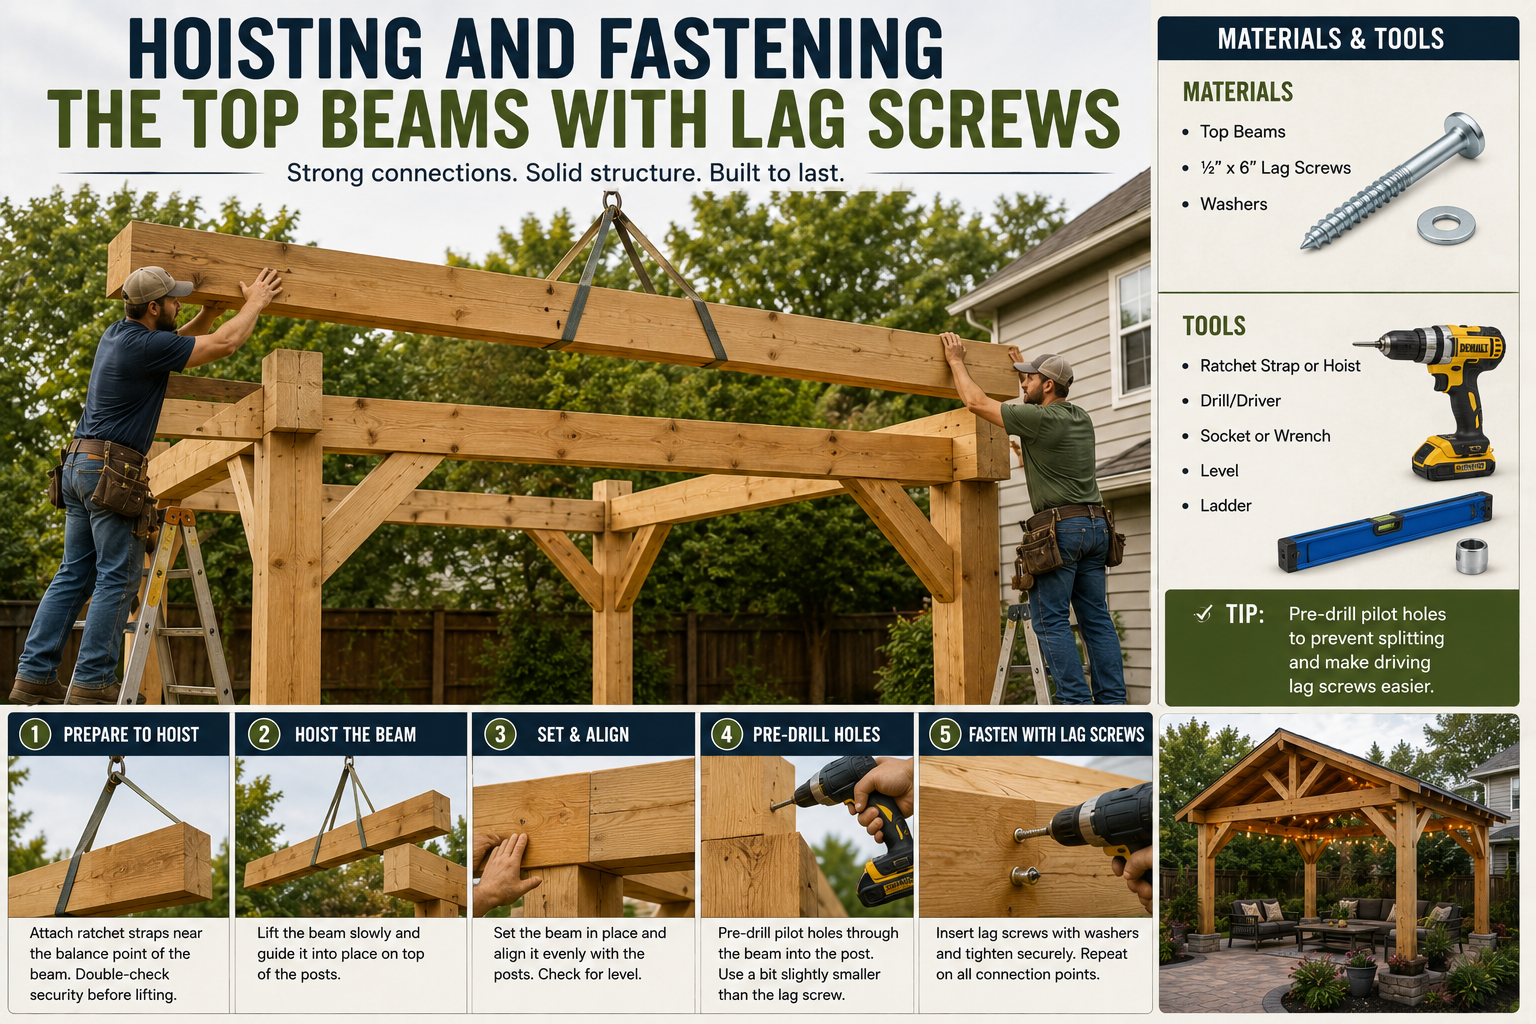
Hoisting and Fastening the Top Beams With Lag Screws
Getting these heavy beams up into position by myself (well, with some much-appreciated help from Kim) was genuinely the most nerve-wracking part of the early build. At one point I nearly went backwards off the ladder — there was a solid two seconds of silence while I made peace with my choices. Thankfully, the ladder held and the beam dropped right into the notch perfectly.
To temporarily hold each beam while I drilled, I used a 5-inch timber screw. Then I drilled through with a half-inch bit, paused to use a paddle bit to create a recess for the washer, and finished with a 3/8-inch bit for the 10-inch lag screws. The reason for the size change: the half-inch is the outer diameter of the lag screw, and the 3/8-inch pilot hole lets the threads still grip the wood properly. Once those lag screws were driven home, those beams weren’t going anywhere.
Designing and Cutting the Knee Braces
Knee braces are the diagonal supports that run between the posts and the top beams. Beyond looking great — they give that authentic timber frame aesthetic — they also add real structural rigidity to the whole frame. For my sizing, I worked off a simple rule of thumb: the posts are 8 feet tall, so I went roughly a third of that, landing on 32-inch knee braces. In hindsight, 36 inches probably would have looked even better, but 32 works just fine.
These got secured with 6-inch lag screws at each end. Again, the beam saw would have made these compound angle cuts much cleaner — but I made do with what I had. The knee braces went up on all four corners and immediately transformed the look of the structure. It stopped looking like a stack of lumber and started looking like an actual gazebo.
Installing the King Posts and Ridge Beam
With the main frame solid, I moved on to the roof structure. The king posts sit vertically at each end of the gazebo and support the ridge beam that runs along the peak of the roof. Before hoisting anything up, I realized I’d forgotten to cut the notch in the top beam where the king post would land — so back up the ladder I went to cut that notch in place. Always check your list before you climb.
I planned out the roof line the old-school way: drawing it out on my workbench top rather than using any design software. I sketched out the king post position, the ridge beam height, and the rafter line. It’s not glamorous, but it works for me. The peak ended up looking proportionally just right for the 9×9 footprint. Once the king posts were notched and secured, the ridge beam went up and the roof structure was ready for rafters.
Cutting and Installing the 4×6 Rafters
The rafters on this build are 4x6s — a solid, beefy choice that fits the scale of the 6×6 posts and 10×10 beams. To get consistent rafter cuts, I made a plywood template from quarter-inch ply based on my workbench drawing. That template saved me from having to re-measure every single rafter and kept all the bird’s mouth cuts and ridge cuts consistent across the set.
There was one moment of frustration here: I cut a piece an inch short because I walked 30 feet from my measurement to my saw and lost a digit in my head somewhere along the way. Write your measurements down, people. I cannot stress this enough. Once I got my head straight and cut the correct lengths, the rafters went up and the roof skeleton started to take real shape. If you enjoy this kind of structural outdoor build, you might also like my post on building a motorized pergola with programmable roller shades for another take on DIY outdoor structures.
Choosing and Sourcing the Metal Roofing
My original plan was to grab standard galvanized roofing panels from the big box store and paint them to match the metal roof on my house. But I found a local metal roof supplier about an hour away that stocked around 30 different colors — and their pricing was actually cheaper than the hardware store. I ended up going with a color called Burnished Slate after second-guessing myself at the last minute from my original choice of Cocoa Brown.
The moment of truth when I held the panel up next to my house roof? Pretty close. Not identical, but close enough that it looks intentional. The two colors — Cocoa Brown and Burnished Slate — are similar enough that the switch wasn’t a disaster. If you’re sourcing metal roofing for a project like this, it’s worth calling around to local suppliers before defaulting to the big box stores. You might save money and get a better color selection at the same time.
Spray Painting the Underside of the Roof Panels
Here’s a detail I’m really glad I caught before it was too late: the back side of those metal roofing panels is white. Looking up from inside the gazebo at bright white panels would have looked terrible — completely out of place with the rest of the build. So before installation, I grabbed some spray paint in a shade that blended with the darker tones of the structure and coated the underside of every panel.
This is one of those small steps that makes a big difference in the finished look. It takes maybe 30 minutes and a couple of cans of spray paint, but it’s the difference between a professional-looking result and something that looks unfinished. Don’t skip it. While you’re at it, take the time to paint any other metal hardware or fasteners that will be visible from common viewing angles inside the structure.
Installing the Metal Roofing Panels
With the underside painted, I started laying the roofing panels over the rafters. Metal roofing goes on fast once you’re in a rhythm — the panels overlap at the ribs, and you drive roofing screws through the high points of the corrugation into the rafter below. A metal cutting blade makes trimming panels to length clean and fast.
Working on the roof itself wasn’t the scary part for me — it was the transitions on and off the ladder that got my heart rate up. I’m not going to pretend I love heights. But the panels went down cleanly, the color looked great against the structure, and once I was back on the ground, I was pretty proud of how solid the roof looked. Good coverage, good color match, and no white showing from underneath.
Fitting the Ridge Cap
The ridge cap was the last roofing step and the one I’d been dreading the entire project. It runs along the very peak of the roof, covering the gap where the two sides of roofing meet, and to install it you have to reach the center of the roof — which, on a 9-foot-wide structure, means getting uncomfortably close to the ridge from both sides.
I eventually got the ladder positioned well enough to reach the middle panel, though my sweaty hands made gripping the screws interesting. That center fastener was a genuine challenge, but I got it. Coming back down off the roof is always the sketchiest transition, but I made it in one piece. Once the ridge cap was on, the gazebo was officially weatherproof and the roofline looked clean and finished from every angle.
Tips and Best Practices for Your DIY Timber Frame Gazebo Build
Go bigger on your posts. I almost used 4x4s and I’m so glad I didn’t. 6x6s give the structure a presence and a solidity that smaller posts simply can’t match. The cost difference is worth every penny.
Measure and write it down. I cut a piece an inch short because I trusted my memory over a 30-foot walk. Always write your measurements on a scrap of wood, a notepad, or your arm — whatever it takes. A tape measure is only as useful as the number you remember.
Source metal roofing locally. Local metal suppliers often beat big box store pricing and give you far more color options. A little driving can save real money and get you a much better color match for your existing roof.
Paint the underside of your panels before installation. White metal panels look terrible from inside a gazebo. A few cans of spray paint before you go up prevents a visible mistake you’d have to live with forever.
Use a template for repeated cuts. Cutting a rafter template from quarter-inch plywood saved me significant time and kept all my rafters consistent. Any time you’re making the same cut more than three times, a template is worth the five minutes it takes to make.
Don’t rush the lag screw pilot holes. Using the correct bit sizes — half-inch for the outer diameter clearance and 3/8-inch for the thread-grip pilot — makes a big difference in how tight and secure your connections end up. Rushing this step leads to split lumber or fasteners that don’t fully seat.
Frequently Asked Questions
What size posts should I use for a DIY timber frame gazebo?
I used 6×6 pressure-treated posts and I highly recommend it. 4x4s will technically work structurally on a smaller build, but they look undersized and diminish the whole timber-frame aesthetic. 6x6s are available at most hardware stores, handle the load easily, and give the finished structure the visual weight it deserves.
Do I need a permit to build a backyard gazebo?
This varies significantly by location. Many municipalities have exemptions for open-sided structures under a certain square footage, but others require permits for any permanent structure with a roof. I’d always recommend checking with your local building department before you pour any concrete or set any posts. It’s a quick call that can save you a major headache later.
What type of roofing is best for a DIY gazebo?
Metal roofing is my top recommendation for durability, longevity, and ease of installation on a DIY build. It goes on fast, handles rain and UV extremely well, and — if you source it from a local supplier — comes in a wide enough color range that you can match your existing roof. I used corrugated panels fastened with roofing screws and trimmed them with a metal cutting blade. Clean, fast, and durable.
How do I anchor gazebo posts to a concrete slab?
I used 4-inch screw anchors paired with post base brackets. You drill into the cured concrete, set the anchors, bolt the brackets down, then drop the posts into the brackets. This gives you a solid mechanical connection that resists lateral movement and uplift. It’s a much better long-term solution than embedding posts directly in concrete, where moisture can cause rot even on pressure-treated lumber.
Final Thoughts: Build It, Don’t Buy It
When I look at this gazebo now — the 6×6 posts, the interlocking beams, the knee braces, the metal roof in Burnished Slate — I genuinely cannot believe what I almost paid for a kit that would have looked half as good. This DIY timber frame gazebo build took more problem-solving than I expected (shoutout to the beam saw bolt saga), but the result is something I’m proud of every time I walk into the backyard.
If you’re thinking about tackling a build like this, just start. Draw it out on a workbench, use the materials that are available to you, and don’t let perfect be the enemy of done. And if you want to see what’s coming next — the outdoor kitchen and solar-powered smoker that’s going under this roof — make sure you’re subscribed so you don’t miss it. For more budget-friendly outdoor builds, check out my full guide on pergola cost: build vs. buy — what I actually spent. I think you’ll find the math is pretty convincing.
Have questions about this build? Drop them in the comments below — I read every single one. And if you try this yourself, I’d love to see how yours turns out.