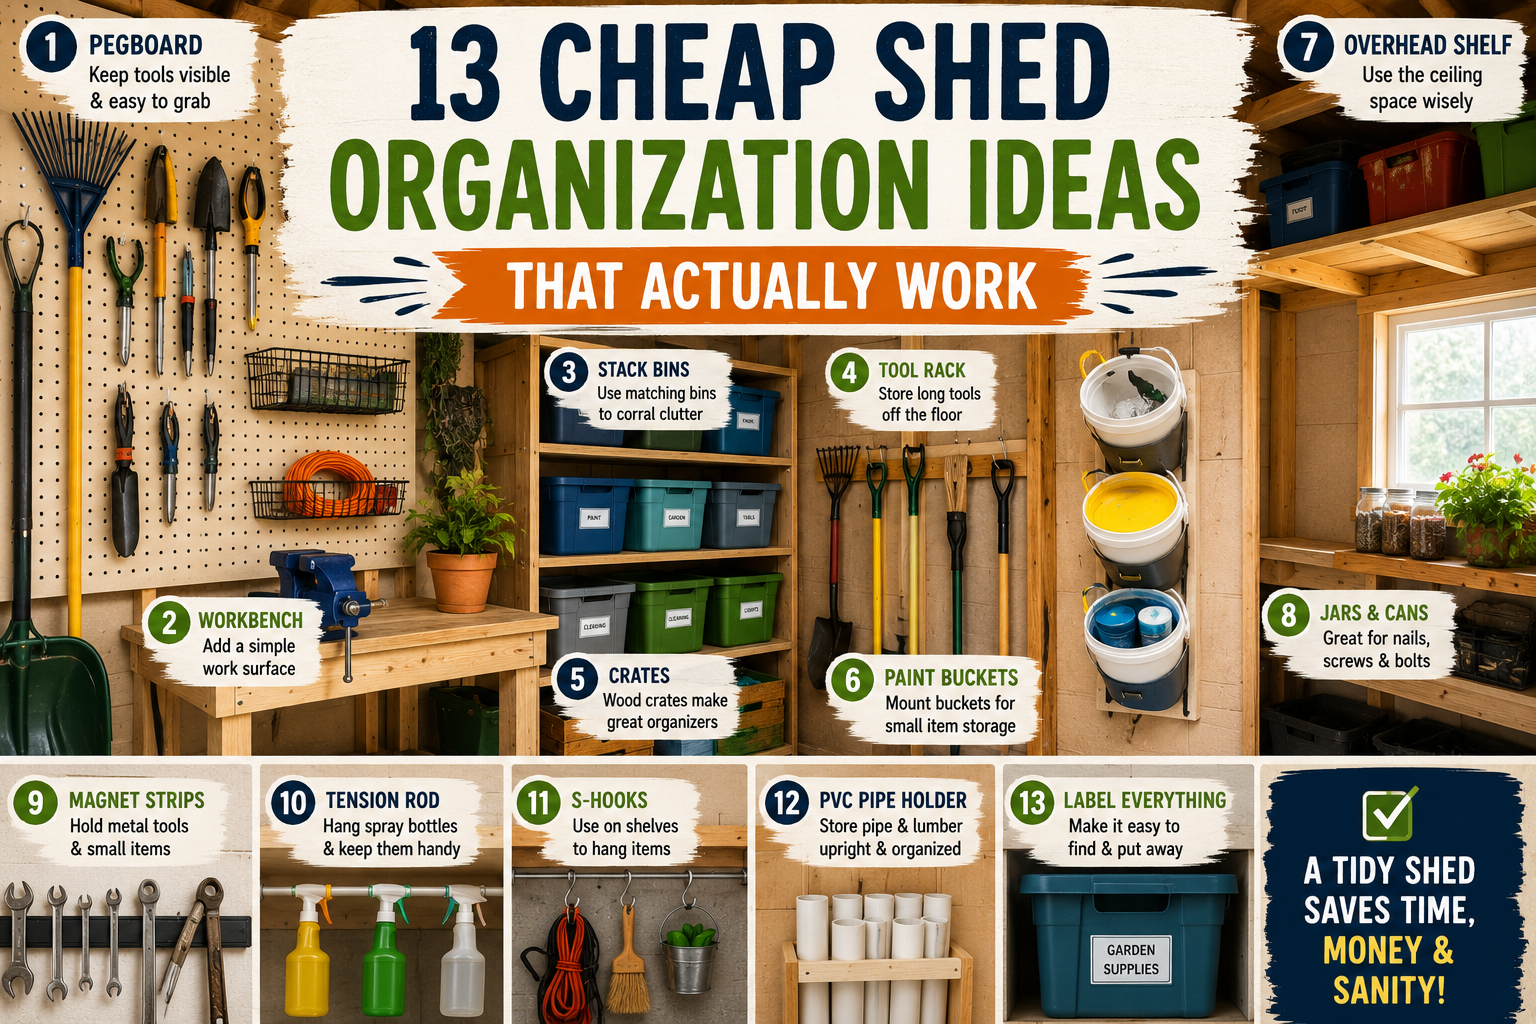
If your shed looks like a tornado ran through it, you’re not alone. One of the most common problems with sheds is that we fill them up fast and then wonder why we can never find anything. The good news? You don’t need to spend a fortune to fix it. These cheap shed organization ideas use mostly scrap lumber, a handful of basic hardware, and a little bit of elbow grease to transform a chaotic shed into a space that actually works for you.
In this post, we’re covering 13 different storage solutions — from a rolling tote rack to built-in tool holders and a DIY workbench. Whether your shed is packed with yard tools, power equipment, or just a general mix of everything, there’s something here for you. And the best part? Most of these builds cost next to nothing if you’ve got leftover lumber sitting around. If you love this kind of budget-friendly project, be sure to check out our guide on garage organization ideas on a budget for even more inspiration.
Before you build a single shelf, there’s one thing you absolutely need to do first: declutter. Go through everything in your shed and pull out anything you no longer use or need. There’s no point organizing junk you’re going to throw away eventually. Once you’ve cleared the space, you’ll have a much better sense of what storage you actually need — and you’ll likely have more room than you thought.
1. Build a Modular Tote Storage Rack
The internet is obsessed with those massive walls of labeled bins, and honestly, it’s hard not to see why. But you don’t need 50 totes to get organized — even five of the popular 27-gallon totes stored in a simple DIY rack can make a huge difference. The rack is just two frames connected by horizontal runners that the tote lips rest on, and the whole thing can be built from scrap 2x4s and 2x2s.
The beauty of this build is that it’s completely modular. Start with five totes and expand later, or build a second unit for your garage. Measure the underside of the tote lip carefully so your runners land in exactly the right spot, then build your two frames and connect them. Use a speed square to keep everything as square as possible, pre-drill to avoid splitting the wood, and anchor the finished rack to the wall studs for stability. Free plans are available if you want to follow along step by step.
2. Create Dedicated Ladder Storage
Ladders are one of the most awkward things to store in a shed. If you just lean them in a corner, they fall over the moment you move anything nearby — and that’s a safety hazard and an annoyance. The simple solution is to position your tote rack strategically so that a full-size ladder can stand upright right next to it, with the rack itself acting as a barrier to keep the ladder from tipping.
For heavier extension ladders (think 40+ pounds), keeping them at floor level next to the rack is the smartest move. For lighter step ladders, you can hang them on the side of the rack using small off-cuts of 2×2 screwed into the frame as pegs. It takes about five minutes and keeps those smaller ladders completely out of the way without wasting any wall space.
3. DIY a Built-In Workbench
Having a dedicated spot to work — somewhere to flip a lawn mower blade, change a chainsaw chain, or just set something down while you figure it out — is genuinely a game-changer in a shed. A basic workbench doesn’t need to be pretty. A front and back rail connected by equally spaced stretchers, topped with a piece of leftover OSB, does the job perfectly.
Set your bench height at around 35 inches, which is a comfortable working height for most people. Use a ledger board on the wall to make leveling the top easier, and use your tote rack as one of the back legs to save materials and floor space. Add small blocking pieces along the back edge of the top so nothing rolls off behind the bench. The space underneath becomes instant storage for tall items like an air sprayer or paint equipment.
4. Add Between-Stud Shelves for Small Items
This is hands-down one of the fastest and most satisfying cheap shed organization ideas you’ll find. If your shed has exposed studs, you’ve got built-in shelf brackets just waiting to be used. All you need to do is cut a 2×4 slightly long so it wedges snugly between two studs, then secure it with a couple of screws from each side. Instant shelf.
These little shelves are perfect for spray cans, lubricants, carb cleaner, small parts, and anything else that tends to get lost in a bigger bin. One important tip: stagger the height of each shelf so you can actually get your drill in to drive the screws. It also gives the wall a nice layered look. These shelves are incredibly strong for their size and cost essentially nothing if you have scrap lumber.
5. Make a Clamp and Hook Storage Bar
Here’s a simple variation on the between-stud shelf that gives you even more versatility. Instead of using a full 2×4, use a 2×2 or rip a 2×4 down to size, and mount it flush with the front face of the studs. This leaves a gap behind the bar — and that gap is exactly what you need to hang anything with a hook or a C-clamp.
Clamps, bungee cords, small tool loops, and even certain garden tools can hang right off this bar. The setup takes the same amount of time as a regular shelf, but it dramatically increases how much you can hang in a small space. It’s a subtle difference that makes a big functional impact.
6. Use Bungee Cords to Secure Corner Items
Corners are the enemy of good shed organization. Anything you store in a corner ends up getting blocked by whatever’s on either adjacent wall. The workaround here is genius in its simplicity: use the corner for tall, upright items — like a canopy frame or folded tent — and use bungee cords hooked onto wall screws to keep them from tipping over.
Just drive a couple of screws into the studs on each wall of the corner and stretch your bungee cord across the items to hold them in place. Some canopy bags even have little holes you can hook directly into for an even more secure hold. It takes about two minutes to set up and it keeps those awkward tall items perfectly contained without dedicating any floor space to a separate rack.
7. Hang Hose Reels and Extension Cords in the Corner
While you’re working that corner, look up. The space just below the top plate is perfect for hanging coiled hoses and extension cords. Screw a 2×2 to the underside of the top plate and use it as a horizontal peg — hose reels and coiled cords hang on it easily and stay up and out of the way.
This is one of those small wins that pays off every single time you’re in the shed. Nothing tangles, nothing ends up on the floor for you to trip over, and you always know exactly where your extension cord is. You could fit multiple cords and a hose reel in the same corner spot without any interference.
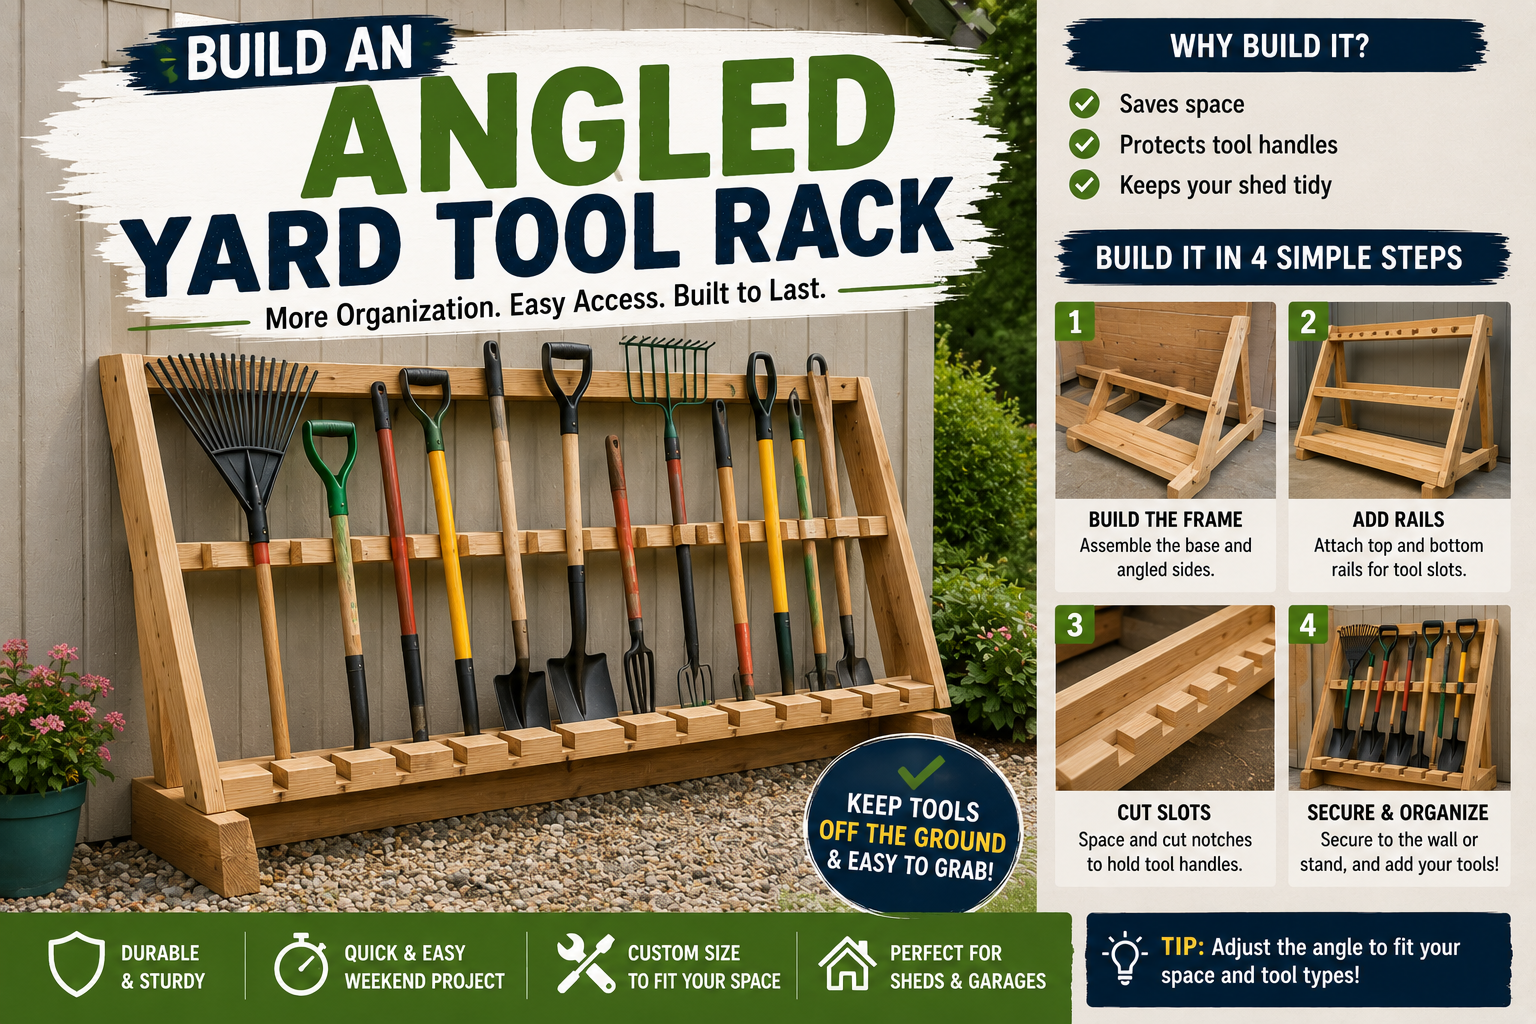
8. Build an Angled Yard Tool Rack
Yard tools — rakes, shovels, hoes — are some of the most frustrating things to store because of their length and awkward shapes. The best approach is to mount pairs of 2×4 brackets directly to the studs so the handles slot in between them, with the tool heads pointing upward. Cutting a slight 5-degree bevel on the back of each bracket angles the tools forward so they naturally stay put instead of sliding off.
Position the brackets high enough that you can use the wall space underneath for other storage. Pre-drill your holes before mounting to avoid splitting, and try to keep it to two or three tools per set of brackets so retrieval stays easy. This system works for straight-handle tools, D-handle shovels, and most standard yard tools you probably already have.
9. Store D-Handle Shovels Between Studs
For shovels with D-handles, the handle itself is too small to loop over a 2×4, but a 2×2 works great. Mount a 2×2 with a 5-degree bevel between the studs where the shovel fits naturally, then slide the D-handle right over it. Use an off-cut piece on the underside of the 2×2 to prevent it from getting pulled flush when you drive the screws in.
If there’s no blocking between the studs where you want to mount, just run a flat 2×4 across the stud bay first to give yourself something solid to attach to. It adds one small step but makes the whole mount rock solid. Once it’s up, your shovels stay neatly against the wall and are easy to grab and put back one-handed.
10. Create a Dedicated Chainsaw Mount
Chainsaws are notoriously awkward to hang because they don’t have a natural hook point. The solution here is a combination of two techniques already covered: a between-stud shelf on the bottom for the body of the saw to rest on, and a 2×2 bar above it to cradle the bar and keep the saw from tipping forward.
Position the shelf at the right height so the chainsaw sits comfortably with the bar resting against the upper 2×2. The whole setup takes a few minutes and keeps your chainsaw secure, accessible, and off the floor where it could get damaged. Keeping tools like this mounted also forces you to put them back in the same spot every time — which is half the battle with shed organization.
11. Hang a Weed Eater with a 2×2 Wall Hook
The weed eater (or string trimmer) is another tool that seems impossible to store neatly. The trick is to screw a 2×2 into the wall studs at a height where the shroud or collar of the weed eater can hang on it. It keeps the tool off the floor, protects the cutting head, and takes up almost no wall space.
Position it next to your chainsaw mount and you’ve got a whole dedicated zone for your power cutting tools. Everything lives in the same area, making it fast to gear up before a yard session and just as fast to put everything away after.
12. Cut a Notched Shelf for Pole Attachments
Got a pole pruner attachment or something similarly awkward? Instead of leaning it against the wall and hoping it doesn’t fall, cut a small notch into one of your existing shelves. Use a spade bit to drill out the initial hole, then extend it into a slot with a jigsaw. Knock off the sharp corners so the attachment slides in and out smoothly.
This kind of custom notched shelf can be adapted for all kinds of odd-shaped tools — it’s one of the most underrated tricks in shed organization. Once you start thinking about cutting custom notches and slots, you’ll find solutions for tools that seemed impossible to store neatly. It’s a small detail that makes a big difference in how polished and functional your shed feels.
13. Install Heavy-Duty Wall Shelves for the Side Wall
For the main storage wall of your shed, a set of three staggered wall-mounted shelves gives you a ton of versatile storage. The top shelf can be light duty — empty containers, seasonal items, light boxes — while the lower shelves handle heavier gear. Testing the strength of each shelf before loading it up is always a smart move; a single 2×4 cantilevered off a stud can hold a surprising amount of weight when properly anchored.
Think about what you’re storing and plan your shelf heights accordingly. Taller items go on lower shelves with more clearance, while shorter bins and containers stack nicely on closer-spaced upper shelves. This kind of intentional planning is what separates a shed that stays organized from one that turns back into chaos within a month. For more ways to think about efficient storage builds on a budget, our post on 8 DIY home improvement projects on a budget is worth a read.
Tips and Best Practices for Cheap Shed Organization
Start with a full declutter. Before you build anything, pull everything out and decide what actually needs to be in the shed. Organizing things you don’t need is just wasted effort.
Use scrap lumber whenever possible. Most of these builds work perfectly with leftover 2x4s and 2x2s. Even rough, slightly warped lumber works fine once it’s anchored to the wall — don’t let imperfect materials stop you from getting started.
Always anchor to studs. Whether you’re mounting a shelf, a rack, or a tool holder, driving screws into studs (not just drywall or OSB sheathing) is what keeps everything solid and safe over time.
Pre-drill to prevent splitting. Especially with dry or older lumber, pre-drilling your holes before driving screws prevents ugly splits and saves you from having to replace boards mid-build.
Think in zones. Group similar tools and items together — yard tools on one wall, power equipment in one section, consumables and small parts on the stud shelves. Zones make it faster to find things and easier to put them back in the right spot.
Keep the center floor clear. If you ever want to park a mower or roll in larger equipment, you’ll be glad you kept the middle of the shed open. Push all storage to the walls and make that open floor space a feature, not an afterthought.
If this has you thinking about other spaces in your home that need a storage overhaul, check out our complete guide to 20 budget home improvement ideas you can do in 30 minutes — some of those quick wins apply directly to sheds and utility spaces too.
Frequently Asked Questions
What is the cheapest way to organize a shed?
The cheapest approach is to use scrap lumber you already have. Between-stud shelves, 2×4 tool racks, and bungee cord corner storage can all be built for essentially nothing if you have leftover wood and basic screws on hand. Start with the declutter, then build storage only for what remains.
How do you store yard tools in a shed without spending a lot?
Mount pairs of 2×4 brackets directly to the wall studs with a slight upward angle, and slot your tool handles between them with the heads pointing up. For D-handle tools, a simple 2×2 peg works perfectly. Both methods cost under a few dollars in materials and keep tools off the floor and easy to grab.
Is it worth building a DIY workbench in a shed?
Absolutely. Even a basic workbench made from scrap lumber and a leftover piece of OSB gives you a dedicated spot to do maintenance on small equipment, sharpen blades, and keep projects off the floor. It also creates useful storage space underneath for larger items like sprayers or paint equipment.
Can I use these shed organization ideas in a garage too?
Yes — most of these builds translate directly to a garage. The modular tote rack, tool wall mounts, between-stud shelves, and workbench all work great in a garage setting. The main difference is that garages often have drywall over the studs, so you’ll need to locate studs with a stud finder before mounting anything heavy.
Conclusion
A well-organized shed isn’t just about aesthetics — it’s about actually being able to find your tools, work safely, and make the most of the space you have. These 13 cheap shed organization ideas prove that you don’t need expensive systems or a big budget to go from chaotic to completely dialed in. A few 2x4s, some screws, and a weekend afternoon is genuinely all it takes.
Start with the declutter, pick two or three of these projects to tackle first, and build from there. Once you see how much better your shed functions, you’ll wonder why you waited so long. Have a project you’d like to share or a question about any of these builds? Drop it in the comments below — we’d love to hear how your shed transformation goes!