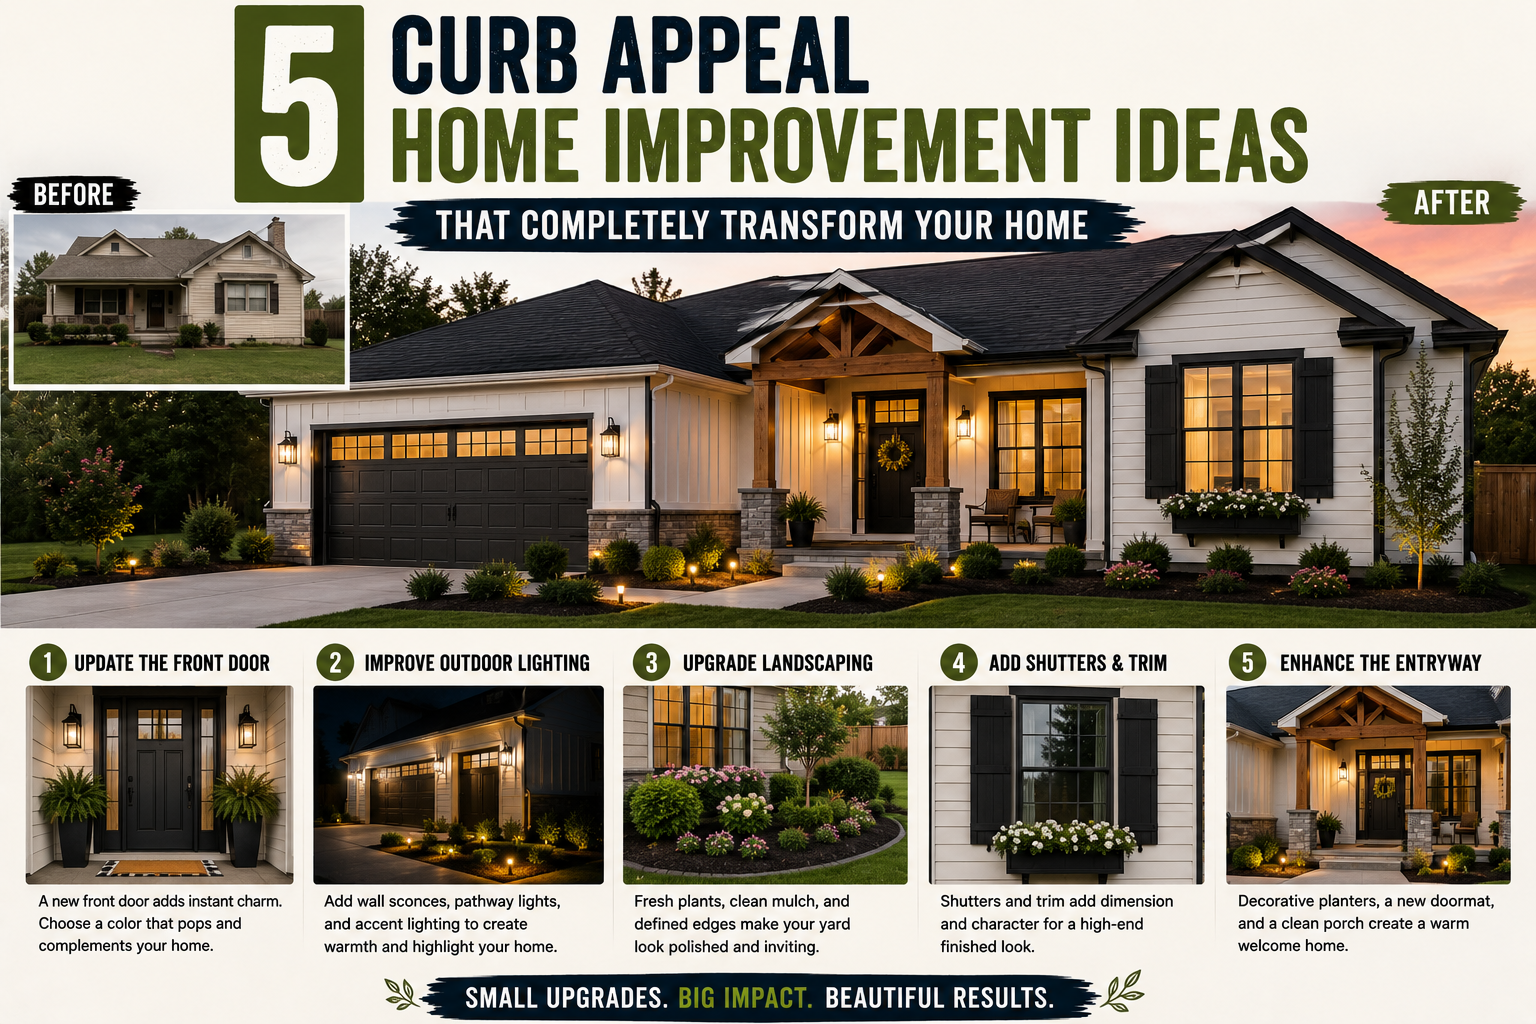
If your home’s exterior has seen better days, you’re not alone — and I’m here to tell you that even the most dated, beaten-up house can be turned into something you’re genuinely proud to pull into every single day. I’ve researched and tested a ton of curb appeal home improvement ideas over the years, and the ones that make the biggest difference almost always fall into a few key categories: cosmetic fixes, entryway upgrades, landscaping, and structural improvements. When you tackle all four together, the transformation is dramatic.
In this post, I’m walking you through a complete curb appeal overhaul — from power washing and painting right through to building a gable porch overhang from scratch. Some of these projects are weekend warriors, and some will take a few weeks of solid effort. But none of them require you to be a professional contractor. If you want more inspiration before diving in, check out my post on 5 DIY outdoor curb appeal projects you can do this weekend for some quick-win ideas to pair with this guide. Now let’s get into the full breakdown.
I’ve broken this transformation into five major project categories. Each one builds on the last, and together they take a home from eyesore to neighborhood standout. Grab a coffee, because we’re covering a lot of ground here.
1. Cosmetic Upgrades: Power Washing, Siding, Paint, and a New Front Door
Every curb appeal transformation has to start with the basics, and for me that means getting the exterior clean and structurally sound before anything else. I always start with a thorough power wash of the entire house — siding, soffits, steps, everything. It’s one of those tasks that costs almost nothing but makes an enormous visual difference, and it lets you see what you’re actually working with once the grime is gone.
After washing, inspect your siding carefully. If you’ve got cracked or damaged panels, replace them before you ever pick up a paintbrush. Fiber cement siding panels from Home Depot are a solid, affordable fix for isolated damage. Once repairs are done, tape off all windows and doors, grab an airless paint sprayer, and coat the siding and soffits in your chosen color. Removing the tape after the paint dries is one of those small but deeply satisfying moments in any exterior project.
Don’t overlook the small cosmetic details either — house numbers, shutters, and mailboxes all add up to create a cohesive look. And if your front door is cracked, warped, or just plain ugly, replacing it is one of the highest-ROI curb appeal upgrades you can make. To do it right, remove the brick mold on the exterior and the interior trim, cut through any screws holding the frame to the house with a reciprocating saw, and pull the whole unit out. Install a PVC sill plate with construction adhesive to direct water away from the home, flash the perimeter of the door frame, then lift the new door into position, shim it level, and screw the frame to the house. Fill the gap around the frame with spray foam insulation to seal out drafts and moisture, then trim the excess. A bold color on the door — even something as daring as a deep blue — ties the whole exterior together beautifully.
2. Front Entryway Overhaul: Resurfacing Steps and Installing New Railings
Once the house itself is looking sharp, the entryway becomes the focal point — and if it’s tired and worn, it undermines everything else you’ve done. The concrete steps are usually the first thing to address. If they’re stained and weathered but structurally sound, you can resurface them with a resurfacer product and then apply a sealer to protect against future staining. That said, I’ll be honest with you: if the staircase is genuinely unattractive in shape or layout, resurfacing is a cosmetic fix that has limits. Demolishing and rebuilding from scratch will always give you a more impressive result. If you’re on the fence, check out my guide on stair renovation on a budget for a cost comparison of both approaches.
Once the steps are done, turn your attention to the railings. Old flimsy metal railings drag down the look of even a freshly painted home. Remove them by unscrewing the attachments at the house and cutting them off where they’re embedded in the concrete, then power wash the steps one more time. For new railings, I recommend a modern cable or wire railing system — the clean lines look fantastic against painted siding. Use a laser level to mark post locations, then drill anchor bolt holes using a hammer drill and a masonry drill bit. Set the posts in expansion anchors, use a post level to make sure everything is plumb, and shim as needed before fully tightening. Follow the manufacturer’s instructions for your railing system, and take your time getting the wire tension right — it makes a big difference in the finished look.
3. Demolishing the Old Walkway and Pouring a New Concrete Sidewalk
A cracked, uneven, or just plain ugly front walkway sends the wrong message before a visitor even reaches your door. If the existing concrete is beyond saving, demo it and start fresh — renting a jackhammer does the job quickly, and it’s more satisfying than you’d expect once you get the hang of it. Break everything up into manageable rubble, haul it out, and you’re starting with a clean slate.
For the new walkway, I like to plan for two poured sections: a larger concrete landing pad at the base of the steps and then a curved sidewalk leading out to the street or driveway. Mark your layout with spray paint, then excavate down about 8 inches total — 4 inches for a gravel subbase and 4 inches for the concrete. Build your forms using 2×6 and 1×6 lumber, stake them securely, and check everything for square and level. For curved sections, have your lumber yard rip down 4-inch strips of hardboard — these bend to create smooth curves without cracking. Apply WD-40 to the forms as a release agent before you pour so they come off cleanly.
Mix and pour your concrete in sections, screeding it smooth as you go. Use an edge trowel around the perimeter for rounded edges, then finish the surface with a finishing trowel and a broom finish for texture and traction. Add control joints every 4 feet on center — this gives the concrete a predetermined place to crack if it ever does, keeping it looking intentional rather than damaged. Let it cure fully before removing the forms, and use a sealer to protect the finished surface.
4. Landscaping and Lawn Restoration: Garden Edging, Mulch, and Grass
Landscaping is where curb appeal home improvement ideas really come to life visually. Even with a freshly painted house and beautiful new concrete, an overgrown or bare front yard will hold the whole project back. I like to start with the garden beds — specifically, defining them with a clean concrete curb edging that gives the entire front of the house a polished, intentional look.
To build concrete garden curbing, remove all the old mulch and weeds first, then excavate down about 4 inches along your planned border. Set gravel subbase, compact it with a hand tamper, and add a weed barrier fabric before building your forms. Use lumber staked in place to create the curb mold — aim for about 6 inches of width for a substantial-looking border. Mix and pour rapid-set concrete, use an edging trowel for rounded edges, and add control joints every 4 feet. Once cured and forms removed, fill the garden beds with low-maintenance evergreen shrubs and top with black mulch. The contrast between dark mulch, green plants, and gray concrete curbing is clean and timeless.
For the lawn itself, start by filling any bare patches or removed-tree areas with quality topsoil. Rent an aerator and run it over the entire lawn — this dramatically improves seed germination and water absorption. Dethatch, pull weeds, then broadcast grass seed evenly using a spreader and apply by hand around the new garden edging. Cover lightly with topsoil and water consistently until the grass establishes. It takes a few weeks, but the payoff of a thick, green lawn framing all your other improvements is absolutely worth the patience. If you want more outdoor transformation inspiration, my guide on 5 home curb appeal improvement ideas that transform your yard covers additional landscaping approaches worth considering.

5. Building a Gable Porch Overhang: The Architectural Upgrade That Ties It All Together
This is the project that takes a house from “nicely maintained” to “wow, that looks like a custom home.” A gable porch overhang over the front door adds architectural character, creates a welcoming covered entry, and dramatically changes the roofline in a way that photographs beautifully. It’s also the most involved project on this list — but it’s absolutely DIY-able if you take it step by step.
Start by planning your footers. Ideally, you’ll have deep concrete footers poured at each corner of your landing pad before you even think about framing — this is your foundation for the vertical support columns. Once footers are in place, use a hammer drill and masonry drill bit to set post anchors, then cut your 6×6 pressure-treated vertical columns to length and secure them into the anchors. Install a horizontal 6×6 beam between the vertical columns to tie everything together at the top. For the roof framing, determine your pitch (a 6:12 pitch gives a nice steep Gable look), cut your ridgeboard to that angle, and tack it into place with a framing nailer. Cut your rafters with a plumb cut at the ridge, a bird’s mouth cut where they land on the horizontal joist, and a tail cut at the overhang — once you cut one rafter correctly, use it as a template for all the rest. Use a circular saw and jigsaw for the angle cuts.
After framing, install plywood roof decking, then PVC fascia trim on the front and sides of the gable. For the underside soffit, build a simple cage framing and install tongue-and-groove soffit boards for a finished, clean look. To dress up the support columns, wrap the bases with a stone-look pillar wrap product — shim the column first to add thickness, then glue and screw the panels in place and clean up the seams with caulk. If your roof needs new shingles anyway, this is the perfect time to have a roofer tie the new gable into the existing roofline professionally. One critical note: check your local permit requirements before starting this type of structural addition. Retroactively getting a structure permitted is significantly more stressful — and expensive — than doing it right the first time.
Tips and Best Practices for Curb Appeal Home Improvement Projects
Plan your projects in the right order. Always complete demolition and structural repairs before cosmetic work. Paint after all the concrete and framing is done, not before.
Use rapid-set concrete mixes strategically. For smaller pours and repair work, rapid-set products are a huge time-saver. For larger pours, standard concrete mix is more forgiving to work with.
Invest in a quality laser level. For any railing, post, or structural installation, getting things plumb and level the first time saves hours of frustration later.
Don’t skip the weed barrier. When installing garden beds, landscaping fabric under the mulch dramatically reduces ongoing maintenance.
Always pull permits for structural work. A gable overhang, new concrete footers, or any framing addition will likely require a permit in most US municipalities. Do it upfront — it protects your home’s value and your homeowner’s insurance.
Add control joints to all concrete pours. Concrete will crack eventually. Control joints tell it where to crack, keeping the damage predictable and manageable.
Frequently Asked Questions
What are the best curb appeal home improvement ideas on a tight budget?
The highest-impact low-cost upgrades are power washing, painting the front door, updating house numbers, adding fresh mulch to garden beds, and installing new exterior light fixtures. These can collectively transform a home’s exterior for well under $500 if you do the labor yourself. For more budget-friendly ideas, check out my post on affordable home improvement projects under $100.
Do I need a permit to build a gable porch overhang?
In most US municipalities, yes — any structural addition to your home that changes the roofline or adds load-bearing elements will require a building permit. Requirements vary by county and city, so contact your local building department before starting. Building without a permit and then having to retroactively get it approved is far more expensive and stressful than doing it right the first time.
What type of concrete should I use for a DIY front walkway?
For a typical residential front walkway, a standard 4,000 PSI concrete mix works well. For smaller repairs or quicker curing times, rapid-set concrete mixes are excellent — they reach working strength in as little as 15 minutes. Always add a gravel subbase, use wire mesh reinforcement, and add control joints every 4 feet to minimize cracking.
How long does a full exterior curb appeal transformation take?
For a project of this scope — cosmetic upgrades, new concrete, landscaping, railing replacement, and a gable porch build — plan for several weekends spread over 4–8 weeks, depending on your experience level, crew size, and how long each concrete pour needs to cure. Breaking it into phases makes it much more manageable and lets you see progress at each stage.
Ready to Transform Your Home’s Exterior?
Curb appeal home improvement ideas don’t have to be overwhelming or wildly expensive. As you’ve seen in this post, the biggest transformations come from stacking multiple projects together — clean cosmetics, a solid entryway, defined landscaping, and one standout architectural feature that gives the whole house a custom look. Whether you tackle all five of these projects or just start with one or two, every improvement you make is adding real value to your home and making it a place you’re proud to come home to.
If you’re looking for your next project after finishing the exterior, I’ve got a full guide on budget home improvement DIY ideas that save thousands — plenty of interior upgrades to keep the momentum going. Drop your questions or share your own curb appeal project in the comments below. I read every one and I’m happy to help you figure out your next move.