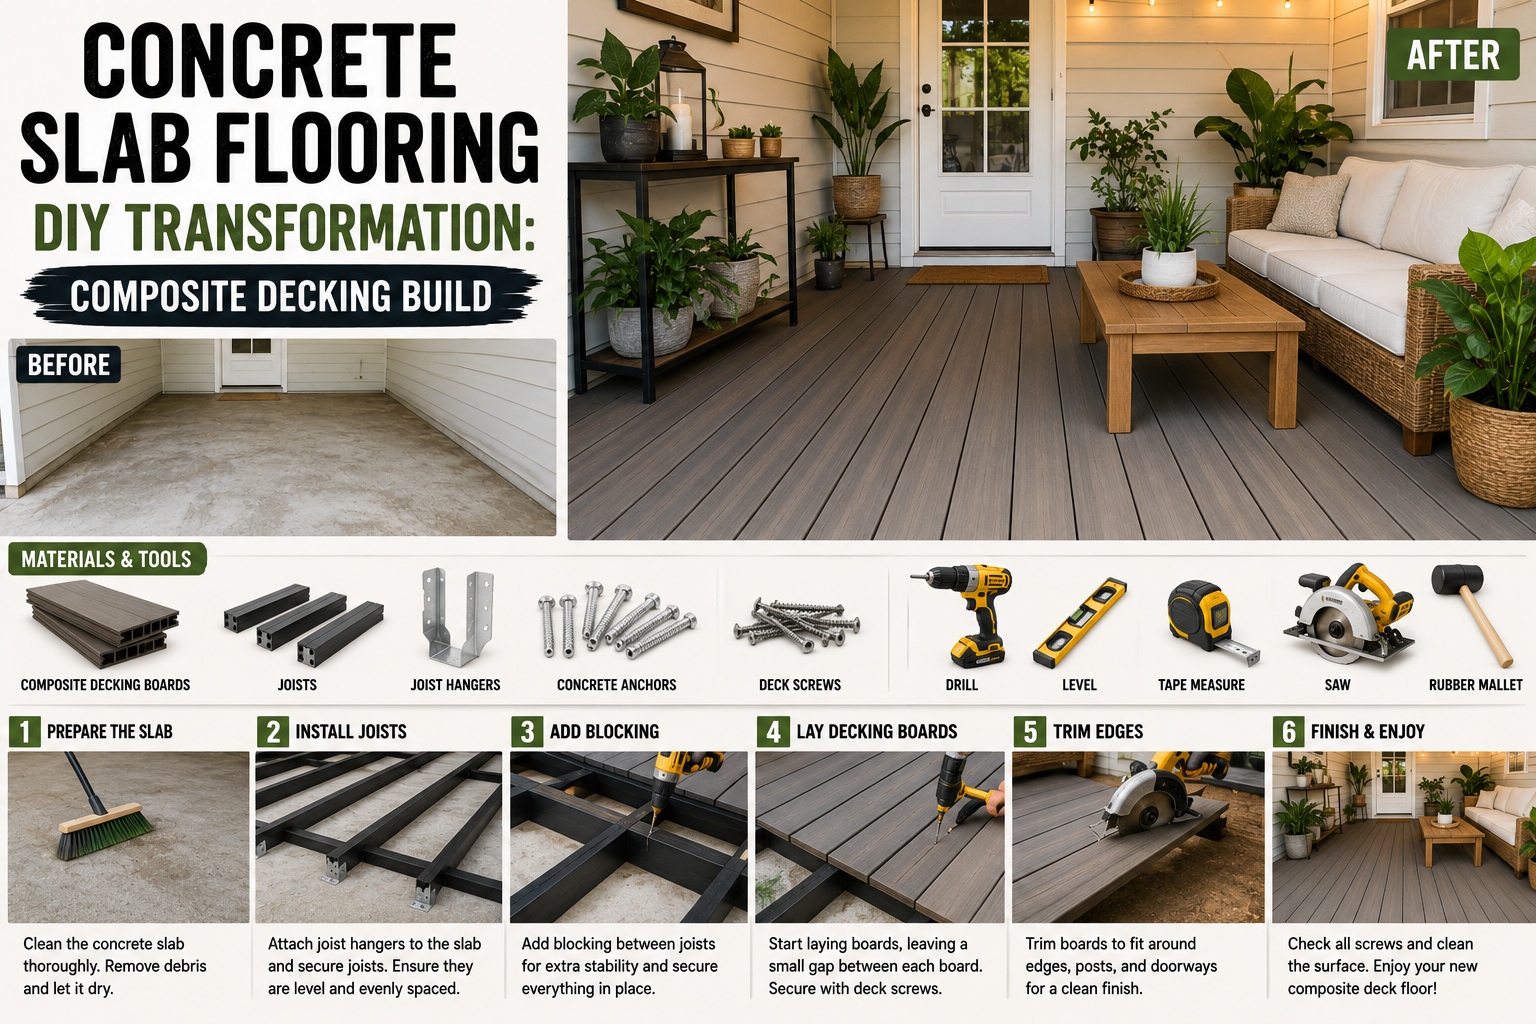
If you’ve got an ugly, bare concrete slab sitting in your backyard doing absolutely nothing, I want to show you what’s possible. I recently tackled one of the most satisfying start-to-finish projects I’ve ever taken on — transforming a plain concrete pad into a beautiful composite decking area that’s become one of my favorite outdoor spaces. And the best part? I did it myself, with zero professional construction background. Just a lot of research, some elbow grease, and a willingness to problem-solve on the fly.
This concrete slab flooring DIY transformation covers everything: subframe prep, moisture barriers, fascia installation, decking layout, finishing touches, and even a bedroom refresh I tackled around the same time. If you’re the kind of person who wants the full picture before picking up a tool, you’re in the right place. I’m walking through every single step I took, including the mistakes, the workarounds, and the moments where I had to get creative. If you’re also looking for inspiration on a tighter budget, check out my post on 8 DIY Home Improvement Projects on a Budget That Transform Your Space — there’s a ton of overlap with what I cover here.
This project is proof that even a rough, uneven slab can become something you’re genuinely proud of. Let me show you how I did it.
Step 1: Clear the Slab and Assess What You’re Working With
Before anything else, I cleared the concrete slab completely. Mine had been the base of an old shed, so there was debris, leftover hardware, and years of grime to deal with first. A good shovel and a wheelbarrow made this go quickly, but the real work started when I assessed the actual condition of the slab itself.
What I found was that the slab wasn’t perfectly level — and it fell about 20 inches short of reaching the back wall on one side, where the gap had been filled in with compacted hardcore. Hardcore can work as a base, but over time it tends to settle and sink, which would eventually cause problems for any structure built on top of it. So before I did anything else, I had to solve that problem.
Step 2: Stabilize the Edges With Coping Stones and Patio Slabs
My solution for the unsettled edge was to place old coping stones and reclaimed patio slabs over the hardcore area, leveling them carefully so they’d provide a solid, stable surface for the joists to rest on. It’s the kind of fix that takes a bit of patience — you’re essentially shimming and adjusting until everything sits flat — but it’s worth every minute because it gives you a reliable foundation that won’t shift over time.
I always say: a good solution for a bad problem is still a good solution. The key here is getting those stones as level as possible before you commit to your subframe. Use a laser level to check your work as you go. It makes the whole process faster and more accurate than eyeballing it.
Step 3: Build the Subframe With Timber Joists and Noggins
With the slab edge sorted, I moved on to the subframe — the skeleton of the whole deck. I used 4×2 timber throughout, spacing the noggins at about 48 inches apart with joists running 12 inches center to center. That tight spacing makes the finished deck incredibly rigid and solid underfoot, which is exactly what you want when you’re building on an imperfect base.
I used a circular saw for the majority of my cuts and secured everything with concrete screws where the frame met the slab. One important detail: I packed the sub-base slightly higher than the concrete in certain spots to create an air gap between the timber joists and the slab surface. That gap is critical — without it, trapped moisture causes the timber to rot prematurely. It also gave me a chance to fine-tune the level across the whole frame, which is much harder to correct after the decking goes on.
Step 4: Lay a Damp-Proof Membrane
One step I see a lot of DIYers skip — and one I’d never miss — is installing a damp-proof membrane before the decking goes down. This layer sits between the timber subframe and any moisture that might rise up from the concrete below. Even a slab that looks dry can wick moisture over time, and that moisture is what destroys timber from the inside out.
The membrane is inexpensive and takes maybe 20 minutes to roll out and trim. I also added a layer of pea gravel along one edge of the frame to improve drainage. I made sure the entire deck was sloped very slightly away from the house — even just a fraction of an inch per foot is enough to keep water moving in the right direction and prevent pooling under the boards.
Step 5: Install the Fascia Framework Before the Decking Boards
Here’s a sequencing tip that saved me a lot of headaches: install your fascia framework before you start laying decking boards, not after. A fascia is the trim board that finishes the exposed edges of the deck — it covers the ends of the joists and gives the whole structure a clean, professional look. By getting the fascia framework in place first, I had a fixed reference edge to build toward, which made aligning each decking board much easier.
I added an extra 4×2 along the side of the damp-proof membrane edge at both the top and bottom, so the fascia boards could sit flush against a solid backing. Color-matched screws are worth using here — they’re a small detail that makes a big difference to the finished appearance of the fascia boards. I used brad nails for some of the lighter trim work and standard screws for anything structural.
Step 6: Lay the Composite Decking Boards With Expansion Clips
This was my first time working with composite decking, and I’ll be honest — I was a little nervous going in. But once I got the first few boards down, the process became straightforward and genuinely enjoyable. Composite decking uses expansion clips between each board rather than screws through the face, which gives you a clean, fastener-free surface and automatically creates the drainage gap each board needs.
The workflow I found most efficient was having one person on cuts and another on installation. That division of labor keeps momentum going — there’s always a cut board ready to drop in, and the installer is never standing around waiting. For the cuts themselves, I used my circular saw with a fine-tooth blade to keep the edges clean. Composite can chip if you rush the cut, so take it steady.
Step 7: Make the Final Edge Cut Cleanly in One Pass
Once all the boards were down, I faced what I’d call the most critical moment of the whole build: trimming the outer edge of the decking in a single straight cut. I’d deliberately let the boards run long during installation — a standard technique that makes alignment easier — and now I needed to cut them all flush in one clean line.
The key is marking a perfectly straight chalk line across all the boards before you cut, then using a straightedge guide clamped to the deck surface to keep the saw on track. There’s no fixing a wavy edge cut on composite decking, so take your time here. Measure twice, mark clearly, clamp your guide securely, and make a slow, confident pass with the saw. Mine came out clean on the first try, and that’s a moment I won’t forget.
Step 8: Fill the Side Gaps With Pea Gravel
Along the edges of the deck where the frame met the surrounding ground, I filled the gaps with pea gravel. This serves two purposes: it improves drainage by giving water somewhere to go, and it prevents weeds and debris from accumulating in the gap over time. I also laid landscaping fabric under the gravel to suppress weed growth long-term.
It’s a finishing detail that most people won’t notice — but you’ll definitely notice if you skip it. After a season or two, those edge gaps become weed jungles if you don’t address them at the start. Twenty minutes of gravel work now saves you hours of weeding later.
Step 9: Add Decorative Wall Features — Trellis and Garden Mirror
With the decking structure complete, I turned my attention to the bare wall behind the deck. A plain rendered wall next to a nice deck looks unfinished and pulls the eye away from the space rather than drawing it in. My approach was to keep it simple but effective: a trellis panel for climbing plants and a garden mirror to reflect light and create a sense of depth.
Garden mirrors are one of those underrated tricks that make a small outdoor space feel dramatically larger. Position it to reflect the greenery and sky rather than direct sunlight, and it looks completely natural — like a window into another garden. The trellis adds a vertical dimension to the planting scheme without requiring a lot of ongoing maintenance, which was a priority for me with this space.
Step 10: Style and Furnish the Finished Deck
Once the structural work was done, I gave the deck a proper styling pass to turn it from a construction project into an actual living space. Outdoor furniture, a few potted plants, and some carefully chosen accessories make all the difference between a deck that looks like it’s waiting to be finished and one that looks like you actually use and love it.
Think about how the space will be used — entertaining, relaxing, dining — and let that drive your furniture choices. I also made sure to position seating to take advantage of the evening sun, which hits this particular area beautifully. If you’re tackling a similar outdoor transformation on a budget, my post on 5 DIY Outdoor Curb Appeal Projects You Can Do This Weekend has a lot of ideas that complement this kind of project perfectly.

Bonus Project: Furnishing the Downstairs Guest Bedroom
Alongside the deck build, I also tackled a guest bedroom that had previously been an open living and lounge space. The room had a staircase running through it that I’d relocated to a more central position in the house, opening up the entire footprint to become a proper bedroom. First order of business: assembling the bed frame, which was a solid few hours of work on its own.
For lighting in a guest room, I went with rechargeable wall-mounted sconces rather than hardwired fixtures. Sconces give you that warm, layered lighting effect that makes a bedroom feel intentional and cozy rather than flat and institutional. The rechargeable versions are a game-changer for rooms where you don’t want to run new wiring — no electrician needed, no holes in the wall, and they look just as good as hardwired options. Good quality bedding and a few thoughtful accessories completed the room transformation.
Tips and Best Practices for a Concrete Slab Flooring DIY Transformation
After going through this entire process, here are the lessons I’d pass on to anyone tackling a similar project:
Always address moisture before you build. A damp-proof membrane and a proper air gap between timber and concrete are non-negotiable. Skipping these steps is how decks rot from the inside out within a few years.
Level your subframe, not the concrete. If your slab isn’t perfectly flat — and most aren’t — use your subframe to correct it. Pack joists higher where needed to create a level plane across the whole deck before a single decking board goes down.
Install fascia framework first. Having a finished edge to build toward makes board alignment much more consistent and gives the finished deck a cleaner look overall.
Let boards run long, then cut in one pass. It’s far easier to trim a straight line across long boards at the end than to try to cut each one to a precise length upfront. Use a laser level and a straightedge to keep that final cut perfectly true.
Two people move twice as fast. The cut-and-install workflow only works well when one person handles cuts and the other handles installation simultaneously. Solo builds are completely doable, but if you can recruit a helper for the decking day, do it.
Gravel and landscaping fabric in the gaps. Don’t leave edge gaps open. Fill them with landscaping fabric and pea gravel to prevent weeds and improve drainage from day one.
Use a power station for outdoor builds. If your outdoor work area is far from an outlet, a portable power station eliminates the need for long extension cords trailing across the yard. I kept one in my garage throughout this build and used it constantly.
FAQ
Can I build composite decking directly on a concrete slab?
Yes, but you shouldn’t skip the subframe. You need a timber framework elevated above the slab to create airflow, allow drainage, and give you a level surface to fix the decking boards to. A direct-to-concrete installation without an air gap will lead to moisture problems and premature timber decay. Use concrete screws to anchor your subframe securely to the slab.
What do I do if my concrete slab is uneven?
Use your timber subframe to correct the level rather than trying to grind or resurface the concrete. Pack joists higher in low spots using composite shims or extra timber. Check your work with a laser level as you go. Once the subframe is level, the decking boards will be level automatically.
Is composite decking worth the extra cost over pressure-treated wood?
For most homeowners, yes. Composite decking requires virtually no ongoing maintenance — no staining, sealing, or sanding — and it won’t warp, splinter, or rot the way wood can. The upfront cost is higher, but the long-term savings in time and maintenance products make it a genuinely good investment for a space you’ll use regularly.
How do I finish the edges of composite decking neatly?
Use matching fascia boards along all exposed edges. Install the fascia framework before you lay the decking boards so you have a reference edge to build toward. Use color-matched screws so fasteners blend into the board face. For the outer edge, let boards run long during installation and make one clean trim cut at the end using a straightedge guide — this gives you a much straighter result than trying to pre-cut each board to length.
Ready to Transform Your Concrete Slab?
This concrete slab flooring DIY transformation is one of the projects I’m most proud of, and it’s the kind of build that genuinely changes how you use your outdoor space. What was once a plain, useless concrete pad is now a proper outdoor room — somewhere to relax, entertain, and actually enjoy. The process takes patience, especially on the subframe and prep work, but the payoff is absolutely worth it.
If this has got you thinking about other spaces in your home that could use a similar treatment, take a look at my guide on Budget Home Improvement DIY Ideas That Save Thousands — there’s a lot of crossover in terms of approach and mindset. And if you’re ready to get started on your own build, pick up your materials, take it one step at a time, and don’t let an imperfect slab stop you. That’s exactly what it’s there for.