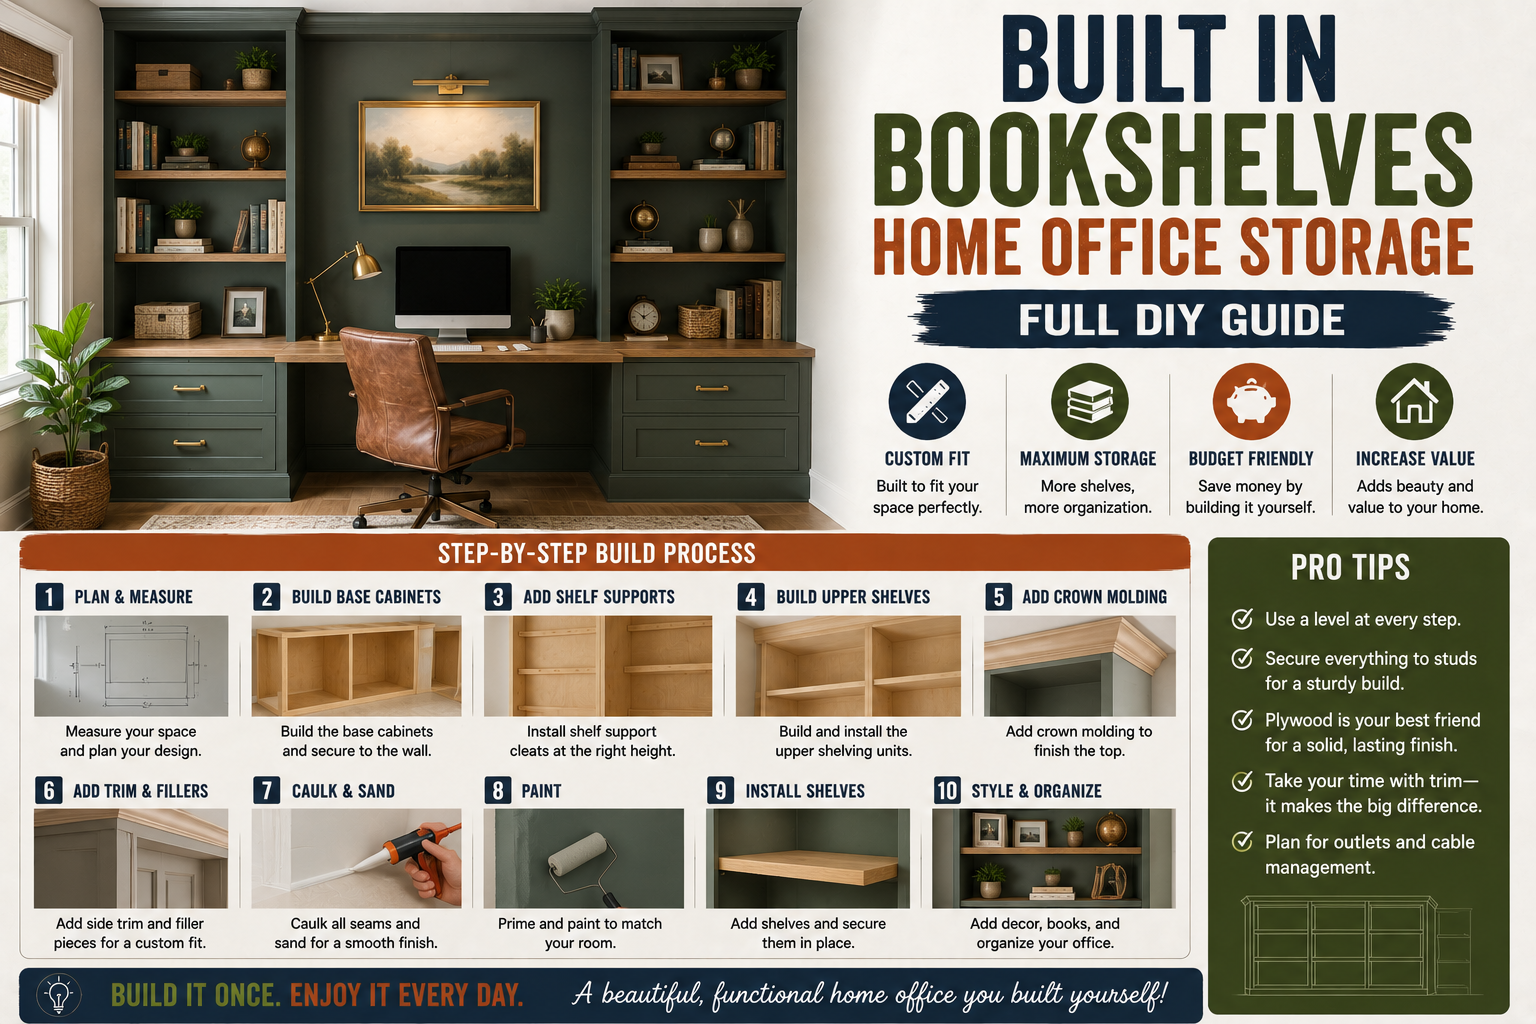
If you’ve been dreaming about adding built in bookshelves home office storage to your space, I’m here to tell you — it’s completely doable, even if you’ve never built a cabinet in your life. I recently tackled this exact project for a family member’s office, and the transformation was absolutely worth every minute of measuring, cutting, and assembling. The space went from a plain, bare wall with an awkward window to a fully functional, beautiful storage wall that looks like it came straight out of a magazine.
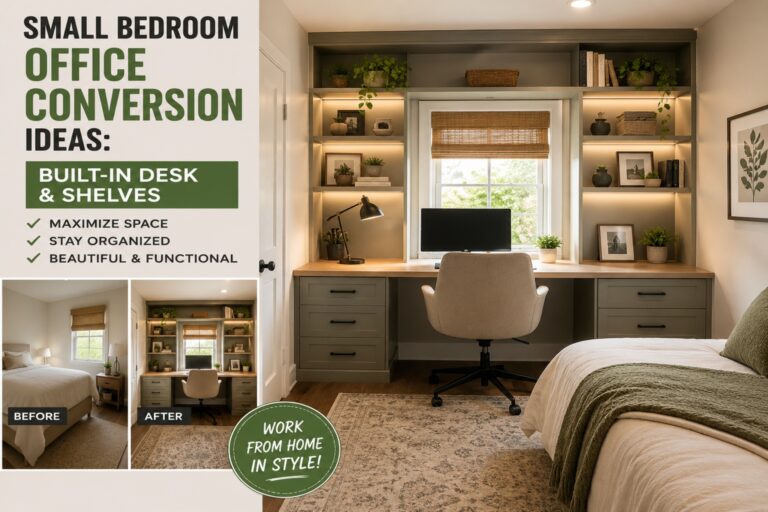
The key thing I want you to take away before we dive in is this: built-ins are really just cabinet boxes screwed to the wall in an arrangement that makes sense for your space. They can be as simple as open shelves, or they can include lower cabinets with doors, drawers, a storage bench — whatever your room needs. In this build, I did all three, and I’m going to walk you through each step so you can customize it for your own home. If you’re also interested in other built-in ideas, check out my post on small bedroom office conversion ideas with a built-in desk and shelves for more inspiration.
I’ll be honest — this is not a small weekend project. It’s a multi-step build that involves cutting plywood, assembling boxes, adding face frames and trim, finishing, and finally installing everything in place. But when it’s broken into smaller pieces, it’s very manageable. Let me show you exactly how I did it.
Step 1: Assess the Space and Plan Your Built-In Layout
Before I cut a single board, I spent time studying the room and figuring out what the space actually needed. In this case, the goal was storage, display shelving for a growing book collection, and a solution for a window that sat low to the ground right in the middle of the wall. That window placement was actually the deciding factor for the entire layout.
I settled on a plan with base cabinets flanking both sides of the window, upper open shelves sitting on top of the base cabinets, and a storage bench filling the space under the window between the two sets of cabinets. This kind of planning phase is everything — a few solid measurements and a basic sketch saved me from costly mistakes down the line. The big takeaway here is that there’s no one-size-fits-all approach to built-ins, so let your room guide the design.
Step 2: Cut the Plywood and Build the Cabinet Boxes
With my plan in hand, I headed to the shop and started breaking down 3/4-inch birch plywood into panels for my cabinet boxes. The base cabinets are essentially the same construction as standard shop cabinets — two sides, a top, a bottom, and a back. One difference I made here was skipping the toe kick cutout on the front corners, though you could absolutely add one if you prefer that look.
For the upper shelf cabinets, I used 3/4-inch plywood for the sides and top, and 1/2-inch plywood for the back panels. I used a Pocket hole joinery jig — specifically the Kreg micro version — to drill pocket holes around the edges of the back panels, since it creates smaller, cleaner holes than the standard size. Because these upper cabinets sit on top of the base cabinets, I didn’t install a bottom panel on them, which saves material and keeps things lighter for installation day.
Step 3: Add the Decorative Arch to the Upper Shelves
My sister wanted the upper shelf cabinets to have an arched detail at the top, which adds a really elegant, built-in furniture look rather than a boxy cabinet feel. To create the arch, I cut a piece of 3/4-inch plywood and used the curved top of an old coffee table as a template to trace the arch shape onto it.
I cut the arch out with a jigsaw and then used pocket holes to attach it to the tops of the shelf cabinets. This is one of those small details that takes maybe an extra hour but dramatically elevates the overall appearance of the finished piece. If arches aren’t your style, you could do a straight top, a stepped detail, or any other profile that fits your aesthetic.
Step 4: Install the Face Frames and Handle Uneven Walls
Face frames are what give built-ins that furniture-quality, finished look, and this is where I spent a good bit of time getting things right. For the upper shelf cabinets, I went a little thicker than usual and used 1x4s for the face frame pieces. I assembled them with pocket holes and glue, then nailed them to the front of the cabinet boxes.
Here’s a tip I always share about face frames: walls are almost never perfectly square, especially in corners. That gap between your cabinet and the wall is completely normal. The solution is to overhang the face frame on the wall side by about 1/4 inch so it acts as a built-in filler strip, letting you push the cabinet flush against the wall without a visible gap. I made sure the exposed side of each face frame was perfectly flush with the cabinet box, while the wall side had that slight overhang all the way up.
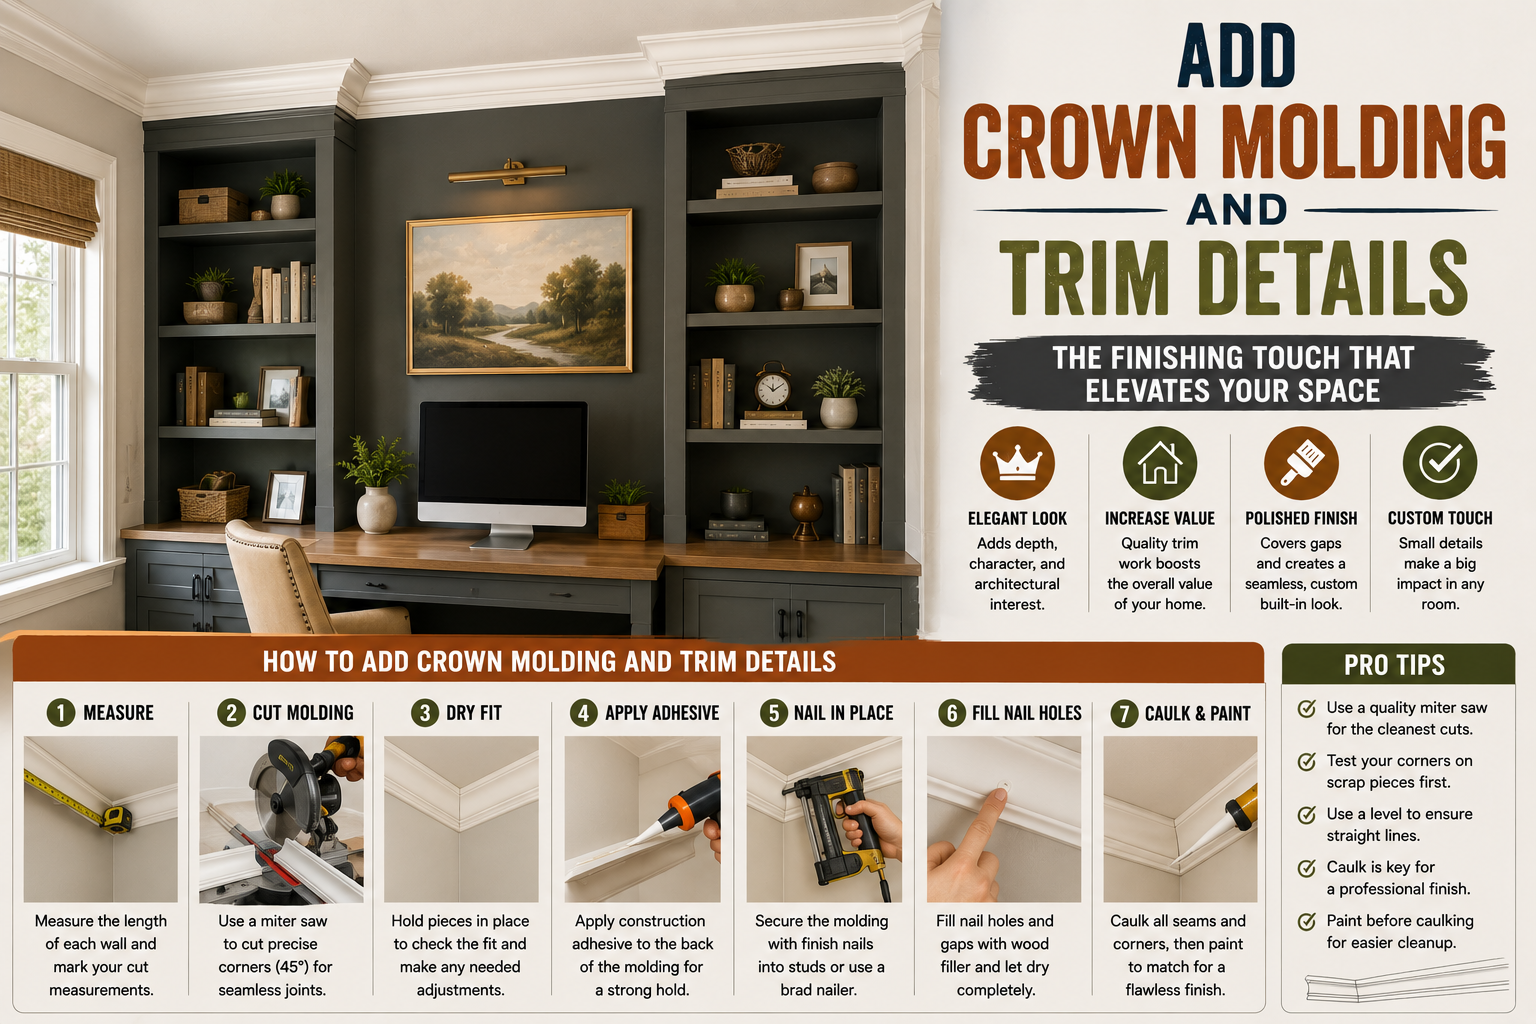
Step 5: Add Crown Molding and Trim Details
Crown molding is what makes built-ins look truly custom and intentional rather than like furniture you picked up from a big-box store. I cut and installed crown molding so the bottom of the molding sat about 1 inch from the top of the cabinet, which ensured it completely covered the raw plywood edge. I pre-glued the small corner end pieces to the molding strips before attaching everything to the cabinet — this made the install much cleaner and easier to manage.
One important planning note: I built my shelf cabinets so that with the molding attached and the cabinets sitting on top of the base cabinets, the overall height would be about 2 inches less than the total ceiling height. That 2-inch gap gave me wiggle room during installation. I also added baseboards along the bottom and some 1×3 pieces at the top, with decorative rectangular molding panels between them — a detail I found at the Home Depot that adds a ton of visual character.
Step 6: Build and Finish the Base Cabinet Face Frames
The base cabinet face frames were simpler than the upper ones — just a clean assembly of 1x3s using pocket holes and screws. I made each face frame 1/4 inch wider than the cabinet box so it would overhang slightly on the wall side, just like I did with the upper shelves. The bottom piece of the face frame didn’t run all the way to the floor because at the time I was still planning to wrap the existing baseboard across the front of the built-ins.
I also cut two plywood pieces for the cabinet doors at this stage, applied edge banding around the sides to clean up the raw plywood edges, and glued decorative trim to the fronts to give them a raised-panel look. The trim I used was a style I found at the Home Depot that resembles miniature base cap molding — but you can use whatever trim style fits your home best. For the cabinet countertops, I cut two pieces of 3/4-inch plywood and glued the same trim to the front and one side of each top.
Step 7: Prime, Stain, and Paint All the Components
Before assembling everything at the job site, I finished all the pieces in the shop. I started by priming everything, then used a paintbrush and roller for the paint coats — not a sprayer. After priming, I caulked around all the trim details where needed. While the caulk dried, I stained the cabinet tops and the insides of the upper shelves with Minwax Early American for a warm wood tone.
Then I painted all the painted surfaces in Sherwin Williams Basil, which happened to be the same color as the office walls — a smart move that makes built-ins feel like they grew out of the room rather than being added later. I also drilled shelf pin holes up both sides of each upper cabinet using a shelf pin jig, so adjustable shelves could be placed at whatever height works best once everything is installed.
Step 8: Build the Storage Bench with Drawers
The storage bench was its own mini-project within the larger build, and it’s honestly one of my favorite parts of this whole piece. I started by measuring the space between the two base cabinets and subtracting to get the exact width the bench needed to fill. Then I cut three plywood panels — two for the sides and one for a center divider — plus some plywood strips to connect them.
Since the bench would have drawers, I didn’t install a solid bottom panel, which saved material. I built a face frame using 1×3 at the top, 1x4s on the sides, and a 1×6 on the bottom. I installed drawer slides, then built two large drawer boxes. The face frame on this bench was built intentionally oversized — wider than the opening it would fit into — so I could trim it on-site for a perfect snug fit between the two base cabinets. I also cut a bench seat top, added matching trim to the front edge, then primed, caulked, stained, and painted the whole bench assembly to match everything else.
Step 9: Install the Base Cabinets and Handle the Outlet Surprise
Installation day is always the moment of truth. Before placing any cabinets, I removed the existing baseboard along the back wall. I started by sliding one base cabinet into the corner, then marked and trimmed the side wall baseboard with an oscillating saw so the cabinet could sit flush. Once in position, I secured each cabinet to the wall studs through the back supports, then screwed the countertops down through the top supports.
Here’s where I have to be honest about a mistake: I completely missed an outlet when measuring the space, and it ended up falling right where my bench divider needed to sit. I had to notch out the divider to keep the outlet accessible. The lesson here — always check for outlets, switches, and anything else on the wall before you finalize your dimensions. That said, a well-placed notch is a perfectly fine solution, and it beats having to move an outlet entirely. I also want to mention that the bench face frame ended up being about 1/8 inch smaller than the opening rather than larger, which meant I didn’t need to trim it at all — lucky, but also a reminder to measure twice (or three times).
Step 10: Install the Upper Shelf Cabinets and Cut Forgotten Shelves
With the base cabinets and bench all secured, it was time to get the upper shelf cabinets in place. I recruited some help to lift and hold the heavy cabinets while I screwed them into the wall studs through the back panels, then added screws at the front through the cabinet tops from underneath for extra stability.
True confession: in all the chaos of wrapping up the build, I completely forgot to cut the actual shelves that go inside the upper cabinets. So I went back to the shop, cut them to size, and finished them to match everything else. It happens on big projects — things slip through the cracks. Once the shelves were in, my sister added her books, plants, and personal touches, and just like that, the built-ins were finished. If you love the idea of maximizing wall space like this, my guide on built-in bookcase IKEA Billy vs. custom is a great read for comparing your options, and for more cabinet-building fundamentals, check out my cabinet building tips for beginners post.
Tips and Best Practices for Built In Bookshelves Home Office Storage
Plan for ceiling height from the start. Build your upper cabinets so the finished height — including any crown molding — is about 2 inches shorter than your ceiling. That gap makes installation far less stressful and gives you room to maneuver.
Overhang your face frames on the wall side. Walls are rarely perfectly square, especially in corners. A 1/4-inch overhang on the face frame acts as a built-in filler strip and gives you a clean, gap-free look without needing separate filler pieces.
Finish your components in the shop before installation. Painting and staining in a controlled environment is so much easier than working around walls and floors. Match your built-in paint color to the wall color for that seamless, custom furniture look.
Check for outlets and utilities before finalizing your design. I learned this one the hard way. Walk the wall carefully before you commit to any dimensions — outlets, switches, and vents can all affect your layout.
Use a shelf pin jig for adjustable shelves. Drilling consistent, level shelf pin holes by hand is nearly impossible. A simple shelf pin jig makes this quick and accurate, and adjustable shelves mean the storage can evolve as needs change.
Build your bench face frame slightly oversized. When building a bench or any filler piece that needs to fit snugly between two cabinets, build it a little large and trim it to fit on-site. It’s much easier to trim down than to try to fill a gap.
Frequently Asked Questions
What materials do I need to build built in bookshelves home office storage?
The main material is 3/4-inch birch plywood for the cabinet boxes, faces, doors, and countertops, plus 1/2-inch plywood for back panels. You’ll also need face frame lumber (1x3s and 1x4s), crown molding, decorative trim, edge banding, Pocket hole joinery screws, shelf pins, concealed hinges, drawer slides, brad nails, wood glue, caulk, primer, stain, and paint. For tools, a table saw, circular saw, jigsaw, and tape measure are the essentials.
Do I need professional woodworking skills to build built-in bookshelves?
No, you don’t need to be a professional. If you’re comfortable using a saw, a drill, and basic hand tools, you can build built-ins. The key is breaking the project into smaller, manageable steps — cut the boxes, build the face frames, add trim, finish, then install. Take it one piece at a time and you’ll be surprised what you can accomplish.
How do I make built-in bookshelves look custom and high-end?
The details make all the difference. Crown molding at the top, decorative trim panels on the doors and cabinet sides, matching paint color between the built-ins and the walls, and consistent finish on all visible surfaces are what separate a DIY built-in from something that looks store-bought. Edge banding on plywood edges and a clean caulk line around all the trim joints also go a long way.
How do I handle a window in the middle of a built-in wall?
A low window in the center of a wall is actually a great opportunity to add a storage bench. Place your base cabinets and upper shelves on either side of the window, then build a bench seat with drawers to fill the space below the window. This makes the window a natural focal point and adds valuable storage at the same time — it’s one of the smartest ways to handle that kind of layout challenge.
Ready to Build Your Own Built In Bookshelves Home Office Storage?
This project genuinely changed the whole feel of the office — it went from a plain, underutilized room to a space that feels purposeful, organized, and beautiful. The combination of base cabinets, upper open shelves, and a window bench gives the room storage for everything while keeping the look cohesive and intentional. And the best part? Every single element of it was built by hand, customized to fit the exact dimensions and style of the space.
If you’re ready to take on your own built-in project, start with your measurements and a simple sketch, then tackle one cabinet box at a time. Before you know it, you’ll be stepping back and seeing the whole picture come together — and that feeling is absolutely worth it. For more budget-friendly ways to transform a room, don’t miss my post on budget home improvement DIY ideas that save thousands. Now go build something great.