If you’ve been staring at your home thinking it needs a refresh but your wallet is saying otherwise, I totally get it. I’ve been there more times than I can count, and honestly, that tension between wanting a nicer space and not wanting to blow your budget is exactly what pushed me to start doing everything myself. And I mean everything — partition walls, doors, flooring, kitchen upgrades, you name it.
The projects I’m sharing today are ones I’ve actually done in my own home, most of them for a fraction of what a contractor would charge. Some cost me under $50. One cost me literally nothing. And the results? People still ask me about them years later. If you’re looking for real, actionable budget home improvement DIY ideas that actually transform your space without draining your bank account, you’re in the right place.
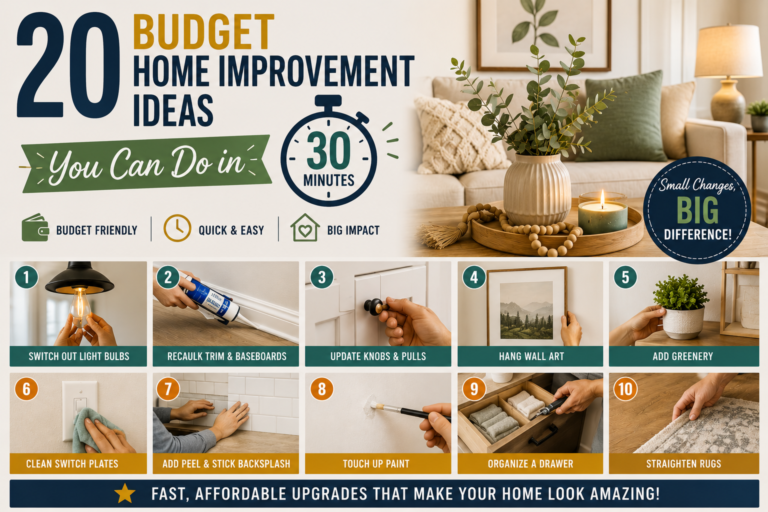
I’ve also put together a bunch of related guides on this site — like my post on 20 budget home improvement ideas you can do in 30 minutes if you’re short on time — but today I want to walk you through the bigger projects that made the most dramatic difference in my home. Let’s get into it.
1. Build a Partition Wall for a Fraction of the Contractor Quote
This is one of my proudest DIY wins. My home was supposed to be a starter home, but when prices shot up and we needed more space, I knew buying wasn’t the answer. I needed to create a bedroom for my daughter by converting part of the dining room. When I got a contractor quote, they wanted just under $6,000 — for a partition wall and a pocket door. I nearly fell out of my chair.
Instead, I sketched out my own plan, recruited my brother (who had zero experience with this kind of thing, by the way), and we built that wall ourselves using 2x4s, drywall, and some insulation for soundproofing. From start to finish, the wall alone cost about $300 — and that included paint, primer, mud, and all the finishing materials. The entire room with all the door hardware came in around $1,200 total. That’s a savings of nearly $5,000 right there.
2. Add Wall Texture to Match Existing Walls
When you build a new wall, the tricky part is making it look like it was always there. Flat, freshly drywalled surfaces stand out like a sore thumb next to textured walls. The fix? A few cans of spray wall texture and a knockdown knife. Seriously, that’s it. Add your primer and paint on top, and the new wall blends right in.
For my first time ever texturing a wall, I was honestly pretty impressed with how it turned out. If this feels intimidating, I promise it isn’t as hard as it looks. You just apply the texture in sections, let it get slightly tacky, and then knock it down lightly with the knife. Practice on a scrap piece of drywall first if you’re nervous, and you’ll nail it.
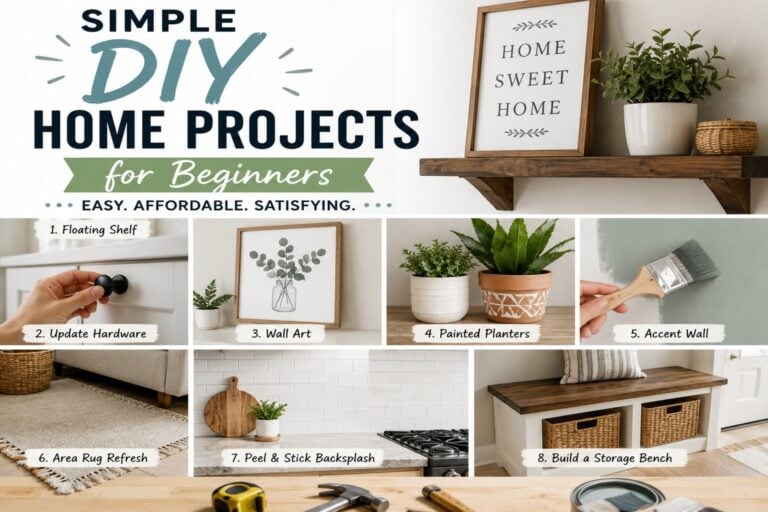
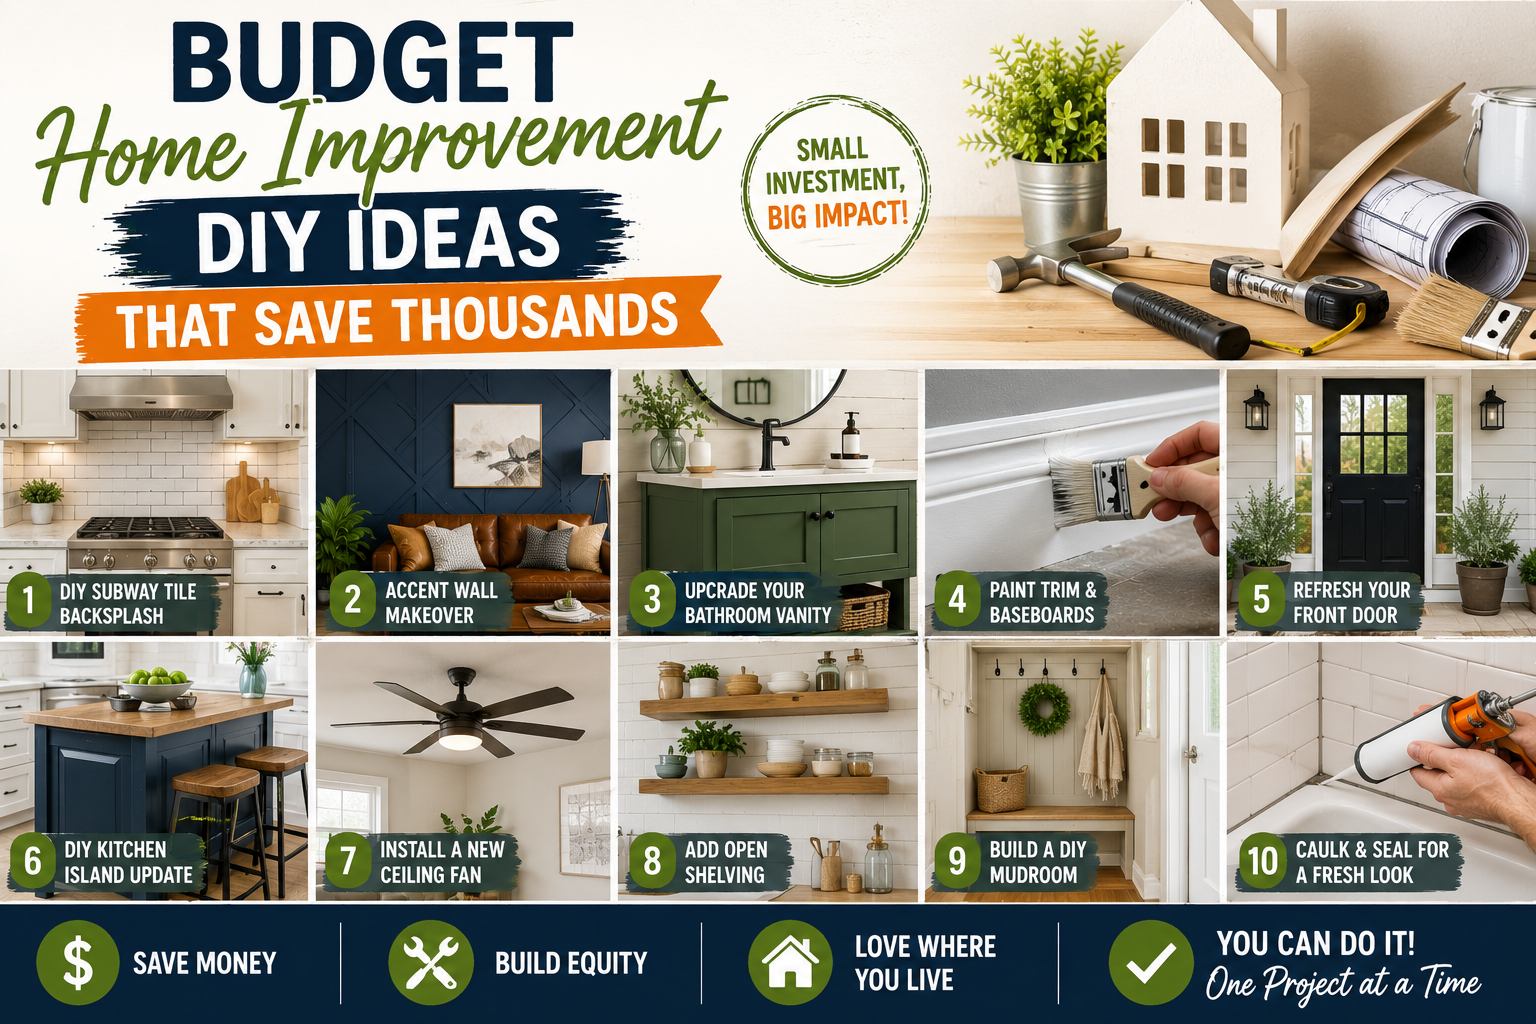
3. Refresh Your Baseboards Instead of Replacing Them
Here’s one I wish someone had told me sooner: you don’t need to buy new baseboards. I was genuinely shocked at how easy it is to pull them off the wall, clean them up, and reinstall them looking brand new. I was so intimidated by this project, and then I just did it and it was totally fine.
The process is simple — remove the baseboards carefully, scrape off any old caulk, cut them to fit if needed (even with a basic handsaw), re-nail them using baseboard nails and a hammer (no nail gun required), re-caulk the edges, and then paint them. The result looks like you installed brand new trim. This is one of those budget home improvement DIY ideas that takes an afternoon and makes a huge visual difference.
4. Install Bifold and Barn Doors on a Budget
Once the partition wall was up, I needed a way to actually close off the space and make it feel like a real room. Doors, as I quickly learned, are expensive. But I found a solution: bifold doors and barn doors purchased on Amazon along with the hardware. The deals I found were genuinely good, and it made the space feel finished and functional.
Yes, it takes time to assemble and install everything yourself, and what you save in money you spend in effort — but I genuinely love that tradeoff. Every project like this builds my confidence and skill set, which means the next one gets easier and cheaper. Unless you truly need a pro, I’d always encourage trying it yourself first. You’ll probably surprise yourself.
5. Paint Your Walls — Seriously, Just Paint Them
I know this sounds almost too simple, but painting is hands down one of the most impactful and affordable things you can do to your home. My entire house was this awful yellow-toned shade that made every room feel dark and dingy. I switched to a cotton gray and the transformation was unbelievable — every room instantly felt bigger, brighter, and more modern.
All you really need is some hole filler, a good Sherwin Williams paint, an extendable roller stick, and some painter’s tape. I even used Dollar Tree baking pans as paint trays and Dollar Tree plastic sheeting as floor protection — every dollar saved counts. If you want a deep dive into low-cost room refreshes, check out my post on affordable home improvement projects under $100.
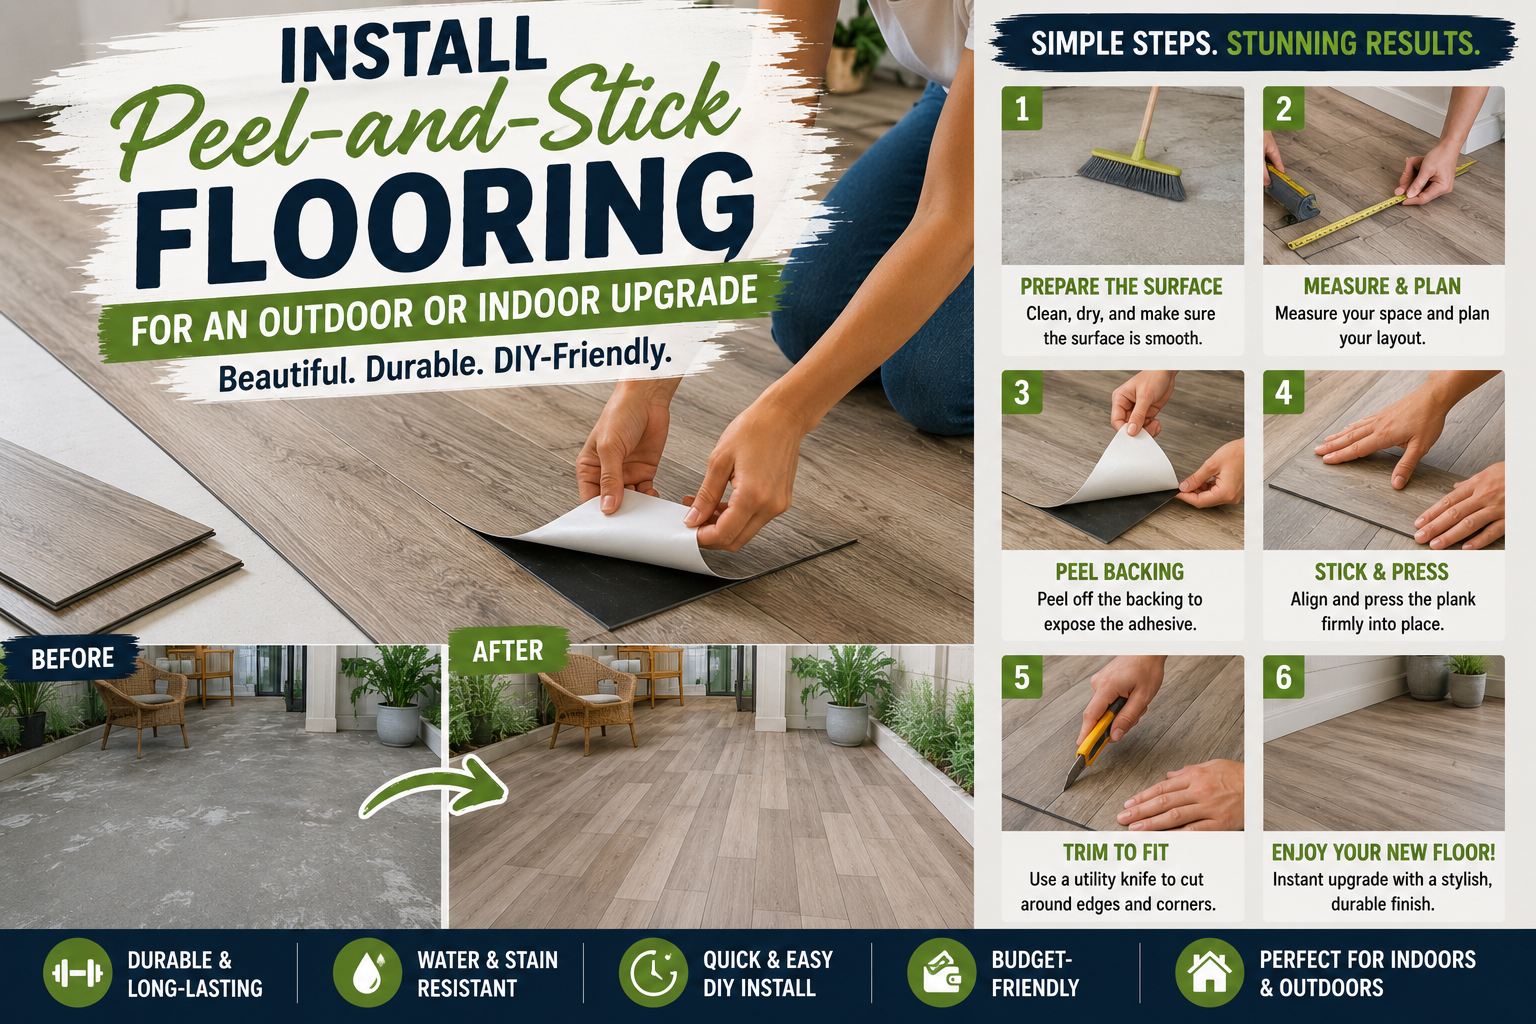
6. Install Peel-and-Stick Flooring for an Outdoor or Indoor Upgrade
This might be my all-time favorite budget project, and people still message me about it years later. I spent about $30 total — including an $11 bottle of tile primer to make sure everything would stick properly — to completely transform a floor using peel-and-stick vinyl planks. I loved the wood grain look and the color, and the install was incredibly straightforward.
I’ll be real with you: the area that gets the most direct sunlight did fade slightly over time. But here’s the thing — it has never come up. Not through rain, not through windstorms, not through years of use. For the cost and the longevity, it’s one of the best budget home improvement DIY ideas I’ve ever tried. If you want more peel-and-stick inspiration, I’ve got a whole post on peel and stick budget makeover ideas that wow your home.
7. Paint Your Front Door for Free (or Close to It)
New front doors cost a lot. And I did not have the budget for one. So instead, I grabbed some soapy water, cleaned off the grime and dust, and went to work with leftover paint I already had on hand. Technically, this project cost me $0. I also picked up some Dollar Tree chalkboard paint for the accent details, and honestly — don’t knock it until you try it, because it worked beautifully.
Part of my door had what used to be a window that had been painted over by previous owners (and then again, and again). I just added another coat to match and gave the whole door a fresh white and black treatment. The transformation was dramatic. Before and after is almost unbelievable for zero dollars spent. A fresh coat of door paint — or even leftover paint — is one of the easiest curb appeal wins you’ll ever find.
8. Build a Budget-Friendly Homework and Workspace
During the COVID lockdowns, my boys were home and we needed a dedicated space for schoolwork — somewhere they could focus that wasn’t a bedroom or a couch. I had this awkward wall in the dining area that I decided to put to work. For about $150, I built a proper dual workspace with a large board cut into sections, added shelving above it, and finished it all with paint and some hardware.
The hardware was the priciest part since it was a larger piece, but the overall cost was still a fraction of what a custom built-in would run. Home Depot and Lowe’s will make cuts for you — sometimes free, sometimes a small fee — which is a game-changer if you don’t own a big saw yet. I started with hand tools and a literal handsaw, and I made it work. You can too.
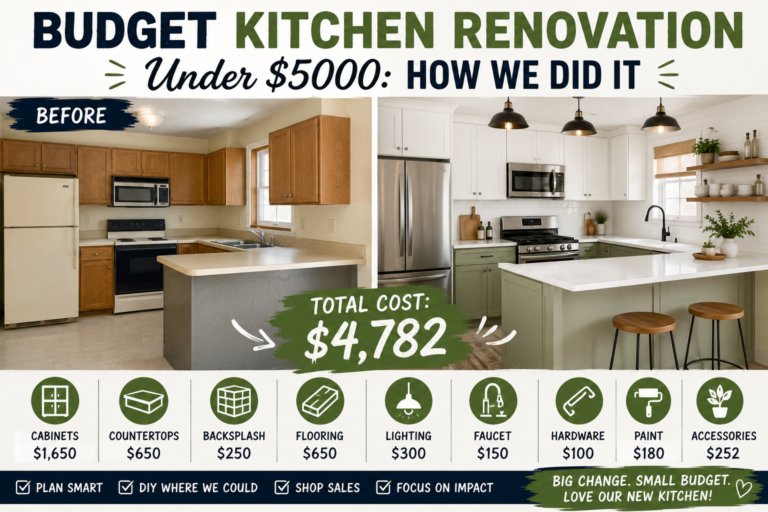
9. Add Kitchen Backsplash and Cabinet Hardware
After gutting our kitchen and getting new cabinets and countertops, I wanted to take things further without spending a fortune. A tile backsplash was my answer. I found tiles for really cheap, and the process using peel-and-stick style tiles (no mortar mess) was so easy and clean that I’d happily do it again a hundred times over.
I also added some inexpensive cabinet door pulls — I’ll admit I probably should have sized up, but the price was right and they still made a big difference. Combined with some decorative panels on the peninsula, painted shelving, and repurposed stain I had left over from another project, these kitchen upgrades totaled about $300 and made the space feel completely transformed. That’s the kind of ROI that gets me excited about DIY.
10. Reupholster Furniture Instead of Replacing It
I was not about to spend $60 per stool on new seating when I had perfectly functional — if embarrassingly ugly and worn — stools sitting right there. So I took them apart, grabbed some leftover fabric I’d originally bought for a nursery chair project, and reupholstered them myself. They came out looking fantastic.
The key lesson here is to reuse what you have. Fabric scraps, leftover paint, extra stain, spare screws — all of these things have value, and keeping them organized means you’re always ready for the next budget project. If you’re looking at tired furniture and thinking you need to replace it, stop and ask yourself if a fresh fabric cover or a coat of spray paint might be all it actually needs.
Tips and Best Practices for Budget Home Improvement DIY
Start with a sketch or plan. Even a rough hand-drawn layout saves you time, money, and mistakes. I sketched my partition wall on paper before buying a single 2×4, and it helped me stay on budget and on track.
Get quotes first, then DIY. Knowing what a contractor would charge gives you a real sense of your savings and motivates you to push through the hard parts. A $6,000 quote for a wall is a very persuasive DIY motivator.
Use what you already have. Leftover paint, extra fabric, spare screws — reusing materials is one of the easiest ways to cut project costs dramatically. Some of my best-looking projects cost almost nothing because I was creative with what was already in my home.
Don’t be afraid of beginner projects. Almost every project I’ve tackled felt intimidating before I started. Wall texture, baseboards, barn doors — they all seemed scary and then turned out to be totally manageable. Confidence builds with every project you finish.
Use store cut services. Home Depot and Lowe’s will cut lumber for you. If you don’t own a table saw or miter saw yet, this service is invaluable and often free or very cheap.
Dollar Tree is your friend. Baking pans as paint trays, plastic sheeting for floor protection, chalkboard paint for accent details — the Dollar Tree has saved me real money on multiple projects, and there’s zero shame in that game.
Frequently Asked Questions About Budget Home Improvement DIY Ideas
How much can I really save by doing home improvements myself?
The savings can be dramatic. In my case, building a partition wall and adding doors myself saved nearly $5,000 compared to a contractor quote. Even smaller projects like painting walls, refreshing baseboards, or adding backsplash tiles can save you hundreds of dollars in labor costs. Over the course of multiple projects, DIY savings can easily reach into the tens of thousands.
What are the easiest budget home improvement projects for beginners?
Painting is always my top recommendation for beginners — it’s cheap, forgiving, and the results are immediate and dramatic. After that, peel-and-stick flooring, cabinet hardware swaps, and reupholstering furniture are all beginner-friendly projects that require minimal tools and deliver great results. Even adding a tile backsplash with peel-and-stick tiles is surprisingly easy for a first-timer.
Do I need a lot of tools to start DIYing my home?
Not at all. I started with a basic handsaw and a hammer and made it work. Most hardware stores will cut lumber for you, which removes the need for big saws early on. As you do more projects, you naturally build up a tool collection. Start with what you have, use store services where you can, and invest in tools as your project list grows.
How do I make new walls or repairs blend in with existing walls?
The secret is matching the texture. Spray can wall texture and a knockdown knife let you replicate almost any standard wall texture, and it’s much easier than it looks. Once you prime and paint over it with a matching color, the repair or new wall becomes virtually invisible. I matched my new partition wall to the rest of the house on my very first attempt at texturing — so I’d call it very beginner-friendly.
Final Thoughts
At the end of the day, the best budget home improvement DIY ideas are the ones you actually do. Every project I’ve shared here started with a problem — too little space, ugly walls, worn-out furniture, an outdated kitchen — and ended with a solution I built myself for a fraction of the professional cost. And every single time I finished one of those projects, I got more confident and more excited to tackle the next one.
Whether you’re converting a room, refreshing your walls, or just finally tackling those worn-out baseboards, I hope this post gave you the push you needed to get started. If you want even more ideas and inspiration, browse around the blog — there’s plenty more where this came from. And if you try any of these projects, I’d love to hear how they go. Drop a comment below and let me know what you’re working on!