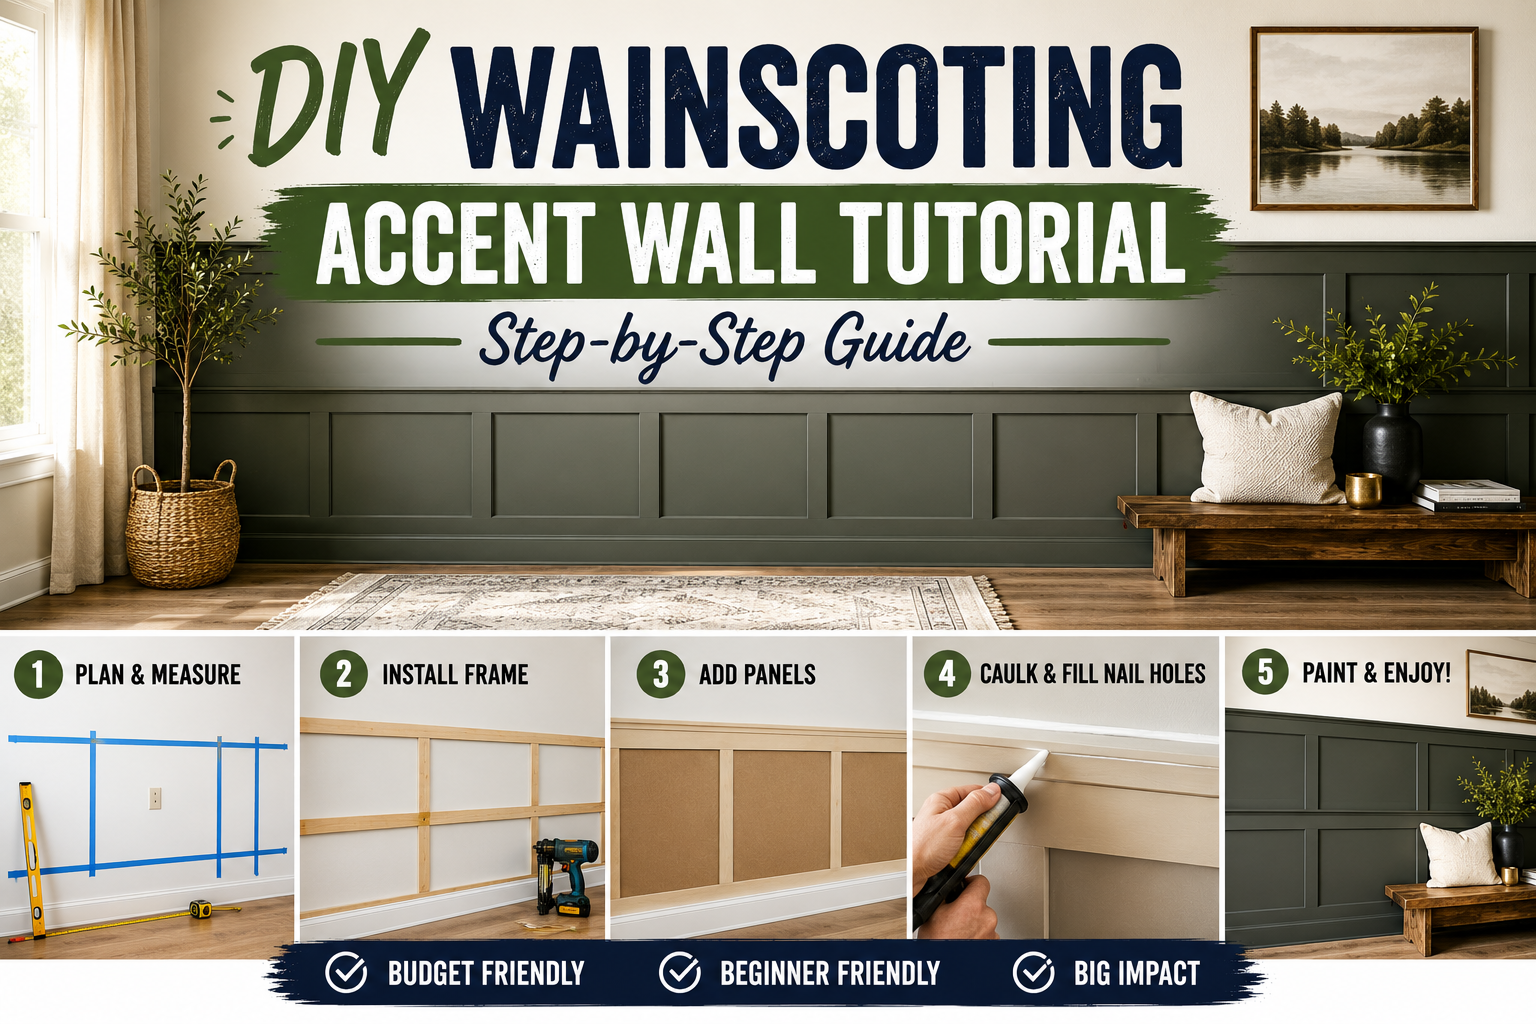
If you’ve been staring at a plain, uninspiring wall and wondering what you could do to give it some serious character, you’re in the right place. This DIY wainscoting accent wall tutorial walks you through every single step of the process — from gathering your materials to hanging the finishing touches. The best part? It’s way simpler than it looks, and you don’t need to be an experienced carpenter to pull it off.
Wainscoting has been a classic interior design element for centuries, but the board-and-batten style used in this project gives it a fresh, modern feel that works in entryways, living rooms, bedrooms, and hallways. Using MDF boards keeps the cost down and makes the cutting and painting process surprisingly easy. Whether you’re a seasoned DIYer or just getting started, this is one of those projects that delivers a dramatic result without requiring a ton of specialized skill.
Ready to get to work? Let’s break down every step of this project so you can confidently tackle your own wainscoting accent wall from start to finish.
Gathering Your Materials
Before you can swing a single nail, you need to get your materials together. For this project, you’ll need 1×3 and 1×2 MDF boards, construction adhesive (like Liquid Nails), 1½-inch brad nails, paint, painter’s tape, and drop paper or a tarp to protect your floor. MDF is the go-to material here because it’s smooth, takes paint beautifully, and is easy to cut without splintering like solid wood can.
You can pick all of these up at your local home improvement store — most of the major chains carry everything you need in one trip. Having all your materials staged and ready before you start will save you from mid-project frustration. It’s also worth grabbing extra paint since you’ll be doing multiple coats, and a fast-drying caulk for the finishing stage.
Measuring and Cutting the Top Rail
The first piece you’ll install is the top rail, which sets the height for your entire wainscoting panel. Measure the full length of your wall carefully — in this project, that came out to 99½ inches. Mark that measurement on your MDF and make your cut. A miter saw is the cleanest option, but MDF cuts easily with a handsaw or a circular saw too. If you’re using a circular saw, a carpenter’s square will help you keep your cuts perfectly straight.
Once your top rail is cut to length, do a quick test fit against the wall before you commit to anything. This is the time to catch any small measurement errors, not after you’ve already applied the adhesive. A good fit here means everything else will line up properly, so don’t rush this step.
Marking the Top Rail Height on the Wall
For this project, the top rail was set at 35½ inches off the ground, which is a classic wainscoting height that feels proportionally balanced in most rooms. Mark that measurement on the wall at one end, then use a 6-foot level to draw a pencil line all the way across. This gives you a reliable, level guide for positioning your top rail when it’s time to install.
If you want to go the extra mile, a laser level will give you a perfectly level line with almost no effort — but honestly, a standard 6-foot level does the job just fine for this type of project. The key is making sure your line is level and clearly visible before you start attaching anything to the wall.
Pre-Painting the MDF Boards
Here’s a smart time-saving move: paint all your MDF pieces before installing them. It’s much easier to get clean, even coverage on a flat board lying on the floor than it is to try painting around tight corners and seams after everything is nailed to the wall. For this project, Ultra Pure White paint was used, which gives that crisp, clean look that makes wainscoting really pop.
Lay down some kraft paper or a drop cloth first so you’re not painting your floor along with your boards. Tape off the edges to keep things tidy, and apply your first coat evenly. You’ll come back for additional coats later, but getting that base coat on now will save you a lot of fussy brushwork during the finishing stage.

Attaching the Top Rail with Adhesive and Brad Nails
With your top rail painted and your wall line marked, it’s time to make it permanent. Apply construction adhesive to the back of the MDF, position it along your pencil line, and then secure it with 1½-inch brad nails. Wherever possible, drive your brad nails into wall studs for maximum holding power. Where you can’t hit a stud, nailing into the drywall with adhesive backing is still plenty strong.
Using both glue and nails is the most secure approach — some people use only one or the other, but combining them gives you a bond that’ll hold for years without any risk of the boards shifting or sagging. Hit a couple of nails at each stud along the run and you’re set.
Calculating Board Spacing with a Formula
Getting the spacing right is what makes your finished wall look intentional and professional. For this project, the outer boards were set 14½ inches in from each wall, leaving a span of 70½ inches in the middle. From there, a simple formula was used: take the total span, subtract the combined width of the interior boards, and divide by the number of spaces between them. That worked out to 21¾ inches of spacing between each vertical board.
You don’t need 3D modeling software to figure this out — a pad of paper and a basic calculator will do just fine. Sketch out your wall, plug in your numbers, and figure out your spacing before you cut anything. Getting this right on paper first saves you from wasted cuts and a wall that looks off-center.
Measuring and Cutting the Vertical Boards
Once your spacing is figured out, it’s time to cut your vertical boards. A critical tip here: measure each vertical piece individually rather than cutting them all to the same length. Floors are rarely perfectly level, and you can easily have a quarter to a half inch of variation from one side of the wall to the other. Measuring each board separately ensures a tight fit at the top and bottom with no awkward gaps.
Cut each piece to its measured length, do a quick test fit, and set them aside ready for installation. Taking a few extra minutes at this stage pays off big when everything sits flush and clean on the wall.
Installing the Vertical Boards
With your boards cut and your spacing mapped out, installation is satisfyingly straightforward. Apply construction adhesive to the back of each vertical board, position it at your marked spacing, check it with a level to make sure it’s perfectly plumb, and then nail it in place with a few brad nails. You don’t need a ton of glue — a few beads along the length of the board is plenty to get a strong hold.
Work your way across the wall, setting each board at your predetermined spacing. Step back occasionally to check the overall look as you go. Once all your vertical boards are up, take a moment to appreciate how quickly this thing is coming together — it’s one of those projects that really starts looking impressive fast.
We used some of these skills in our wallpaper removal & home office renovation.
Adding the Thinner Top Cap Rail
To give the top of the wainscoting a finished, layered look, a thinner piece of MDF is added as a cap rail on top of the main horizontal rail. This detail elevates the whole project from “boards on a wall” to “architectural feature.” Apply adhesive first, press the cap rail into place along the top of the horizontal rail, and then brad nail it to lock it in. Make sure it’s embedded nicely in the adhesive before the nails go in.
This small extra step makes a noticeable difference in how polished the finished wall looks. The layered profile adds depth and shadow that really sells the whole wainscoting aesthetic.
Caulking All the Seams and Nail Holes
Caulking is the step that separates a good DIY result from a great one. Using fast-drying caulk, go along every seam where the boards meet the wall and fill any gaps left from the installation. Also fill all the brad nail holes so they disappear completely under the paint. If your first caulk run isn’t clean, don’t panic — put painter’s tape on each side of the seam, run a fresh bead, and smooth it with your finger for a crisp line.
Take your time here. Caulking isn’t glamorous, but it’s what makes the final painted surface look seamless and professionally done. Rushed caulking shows; good caulking becomes invisible.
Applying the Final Coats of Paint
Now it’s time to bring it all home with your second and third coats of paint. Use a paintbrush to work into all the tight corners, inside edges, and any spots a roller can’t reach. A small angled brush is your best friend here. Roll the flat surfaces for speed and a smooth finish, then cut in carefully around all the edges.
Two to three coats will give you full, even coverage that looks crisp and clean. Let each coat dry fully before applying the next, and you’ll end up with a finish that looks like it was done by a pro.
Addressing the Bottom Gap
One practical consideration worth knowing before you start: depending on your existing baseboard, you may end up with a small gap at the bottom of your vertical boards where they meet the floor trim. As noted in the video, this can be avoided by installing a taller or larger baseboard that bridges the gap cleanly. For this particular project, the existing baseboard was left in place and the gap was accepted as a minor trade-off for simplicity.
If a perfectly seamless look matters to you, it’s worth planning for this ahead of time. Measure the height of your existing baseboard and factor that into your board lengths, or plan to upgrade the baseboard as part of the project.
Hanging a Mirror and Adding Finishing Decor
Once the painters tape comes off and you’ve stepped back to admire your work, the fun part begins: styling the space. For this project, a mirror was hung centered on the wainscoting panel using drywall anchors, which adds depth and reflects light beautifully against the crisp white boards. The centering is key — it ties the whole composition together and reinforces that intentional, designed look.
A decorative element like a mirror, a piece of art, or even a small shelf turns your wainscoting wall from a background detail into a true focal point. And if you want to go full cozy, a plant in the corner (fake or real — no judgment here) finishes the look perfectly.
Tips and Best Practices
A few things worth keeping in mind as you take on this project. Always do a dry test fit before applying any adhesive — it’s much easier to adjust a measurement before the glue goes on. Use a level at every stage, not just when marking your initial line. MDF is great to work with but it doesn’t love moisture, so make sure your paint has full coverage on all edges to protect it long-term.
When caulking, less is more on the initial application — it’s easier to add a little more than to clean up a big messy bead. And if you’re working on a wall with outlets or switches, plan your board spacing around them so you’re not trying to notch boards at the last minute.
Frequently Asked Questions
What is the best material for a DIY wainscoting accent wall?
MDF (medium-density fiberboard) is the top choice for most DIYers. It’s affordable, smooth, easy to cut, and takes paint extremely well. Unlike solid wood, it won’t warp or develop grain texture under paint, giving you a clean, professional finish.
Do I need a nail gun for this project?
A brad nail gun makes the job faster and easier, but it’s not strictly required. You can use construction adhesive alone for lighter pieces, though combining glue and nails is always the most secure approach. If you don’t own a nail gun, many home improvement stores offer tool rentals.
How high should wainscoting be on the wall?
A common height is around one-third of the total wall height, which typically lands between 32 and 36 inches from the floor. In this project, 35½ inches was used, which hits that sweet spot for most standard ceiling heights.
Can I do this project without a miter saw?
Absolutely. MDF cuts cleanly with a circular saw or even a handsaw. Use a carpenter’s square to keep your cuts straight, and take your time — clean cuts make installation much smoother.
How do I avoid gaps at the bottom of the wainscoting boards?
The cleanest solution is to install a taller baseboard that covers the bottom edge of your vertical boards. If you’re keeping your existing baseboard, measure carefully and cut your boards to sit flush, or use caulk to fill any small gaps before the final coat of paint.
Ready to Transform Your Wall?
This DIY wainscoting accent wall tutorial proves that you don’t need a big budget or advanced woodworking skills to make a huge impact in your home. With some MDF, a little adhesive, a brad nailer, and a couple coats of paint, you can take a flat, forgettable wall and turn it into the kind of detail that makes guests ask, “Did you hire someone to do that?”
Take your time with the planning and spacing, don’t skip the caulking step, and have fun with the styling at the end. Once you see how good it looks, you’ll be eyeing every plain wall in your house as the next project. Give it a try and let us know how yours turns out in the comments below — we’d love to see it!